New in version 9
*Scroll for download link
This release includes new features and options requested by our user community.
Please find detailed information about what’s new in this release.
Summary
A New Web Interface Show Me
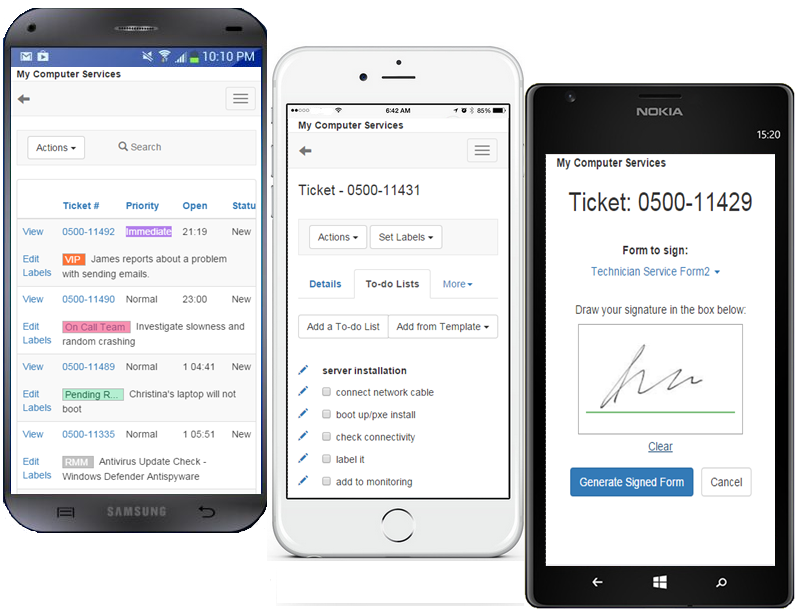
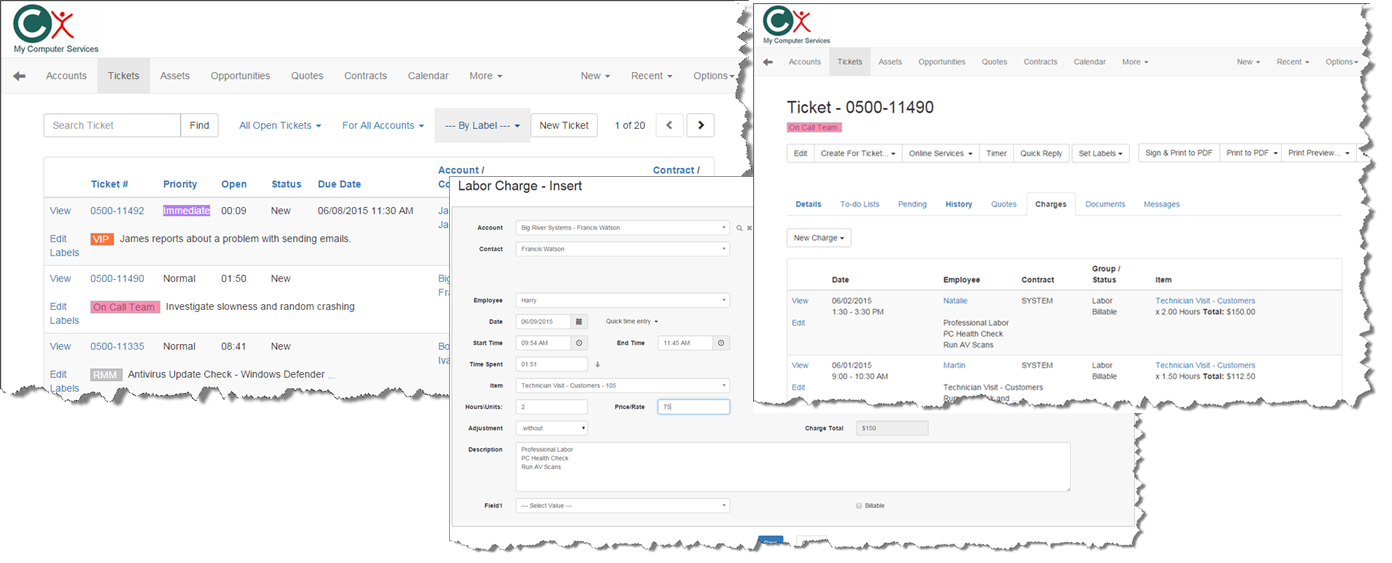
An entirely new Web interface module with modern design and plenty of new features and options such as graphically hand-sign tickets on mobile; Responsive mobile experience; New support for Microsoft IIS to act as the Web Server, and more.
Contracts – Custom Settings
Powerful new custom settings options for Contracts that provide great flexibility.
Have your Contract settings match many more real life and unique scenarios.
New! QuickBooks Online Link
A powerful new integration module with QuickBooks Online!
New! Xero Link
A powerful new integration module with Xero (Online accounting).
New! Tracking Time Spent
Easily track employees time, regardless of the time being charged (with a dozen of new time spent reports).
Usability
Plenty of super useful new features and enhancements for a better usability experience.
Reports
New Reports in the Tickets, Charges and Assets areas.
Data Import
Powerful new data import features for all Tickets import and Account Secondary Contacts import.
A LOT more!
What’s New – Detailed
- A complete redesign of the Web interface modules!
- Let customer graphically sign on tickets.
- Easily choose Items and Accounts without opening a selection window.
- Use Microsoft IIS as the Web Server for the Web interface.
- Edit Configuration Note.
- Edit Custom Fields.
- Connect over ports 80 and 443 (with Microsoft IIS as the backend).
click to enlarge
click to enlarge
The new Custom Settings for Contracts provide much more flexibility when defining your contracts. The new variations and options can help you to provide better service, with a more accurate and easier billing workflow (e.g. better MSP coverage for recurring Contracts).
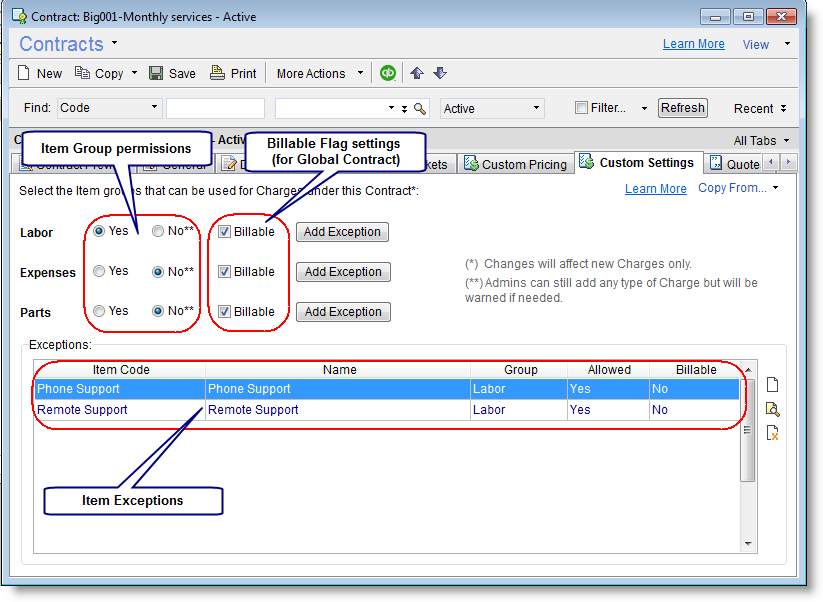
The new Custom Settings for Contracts include: Item Group permissions and Billable flag settings for Global Contracts.
Item Group permissions: The Item settings allow you to select which Items can or cannot be logged for Charges under this Contract. The settings include whether Labor, Expense or Part Item groups are allowed or not. Exceptions for specific Items can be added.
Billable Flag Settings for Global Contracts: you can now set default values for the Billable flag, based on the Item group. This way you can choose which items are covered by the contract, and which are not, and should be billed. Note that for other Contract types (i.e. block contracts), the billable flag is determined automatically by the system according to the contract type.
Usage example:
You offer a monthly recurring Contract for services you provide. The contract covers phone and remote support but does not cover on-site work, nor any expenses or parts.
Defining your contract:
- Contract defined: Global Contract.
- Define the recurring price using Contract-Price Charges.
- Do not allow Parts and Expense Items to be used.
- Allow Labor Items.
- Set the contract’s Billable flag behavior for Labor Items to – Billable.
- Then add two Labor Item exceptions for ‘Phone Support’ and ‘Remote Support’ and set their Billable flag to ‘Not Billable’ (i.e. covered).
This way, parts and expense Items cannot be logged as Charges under this contract. The phone/remote support services will be covered while any other type of labor charges will be billed.
To define Custom Contract settings go to the Contract’s Custom Settings tab.
click to enlarge
In this version, it is now possible to easily change the type of a Contract. For example, a Contract was configured as a Block of Time. However, after using it for a while and logging Charges under it, you decide that it would be better to use a Global Contract. You can now simply change the contract type to Global and you are done. All required updates to the charges and contract will be performed automatically.
- New! Select which icons you want to display, and in what order, in the main left-pane of the application.
- Lists now have a much more readable display (You can always revert back to Compact mode).
- Use Ctrl+F to easily focus on the search field in all windows! To show/hide the search pane use Ctrl+Shift+F.
- Search panes, in general, are now much clearer and easier to use.
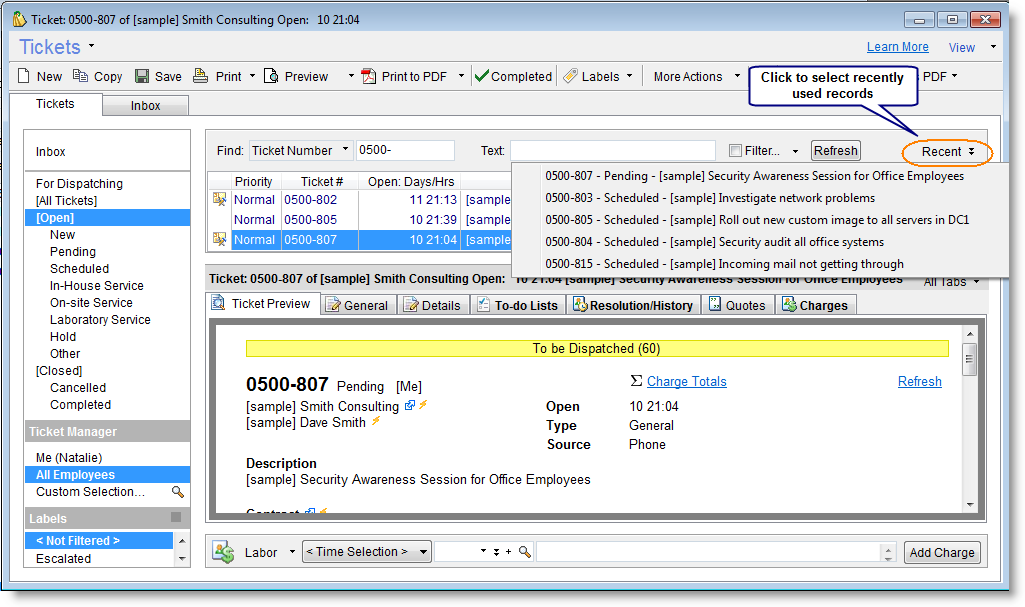
- Easily jump to recently used records, rather than searching for them again.
- Easily activate a saved filter using a drop down menu on the toolbar, without opening the Filtering Window.
- Faster list scrolling: List scrolling, especially when scrolling several records at once quickly, works much faster now!
- Faster list operations: text search, list printing, list export, record counting and running a formula on a column work much faster now! (to activate these options, use Right click > Table Options…).
- New filtering option – ‘Does Not Include’ allows you to easily exclude results you do not need.
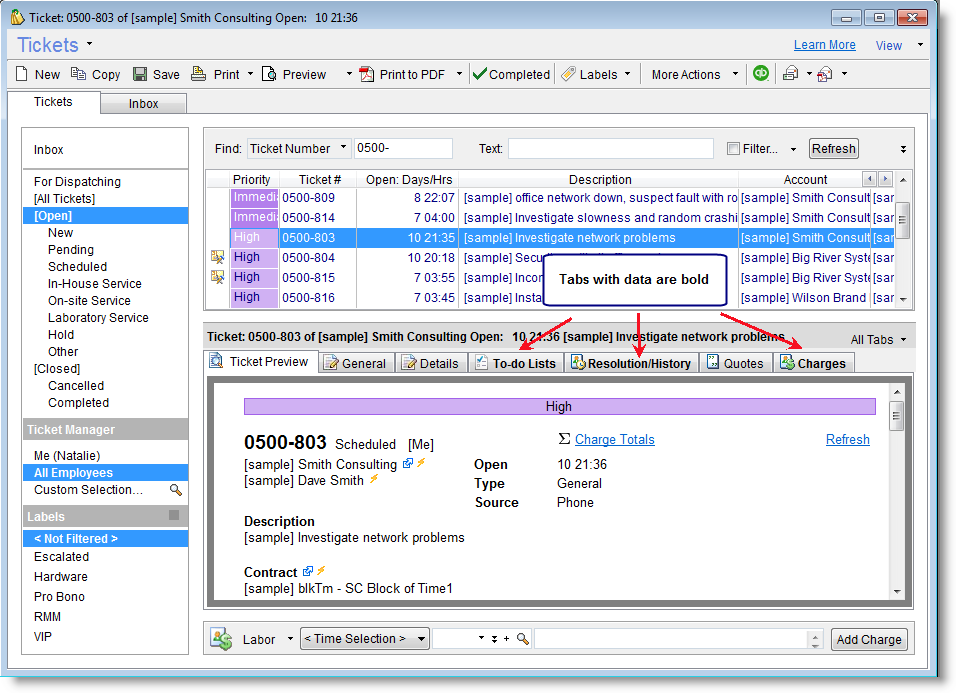
- Easily tell which tab holds data: The name of Tabs with data listed in them will appear as bold (Bold indication considers also the current filtering settings of the tab).
![]()
click to enlarge
click to enlarge

click to enlarge
click to enlarge
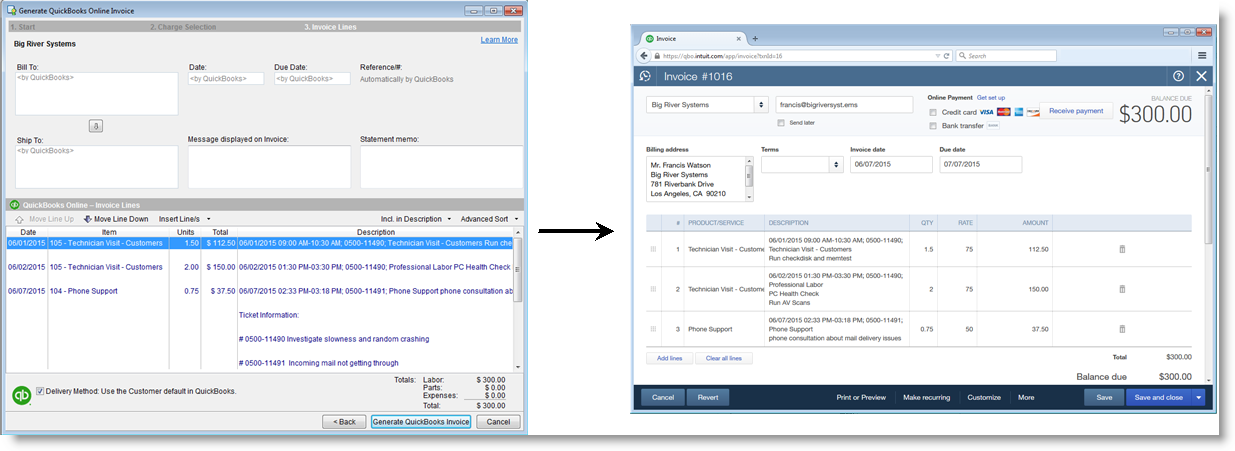
Get the power of QuickBooks desktop link module now with QuickBooks Online!
QuickBooks Online Link is a new module that integrates the billing module with QuickBooks Online. We’ve implemented all of the features that you’ve learnt to love when integrating with QuickBooks Desktop, making the switch to using the new QuickBooks Online module as streamlined as possible for existing users. A separate license is required for integrating with QuickBooks Online.

click to enlarge
(*) Tested with QuickBooks Online US, UK and Canada editions
Using Xero as your online accounting system? Now you can integrate it with the billing module to streamline customer billing processes. Easily export invoices to Xero. You can invoice Tickets, invoice Contracts or invoice at the Account level.
Using the batch invoicing options, you can easily create any number of invoices and then import them into Xero. The batch invoicing is very helpful when dealing with monthly recurring contracts that get invoiced every month, as well as when generating invoice for all tickets at the end of the month.
Make sure to assign Xero Sales Accounts and Taxes to CRM’s customer Accounts and Items. This way Xero will allocate sales to the correct account and apply the relevant taxes to all imported invoices.

==>Read more about the Xero Link
The new Tracking Time Spent feature is focused on letting you easily track employees time, regardless of the time being charged.
Until now, tracking time has always been related to billing. While you could get an idea about time spent by employees, some of it may have not reflected all the actual time spent, because it is billing oriented, not time-spent oriented.
The new Tracking Time Spent feature is built into the Charges section. This saves the hassle for employees to log their time in yet another system, and – most of their time may already be logged as charges, so – why split?
Using it is simple – you now have a new Time Spent field as part of every Charge. This field is automatically set with a value based on the Start/End times logged as part of the Charge, or – when no Start/End times are logged, you can simply type in the time spent.
With the new release you will be able to easily compare time spent versus time charged in various options and perspectives.
The new Tracking Time Spent feature also comes with a handful of new reports:
- Annual Time Spent Summary by Employees and Months
- Monthly Time Spent Summary by Employees and Days
- Time Spent and Time Charged by Accounts and Employees
- Time Spent and Time Charged by Accounts and Employees – Summary
- Time Spent and Time Charged by Accounts, Contracts and Tickets
- Time Spent and Time Charged by Accounts, Contracts and Tickets – Summary
- Time Spent and Time Charged by Employees
- Time Spent and Time Charged by Employees – Summary
- Time Spent and Time Charged by Employees and Items – Detailed
- Time Spent and Time Charged by Employees and Items – Summary
- Time Spent and Time Charged by Employees, Accounts and Tickets – Detailed
- Time Spent and Time Charged by Employees, Accounts and Tickets – Summary
- QuickBooks 2015 Pro/Premier/Enterprise are now officially supported.
-
The Charge’s Secondary Contact can now be included in the Invoice Line. You can also configure the system to include it by default.
-
You can now find a record based on the record linked to it (Customer or Item) in QuickBooks. Search is based on the the record ID (aka List ID) in QuickBooks.
-
Batch invoicing enhancements: You can now choose whether to include or exclude Open Tickets’ Charges while creating the invoices, rather than rely on the default settings only. Until now the decision whether to include such Charges was taken from the default setting (via Tools > Options > QuickBooks tab).
With the new release, the default settings can be overridden while generating the batch invoices and the list is updated immediately, helping you take better decisions during batch invoicing.
-
Better filtering – A new date filtering drop-down menu was added to help you quickly filter by Today/Yesterday/Last Week/etc.
-
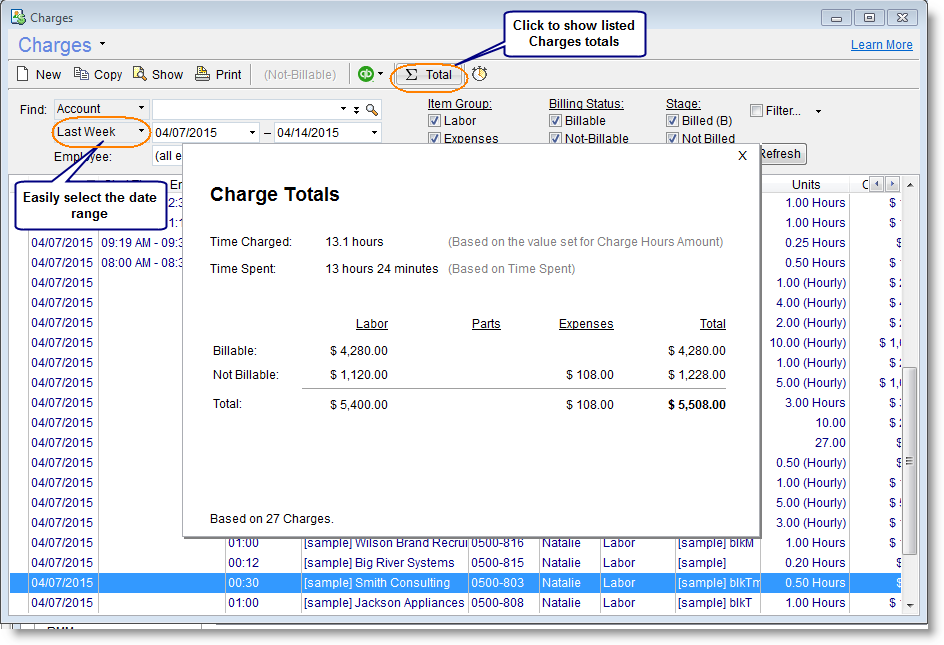
Charge Totals! A new Charge Totals summary option is now available from the Charges Window. To display the Charge totals, filter the Charge list to show only the Charges you want to summarise, and click ‘Charge Totals’ from the toolbar to display the total amounts.
This option can help you easily get the total amount for all Charges for this month or everyone’s Charges today etc.
click to enlarge
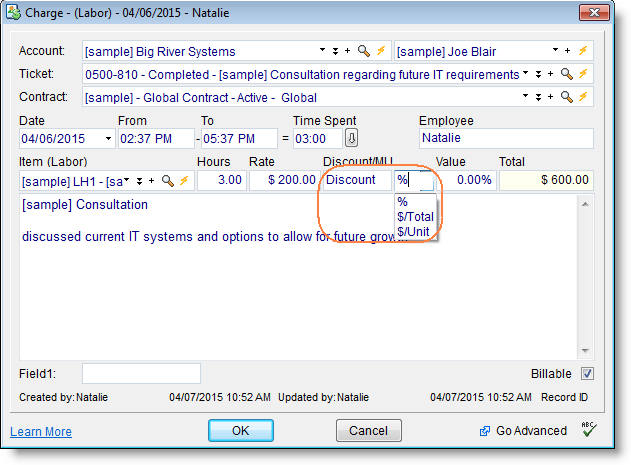
You can now add a discount or markup to the Charge, which is applied per unit, rather than for the total of the Charge. Using this option, the total amount for the Charge, including the discount or markup, will be automatically recalculated and adjusted when the quantity of the Charge changes.
click to enlarge
-
New Title Line: When generating a report you can now print a free-text title line. You can edit the title from the bottom part of the Report Generation Window where you choose your report filtering criteria.
- New reports where added to the predefined reports:
- Asset Reports
- Asset Details Including Tickets
- Assets List Including Sub-Assets
- Charge Reports
- Annual Charges Summary by Account and Months
- Ticket Reports
- Number of Tickets by Manager
- Tickets List by Manager and Type
- Tickets List by Manager and Category
- Tickets List by Account and Type
- Tickets List by Account and Category
- Tickets reports – Easily print Tickets without Labels.
- Asset Reports
-
Batch Delete Tickets: A new batch-delete Tickets option was added,
allowing you to easily delete a list of Tickets. This option is
especially helpful when you need to delete a bunch of unneeded tickets
that were created automatically by the RMM integration system or when
using the Email-to-Ticket feature.
To use the batch delete option, filter the list to show only the Tickets you want to delete , and activate the option from Tickets > Tools > Batch Delete Tickets.This option is available for administrators only.
-
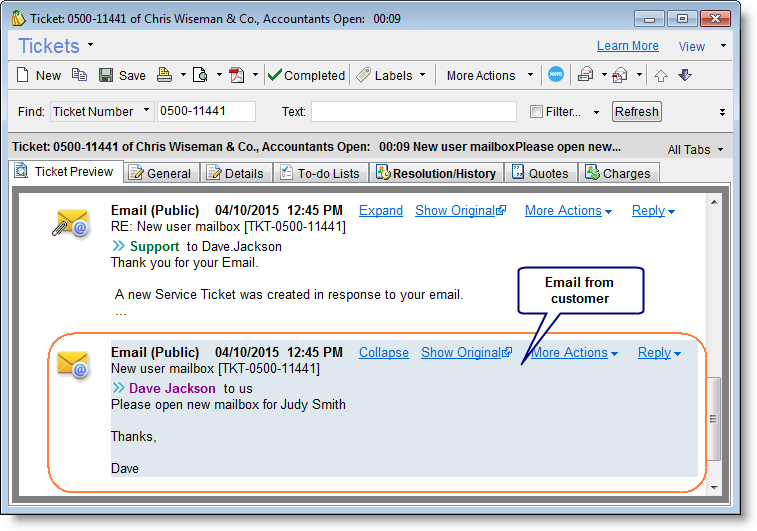
Interaction Threads Enhancements: Easily tell which email message or
ticket notes, listed under the Ticket History and Preview tabs, come
from a customer. All interactions originating from a customer are now
colored. -
Asset Column: The Asset column can now be added to the Tickets list.
To add the Asset to the list, open the ticket list, Right click > Table Options > Add/remove columns > Asset. -
When a ticket is created for an Asset and the Asset has a Contact
assigned to it – the Contact will be automatically selected for this
Ticket.
click to enlarge
New! Discount/Markup by Unit – You can now add a discount or markup to the Quote Line, which is applied per unit, rather than for the total of the Quote Line. Using this option, the total amount for the Quote Line, including the discount or markup, will be automatically recalculated and adjusted when the quantity of the Quote Line changes.
New smart Tickets import… – Auto creates the relevant Accounts, Contacts and Assets…
New smart Assets import… – Auto creates the relevant Accounts and Contacts…
New smart Secondary Contacts import… – Batch import Secondary Contacts to different Accounts…
All import types now support the RecordID field to easily update records in your PSA.
RMM Link (GFI MAX / Continuum): When linking and mapping Sites and Devices with the PSA customer Accounts and Assets you can now use keyboard shortcuts to really streamline the linking process.
Asset management was added to the Privileges section. You can now control who has access to Assets details and what they can do with Assets.
A number of minor bugs have been fixed.
A variety of performance improvements have been implemented.
Jump to what’s new in version: