Activity Templates for Accounts: Difference between revisions
No edit summary |
|||
| (4 intermediate revisions by 2 users not shown) | |||
| Line 1: | Line 1: | ||
{{usermanualsactivitytemplates}} | |||
Creating Activity Entries for Accounts | Creating Activity Entries for Accounts | ||
To create a new entry in an Account Activity Template, go to the Entries tab of the template and click on the New button in the bottom-left corner. A pop-up menu now appears where you can select “Task,” “Appointment,” or “Ticket.” | To create a new entry in an Account Activity Template, go to the Entries tab of the template and click on the New button in the bottom-left corner. A pop-up menu now appears where you can select “Task,” “Appointment,” or “Ticket.” | ||
| Line 6: | Line 8: | ||
To ''edit'' an existing entry, simply select it from the Entries List in the General tab. | To ''edit'' an existing entry, simply select it from the Entries List in the General tab. | ||
[[File: | [[File:activity_templates_new_account_menu.gif|center]] | ||
| Line 15: | Line 17: | ||
After selecting to create a Task entry for an Account Activity Template, the following window opens: | After selecting to create a Task entry for an Account Activity Template, the following window opens: | ||
[[File: | [[File:activity_templates_new_task_account.gif|center]] | ||
In this window you should enter the information the system can use to create the task when the template is applied. | In this window you should enter the information the system can use to create the task when the template is applied. | ||
| Line 21: | Line 23: | ||
Below is an explanation of the fields/buttons in this window. | Below is an explanation of the fields/buttons in this window. | ||
'''Employee'''<br>Each task is the | '''Employee'''<br>Each task is the RangerMSP system must be assigned to an employee. When assigning an employee to a Task entry in a template, you should select the employee who you want assigned to the task once the template is applied and a specific task is “created.” | ||
You can choose the “Employee” from any of the following options: | You can choose the “Employee” from any of the following options: | ||
| Line 33: | Line 35: | ||
*Shared: By selecting this option, the task will be set as “Shared,” rather than assigned to a specific employee, when the template is applied to a specific asset. | *Shared: By selecting this option, the task will be set as “Shared,” rather than assigned to a specific employee, when the template is applied to a specific asset. | ||
'''Task Date'''<br>Each task in the | '''Task Date'''<br>Each task in the RangerMSP system needs to be assigned a date. In an Account template, the Task Date is defined as a certain number of days before or after—or the day of—a reference date that is defined in the "Copy From" field. | ||
The "Copy From" field allows the user to define the date to copy from as any of the following: | The "Copy From" field allows the user to define the date to copy from as any of the following: | ||
| Line 42: | Line 44: | ||
These choices appear in a drop-down menu from this field. | These choices appear in a drop-down menu from this field. | ||
[[File: | [[File:activity_templates_new_task_date.gif|center]] | ||
Users can then adjust the date to be a certain number of days earlier or later than this day. | Users can then adjust the date to be a certain number of days earlier or later than this day. | ||
| Line 50: | Line 52: | ||
In addition, you can select the '''Move to next workday''' flag. This flag takes effect if the date that is calculated when applying the template falls out on a weekend. If this box is checked, the system automatically moves the Task Date to the next available business day. | In addition, you can select the '''Move to next workday''' flag. This flag takes effect if the date that is calculated when applying the template falls out on a weekend. If this box is checked, the system automatically moves the Task Date to the next available business day. | ||
For example, if according to the information you enter in the template the Task Date falls out on a Saturday (and Monday through Friday are defined as working days in your | For example, if according to the information you enter in the template the Task Date falls out on a Saturday (and Monday through Friday are defined as working days in your RangerMSP Calendar), then Task Date is calculated to be the following Monday. If such a move is made, a comment is displayed when applying the template. | ||
<u>Note:</u> In order to apply the template successfully, the information in field "Copy From" must be defined in the Account to which you wish to apply the template. If the reference date has not been entered into the Account, applying a template to it will fail. | <u>Note:</u> In order to apply the template successfully, the information in field "Copy From" must be defined in the Account to which you wish to apply the template. If the reference date has not been entered into the Account, applying a template to it will fail. | ||
| Line 68: | Line 70: | ||
After choosing to create or edit an Appointment entry for a Asset Activity Template, the following window opens: | After choosing to create or edit an Appointment entry for a Asset Activity Template, the following window opens: | ||
[[File: | [[File:activity_templates_new_appt_account.gif|center]] | ||
In this window you should enter the information the system can use to create the appointment when the template is applied. | In this window you should enter the information the system can use to create the appointment when the template is applied. | ||
| Line 75: | Line 77: | ||
'''Employee'''<br>Each appointment is the | '''Employee'''<br>Each appointment is the RangerMSP system must be assigned to an employee. When assigning an employee to an Appointment entry in a template, you should select the employee who you want assigned to the appointment once the template is applied to a specific account and the appointment is “created.” | ||
You can choose the “Employee” from any of the following options: | You can choose the “Employee” from any of the following options: | ||
| Line 88: | Line 90: | ||
'''Appointment Date'''<br>Each Appointment in the | '''Appointment Date'''<br>Each Appointment in the RangerMSP system needs to be assigned a date. In an Account template, the Appointment Date is defined as a certain number of days before or after—or the day of—a reference date that is defined in the "Copy From" field. | ||
The "Copy From" field allows the user to define the reference date to copy from as any of the following: | The "Copy From" field allows the user to define the reference date to copy from as any of the following: | ||
| Line 98: | Line 100: | ||
These choices appear in a drop-down menu from this field. | These choices appear in a drop-down menu from this field. | ||
[[File: | [[File:activity_templates_new_appt_date.gif|center]] | ||
Users can then adjust the date to be a certain number of days earlier or later than this day. | Users can then adjust the date to be a certain number of days earlier or later than this day. | ||
| Line 104: | Line 106: | ||
In addition, you can select the '''Move to next workday''' flag. This flag takes effect if the date that is calculated when applying the template falls out on a weekend. If this box is checked, the system automatically moves the Appointment Date to the next available business day. | In addition, you can select the '''Move to next workday''' flag. This flag takes effect if the date that is calculated when applying the template falls out on a weekend. If this box is checked, the system automatically moves the Appointment Date to the next available business day. | ||
For example, if according to the information you enter in the template the Appointment Date falls out on a Saturday (and Monday through Friday are defined as working days in your | For example, if according to the information you enter in the template the Appointment Date falls out on a Saturday (and Monday through Friday are defined as working days in your RangerMSP Calendar), then Appointment Date is calculated to be the following Monday. If such a move is made, a comment is displayed when applying the template. | ||
<u>Note:</u> In order to apply the template successfully, the information in field "Copy From" must be defined in the Account to which you wish to apply the template. If the "Copy From" has not been entered into the Account, applying a template to it will fail. | <u>Note:</u> In order to apply the template successfully, the information in field "Copy From" must be defined in the Account to which you wish to apply the template. If the "Copy From" has not been entered into the Account, applying a template to it will fail. | ||
| Line 117: | Line 119: | ||
'''Appointment Color'''<br>These buttons allow the user to determine what color the Appointment appears in when it is shown on the | '''Appointment Color'''<br>These buttons allow the user to determine what color the Appointment appears in when it is shown on the RangerMSP Calendar. You can choose from the following options: | ||
*Employee Default Color: This option sets the color according to the color of the employee assigned to the Appointment. (The default color for Appointments can be defined for each employee in the Employee window.) | *Employee Default Color: This option sets the color according to the color of the employee assigned to the Appointment. (The default color for Appointments can be defined for each employee in the Employee window.) | ||
| Line 126: | Line 128: | ||
You can also specify whether the Account/Contact information should appear before or after the Appointment Description. To do so, check either the '''Before Description''' or '''After Description''' box. | You can also specify whether the Account/Contact information should appear before or after the Appointment Description. To do so, check either the '''Before Description''' or '''After Description''' box. | ||
==Ticket Entries for Account Activity Templates== | ==Ticket Entries for Account Activity Templates== | ||
After choosing to create or edit a new Ticket Entry for the Asset Activity Template, the following window opens: | After choosing to create or edit a new Ticket Entry for the Asset Activity Template, the following window opens: | ||
[[File: | [[File:activity_templates_new_ticket_account.gif|center]] | ||
In this window you should enter the information the system can use to create the ticket when the template is applied to an account. | In this window you should enter the information the system can use to create the ticket when the template is applied to an account. | ||
| Line 137: | Line 140: | ||
'''Ticket Manager'''<br>Every ticket in the | '''Ticket Manager'''<br>Every ticket in the RangerMSP system needs to be assigned to an employee, called the Ticket Manager. In this window you should select who should be assigned as the Ticket Manager once the ticket is created. | ||
Determining the employee can be done by using one of the following options: | Determining the employee can be done by using one of the following options: | ||
| Line 157: | Line 160: | ||
These choices appear in a drop-down menu from this field. | These choices appear in a drop-down menu from this field. | ||
[[File: | [[File:activity_templates_new_ticket_date.gif|center]] | ||
<u>Note:</u> In order to apply the template successfully, the information in field "Copy From" must be defined in the Account to which you wish to apply the template. If the reference date has not been entered into the Account, applying a template to it will fail. | <u>Note:</u> In order to apply the template successfully, the information in field "Copy From" must be defined in the Account to which you wish to apply the template. If the reference date has not been entered into the Account, applying a template to it will fail. | ||
| Line 178: | Line 181: | ||
'''Details tab''' | '''Details tab''' | ||
[[File: | [[File:activity_templates_new_ticket_details_account.gif|center]] | ||
In this area you can define the values for additional fields of the ticket, which appear in the ticket's Details tab: | In this area you can define the values for additional fields of the ticket, which appear in the ticket's Details tab: | ||
| Line 204: | Line 207: | ||
*[[Activity Templates for Tickets]] | *[[Activity Templates for Tickets]] | ||
*[[Activity Templates for Opportunities]] | *[[Activity Templates for Opportunities]] | ||
*[[Accounts]] | |||
[[Category:User Manuals]] | [[Category:User Manuals]] | ||
[[Category:Office Management]] | [[Category:Office Management]] | ||
[[Category:Activity Templates]] | [[Category:Activity Templates]] | ||
[[Category:Accounts]] | |||
Latest revision as of 07:42, 8 July 2020
Creating Activity Entries for Accounts To create a new entry in an Account Activity Template, go to the Entries tab of the template and click on the New button in the bottom-left corner. A pop-up menu now appears where you can select “Task,” “Appointment,” or “Ticket.”
To edit an existing entry, simply select it from the Entries List in the General tab.
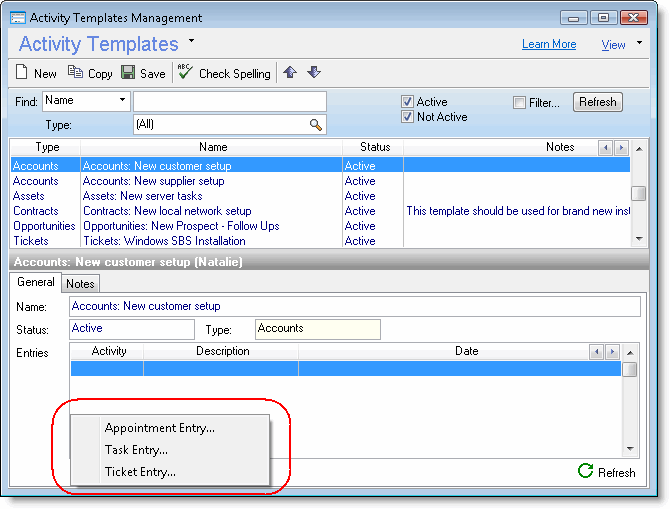
After making your selection, a window opens, allowing you to enter detailed information about the newly created entry. Task, Appointment, and Ticket entries all have slightly different Detail windows. To learn more about these Detail windows, see the sections that immediately follow, or click on the appropriate link below.
Task Entries for Account Activity Templates
After selecting to create a Task entry for an Account Activity Template, the following window opens:
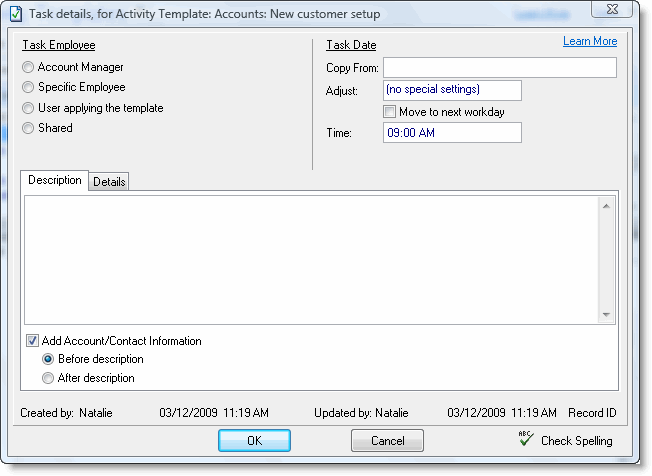
In this window you should enter the information the system can use to create the task when the template is applied.
Below is an explanation of the fields/buttons in this window.
Employee
Each task is the RangerMSP system must be assigned to an employee. When assigning an employee to a Task entry in a template, you should select the employee who you want assigned to the task once the template is applied and a specific task is “created.”
You can choose the “Employee” from any of the following options:
- Account Manager: By selecting this option, the task will be assigned to the Account Manager of the account to which the template is applied. (The Account Manager is defined in the Account details window > General tab > Account Manager [“Acct Mgr.”] field).
- Specific Employee: When applying the template and creating the task, the employee specified in this option is assigned to the task. If the specified employee is no longer an active employee at the time the template is applied, the appointment is automatically assigned to the user applying the template. The system makes note of this change when applying the template.
- The user applying the template: By selecting this option, the task will be assigned to the user who actually applies the template to a specific asset.
- Shared: By selecting this option, the task will be set as “Shared,” rather than assigned to a specific employee, when the template is applied to a specific asset.
Task Date
Each task in the RangerMSP system needs to be assigned a date. In an Account template, the Task Date is defined as a certain number of days before or after—or the day of—a reference date that is defined in the "Copy From" field.
The "Copy From" field allows the user to define the date to copy from as any of the following:
- The Account's Birthdate
- The date the template is applied
These choices appear in a drop-down menu from this field.
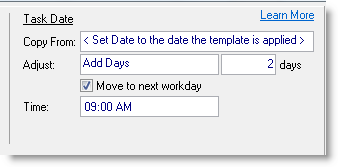
Users can then adjust the date to be a certain number of days earlier or later than this day.
For example, add a task at the account's birth date to send them a greeting card.
In addition, you can select the Move to next workday flag. This flag takes effect if the date that is calculated when applying the template falls out on a weekend. If this box is checked, the system automatically moves the Task Date to the next available business day.
For example, if according to the information you enter in the template the Task Date falls out on a Saturday (and Monday through Friday are defined as working days in your RangerMSP Calendar), then Task Date is calculated to be the following Monday. If such a move is made, a comment is displayed when applying the template.
Note: In order to apply the template successfully, the information in field "Copy From" must be defined in the Account to which you wish to apply the template. If the reference date has not been entered into the Account, applying a template to it will fail.
Task Time
You can set the task Time as you wish. This field may also be edited when applying the template to a specific account.
Details Tab
In this tab you can enter a value to additional fields of the Task. These are the Task’s user-defined fields, which can be used as you wish. Setting the values in the template entries will set these values to the fields when the task is created from the template.
Note: If you've enabled Field3, Field4, and Field5 in your system, they will be displayed here as well.
Description
In this box you should enter a description of the task. When the template is applied to a specific account, this field appears as the Task Description. If you would like the Account/Contact information to be automatically added to this field when the template is applied, you can check the Add Account/Contact info box. Including this information in this field can be helpful when exporting the task to Outlook.
You can also specify whether the Account/Contact information should appear before or after the Task Description. To do so, check either the Before Description box or the After Description box.
Appointment Entries for Account Activity Templates
After choosing to create or edit an Appointment entry for a Asset Activity Template, the following window opens:
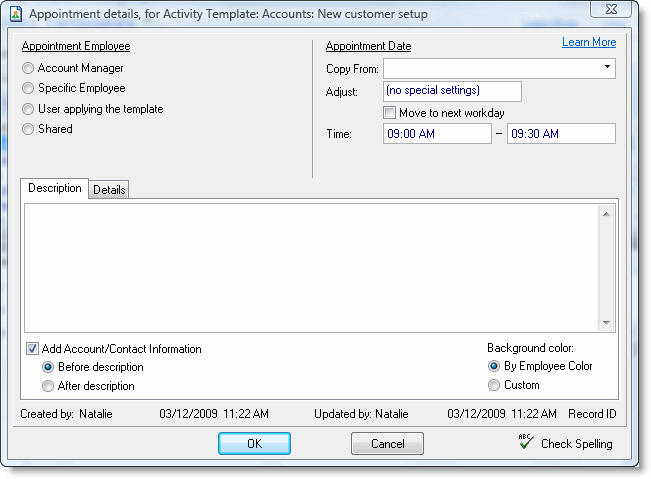
In this window you should enter the information the system can use to create the appointment when the template is applied.
Below is an explanation of the fields/buttons in this window.
Employee
Each appointment is the RangerMSP system must be assigned to an employee. When assigning an employee to an Appointment entry in a template, you should select the employee who you want assigned to the appointment once the template is applied to a specific account and the appointment is “created.”
You can choose the “Employee” from any of the following options:
- Account Manager: By selecting this option, the appointment will be assigned to the Account Manager of the account to which the template is applied. (The Account Manager is defined in the Account details window > General tab > Account Manager [“Acct Mgr.”] field.
- Specific Employee: When applying the template and creating the appointment, the employee specified in this option is assigned to the appointment. If the specified employee is no longer an active employee at the time the template is applied, the appointment is automatically assigned to the user applying the template. The system makes note of this change when applying the template.
- The user applying the template: By selecting this option, the appointment will be assigned to the user who actually applies the template to a specific ticket.
- Shared: By selecting this option, the appointment will be set as “Shared,” rather than assigned to a specific employee, when the template is applied to a specific ticket.
Appointment Date
Each Appointment in the RangerMSP system needs to be assigned a date. In an Account template, the Appointment Date is defined as a certain number of days before or after—or the day of—a reference date that is defined in the "Copy From" field.
The "Copy From" field allows the user to define the reference date to copy from as any of the following:
- The Account's Birthdate
- The current date when applying the template
These choices appear in a drop-down menu from this field.
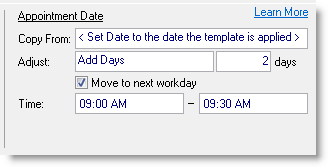
Users can then adjust the date to be a certain number of days earlier or later than this day.
In addition, you can select the Move to next workday flag. This flag takes effect if the date that is calculated when applying the template falls out on a weekend. If this box is checked, the system automatically moves the Appointment Date to the next available business day.
For example, if according to the information you enter in the template the Appointment Date falls out on a Saturday (and Monday through Friday are defined as working days in your RangerMSP Calendar), then Appointment Date is calculated to be the following Monday. If such a move is made, a comment is displayed when applying the template.
Note: In order to apply the template successfully, the information in field "Copy From" must be defined in the Account to which you wish to apply the template. If the "Copy From" has not been entered into the Account, applying a template to it will fail.
Appointment Time
You can set the appointment’s Time as you wish. This field may also be edited when applying the template to a specific account.
Details Tab
In this tab you can enter a value to additional fields of the Appointment. These are the appointment's user-defined fields, which can be used as you like. Setting the value in the template entry will set this value to the field when the task is created from the template.
Note: If you've enabled Field3, Field4, and Field5 in your system, they will be displayed here as well.
Appointment Color
These buttons allow the user to determine what color the Appointment appears in when it is shown on the RangerMSP Calendar. You can choose from the following options:
- Employee Default Color: This option sets the color according to the color of the employee assigned to the Appointment. (The default color for Appointments can be defined for each employee in the Employee window.)
- Fixed Color: This option allows you to choose a specific color to be used for the Appointment once the template is applied to a ticket.
Description
In this box you should enter a description of the appointment. When the template is applied to a specific asset, this field appears as the Appointment Description. If you would like the Account information to be automatically added to this field when the template is applied, you can check the Add Account/Contact info box. Including this information in this field can be helpful when exporting the task to Outlook.
You can also specify whether the Account/Contact information should appear before or after the Appointment Description. To do so, check either the Before Description or After Description box.
Ticket Entries for Account Activity Templates
After choosing to create or edit a new Ticket Entry for the Asset Activity Template, the following window opens:
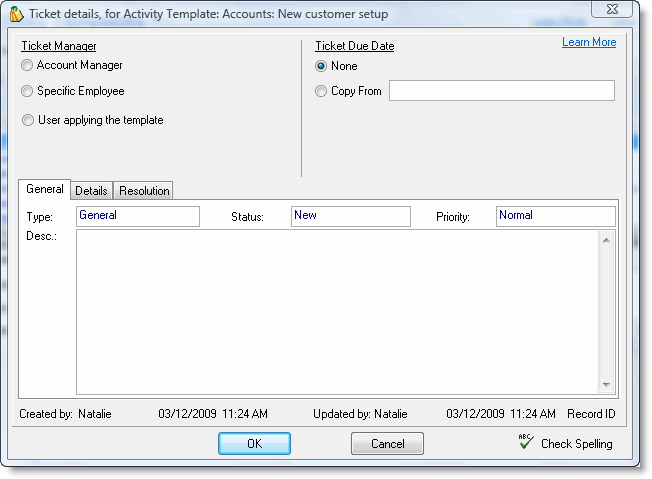
In this window you should enter the information the system can use to create the ticket when the template is applied to an account.
Below is an explanation of the fields, buttons, and tabs in this window
Ticket Manager
Every ticket in the RangerMSP system needs to be assigned to an employee, called the Ticket Manager. In this window you should select who should be assigned as the Ticket Manager once the ticket is created.
Determining the employee can be done by using one of the following options:
- Account Manager: By selecting this option, the ticket will be assigned to the Account Manager of the account to which the template is applied. (The Account Manager is defined in the Account details window > General tab > Account Manager [“Acct Mgr.”] field.)
- Specific Employee: When applying the template and creating the ticket, the employee specified in this option is assigned to the ticket. If the specified employee is no longer an active employee at the time the template is applied, the ticket is automatically assigned to the user applying the template. The system makes note of this change when applying the template.
- The user applying the template: By selecting this option, the ticket will be assigned to the user who actually applies the template to a specific asset.
Ticket Due Date
You may choose to set a Ticket Due Date. The Ticket Due Date is defined as a certain number of days before or after—or the day of—a reference date that is defined in the "Copy From" field.
The "Copy From" field allows the user to define the date to copy from as any of the following:
- The Account's Birth date
- The current date when applying the template
These choices appear in a drop-down menu from this field.
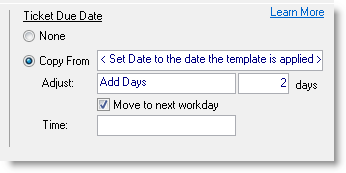
Note: In order to apply the template successfully, the information in field "Copy From" must be defined in the Account to which you wish to apply the template. If the reference date has not been entered into the Account, applying a template to it will fail.
Ticket Due Time
The Ticket Due Time is optional and can be defined in the Time field, next to the Ticket Due Date.
General Tab
In the General tab you can define the values for the following ticket fields, which appear in the ticket's General tab:
- Type
- Status
- Priority
- Description
The Type, Status, and Priority fields all have default values, but the Description field is mandatory.
The values assigned to these fields determine the values that will be calculated when a ticket is created. For a full explanation of a ticket’s fields, consult here.
Details tab
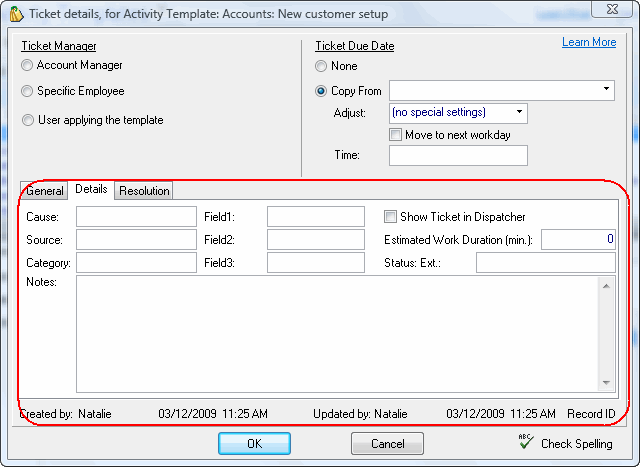
In this area you can define the values for additional fields of the ticket, which appear in the ticket's Details tab:
- Cause, Source, Category
- Field1, Field2, Field3
- Show Ticket in Dispatcher
- Estimated Work Duration
- Status Ext. (Status Extension)
- Notes
Setting values to these fields in the template will determine the values which will applied to the ticket's data when creating the ticket. None of these fields are mandatory.
Resolution tab
In this field you can enter a ”Resolution” for the ticket that is automatically entered into a ticket's resolution field when the template is applied. Presetting this information can be useful when creating templates for common tickets that usually involve the same set of steps for resolving the issue. For example, you can create a Ticket entry for a maintenance job such as checking the server event log or checking the free space on the hard disk, and enter all the steps required to perform this job in the Resolution field.
Creating entries for the Resolution tab in a template saves time and improves the quality of your service in several ways:
- The technician will not need to spend time entering a resolution, as it will already be filled in.
- The pre-entered steps in the Resolution field can provide guidance to technicians, leaving less room for error.
- The technician can use the steps listed in the resolution as a checklist to make sure all the necessary work has been performed.