Items: Difference between revisions
(Created page with ' ===Pricing Methods for Items=== It is possible to use different Pricing methods for Items as follows: <u>'''Hourly Rates'''</u> *'''Employee Hourly Rates'''<br>The hourly rate…') |
No edit summary |
||
| (20 intermediate revisions by 3 users not shown) | |||
| Line 1: | Line 1: | ||
{{Usermanualbilling}} | |||
Items in RangerMSP are a catalog of all the services and products you offer and their prices. The Items list in RangerMSP acts as your price list. Note that setting the price for an Item is optional; they can be set ad-hoc when using the Item for adding a Charge. For further details see Using Charges. | |||
There are three types of Items in RangerMSP: | |||
*'''Product/Parts Items:''' hardware, software, or any other items you ship to your customer. These items have fixed-prices. | |||
*'''Labor Items:''' services you provide to your customers, such as server installation, network installation, on-site technician visits, etc. These Items can be priced according to the employee hourly-rate, a fixed hourly-rate or by a fixed-price for the service. | |||
*'''Expense Items''': used to charge expenses, such as travel and special deliveries. Expense Items can have a fixed-price per unit or a fixed hourly rate. | |||
<br> | |||
__TOC__ | |||
<br> | |||
===Pricing Methods for Items=== | ===Pricing Methods for Items=== | ||
Each Item group (Labor, Expense, Part) has slightly different pricing methods and settings. | |||
Following are the various pricing methods per Item group. | |||
====Labor Item Pricing Methods==== | |||
For Labor Items, it is possible to define the rate by hours or by units (fixed price). | |||
[[File:items_pricing_methods_hours_units.png|center]] | |||
'''Priced By: Hours (default)'''<br> | |||
When using Hours as your price source, the Item is priced by the hour. The 'Hours' pricing method is selected by default when creating a new Labor Item, and you can change it in this window. | |||
You can determine the hourly rate in two ways: | |||
[[File:Items_pricing_methods_hourly_rate.png|center]] | |||
<br> | |||
* By Employee Rate (default)<br>When using By Employee Rate, the employee rate is automatically used for all labor charges added using this Item. The hourly rate of each employee should be determined by their skills and role. These rates are set in the Employee window (under the Employee tab) when viewing employee details. | |||
*Fixed Price (Regardless of Employee)<br>When choosing Fixed Price, the Item’s rate is defined in the Item’s window and is automatically used for all charges added using this Item. The Charge amount is calculated according to the amount of time spent on the job, regardless of the specific employee who performs the work. | |||
'''Priced By: Units (Fixed-Priced Items)'''<br> | |||
When using Units as your price source for labor Items, the Item has a fixed price. When using the Item in a Charge, the price is calculated by the quantity entered in the charge, regardless of the amount of time spent on the job. | |||
Use Units as your labor rates when charging on a per-service basis rather than on an hourly basis. | |||
For example, you can have fixed-rates for specific services, such as $50 for printer setup, $60 for PC examination, $1,000 for server installation, etc. In these cases, time does not affect the final charge. | For example, you can have fixed-rates for specific services, such as $50 for printer setup, $60 for PC examination, $1,000 for server installation, etc. In these cases, time does not affect the final charge. | ||
'''Using Custom Pricing'''<br> | |||
Note that you may use Custom Pricing to set fixed hourly rates for specific employees or all employees, that will override the Item settings per Account or Contract. You can read more about custom pricing in the [[Custom Pricing]] section. | |||
====Expense Item Pricing Methods==== | |||
For Expense Items, it is possible to define the rate by units (fixed price) or by hours. | |||
[[File:Items_pricing_methods_expense.png|center]] | |||
'''Priced By: Units (default)'''<br> | |||
When using Units as your price source for Expense Items, the Item has a fixed price. When using the Item in a Charge, the price is calculated by the quantity entered in the charge, regardless of the amount of time spent entered. | |||
Use Units as your expense rates when charging on a per-service basis rather than on an hourly basis. | |||
For example, you can charge your customer for Parking expenses with a fixed price per parking event, regardless of the amount of time the parking was logged with. | |||
The '''Cost''' is the price you originally paid for the Expense Item. This will be used when generating expense reports. | |||
'''Priced By: Hours'''<br> | |||
When using Hours as your price source, the Item is priced by the hour. The 'Fixed Price' pricing method is selected by default when creating a new Expense Item, and you can change it in this window. | |||
[[File:Items_pricing_methods_expense_hourly_rate.png|center]] | |||
For example, you can charge your customer for Parking expenses with hourly parking expenses, or by charging by the employee rate for this time. | |||
You can determine the hourly rate in two ways: | |||
* By Employee Rate (default)<br>When using By Employee Rate, the employee rate is automatically used for all expense charges added using this Item. These rates are set in the Employee window (under the Employee tab) when viewing employee details. | |||
* Fixed Price (Regardless of Employee)<br>When choosing Fixed Price, the Item’s rate is defined in the Item’s window and is automatically used for all charges added using this Item. The Charge amount is calculated according to the amount of time spent on the job, regardless of the specific employee who enters the Charge. | |||
'''Using Custom Pricing'''<br> | |||
Note that you may use Custom Pricing to set fixed hourly rates for specific employees or all employees, that will override the Item settings per Account or Contract. You can read more about custom pricing in the [[Custom Pricing]] section. | |||
====Parts Item Pricing Methods==== | |||
For Product/Part Items, it is possible to define the rate by units (fixed price) only. | |||
[[File:Items_pricing_methods_part.png|center]] | |||
'''Priced By: Units (default, only option)''' | |||
For Product/Part Items, the Item always has a fixed price. When using the Item in a Charge, the price is calculated by the quantity entered in the charge. | |||
The '''Cost''' is the price you originally paid for the Expense Item. This will be used when generating expense reports. | |||
===Items Fields=== | ===Items Fields=== | ||
| Line 41: | Line 97: | ||
|- | |- | ||
| Pricing Settings | | Pricing Settings | ||
| Pricing settings vary based on the Item Group (i.e. Labor, Expense or Products/Parts), and the | | | ||
Pricing settings vary based on the Item Group (i.e. Labor, Expense or Products/Parts), and the pricing method which is selected (By Hours or By Units). | |||
''' | '''Labor:'''<br>The '''Priced By''' field for Labor Items determines if the Item should be priced by Hours or by Units. When using Hours, a fixed-price or employee-rate can be used. When using the fixed-price, the Item will be charges regardless of the Employee who performs the work. | ||
'''Expense:'''<br>The '''Priced By''' field for Expense Items determines if the Item should be priced by Hours or by Units. When choosing Hours, a fixed-price or employee-rate can be used. | |||
For example, you can charge your customer for Parking expenses with a fixed price per parking event or with hourly parking expenses. | |||
The '''Cost''' is the price you originally paid for the Expense Item. | The '''Cost''' is the price you originally paid for the Expense Item. | ||
''' | '''Products/Parts:'''<br>The pricing for Parts is simple and consists of the '''Priced By that allows only Units'''. | ||
The cost is the price you pay for the Item when you purchase it from your Vendor. | |||
See more details in [[Items#Pricing Methods|Pricing Methods]]. | |||
|- | |- | ||
| Suspended | | Suspended | ||
| Line 55: | Line 117: | ||
|- | |- | ||
| Tax Fields | | Tax Fields | ||
| Using taxes in | | Using taxes in RangerMSP is optional. By default, the tax option is not activated. To begin using taxes, you first need to set the taxable Accounts and taxable Items. You can read more about taxes in [[Charges#Charging Using Taxes|Charging Using Taxes]]. | ||
|} | |} | ||
===Setting Up Items=== | ===Setting Up Items=== | ||
You can start working with | You can start working with RangerMSP without setting up any new Items. RangerMSP's default installation includes three pre-defined Items, one for each Item type; (Labor, Expense and Parts). This is designed to make the initial steps with RangerMSP easier. | ||
'''It is advisable to define your own Items List which will better represent the products and services offered by your business.''' | '''It is advisable to define your own Items List which will better represent the products and services offered by your business.''' | ||
Items can be manually defined, or imported from various data sources, including '''Excel® files, CSV files, QuickBooks®''', etc. This way you can import your existing price list into | Items can be manually defined, or imported from various data sources, including '''Excel® files, CSV files, QuickBooks®''', etc. This way you can import your existing price list into RangerMSP. | ||
Read more about setting up the system in the [[ | Read more about Importing Items from external sources in the [[Import_Items|Importing Items]] section. | ||
<br>Read more about setting up the system in the [[Setup]] menu. | |||
===Deleting Items=== | |||
Normally if you used an Item you probably do not want to delete it, in order to keep you database complete with all of your history. <br>'''Best practice''' in case you don't want to use an Item anymore is simply to '''deactivate it by selecting the 'Suspend'''' checkbox while viewing the Item's details window. | |||
<br> | |||
Having said that, if you do want to delete an Item (for example, if it is a test Item that you do not want to affect your database), select the Item in the list, and use right-click > Delete Item option, or the Items > Delete option. | |||
'''Important Note:''' | |||
Items that are linked to existing Charges cannot be deleted, to keep the data integrity. | |||
In order to delete an item, you should first delete all linked Charges. To find which Charges are linked to this Item: | |||
# Open the main Charges window from the left side pane. | |||
# In the top Search panel, change the date filtering to start since the year 2000 (or so) - this way All charges will be included (i.e. not filtered by date). | |||
# Click the drop-down menu in the Find field (upper left side) and select ''Charged Item''. | |||
# Select the Item you want to filter the Charges by (in this case the one you want to delete) | |||
# Click the 'Refresh' button. | |||
# Done. All Charge records linking to this Item will be displayed and you can delete them one by one. | |||
Only after deleting all the Charges that were created with this Item, the system will let you delete the Item.'' | |||
'' | |||
===Items Custom Pricing=== | ===Items Custom Pricing=== | ||
Custom Pricing lets you set special pricing for different Accounts or Contracts. Once you set custom pricing to an Account or Contract, each time you log a Charge for those Accounts or Contracts, | Custom Pricing lets you set special pricing for different Accounts or Contracts. Once you set custom pricing to an Account or Contract, each time you log a Charge for those Accounts or Contracts, RangerMSP automatically pulls up the correct custom price for it. You can also manually adjust the prices while creating a Charge. | ||
'''When should I use Custom Pricing?'''<br>By default the standard employee hourly rates and item prices will be used automatically.<br>You should use custom pricing only when you want to use a different set of prices or rates for a specific Account or Contract. For example when you want to set a global 10% discount for a customer or when you want to set specific custom hourly rates for employees for a specific Account. You then set up a Custom Pricing for the Account or Contract and define the adjustments. | '''When should I use Custom Pricing?'''<br>By default the standard employee hourly rates and item prices will be used automatically.<br>You should use custom pricing only when you want to use a different set of prices or rates for a specific Account or Contract. For example when you want to set a global 10% discount for a customer or when you want to set specific custom hourly rates for employees for a specific Account. You then set up a Custom Pricing for the Account or Contract and define the adjustments. | ||
| Line 75: | Line 158: | ||
You can read more about Custom Pricing in the Custom Pricing section. | You can read more about Custom Pricing in the Custom Pricing section. | ||
===Batch Update Tax Settings=== | |||
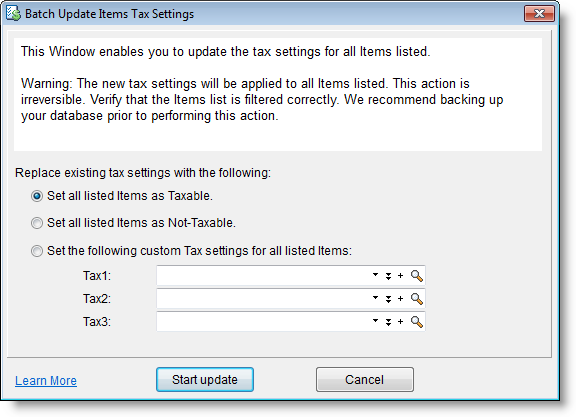
The Batch Update Tax Settings utility allows updating the Tax field settings for many Items at once. You can set new taxes and overwrite any existing settings, replace one tax with another or remove a selected tax. | |||
The new Tax settings will be applied to all Items in the Items window. Note that this action is irreversible so we recommend that you make sure the Items list is filtered correctly before performing the action. It is also recommended to backup your database before proceeding. | |||
To activate the utility: | |||
# In the Items window, filter the Items list to show only the Items you want to update. | |||
# Then and go to Items > Tools > Batch Update Tax Settings. | |||
In the popup window you can choose between the following options: | |||
* Set all listed Items as Taxable | |||
* Set all listed Items as Not-Taxable | |||
* Set the following custom Tax settings for all listed Items. | |||
[[File:Batch-update-item-tax.png|center]] | |||
Remember to [[Backup and Restore FAQ|backup your database]] before performing this action. | |||
==See Also== | |||
*[[Billing]] | |||
*[[Charges]] | |||
*[[Contracts]] | |||
*[[Custom Pricing]] | |||
*[[Import_Items|Importing Items]] | |||
*[[Items FAQ]] | |||
[[Category:User Manuals]] | |||
[[Category:Billing]] | |||
Latest revision as of 08:42, 8 July 2020
Items in RangerMSP are a catalog of all the services and products you offer and their prices. The Items list in RangerMSP acts as your price list. Note that setting the price for an Item is optional; they can be set ad-hoc when using the Item for adding a Charge. For further details see Using Charges.
There are three types of Items in RangerMSP:
- Product/Parts Items: hardware, software, or any other items you ship to your customer. These items have fixed-prices.
- Labor Items: services you provide to your customers, such as server installation, network installation, on-site technician visits, etc. These Items can be priced according to the employee hourly-rate, a fixed hourly-rate or by a fixed-price for the service.
- Expense Items: used to charge expenses, such as travel and special deliveries. Expense Items can have a fixed-price per unit or a fixed hourly rate.
Pricing Methods for Items
Each Item group (Labor, Expense, Part) has slightly different pricing methods and settings. Following are the various pricing methods per Item group.
Labor Item Pricing Methods
For Labor Items, it is possible to define the rate by hours or by units (fixed price).
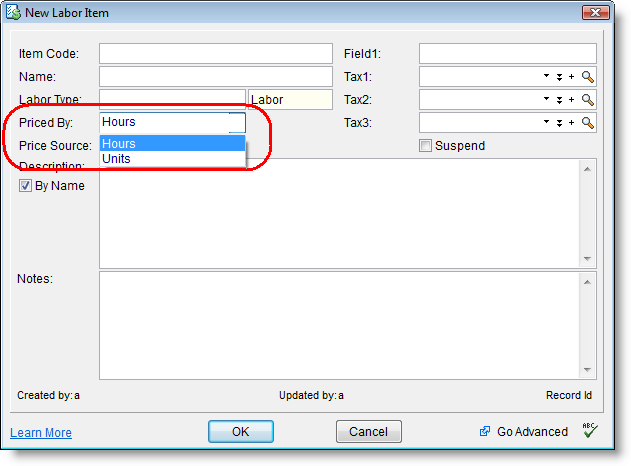
Priced By: Hours (default)
When using Hours as your price source, the Item is priced by the hour. The 'Hours' pricing method is selected by default when creating a new Labor Item, and you can change it in this window.
You can determine the hourly rate in two ways:
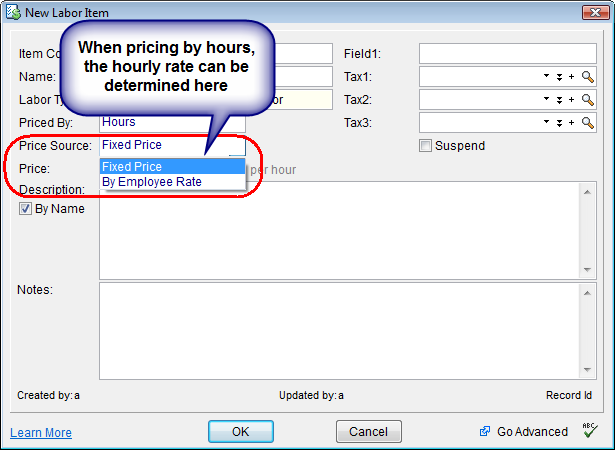
- By Employee Rate (default)
When using By Employee Rate, the employee rate is automatically used for all labor charges added using this Item. The hourly rate of each employee should be determined by their skills and role. These rates are set in the Employee window (under the Employee tab) when viewing employee details. - Fixed Price (Regardless of Employee)
When choosing Fixed Price, the Item’s rate is defined in the Item’s window and is automatically used for all charges added using this Item. The Charge amount is calculated according to the amount of time spent on the job, regardless of the specific employee who performs the work.
Priced By: Units (Fixed-Priced Items)
When using Units as your price source for labor Items, the Item has a fixed price. When using the Item in a Charge, the price is calculated by the quantity entered in the charge, regardless of the amount of time spent on the job.
Use Units as your labor rates when charging on a per-service basis rather than on an hourly basis.
For example, you can have fixed-rates for specific services, such as $50 for printer setup, $60 for PC examination, $1,000 for server installation, etc. In these cases, time does not affect the final charge.
Using Custom Pricing
Note that you may use Custom Pricing to set fixed hourly rates for specific employees or all employees, that will override the Item settings per Account or Contract. You can read more about custom pricing in the Custom Pricing section.
Expense Item Pricing Methods
For Expense Items, it is possible to define the rate by units (fixed price) or by hours.
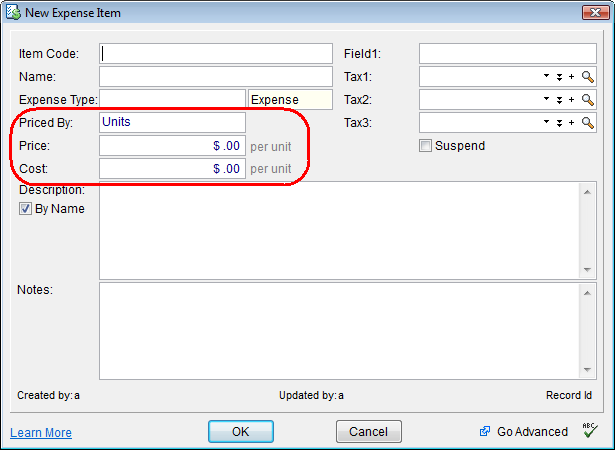
Priced By: Units (default)
When using Units as your price source for Expense Items, the Item has a fixed price. When using the Item in a Charge, the price is calculated by the quantity entered in the charge, regardless of the amount of time spent entered.
Use Units as your expense rates when charging on a per-service basis rather than on an hourly basis.
For example, you can charge your customer for Parking expenses with a fixed price per parking event, regardless of the amount of time the parking was logged with.
The Cost is the price you originally paid for the Expense Item. This will be used when generating expense reports.
Priced By: Hours
When using Hours as your price source, the Item is priced by the hour. The 'Fixed Price' pricing method is selected by default when creating a new Expense Item, and you can change it in this window.
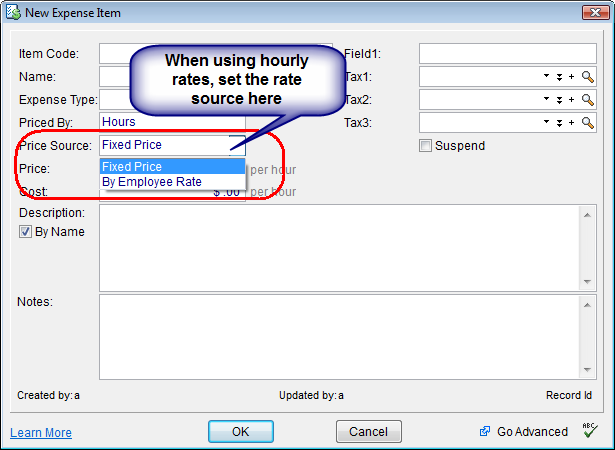
For example, you can charge your customer for Parking expenses with hourly parking expenses, or by charging by the employee rate for this time.
You can determine the hourly rate in two ways:
- By Employee Rate (default)
When using By Employee Rate, the employee rate is automatically used for all expense charges added using this Item. These rates are set in the Employee window (under the Employee tab) when viewing employee details. - Fixed Price (Regardless of Employee)
When choosing Fixed Price, the Item’s rate is defined in the Item’s window and is automatically used for all charges added using this Item. The Charge amount is calculated according to the amount of time spent on the job, regardless of the specific employee who enters the Charge.
Using Custom Pricing
Note that you may use Custom Pricing to set fixed hourly rates for specific employees or all employees, that will override the Item settings per Account or Contract. You can read more about custom pricing in the Custom Pricing section.
Parts Item Pricing Methods
For Product/Part Items, it is possible to define the rate by units (fixed price) only.
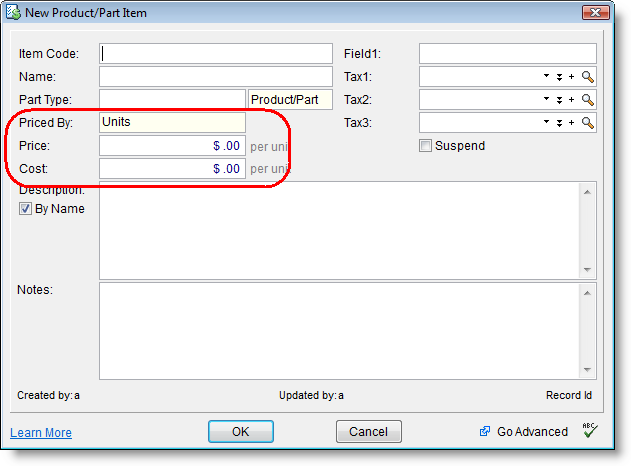
Priced By: Units (default, only option) For Product/Part Items, the Item always has a fixed price. When using the Item in a Charge, the price is calculated by the quantity entered in the charge.
The Cost is the price you originally paid for the Expense Item. This will be used when generating expense reports.
Items Fields
| Field | Description |
|---|---|
| Code (mandatory) | The Item Code is a unique ID for each Item. It can contain numbers, letters and special characters. The Item Code can be used in order to sort and find the Items (e.g. HP-P4200TN). |
| Name
(mandatory) |
Contains a short description of the Item (e.g. "Hp LaserJet Printer 4200 Network Support"). |
| Type | The Item Type is a customizable field which allows you to define a list of possible types. For example Labor Items may include the following types: Consulting, HW Installation, Maintenance etc., while Expense Items may include the following types: Travel, Parking etc. The Item Type list for selection is determined according to the Item group (Labor, Expense or Parts). |
| Pricing Settings |
Pricing settings vary based on the Item Group (i.e. Labor, Expense or Products/Parts), and the pricing method which is selected (By Hours or By Units). Labor: Expense: The Cost is the price you originally paid for the Expense Item. Products/Parts: See more details in Pricing Methods. |
| Suspended | Items can be Active or Suspended. A suspended Item cannot be selected when adding new charges (it is not available in the list of Items for selection). Existing Charges which are using this Item will not be affected.
Suspend an Item when you do not want to sell it anymore or when it's temporarily out of stock. |
| Tax Fields | Using taxes in RangerMSP is optional. By default, the tax option is not activated. To begin using taxes, you first need to set the taxable Accounts and taxable Items. You can read more about taxes in Charging Using Taxes. |
Setting Up Items
You can start working with RangerMSP without setting up any new Items. RangerMSP's default installation includes three pre-defined Items, one for each Item type; (Labor, Expense and Parts). This is designed to make the initial steps with RangerMSP easier.
It is advisable to define your own Items List which will better represent the products and services offered by your business.
Items can be manually defined, or imported from various data sources, including Excel® files, CSV files, QuickBooks®, etc. This way you can import your existing price list into RangerMSP.
Read more about Importing Items from external sources in the Importing Items section.
Read more about setting up the system in the Setup menu.
Deleting Items
Normally if you used an Item you probably do not want to delete it, in order to keep you database complete with all of your history.
Best practice in case you don't want to use an Item anymore is simply to deactivate it by selecting the 'Suspend' checkbox while viewing the Item's details window.
Having said that, if you do want to delete an Item (for example, if it is a test Item that you do not want to affect your database), select the Item in the list, and use right-click > Delete Item option, or the Items > Delete option.
Important Note: Items that are linked to existing Charges cannot be deleted, to keep the data integrity.
In order to delete an item, you should first delete all linked Charges. To find which Charges are linked to this Item:
- Open the main Charges window from the left side pane.
- In the top Search panel, change the date filtering to start since the year 2000 (or so) - this way All charges will be included (i.e. not filtered by date).
- Click the drop-down menu in the Find field (upper left side) and select Charged Item.
- Select the Item you want to filter the Charges by (in this case the one you want to delete)
- Click the 'Refresh' button.
- Done. All Charge records linking to this Item will be displayed and you can delete them one by one.
Only after deleting all the Charges that were created with this Item, the system will let you delete the Item.
Items Custom Pricing
Custom Pricing lets you set special pricing for different Accounts or Contracts. Once you set custom pricing to an Account or Contract, each time you log a Charge for those Accounts or Contracts, RangerMSP automatically pulls up the correct custom price for it. You can also manually adjust the prices while creating a Charge.
When should I use Custom Pricing?
By default the standard employee hourly rates and item prices will be used automatically.
You should use custom pricing only when you want to use a different set of prices or rates for a specific Account or Contract. For example when you want to set a global 10% discount for a customer or when you want to set specific custom hourly rates for employees for a specific Account. You then set up a Custom Pricing for the Account or Contract and define the adjustments.
Once set, the system will automatically use the custom prices or rates instead of the standard ones when Charges are logged under this Account or Contract. When defining a Custom Pricing you can choose between a global custom price level or a per-item price.
You can read more about Custom Pricing in the Custom Pricing section.
Batch Update Tax Settings
The Batch Update Tax Settings utility allows updating the Tax field settings for many Items at once. You can set new taxes and overwrite any existing settings, replace one tax with another or remove a selected tax.
The new Tax settings will be applied to all Items in the Items window. Note that this action is irreversible so we recommend that you make sure the Items list is filtered correctly before performing the action. It is also recommended to backup your database before proceeding.
To activate the utility:
- In the Items window, filter the Items list to show only the Items you want to update.
- Then and go to Items > Tools > Batch Update Tax Settings.
In the popup window you can choose between the following options:
- Set all listed Items as Taxable
- Set all listed Items as Not-Taxable
- Set the following custom Tax settings for all listed Items.
Remember to backup your database before performing this action.