Activity Templates: Difference between revisions
No edit summary |
|||
| (9 intermediate revisions by 3 users not shown) | |||
| Line 1: | Line 1: | ||
An Activity Template in the | {{usermanualsnav}} | ||
An Activity Template in the RangerMSP system is a file that contains a group of pre-programmed activities—such as Tasks, Appointments, or Tickets—that can be applied to different parts of the system, including Accounts, Assets, Contracts, and Sales Opportunities. Users can create Activity Templates for projects that their company commonly performs and which require a similar set of tasks, regardless of the client. Using the right template can get you and your team started on a project more quickly and efficiently, increasing productivity and streamlining your work. | |||
<br><br> | |||
== Overview == | == Overview == | ||
'''What is an Activity Template?'''<br>Many IT companies provide services, such as network installation or server setup, that involve a standard set of steps. Rather than manually create the same steps over and over again for every new project, users can use the Activity Template features of | '''What is an Activity Template?'''<br>Many IT companies provide services, such as network installation or server setup, that involve a standard set of steps. Rather than manually create the same steps over and over again for every new project, users can use the Activity Template features of RangerMSP. | ||
An Activity Template is an entity that contains a group of pre-programmed activities—such as Tasks, Appointments, or Tickets—that can be applied to different parts of the | An Activity Template is an entity that contains a group of pre-programmed activities—such as Tasks, Appointments, or Tickets—that can be applied to different parts of the RangerMSP system, including Accounts, Assets, Contracts, and Sales Opportunities. By applying an Activity Template to a specific project, all of the activities programmed into the template are automatically created for that project and placed into the Pending tab, saving the user valuable time. | ||
Activity Templates can also be created for simpler projects, such as setting up a new laptop, and applied to the relevant Ticket or Asset. | Activity Templates can also be created for simpler projects, such as setting up a new laptop, and applied to the relevant Ticket or Asset. | ||
| Line 13: | Line 19: | ||
For more information on applying Activity Templates, see the Activating the [[Activity Templates#Applying Templates|Applying Templates section]]. | For more information on applying Activity Templates, see the Activating the [[Activity Templates#Applying Templates|Applying Templates section]]. | ||
==Activity Templates Examples== | ==Activity Templates Examples== | ||
The following are examples of how Activity Templates can be used: | The following are examples of how Activity Templates can be used: | ||
'''New PC Setup'''<br>Installing a new PC usually involves a few standard tasks, regardless of the client. In | '''New PC Setup'''<br>Installing a new PC usually involves a few standard tasks, regardless of the client. In RangerMSP, a new PC installation is generally managed under a ticket, which lists all the tasks needed to complete the project. Rather than have its employees spend time manually creating new tasks for every PC installed, a company can create an Activity Template for a Ticket that can be applied every time a new PC needs to be installed. When a user applies this template to a specific ticket, all the tasks automatically appear in the ticket's Pending tab. Before closing the ticket, the system alerts the user if any of these tasks has not been carried out. | ||
Possible template activities include: | Possible template activities include: | ||
| Line 25: | Line 33: | ||
*Task: Test the system. | *Task: Test the system. | ||
'''New Local Network Setup'''<br>A new network installation is a complicated project that usually requires a number of tickets, tasks, and appointments. In | '''New Local Network Setup'''<br>A new network installation is a complicated project that usually requires a number of tickets, tasks, and appointments. In RangerMSP, such a project is generally managed under a contract. In order to create these activities easily, you can use an Activity Template designed specifically for contracts. When the template is applied to a specific contract, the activities appear in the contract's Pending tab, showing all the work necessary to complete the job. | ||
Possible template activities include: | Possible template activities include: | ||
| Line 35: | Line 43: | ||
*Task: Prepare audit document describing network components. | *Task: Prepare audit document describing network components. | ||
'''Monthly Service Contract'''<br>Monthly service contracts often require many types of activities, including tickets, appointments, and tasks, which need to be performed each month as part of an agreement. These activities are generally the same from client to client. A monthly service contract is most likely managed as a contract in the | '''Monthly Service Contract'''<br>Monthly service contracts often require many types of activities, including tickets, appointments, and tasks, which need to be performed each month as part of an agreement. These activities are generally the same from client to client. A monthly service contract is most likely managed as a contract in the RangerMSP system. | ||
In order to easily create these activities (rather than create them manually for each client), you can create an Activity Template. When the template is applied to a specific contract, the activities appear in the contract's Pending tab, displaying all the work necessary to provide your services. In addition, you can link this template to the contract as the contract’s “default template,” meaning that the template is automatically applied when copying or renewing this contract. You can read more about this feature in the [[Activity Templates#Contract Linked Activity Templates|Default Activity Templates section]]. | In order to easily create these activities (rather than create them manually for each client), you can create an Activity Template. When the template is applied to a specific contract, the activities appear in the contract's Pending tab, displaying all the work necessary to provide your services. In addition, you can link this template to the contract as the contract’s “default template,” meaning that the template is automatically applied when copying or renewing this contract. You can read more about this feature in the [[Activity Templates#Contract Linked Activity Templates|Default Activity Templates section]]. | ||
| Line 44: | Line 52: | ||
*Task: Call the customer and discuss open issues, 7 days before the contract’s End Date. | *Task: Call the customer and discuss open issues, 7 days before the contract’s End Date. | ||
'''New Prospect Opportunity'''<br>Following up on prospective customers is an important part of running any business and can often determine whether you succeed in bringing in new clients or not. In order to properly monitor new prospects and perform effective follow-up, most companies have a standard set of follow-up tasks, which can be managed under an opportunity in the | '''New Prospect Opportunity'''<br>Following up on prospective customers is an important part of running any business and can often determine whether you succeed in bringing in new clients or not. In order to properly monitor new prospects and perform effective follow-up, most companies have a standard set of follow-up tasks, which can be managed under an opportunity in the RangerMSP system. | ||
Because most follow-up involves a similar set of activities, regardless of the client, the easiest way to create a new opportunity is by applying an Activity Template. After a template is applied to a specific opportunity, all these activities appear in the opportunity's Pending tab, including phone calls which should take place, e-mails which should be sent, etc. | Because most follow-up involves a similar set of activities, regardless of the client, the easiest way to create a new opportunity is by applying an Activity Template. After a template is applied to a specific opportunity, all these activities appear in the opportunity's Pending tab, including phone calls which should take place, e-mails which should be sent, etc. | ||
| Line 58: | Line 66: | ||
To create a new template, click on the '''New''' button at the top left-hand corner of this window, and the following window opens: | To create a new template, click on the '''New''' button at the top left-hand corner of this window, and the following window opens: | ||
[[File: | [[File:activity_templates_new.gif|center]] | ||
In this window you should enter the basic information about the Activity Template. All the fields in this window are mandatory. Below is an explanation of the fields in this window. | In this window you should enter the basic information about the Activity Template. All the fields in this window are mandatory. Below is an explanation of the fields in this window. | ||
| Line 66: | Line 74: | ||
*'''Status''': Activity Templates can be set as active or inactive. The Status is displayed in the Templates List. The system does not allow users to apply inactive Activity Templates. | *'''Status''': Activity Templates can be set as active or inactive. The Status is displayed in the Templates List. The system does not allow users to apply inactive Activity Templates. | ||
*'''Type''': The Type button determines which entity in the | *'''Type''': The Type button determines which entity in the RangerMSP system (Accounts, Assets, Contracts, Tickets, Opportunities) the Activity Template applies to. An “Account Activity Template” is a template that can be applied to Accounts; a “Ticket Activity Template” is a template that can be applied to Tickets, etc.<br><BR>The Type field is an important classification, as there are slight differences in the activities (and activity features) that may be assigned to each Activity Template Type. | ||
After completing these fields, click the OK button. An Activity Template has now been created, and the template’s Details window appears: | After completing these fields, click the OK button. An Activity Template has now been created, and the template’s Details window appears: | ||
[[File: | [[File:activity_templates_new_details.gif|center]] | ||
There are two tabs in this window. In the General tab, most of the basic information about the template appears. (This information was entered in the previous window.) | There are two tabs in this window. In the General tab, most of the basic information about the template appears. (This information was entered in the previous window.) | ||
In the center of the General tab is the Entries List. This is an important section of an Activity Template. In | In the center of the General tab is the Entries List. This is an important section of an Activity Template. In RangerMSP Activity Templates, the term “entry” is a general phrase that refers to a specific activity assigned to an Activity Template. An activity “entry” can be a Task, Appointment, or Ticket. | ||
The Entries List displays a complete list of all the entries already assigned to the template. | The Entries List displays a complete list of all the entries already assigned to the template. | ||
[[File: | [[File:activity_templates_entries_tab.gif|center]] | ||
You can also create new entries from this window. To create a new entry, click the New button at the bottom-left corner of the Entries tab. A pop-up menu then appears from which you should choose to create a Task, Appointment, or Ticket entry. | You can also create new entries from this window. To create a new entry, click the New button at the bottom-left corner of the Entries tab. A pop-up menu then appears from which you should choose to create a Task, Appointment, or Ticket entry. | ||
| Line 87: | Line 95: | ||
In the '''Notes tab''' you may add details about the template, such as a more specific description of when the template should be used: | In the '''Notes tab''' you may add details about the template, such as a more specific description of when the template should be used: | ||
[[File: | [[File:activity_templates_notes_tab.gif|center]] | ||
These details are also displayed in the Activity Templates List. In addition, this tab contains some administrative information about the template, including the date the template was first created, who created the template, and when it was last updated. | These details are also displayed in the Activity Templates List. In addition, this tab contains some administrative information about the template, including the date the template was first created, who created the template, and when it was last updated. | ||
| Line 129: | Line 137: | ||
#Open the entity to which you want to apply a template (i.e. Account, Asset, Contract, Ticket, or Opportunity). | #Open the entity to which you want to apply a template (i.e. Account, Asset, Contract, Ticket, or Opportunity). | ||
#Go to the Pending tab, click the '''New''' button, and select '''Apply Activity Template'''. The image below displays how this appears in a Contract window.<br><br>[[File: | #Go to the Pending tab, click the '''New''' button, and select '''Apply Activity Template'''. The image below displays how this appears in a Contract window.<br><br>[[File:activity_templates_apply_menu.gif|center]]<br> | ||
#The Activity Templates Wizard now opens. A list of all active Activity Templates for the current Type (i.e. Accounts, Contracts, Ticket, etc.) is displayed. Highlight the template you want to use, then click Next.<br><BR>Once a template is selected but before proceeding to the next step, the system performs some validity checks to verify that the selected template can be applied to the entity you’ve chosen. This includes verifying that all the necessary data fields in the entity itself are filled. Should a required field not be defined, an error message is displayed with an explanation of the problem, and the template will not be applied. For more details, see the [[Activity Templates#Making Sure Data Fields are Initialized|Making Sure Data Fields Are Initialized]] section below.<br><BR>[[File: | #The Activity Templates Wizard now opens. A list of all active Activity Templates for the current Type (i.e. Accounts, Contracts, Ticket, etc.) is displayed. Highlight the template you want to use, then click Next.<br><BR>Once a template is selected but before proceeding to the next step, the system performs some validity checks to verify that the selected template can be applied to the entity you’ve chosen. This includes verifying that all the necessary data fields in the entity itself are filled. Should a required field not be defined, an error message is displayed with an explanation of the problem, and the template will not be applied. For more details, see the [[Activity Templates#Making Sure Data Fields are Initialized|Making Sure Data Fields Are Initialized]] section below.<br><BR>[[File:activity_templates_apply_select.gif|center]]<br><br>After the system has completed this check, the wizard moves on to the next step, and the template’s “Activities List” is displayed. The Activities List is a preview of all the activities defined in the template. Each activity appears on a separate line.<br><BR>[[File:activity_templates_apply_activities.gif|center]]<br> | ||
#The following information is displayed for each activity in the Activities List: | #The following information is displayed for each activity in the Activities List: | ||
#*Type | #*Type | ||
| Line 144: | Line 152: | ||
#*'''Note'''<br>This column displays special notes regarding the adjustment of the activity. The reason for any automatic adjustment (such as the Date and Employee) is displayed in this column. You can decide to change the adjusted value explicitly for this activity by double-clicking the activity line (see Step 5 below). After updating the activity line, the entry will be “accepted,” and the note will be removed.<br><br> | #*'''Note'''<br>This column displays special notes regarding the adjustment of the activity. The reason for any automatic adjustment (such as the Date and Employee) is displayed in this column. You can decide to change the adjusted value explicitly for this activity by double-clicking the activity line (see Step 5 below). After updating the activity line, the entry will be “accepted,” and the note will be removed.<br><br> | ||
#*'''Description'''<br>The Description in the Activities List appears exactly as entered in the Description field of the template entry.<br><br>Note that the Description field for Tasks and Appointments may contain Account information about the specific entity to which you are applying the template, if the template was defined to so. Including this information can be helpful when exporting information to Outlook.<br><br> | #*'''Description'''<br>The Description in the Activities List appears exactly as entered in the Description field of the template entry.<br><br>Note that the Description field for Tasks and Appointments may contain Account information about the specific entity to which you are applying the template, if the template was defined to so. Including this information can be helpful when exporting information to Outlook.<br><br> | ||
#To update the Employee, Date, or Time of an entry, double-click the activity line. The following window then opens.<br><br>[[File: | #To update the Employee, Date, or Time of an entry, double-click the activity line. The following window then opens.<br><br>[[File:activity_templates_apply_update_entry.gif|center]]<br>Enter the desired changes and click Save. Your changes have now been made.<br> | ||
#You can also choose not to apply a specific activity by clicking on the checkbox next to the activity. This de-selects the activity. By default, all activities are selected. | #You can also choose not to apply a specific activity by clicking on the checkbox next to the activity. This de-selects the activity. By default, all activities are selected. | ||
#After reviewing all the activities, verifying the data, and making any necessary changes, click the Add button at the bottom of the window to create the activities. | #After reviewing all the activities, verifying the data, and making any necessary changes, click the Add button at the bottom of the window to create the activities. | ||
| Line 150: | Line 158: | ||
That's it! You can now see the newly created Tasks, Appointments, and Tickets in the Pending tab of the entity to which you have applied the template, and you can go on working with these activities just as you would with any other activity. | That's it! You can now see the newly created Tasks, Appointments, and Tickets in the Pending tab of the entity to which you have applied the template, and you can go on working with these activities just as you would with any other activity. | ||
[[File: | [[File:activity_templates_apply_pending_tab.gif|center]] | ||
====Making Sure Data Fields are Initialized==== | ====Making Sure Data Fields are Initialized==== | ||
| Line 157: | Line 165: | ||
In order for an Activity Template to be applied successfully, any information used as a reference point in one its entries must be entered into the entity (Contract, Asset, Ticket, etc.) to which the template is being applied. For example, if a Task Date in a Tickets template is defined as “2 days before the Due Date,” but the ticket to which the template is being applied does not have a Due Date defined, then applying the template will fail. | In order for an Activity Template to be applied successfully, any information used as a reference point in one its entries must be entered into the entity (Contract, Asset, Ticket, etc.) to which the template is being applied. For example, if a Task Date in a Tickets template is defined as “2 days before the Due Date,” but the ticket to which the template is being applied does not have a Due Date defined, then applying the template will fail. | ||
[[File: | [[File:activity_templates_apply_entry_with_due_date.gif|center]] | ||
In order to avoid such problems, the Activity Template Wizard which applies the template, verifies that the template can actually be applied to the selected entity, and it does not allow the user to select a template that makes reference to fields that are not initialized. If the system determines that a template cannot be applied to a specific entity, it displays an error message with an explanation for this failure. | In order to avoid such problems, the Activity Template Wizard which applies the template, verifies that the template can actually be applied to the selected entity, and it does not allow the user to select a template that makes reference to fields that are not initialized. If the system determines that a template cannot be applied to a specific entity, it displays an error message with an explanation for this failure. | ||
| Line 191: | Line 199: | ||
#Click '''Delete''' from the Activity Templates menu. | #Click '''Delete''' from the Activity Templates menu. | ||
<u>Note:</u> If the template you wish to delete has been assigned to a contract as a Linked Activity Template, the system will not allow for the template to be deleted. For more information about Linked Activity Templates, see the [[Activity Templates#Contract Linked Activity Templates|Linked Activity Templates]] section. | <u>Note:</u> If the template you wish to delete has been assigned to a contract as a Linked Activity Template, the system will not allow for the template to be deleted. For more information about Linked Activity Templates, see the [[Activity Templates#Contract Linked Activity Templates|Linked Activity Templates]] section. | ||
<br><br> | |||
==Sharing Activity Templates== | |||
Starting with RangerMSP 5.4 you can easily share Activity Templates with other RangerMSP users, using a dedicated forum. | |||
Each of the shared Activity Templates can be exported to a file, and uploaded to a community sharing forum, so other users can download it and use in RangerMSP. | |||
By sharing your work you’ll help other members, and you’ll enjoy other members work. This can save you tremendous amount of time as you can take advantage of a lot of work already invested by other users creating templates which may be very well-suited for your needs. All templates can then be further adjusted like any other Activity Template, to fit your specific requirements. | |||
For further instructions on how to export and import Activity Templates, refer to the Activity Templates Sharing Center forum ( [http://{{SERVERNAME}}/forum/showthread.php?t=1548 Enter Activity Templates Sharing Center].) | |||
<br><br> | |||
==Contract Linked Activity Templates== | ==Contract Linked Activity Templates== | ||
Each contract in the | Each contract in the RangerMSP system can be assigned a "Linked Activity Template." This template can be linked to a contract and applied whenever a user copies this contract to a new date range or creates a new contract based on the contract to which the template is assigned. | ||
| Line 209: | Line 228: | ||
'''How do I assign a Default Activity Template to a Contract?'''<br>To assign a Linked Activity Template to a contract, go to the Contract's Details tab and click on the Linked Activity Template field. A pull-down menu appears, allowing you to select any active Contract Activity Template. | '''How do I assign a Default Activity Template to a Contract?'''<br>To assign a Linked Activity Template to a contract, go to the Contract's Details tab and click on the Linked Activity Template field. A pull-down menu appears, allowing you to select any active Contract Activity Template. | ||
[[File: | [[File:activity_templates_contract_default_template.gif|center]] | ||
Once a Linked Activity Template is assigned to a contract, it can be applied whenever the contract is copied. You can read more about this in Copying Contracts With Linked Activity Templates (the next section). | Once a Linked Activity Template is assigned to a contract, it can be applied whenever the contract is copied. You can read more about this in Copying Contracts With Linked Activity Templates (the next section). | ||
| Line 215: | Line 234: | ||
===Copying Contracts With Linked Activity Templates=== | ===Copying Contracts With Linked Activity Templates=== | ||
In the | In the RangerMSP system, users may choose to copy a contract in order to create a new contract based on the original one, or they may copy a contract in order to renew it for the next date range. If there are many contracts to renew, users can use the Batch Copy Wizard, which easily copies/renews many contracts at one time. | ||
To learn more about the different options and features related to copying contracts, you should review the [[Charges]] manual, chapter [[Contracts#Copying Contracts]]. The following section assumes you are already familiar with copying contracts. | To learn more about the different options and features related to copying contracts, you should review the [[Charges]] manual, chapter [[Contracts#Copying Contracts]]. The following section assumes you are already familiar with copying contracts. | ||
| Line 223: | Line 242: | ||
After making this selection, the “Copy Contract” window opens, which guides the user through the steps needed to copy the contract. As one of these steps, the following window opens: | After making this selection, the “Copy Contract” window opens, which guides the user through the steps needed to copy the contract. As one of these steps, the following window opens: | ||
[[File: | [[File:activity_templates_copy_single.gif|center]] | ||
In this screen you can easily select whether to apply the Linked Activity Template or not. | In this screen you can easily select whether to apply the Linked Activity Template or not. | ||
| Line 230: | Line 249: | ||
'''Batch Copy Contracts to a New Date Range'''<br>If you have many recurring contracts to renew, you can use the Batch Copy Wizard, which easily copies/renews many contracts at one time. This wizard includes a few steps, such as selecting the contracts to be renewed, date ranges, and more. One of the steps in this wizard refers to Linked Activity Templates. | '''Batch Copy Contracts to a New Date Range'''<br>If you have many recurring contracts to renew, you can use the Batch Copy Wizard, which easily copies/renews many contracts at one time. This wizard includes a few steps, such as selecting the contracts to be renewed, date ranges, and more. One of the steps in this wizard refers to Linked Activity Templates. | ||
[[File: | [[File:activity_templates_batch_copy_contracts.gif|center]] | ||
In this step you can decide whether to automatically apply the Linked Activity Templates of the original contracts to all of the new contracts you are about to create using this wizard. | In this step you can decide whether to automatically apply the Linked Activity Templates of the original contracts to all of the new contracts you are about to create using this wizard. | ||
| Line 239: | Line 258: | ||
==Activity Template Privileges== | ==Activity Template Privileges== | ||
In order to apply, create, or edit Activity Templates, users must be assigned certain privileges. The | In order to apply, create, or edit Activity Templates, users must be assigned certain privileges. The RangerMSP system allows for different levels of privileges for Activity Templates. | ||
'''Basic Privileges'''<br>A system administrator can assign these privileges by going to File > User & Privileges > Privileges. | '''Basic Privileges'''<br>A system administrator can assign these privileges by going to File > User & Privileges > Privileges. | ||
[[File: | [[File:activity_templates_privileges_general.gif|center]] | ||
The Privileges window lists a separate line for Activity Templates. Like all privileges in the | The Privileges window lists a separate line for Activity Templates. Like all privileges in the RangerMSP system ([[Employees#Employee Privileges Group|click here for general information on using privileges in RangerMSP]]), the system administrator can assign the user privileges to View, Edit, or Delete. Below is an explanation of what these privileges mean in reference to Activity Templates privilege: | ||
*View: The user can view templates but not update them. This privilege is required for a user to be able to apply a template. | *View: The user can view templates but not update them. This privilege is required for a user to be able to apply a template. | ||
| Line 253: | Line 272: | ||
'''Advanced'''<br>In certain situations, the user applying a template might not have the privileges to add Tasks, Appointments, or Tickets to other employees (click here for more details on the various privileges available in | '''Advanced'''<br>In certain situations, the user applying a template might not have the privileges to add Tasks, Appointments, or Tickets to other employees (click here for more details on the various privileges available in RangerMSP). Nevertheless, such a user can apply a template successfully, thereby adding Tasks, Appointments, or Tickets to other employees. This is the default setting of the system. | ||
For example, when closing a ticket, a technician may want to apply a template that assigns a Task to the secretary to follow up with a client in a week and assigns another Task to the accounting manager to issue an invoice. Even if this technician does not have privileges to see other employees’ Tasks and Appointments, he can still apply a template, thereby assigning these activities to other employees. | For example, when closing a ticket, a technician may want to apply a template that assigns a Task to the secretary to follow up with a client in a week and assigns another Task to the accounting manager to issue an invoice. Even if this technician does not have privileges to see other employees’ Tasks and Appointments, he can still apply a template, thereby assigning these activities to other employees. | ||
| Line 259: | Line 278: | ||
The system administrator can further restrict a user’s privileges in these circumstances by going to Tools > Options > Activity Templates (Note: this is a different area than the regular Privileges section of the system): | The system administrator can further restrict a user’s privileges in these circumstances by going to Tools > Options > Activity Templates (Note: this is a different area than the regular Privileges section of the system): | ||
[[File: | [[File:activity_templates_privileges.gif|center]] | ||
In this window the administrator can check either of the following boxes: | In this window the administrator can check either of the following boxes: | ||
Latest revision as of 07:41, 8 July 2020
An Activity Template in the RangerMSP system is a file that contains a group of pre-programmed activities—such as Tasks, Appointments, or Tickets—that can be applied to different parts of the system, including Accounts, Assets, Contracts, and Sales Opportunities. Users can create Activity Templates for projects that their company commonly performs and which require a similar set of tasks, regardless of the client. Using the right template can get you and your team started on a project more quickly and efficiently, increasing productivity and streamlining your work.
Overview
What is an Activity Template?
Many IT companies provide services, such as network installation or server setup, that involve a standard set of steps. Rather than manually create the same steps over and over again for every new project, users can use the Activity Template features of RangerMSP.
An Activity Template is an entity that contains a group of pre-programmed activities—such as Tasks, Appointments, or Tickets—that can be applied to different parts of the RangerMSP system, including Accounts, Assets, Contracts, and Sales Opportunities. By applying an Activity Template to a specific project, all of the activities programmed into the template are automatically created for that project and placed into the Pending tab, saving the user valuable time.
Activity Templates can also be created for simpler projects, such as setting up a new laptop, and applied to the relevant Ticket or Asset.
How are Activity Templates created and applied?
Activity Templates can be created by selecting the “Activity Templates…” option from the Settings menu. Companies may choose to create Activity Templates in advance for specific projects, saving their employees time at the start of an actual project. For more information about creating Activity Templates, see the Creating New Activity Templates section of this manual.
To apply an Activity Template, users should go to the Pending tab of the entity to which they wish to apply the template (i.e., the Account, Asset, Contract, Ticket, or Opportunity) and click the New button. They should then select the “Apply Activity Template” option, which applies the template using a wizard. This wizard walks the user through creating all the activities pre-programmed in the template.
For more information on applying Activity Templates, see the Activating the Applying Templates section.
Activity Templates Examples
The following are examples of how Activity Templates can be used:
New PC Setup
Installing a new PC usually involves a few standard tasks, regardless of the client. In RangerMSP, a new PC installation is generally managed under a ticket, which lists all the tasks needed to complete the project. Rather than have its employees spend time manually creating new tasks for every PC installed, a company can create an Activity Template for a Ticket that can be applied every time a new PC needs to be installed. When a user applies this template to a specific ticket, all the tasks automatically appear in the ticket's Pending tab. Before closing the ticket, the system alerts the user if any of these tasks has not been carried out.
Possible template activities include:
- Task: Build PC according to hardware specifications.
- Task: Install operating system.
- Task: Install antivirus software.
- Task: Test the system.
New Local Network Setup
A new network installation is a complicated project that usually requires a number of tickets, tasks, and appointments. In RangerMSP, such a project is generally managed under a contract. In order to create these activities easily, you can use an Activity Template designed specifically for contracts. When the template is applied to a specific contract, the activities appear in the contract's Pending tab, showing all the work necessary to complete the job.
Possible template activities include:
- Appointment: On-site visit for general planning
- Ticket: Install network cables.
- Ticket: Set up and install switch.
- Ticket: Set up and install router.
- Ticket: Set up and install firewall.
- Task: Prepare audit document describing network components.
Monthly Service Contract
Monthly service contracts often require many types of activities, including tickets, appointments, and tasks, which need to be performed each month as part of an agreement. These activities are generally the same from client to client. A monthly service contract is most likely managed as a contract in the RangerMSP system.
In order to easily create these activities (rather than create them manually for each client), you can create an Activity Template. When the template is applied to a specific contract, the activities appear in the contract's Pending tab, displaying all the work necessary to provide your services. In addition, you can link this template to the contract as the contract’s “default template,” meaning that the template is automatically applied when copying or renewing this contract. You can read more about this feature in the Default Activity Templates section.
Possible template activities include:
- Ticket: Remote login to the server to monitor the event logs—due 5 days after the contract’s Start Date.
- Appointment: preventive on-site visit for general maintenance and support, 15 days after the contract’s Start Date.
- Task: Call the customer and discuss open issues, 7 days before the contract’s End Date.
New Prospect Opportunity
Following up on prospective customers is an important part of running any business and can often determine whether you succeed in bringing in new clients or not. In order to properly monitor new prospects and perform effective follow-up, most companies have a standard set of follow-up tasks, which can be managed under an opportunity in the RangerMSP system.
Because most follow-up involves a similar set of activities, regardless of the client, the easiest way to create a new opportunity is by applying an Activity Template. After a template is applied to a specific opportunity, all these activities appear in the opportunity's Pending tab, including phone calls which should take place, e-mails which should be sent, etc.
Possible template activities include:
- Task: Make initial phone call with prospective client, same day as the opportunity is opened.
- Task: Prepare and send proposal, same day as the opportunity is opened.
- Task: Follow up on proposal, 3 days after the opportunity’s Open Date.
Creating New Activity Templates
To create an Activity Template, go to Settings from the main menu and select the “Activity Templates” option. This opens the Activity Templates management window, where you can see a list of Activity Templates.
To create a new template, click on the New button at the top left-hand corner of this window, and the following window opens:
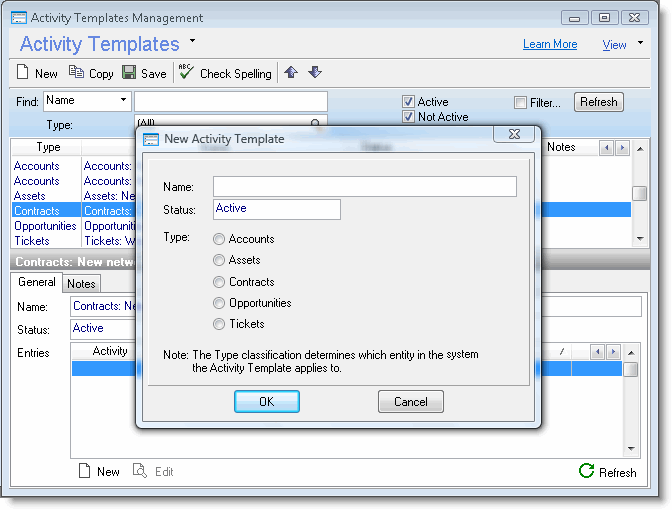
In this window you should enter the basic information about the Activity Template. All the fields in this window are mandatory. Below is an explanation of the fields in this window.
- Name: In this field you should enter a name that clearly identifies the cases in which the template should be used. The name should also make the template easy to identify in the Templates List. A template’s Name field must be unique. The system does not allow for two Activity Templates with the same name.
- Status: Activity Templates can be set as active or inactive. The Status is displayed in the Templates List. The system does not allow users to apply inactive Activity Templates.
- Type: The Type button determines which entity in the RangerMSP system (Accounts, Assets, Contracts, Tickets, Opportunities) the Activity Template applies to. An “Account Activity Template” is a template that can be applied to Accounts; a “Ticket Activity Template” is a template that can be applied to Tickets, etc.
The Type field is an important classification, as there are slight differences in the activities (and activity features) that may be assigned to each Activity Template Type.
After completing these fields, click the OK button. An Activity Template has now been created, and the template’s Details window appears:
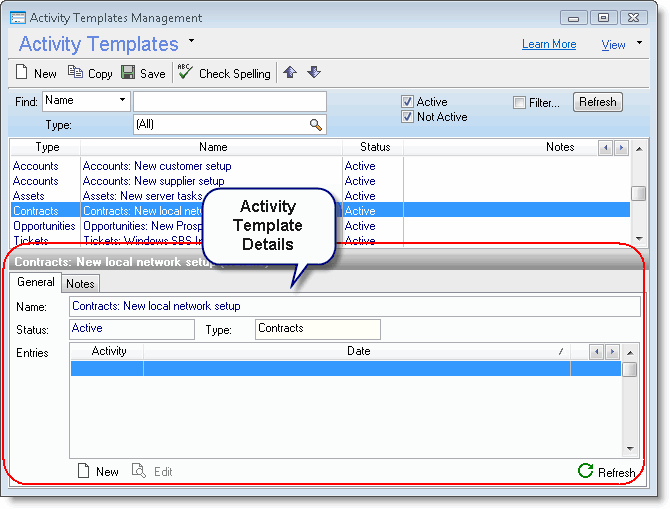
There are two tabs in this window. In the General tab, most of the basic information about the template appears. (This information was entered in the previous window.)
In the center of the General tab is the Entries List. This is an important section of an Activity Template. In RangerMSP Activity Templates, the term “entry” is a general phrase that refers to a specific activity assigned to an Activity Template. An activity “entry” can be a Task, Appointment, or Ticket.
The Entries List displays a complete list of all the entries already assigned to the template.
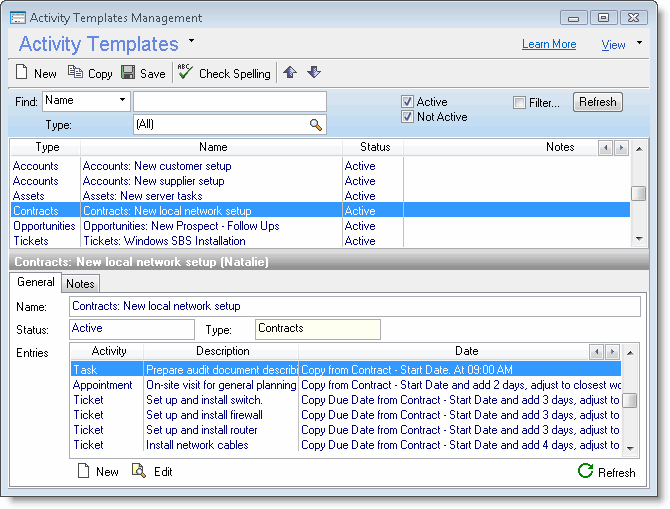
You can also create new entries from this window. To create a new entry, click the New button at the bottom-left corner of the Entries tab. A pop-up menu then appears from which you should choose to create a Task, Appointment, or Ticket entry.
Note: In Ticket and Opportunity Activity Templates, users are given the option of creating Task or Appointment entries only. The system does not allow for Ticket entries in either Ticket or Opportunity Activity Templates.
After choosing which type of entry to create, a Details window opens. This window varies according to the activity and template Type. The different activities and template Types are explained in detail in the following sections of this manual. In the Notes tab you may add details about the template, such as a more specific description of when the template should be used:
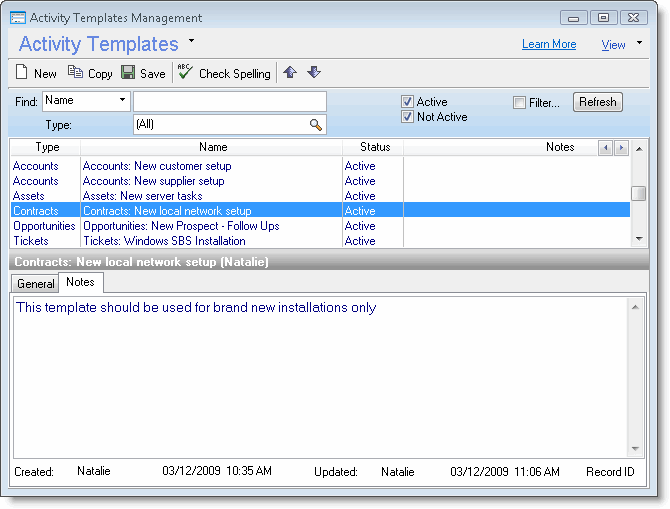
These details are also displayed in the Activity Templates List. In addition, this tab contains some administrative information about the template, including the date the template was first created, who created the template, and when it was last updated.
Creating Activity Entries for Accounts
To create a new entry in an Account Activity Template, go to the Entries tab of the template and click on the New button in the bottom-left corner. A pop-up menu now appears where you can select “Task,” “Appointment,” or “Ticket.”
See Activity Templates for Accounts.
Creating Activity Entries for Assets
To create a new entry in an Asset Activity Template, go to the Entries tab of the template and click on the New button in the bottom-left corner. A pop-up menu now appears where you can select “Task,” “Appointment,” or “Ticket.”
See Activity Templates for Assets.
Creating Activity Entries for Contracts
Note: Before reading this section, we recommend reviewing the Billing section, with particular attention paid to the Contracts section.
To create a new entry in an Contract Activity Template, go to the Entries tab of the template and click on the New button in the bottom-left corner. A pop-up menu now appears where you can select “Task,” “Appointment,” or “Ticket.”
See Activity Templates for Contracts.
Creating Activity Entries for Tickets
To create a new entry in a Ticket Activity Template, go to the Entries tab of the template and click on the New button in the bottom-left corner. A pop-up menu now appears where you can select either “Task” or “Appointment.”
See Activity Templates for Tickets.
Creating Activity Entries for Opportunities
To create a new entry in an Opportunity Activity Template, go to the Entries tab of the template and click on the New button in the bottom-left corner. A pop-up menu now appears where you can select either “Task” or “Appointment.”
See Activity Templates for Opportunities.
Applying Templates
Applying an Activity Template creates the activities (Tasks, Appointments, and Tickets) based on the entries defined in the template. All newly created activities are linked to the entity to which you have applied the template. Using the right template can get you and your team started on a project more quickly and efficiently.
Applying a template starts with selecting the Activity Template you wish to apply. You can then review the activities to be created, select whether or not to create each activity, and update activity Dates or Employees, if needed. Once the data is reviewed, the user authorizes the system to apply the template, thereby creating all the activities. To make this process easier, applying Activity Templates is done using a wizard. See the following sections for detailed description of this process.
Activating the Activity Templates Wizard
Activating the Activity Templates Wizard is done from the Pending tab of the entity to which you want to apply the template. Applying a template creates the Tasks, Appointments, and Tickets as defined in the template entries. All activities created from a template are placed in the Pending tab.
To apply a template, follow these steps:
- Open the entity to which you want to apply a template (i.e. Account, Asset, Contract, Ticket, or Opportunity).
- Go to the Pending tab, click the New button, and select Apply Activity Template. The image below displays how this appears in a Contract window.

- The Activity Templates Wizard now opens. A list of all active Activity Templates for the current Type (i.e. Accounts, Contracts, Ticket, etc.) is displayed. Highlight the template you want to use, then click Next.
Once a template is selected but before proceeding to the next step, the system performs some validity checks to verify that the selected template can be applied to the entity you’ve chosen. This includes verifying that all the necessary data fields in the entity itself are filled. Should a required field not be defined, an error message is displayed with an explanation of the problem, and the template will not be applied. For more details, see the Making Sure Data Fields Are Initialized section below.
After the system has completed this check, the wizard moves on to the next step, and the template’s “Activities List” is displayed. The Activities List is a preview of all the activities defined in the template. Each activity appears on a separate line.
- The following information is displayed for each activity in the Activities List:
- Type
- Date
- From Time
- Employee
- Note
- Description
The information in the Activities List has already been calculated according to the parameters entered into the template and it is a preview to how activities will appear when the template is applied.
At this point, the user should review the information in the Activities List. Many of the fields can be edited. This allows the user to tweak the entries Before creating the actual activities.
Below is an explanation of each column in the Activities List. - Type
This column lists whether the activity is a Task, Appointment, or Ticket. This column cannot be edited. - Date
The date for an activity is calculated according to the entry definitions in the template. In certain cases a date may be adjusted by the system, such as when a date is calculated to fall out on a weekend. If the system does adjust a date, the new date appears in red, and the reason for the change appears in the Notes column, to the right.
In other cases, the parameters of an entry may cause the system to calculate a date that has already passed. For example, the entry can define a date as "3 days before Due Date," but the Due Date is only one day away. In such a situation, the date in the Activities List is displayed in red, with an explanation in the Notes column. You can adjust a date manually by double-clicking the activity line (see Step 5 below) and updating the data. After updating the activity details, the date is “accepted,” and the note is removed. - From Time
The activity Time is determined according to the settings in the Activity Template. You can update the Time for this activity by double-clicking the activity line (see Step 5 below). - Employee
The Employee appearing in the Activities List is calculated according to the entry definitions in the template. In certain situations, the system automatically adjusts the Employee. For example, if a specific employee is selected for the entry but the employee is no longer an Active Employee in the system, then the employee applying the template is automatically listed as the Employee.
In these situations, the new name appears in red, and the reason for the change is listed in the Notes column, to the right. Users can edit this field by double-clicking on the activity (see Step 5). - Note
This column displays special notes regarding the adjustment of the activity. The reason for any automatic adjustment (such as the Date and Employee) is displayed in this column. You can decide to change the adjusted value explicitly for this activity by double-clicking the activity line (see Step 5 below). After updating the activity line, the entry will be “accepted,” and the note will be removed. - Description
The Description in the Activities List appears exactly as entered in the Description field of the template entry.
Note that the Description field for Tasks and Appointments may contain Account information about the specific entity to which you are applying the template, if the template was defined to so. Including this information can be helpful when exporting information to Outlook.
- To update the Employee, Date, or Time of an entry, double-click the activity line. The following window then opens.

Enter the desired changes and click Save. Your changes have now been made. - You can also choose not to apply a specific activity by clicking on the checkbox next to the activity. This de-selects the activity. By default, all activities are selected.
- After reviewing all the activities, verifying the data, and making any necessary changes, click the Add button at the bottom of the window to create the activities.
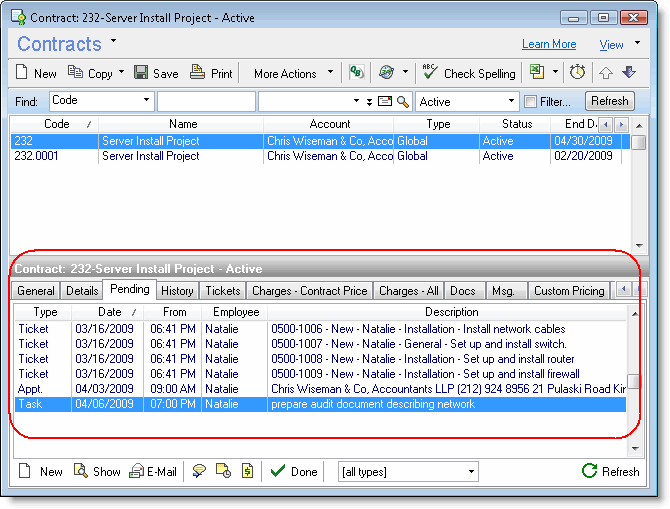
That's it! You can now see the newly created Tasks, Appointments, and Tickets in the Pending tab of the entity to which you have applied the template, and you can go on working with these activities just as you would with any other activity.
Making Sure Data Fields are Initialized
When an Activity Template is applied, certain fields are calculated according to a reference point defined in the template’s entries. For example, you may define a Task Date in a Tickets template as “2 days before the Due Date.”
In order for an Activity Template to be applied successfully, any information used as a reference point in one its entries must be entered into the entity (Contract, Asset, Ticket, etc.) to which the template is being applied. For example, if a Task Date in a Tickets template is defined as “2 days before the Due Date,” but the ticket to which the template is being applied does not have a Due Date defined, then applying the template will fail.
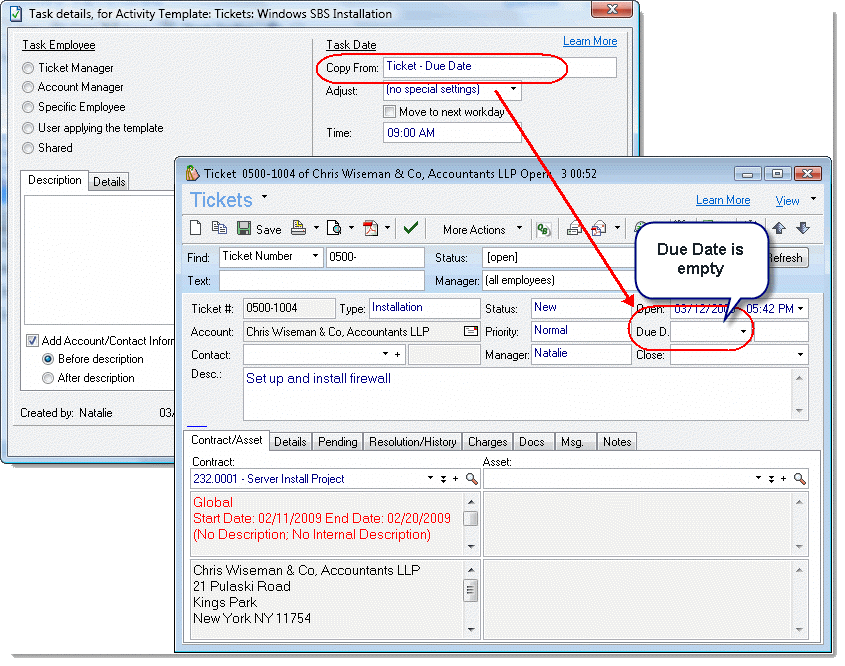
In order to avoid such problems, the Activity Template Wizard which applies the template, verifies that the template can actually be applied to the selected entity, and it does not allow the user to select a template that makes reference to fields that are not initialized. If the system determines that a template cannot be applied to a specific entity, it displays an error message with an explanation for this failure.
Editing, Copying, and Deleting Templates
Editing templates
Should the parameters of an activity change after you’ve created a template, you may edit the template accordingly. Changes made to a template only take effect the next time you apply the template. Editing has no effect on any of the activities already created using this template.
To edit a template, follow the steps below:
- Open the Activity Templates List from Settings > Activity Templates.
- Select the template to be edited from the list and double click it. This opens the template details.
- Make changes to the template, then click Save.
Copying a Template
Copying a template can help you create new templates quickly by copying the basic activity entries and then editing the new template to your needs. Template details are copied together with all the existing activity entries.
To copy a template, follow the steps below:
- Open the Activities Templates list from Settings > Activity Templates.
- Highlight the template you want to copy.
- Click the Copy button on the toolbar.
- Give a name to the new template.
- Press Save.
Note: A Contract's Linked Activity Templates can be useful for situations in which you want to copy a contract with all its data (the block terms, contract-price, etc.) along with a set of activities that are typical to this contract. You can read more about this in Copying Contracts With Linked Activity Templates.
Deleting templates
To delete a template, follow the steps below:
- Open the Activity Templates List from Settings > Activity Templates.
- Select the template you want to delete.
- If there are entries in the template, delete each entry by right-clicking on it and selecting Delete.
- Click Delete from the Activity Templates menu.
Note: If the template you wish to delete has been assigned to a contract as a Linked Activity Template, the system will not allow for the template to be deleted. For more information about Linked Activity Templates, see the Linked Activity Templates section.
Sharing Activity Templates
Starting with RangerMSP 5.4 you can easily share Activity Templates with other RangerMSP users, using a dedicated forum.
Each of the shared Activity Templates can be exported to a file, and uploaded to a community sharing forum, so other users can download it and use in RangerMSP.
By sharing your work you’ll help other members, and you’ll enjoy other members work. This can save you tremendous amount of time as you can take advantage of a lot of work already invested by other users creating templates which may be very well-suited for your needs. All templates can then be further adjusted like any other Activity Template, to fit your specific requirements.
For further instructions on how to export and import Activity Templates, refer to the Activity Templates Sharing Center forum ( Enter Activity Templates Sharing Center.)
Contract Linked Activity Templates
Each contract in the RangerMSP system can be assigned a "Linked Activity Template." This template can be linked to a contract and applied whenever a user copies this contract to a new date range or creates a new contract based on the contract to which the template is assigned.
When should it be used?
Linked Activity Templates can be useful for situations in which you want to copy a contract with all its data (the block terms, contract-price, etc.) along with a set of activities that are typical to this contract.
For example, if you have a monthly service contract that requires you to perform the same actions each month (on-site visit for preventative maintenance, server checkup, etc.), you can simply assign a Linked Activity Template to that contract. By attaching the template, every time you renew the contract for the following month, all of the monthly Tasks, Tickets, and Appointments associated with this template can be automatically created as well.
Another possible use for Linked Activity Templates would be in preparing predefined plans to offer to new and existing customers. Each plan can be defined as a Contract, linked to your business account record. Whenever a customer purchases a plan, you can simply copy the predefined contract, including all the predefined terms and activities, and create an actual contract for the customer.
Each of these predefined contracts would already include all of the plan terms—custom pricing, default items, special internal terms, block size, etc., as well as a linked activity template, which defines all the activities that needs to be done once an actual contract based on this predefined one is signed. All you would need to do is copy the predefined contract to a new one and apply the Linked Activity Template.
How do I assign a Default Activity Template to a Contract?
To assign a Linked Activity Template to a contract, go to the Contract's Details tab and click on the Linked Activity Template field. A pull-down menu appears, allowing you to select any active Contract Activity Template.
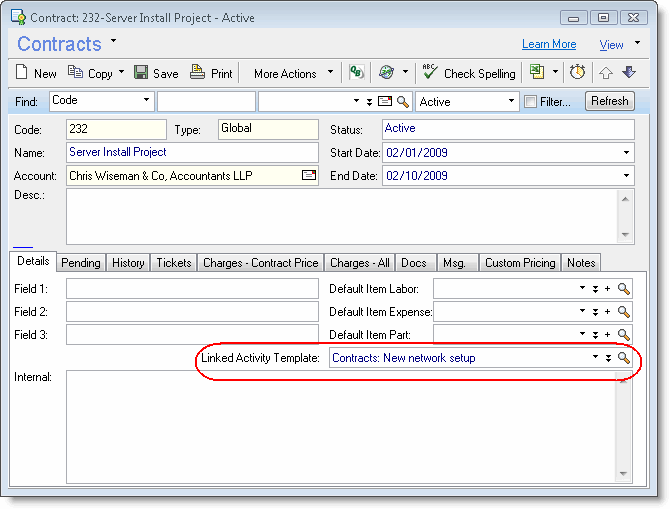
Once a Linked Activity Template is assigned to a contract, it can be applied whenever the contract is copied. You can read more about this in Copying Contracts With Linked Activity Templates (the next section).
Copying Contracts With Linked Activity Templates
In the RangerMSP system, users may choose to copy a contract in order to create a new contract based on the original one, or they may copy a contract in order to renew it for the next date range. If there are many contracts to renew, users can use the Batch Copy Wizard, which easily copies/renews many contracts at one time. To learn more about the different options and features related to copying contracts, you should review the Charges manual, chapter Contracts#Copying Contracts. The following section assumes you are already familiar with copying contracts.
Copying a Single Contract with a Linked Activity Template
To copy a single contract with a Linked Activity Template, open the contract you want to copy and click the Copy button on the toolbar. A pop-up menu now appears in which you can choose to ”Copy to a New Contract” or “Copy Contract to a New Date Range.”
After making this selection, the “Copy Contract” window opens, which guides the user through the steps needed to copy the contract. As one of these steps, the following window opens:
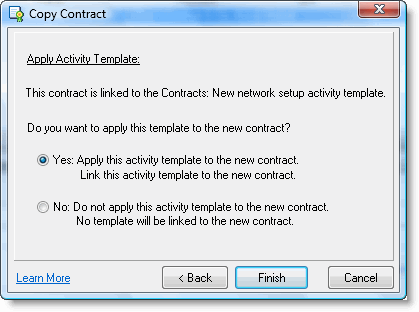
In this screen you can easily select whether to apply the Linked Activity Template or not.
Batch Copy Contracts to a New Date Range
If you have many recurring contracts to renew, you can use the Batch Copy Wizard, which easily copies/renews many contracts at one time. This wizard includes a few steps, such as selecting the contracts to be renewed, date ranges, and more. One of the steps in this wizard refers to Linked Activity Templates.
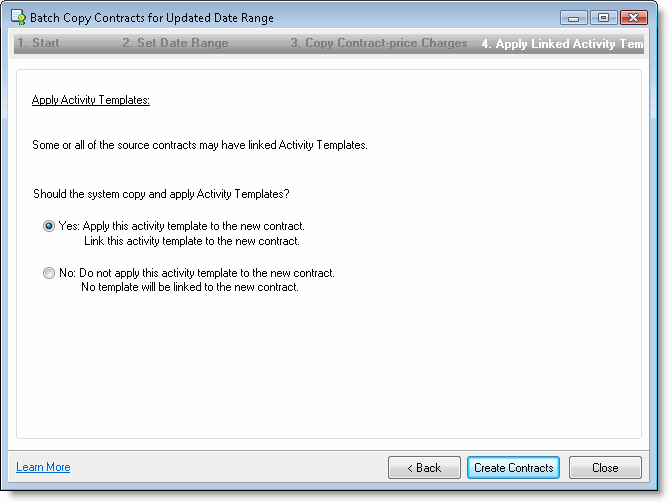
In this step you can decide whether to automatically apply the Linked Activity Templates of the original contracts to all of the new contracts you are about to create using this wizard.
If the user selects Yes in this step, all the Linked Activity Templates in the source contracts are applied to the new contracts being created. It also automatically assigns the default template to the Linked Activity Template field in the new contracts.
If the user selects No in this step, none of the Linked Activity Templates in the source contracts are applied to the new contracts being created, and none of Tasks, Appointments, or Tickets defined in the linked templates are created. In addition, the Linked Activity Template fields of the new contracts are left empty.
Activity Template Privileges
In order to apply, create, or edit Activity Templates, users must be assigned certain privileges. The RangerMSP system allows for different levels of privileges for Activity Templates.
Basic Privileges
A system administrator can assign these privileges by going to File > User & Privileges > Privileges.
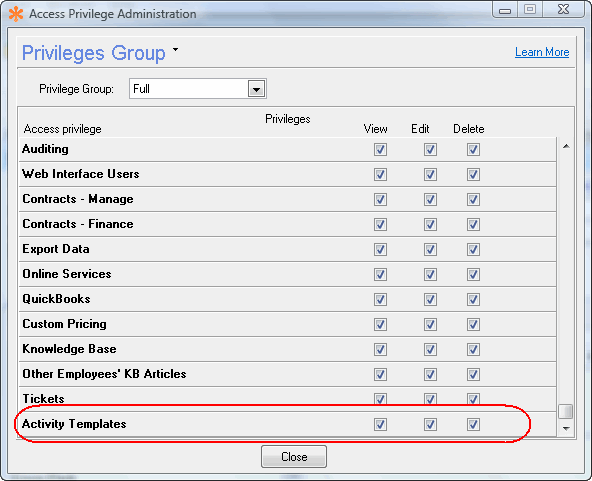
The Privileges window lists a separate line for Activity Templates. Like all privileges in the RangerMSP system (click here for general information on using privileges in RangerMSP), the system administrator can assign the user privileges to View, Edit, or Delete. Below is an explanation of what these privileges mean in reference to Activity Templates privilege:
- View: The user can view templates but not update them. This privilege is required for a user to be able to apply a template.
- Edit: The user can create or update Activity Templates.
- Delete: The user can delete Activity Templates
Advanced
In certain situations, the user applying a template might not have the privileges to add Tasks, Appointments, or Tickets to other employees (click here for more details on the various privileges available in RangerMSP). Nevertheless, such a user can apply a template successfully, thereby adding Tasks, Appointments, or Tickets to other employees. This is the default setting of the system.
For example, when closing a ticket, a technician may want to apply a template that assigns a Task to the secretary to follow up with a client in a week and assigns another Task to the accounting manager to issue an invoice. Even if this technician does not have privileges to see other employees’ Tasks and Appointments, he can still apply a template, thereby assigning these activities to other employees.
The system administrator can further restrict a user’s privileges in these circumstances by going to Tools > Options > Activity Templates (Note: this is a different area than the regular Privileges section of the system):
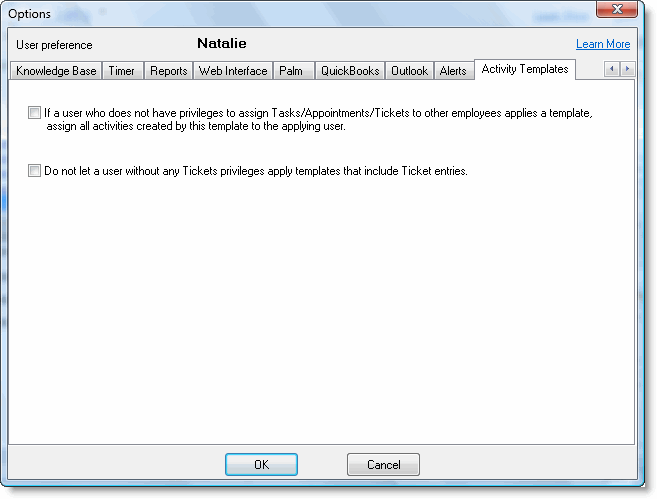
In this window the administrator can check either of the following boxes:
- “If a user who does not have privileges to assign Tasks/Appointments/Tickets to other employees applies a template, assign all activities created by this template to the applying user.”
If this box is checked, the system will override any Employee fields in the template entries and automatically assign activities to the user applying the template. By default, this box is not checked.
- "Do not let a user without any Tickets privileges apply templates that include Ticket entries."
If this box is checked, a user without Tickets privileges is prevented from applying any template that includes a Ticket entry. Any attempt such a user would make to apply a template containing a Ticket entry will fail. By default, this box is not checked.