Web Interface: Difference between revisions
| (71 intermediate revisions by 4 users not shown) | |||
| Line 1: | Line 1: | ||
{{usermanuals}} | {{usermanuals}} | ||
==Introduction== | |||
This document contains information about how to install, configure and run the Web Interface application. | This document contains information about how to install, configure and run the Web Interface application. | ||
This document is also available as Readme.txt file: | This document is also available as Readme.txt file: | ||
<blockquote>'''<Installation_DIR>\ | <blockquote>'''<Installation_DIR>\RangerMSP\WebInterface\Readme.txt'''</blockquote> | ||
Note: "<Installation_DIR>" refers to the path on the server (drive and directory) where the RangerMSP server files are installed. | |||
<br><br> | |||
<br><br> | |||
__TOC__ | __TOC__ | ||
== General Settings and Configuration == | == General Settings and Configuration == | ||
===Setting the Port=== | ===Setting the Port=== | ||
RangerMSP Web Interface communicates with users/browsers through a port. | |||
RangerMSP's default configuration uses Port 4961. | |||
If you want to change the default port number, to a port number other than the default (4961) follow these instructions: | |||
# Edit the Properties File: <Installation_DIR>\RangerMSP\WebInterface\CRMWebInterface.ini. | |||
# Modify the port number under the token: 'ServerPort'. | |||
# Note that you must use a port number greater than 1024 in order for the Web Interface service to work. | |||
# Make sure that the port you choose is not being used by any other application or service. | |||
# If you use a firewall, proxy, etc. it is recommended that you open Port 4961 (or the port defined in the properties file) in order to allow a connection to be established with RangerMSP Web Interface. If this port is blocked by a firewall, a connection cannot be established. | |||
===Setting the Server IP or URL=== | |||
<font color="red">** Required only for version 6.1 and older **</font> | |||
From version 6.2 and up you do '''not''' need to configure this. | |||
RangerMSP Web Interface uses a permanent IP address or URL. This IP/URL is the external Internet address of the computer on which RangerMSP Web Interface is running. | |||
You can set up the server IP or URL by editing the file <Installation_DIR>\RangerMSP\WebInterface\CRMWebInterface.ini and changing the token: 'ServerIP' (e.g. ServerIP=212.140.210.143 or ServerIP=www.mydomainname.com). | |||
Note that by default the Web Interface uses IP 127.0.0.1 (localhost), which means you can use the Web Interface on your local computer only. | |||
=== | ===Checking the Port=== | ||
You can check the port is open and reachable by your customers and remote technicians by using [http://www.myportchecker.com/ My Port Checker] which is a free web based utility. | |||
== Activating RangerMSP Web Interface == | |||
===Install/Uninstall RangerMSP Web Interface === | |||
RangerMSP Web Interface runs as a Windows Service on your server. | |||
'''Install''' | |||
Note: Make sure to run RangerMSP client at least once before installing the Web interface service for the first time. | |||
'''This part of the installation should be performed on the server itself. | |||
<u>Automatic installation</u> (requires RangerMSP 14 and up) | |||
Log in to to your Server with a Window's Administrator account and run the installer from: | |||
<blockquote>'''''<Installation_DIR>\RangerMSP\Utils\Install\InstallServerSideWindowsServices.exe'''''</blockquote> | |||
OR - <br><br> | |||
<u>Manual installation</u> | |||
# Open a command prompt window: Right-click the command prompt icon and and choose 'Run As Adminsitrator'. | |||
# Type the following command:<br><blockquote><tt><Installation_DIR>\RangerMSP\WebInterface\CRMWebInterface.exe -install</tt></blockquote><u>Note</u>: The <Installation_Dir> must refer to a LOCAL server path (e.g. C:\ or D:\Software, etc.) and NOT to a shared network name/path. | |||
# Wait for a success message to appear, indicating the service was installed successfully. | |||
# Open the Windows Services Management windows from ''Control Panel > Administration Tools > Services''. | |||
# Verify that a Window's service called '''RangerMSP Web Interface ''' is now displayed the services list. | |||
# If the service is not there, make sure again that you are running the command prompt Window using 'Run as Administrator' and try again. | |||
<u>Notes | <u>Notes</u>: In case you wish to install and run the Web Interface service on Vista, you should run the command prompt from Start > Accessories > Command Prompt > right-click it and select > Run as administrator. | ||
'''Running RangerMSP Web Interface Service''' | |||
After | After a successful service installation, a service called ''RangerMSP Web Interface'' is now displayed in the system services management window (''Control Panel > Administration Tools > Services''). | ||
Using the Services Management window, start the service and make sure that the service is defined to start automatically with a ''Delayed Start'' ('''Startup type > Automatic (Delayed Start)''') each time the server is restarted. | |||
'''Uninstall''' | '''Uninstall''' | ||
To Uninstall | To Uninstall RangerMSP Web Interface stop the RangerMSP WebInterface service and then type the following command in a command prompt window on the server: | ||
<Installation_DIR>\ | <blockquote><tt><Installation_DIR>\RangerMSP\WebInterface\CRMWebInterface.exe -uninstall</tt></blockquote> | ||
==Starting To Use Web Interface== | |||
To start using the Web Interface, you should first define Web Users for Employees and for Customers. Then, browse to the login page and log in to the system. | |||
Note that logging in via mobile devices will automatically adjust the display to be optimized for small screens. See more details in [[Web Interface#Web Interface From Mobile Devices|Web Interface From Mobile Devices]]. | |||
===Define Web Users=== | ===Define Web Users=== | ||
To test the installation and start using | To test the installation and start using RangerMSP Web Interface, create web users for employees and customers. | ||
Web user management is done within the | Web user management is done within the RangerMSP application. | ||
Login to | Login to RangerMSP and follow these instructions: | ||
'''Creating web users for | '''Creating web users for Employees'''<br> | ||
# Open the Employees/Accounts window and navigate to the desired employee record. | |||
# Select the "Employee" tab and click on the "Configure Web User" Button. | |||
# Set a web username and password and confirm. | |||
Note: You can use Employee Web Users to work with Subcontractors. See more details in [[Subcontractors#Activating_Subcontractors|Activating Subcontractors]]. | |||
<br> | |||
'''Creating web users for customer Accounts'''<br> | |||
# Open the Accounts window and navigate to the desired Account record. | |||
# Select the "Web Users" page, click on the "New" button at the bottom of the page. | |||
# Set the web user username, password and other information and confirm. | |||
Note: After defining the user, you can send them an email with the Account login credentials. See more details in [[Web Interface#Sending Account Login Credentials to Customers|Sending Account Login Credentials to Customers]]. | |||
<u>Notes:</u> | <u>Notes:</u> | ||
# | #RangerMSP Web Interface will identify the newly created users within several minutes. | ||
#All passwords are case sensitive. | #All passwords are case sensitive. | ||
#Since each username must be unique in the entire system, it may be a good idea to add a common prefix to all the web users of each Account, i.e. BIZ_1_John, BIZ_1_Mary, BIZ_2_John, BIZ_2_Phil etc. | #Since each username must be unique in the entire system, it may be a good idea to add a common prefix to all the web users of each Account, i.e. BIZ_1_John, BIZ_1_Mary, BIZ_2_John, BIZ_2_Phil etc. | ||
| Line 98: | Line 128: | ||
You can also [[Web Interface#Embedding a login page in your web site|embed the login page]] in your web site. | You can also [[Web Interface#Embedding a login page in your web site|embed the login page]] in your web site. | ||
==Web Interface From Mobile Devices== | |||
When using the Web Interface from Mobile devices, RangerMSP Web Interface uses an optimized display for mobile devices with small displays. The mobile display allows you to easily view and manage tickets, get customer contact details, log time and parts charges and much more directly from your phone. | |||
Options for mobile devices: | |||
* All HTML templates are adjusted to fit mobile screen resolution (minimum screen width 320 pixels). | |||
* Instead of the existing tabs in regular browsers (i.e. Account/Tickets etc.), a quick selection list will switch between the tabs. | |||
* Users can adjust the amount of characters to make long textual fields look better on mobile devices. To make the adjustment go to Tools > Options > Web Interface. | |||
* It is possible to switch to mobile display also on any browser using the new switch to mobile / switch to standard option. | |||
[[File:Web_mobile_demo_all_os.png]] | |||
== Document Download and Upload Settings == | == Document Download and Upload Settings == | ||
Using the Web Interface, employees can download and upload | Using the Web Interface, employees can download and upload RangerMSP documents which are located on your server, directly from the browser. | ||
In order to allow file downloads and uploads, you should first enable file download and upload to allow the Web Interface Service to access the documents for downloads and uploads. | In order to allow file downloads and uploads, you should first enable file download and upload to allow the Web Interface Service to access the documents for downloads and uploads. | ||
To enable uploads and downloads, go to '''Tools > Options > Web Interface:''' | To enable uploads and downloads, go to '''Tools > Options > Web Interface (Admin):''' | ||
[[File: | [[File:web_interface_options_download_upload_flag.png|center]] | ||
In this window an administrator user can determine whether Web Interface users will be able to download and upload documents: | In this window an administrator user can determine whether Web Interface users will be able to download and upload documents: | ||
| Line 119: | Line 159: | ||
In order to allow file downloads and uploads, you should first map the folder locations for the documents, so that the Web Interface Service will be able to access them for download and uploads. You can also define folders which will deny access, in case you need to protect sensitive information from being accessed via the web interface. | In order to allow file downloads and uploads, you should first map the folder locations for the documents, so that the Web Interface Service will be able to access them for download and uploads. You can also define folders which will deny access, in case you need to protect sensitive information from being accessed via the web interface. | ||
The | The RangerMSP Document files can be physically stored in various places on your server. The system has a default documents folder (as mapped in Tools > Options > Documents > Default Document Folder), which is usually physically located on the server. Note that the documents UNC path in the Document's properties is stored in the same way the client PCs sees it. | ||
When the Web Interface tries to access a file on the server, this is done via the Web Interface service, running on your server. This means that the paths that are specified in the document properties in | When the Web Interface tries to access a file on the server, this is done via the Web Interface service, running on your server. This means that the paths that are specified in the document properties in RangerMSP will probably not be comprehensible to the Web Interface Service running on your server. | ||
For the service to be able to access these files, you need to 'teach' the server how to access the files locally, when encountering a mapped drive in the file path. | For the service to be able to access these files, you need to 'teach' the server how to access the files locally, when encountering a mapped drive in the file path. | ||
| Line 128: | Line 168: | ||
To setup the documents folders mapping settings, go to '''Tools > Options > Web Interface''': | To setup the documents folders mapping settings, go to '''Tools > Options > Web Interface''': | ||
[[File: | [[File:web_interface_options_zoom.png|center]] | ||
To map the folders, click the '''Setup folder mappings''' button to open the download folders settings window. | |||
===Allow Folders Settings=== | ===Allow Folders Settings=== | ||
| Line 139: | Line 176: | ||
[[File: | [[File:web_interface_download_folders_settings.gif|center]] | ||
In this tab, you can enter the path mappings, which will map the 'network' path to the 'local' server path. | In this tab, you can enter the path mappings, which will map the 'network' path to the 'local' server path. | ||
| Line 171: | Line 208: | ||
<u>Note</u>: The system will automatically block access to files stored under each specified folder, including files in subfolders. <br>For example, if you block the folder D:\ITDocs\Passwords, files stored at D:\ITDocs\Passwords\RDP\ will be blocked too. | <u>Note</u>: The system will automatically block access to files stored under each specified folder, including files in subfolders. <br>For example, if you block the folder D:\ITDocs\Passwords, files stored at D:\ITDocs\Passwords\RDP\ will be blocked too. | ||
===Default | ===Default Uploading Folder Settings=== | ||
When files are uploaded via the Web Interface, they are automatically saved in the account's “Docs Dir” folder (which can be defined in the account window, under the Details tab). However under certain circumstances the Docs Dir folder cannot be accessed over the Web Interface, such as when no Docs Dir folder has been created for an account, or when it has been placed in the Deny Folders list. | When files are uploaded via the Web Interface, they are automatically saved in the account's “Docs Dir” folder (which can be defined in the account window, under the Details tab). However under certain circumstances the Docs Dir folder cannot be accessed over the Web Interface, such as when no Docs Dir folder has been created for an account, or when it has been placed in the Deny Folders list. | ||
For this reason, users should define an “Uploads Default Folder.” When a file cannot be uploaded to the account’s Docs Dir folder, it will be automatically uploaded to this default folder. To define the Uploads Default Folder, go to '''Tools > Options > Web Interface > | For this reason, users should define an “Uploads Default Folder.” When a file cannot be uploaded to the account’s Docs Dir folder, it will be automatically uploaded to this default folder. To define the Uploads Default Folder, go to '''Tools > Options > Web Interface > Download/Upload Settings > Click Set Folder Mapping. In the Folder Mapping Settings window > Default Uploading Folder''': | ||
[[File:Web_interface_options_upload_folder.gif|center]] | |||
==Web Interface Options== | |||
Web Interface Options control different aspects of the way the Web Interface behaves. To customize the Web Interface, go to ''Tools > Options > Web Interface'' tab. | |||
<br> | |||
''Note: Always make sure to '''restart the RangerMSP Web Interface service''' after performing any changes, so they will take effect in the Web Interface. | |||
'' | |||
<br><br> | |||
[[File:web_interface_options_general.png|center]] | |||
[[File:Web_interface_user_options.png|center]] | |||
In this window you can set up the following (note there are more options when you scroll down, see more screenshots below): | |||
===Default Web Calendar View=== | |||
The Default Web Calendar view options allow you to choose how you want to see your appointments when using the Web Interface. | |||
Your options are: | |||
* Graphic weekly Calendar. | |||
* List of Appointments (non graphic). | |||
===Memo Fields Display Limits=== | |||
The Memo Fields Display Limits Option controls the amount of characters that will be displayed for long textual fields (Memo fields) showing up in lists on the Web Interface. This feature helps you manage the way you see the list, and the amount of data that will be displayed when showing long (Memo) fields. | |||
In situations where the text is very long and exceeds the length defined here, a linkable '...' sign will appear at the end of the truncated text and this will open for viewing the full details for this entity. | |||
The length of text to show in the lists is defined separately for standard Web browsers and for mobile devices' browsers (small display). | |||
The length settings are personal, and affect each user's display separately. | |||
===Web Pages – Header and Footer=== | |||
The Header and Footer option lets you design the Web pages for the Web Interface. This affects both customers and employees view. | |||
Click ''Edit Header'' and ''Edit Footer'' to design these parts using HTML. | |||
See also: | |||
* [[Web_Interface#Embedding_a_login_page_in_your_web_site|Embedding a login page in your web site]]. | |||
* [[Web_Interface#Adding_your_name_and_logo_to_RangerMSP_Web_Interface_pages|Adding your name and logo to RangerMSP Web Interface pages]]. | |||
===Download/Upload Settings=== | |||
Using the Web Interface, employees and customers can download and upload (only employees) RangerMSP documents which are located on your server, directly from the browser. | |||
In order to allow file downloads and uploads, you should first enable file download and upload to allow the Web Interface Service to access the documents for downloads and uploads. | |||
See more details in [[Web_Interface#Document_Download_and_Upload_Settings|Document Download and Upload Settings]]. | |||
<br> | |||
'''More Options (scroll Down):'''<br> | |||
[[File:web_interface_options_screen2.png|center]] | |||
<br> | |||
===Default Technician Service Form=== | |||
Choose the report which will be printed when clicking the ''Print'' icon from the Ticket page in the Employees Web Interface. | |||
===Web Links in Emails=== | |||
Web Links refer to email Alerts being sent via [[Alerts Server|RangerMSP Alerts Server]]. When enabled, the system will add a link to the relevant entity in the email alert body. This allows employees to quickly open RangerMSP Web Interface and view or edit the details of the entity being referred in the email. This saves the need to go explicitly to the Web Interface site, login and search for the entity in order to see its details. | |||
Web Links Options: | |||
# Enable - enabling this option will automatically add links to email Alerts sent by RangerMSP Alerts Server. | |||
# Disable - disabling this option will not add the links to the emails sent by RangerMSP Alerts Server. | |||
# Use SSL/Https - when the Web Interface is configured with IIS as a Web Server and with SSL - the special tokens should be configured Web Links in Emails (see more details in [[Microsoft_IIS_as_the_Web_Server_for_the_Web_Interface#Web_Links_in_Emails|Web Links in Emails]]). | |||
<br> | |||
''Note: When using Alerts to Customers, which send email alerts regarding new Tickets and Tickets being closed, it is possible to add Web Links to the email template sent to the customer. This requires using RangerMSP Web Interface for Customers. See more details in [[Alerts_to_Customers#Alerts_to_Customers_Settings|Alerts to Customers Settings]].'' | |||
===Memo Fields Display Limits (for Customer Users)=== | |||
The Memo Fields Display Limits Option controls the amount of characters that will be displayed for long textual fields (Memo fields) showing up in lists on the Web Interface. This feature helps Administrators manage the way customers see lists, and the amount of data that will be displayed when showing long (Memo) fields. | |||
In situations where the text is very long and exceeds the length defined here, a linkable '...' sign will appear at the end of the truncated text and this will open for viewing the full details for this entity. | |||
The length of text to show in the lists is defined separately for standard Web browsers and for mobile devices' browsers (small display). | |||
These settings are global for all customer users. | |||
===Sort Items List According To=== | |||
This option determines the sort criteria for Items when choosing Items from the list, i.e. when creating a new Charge and choosing the Item. Possible options are to sort the list either by the ''Item Code'' or ''Item Name''. | |||
===Initialize Customer Web Usernames=== | |||
When using the "Initialize new Web users with the account number" option, new Customer Web Users will be automatically copied to the username so all this customer's Web users will start with the same prefix. This can help standardize the usernames for customers. | |||
The Account number is copied only if defined for the Account in Details tab > Accnt #. | |||
=== Setting Customer Privileges === | |||
Using the Web Interface, customers can create new tickets and view their open and closed tickets. When given additional privileges, customers can also optionally view contract information, charges, assets, and Knowledge Base articles; download files; and more. | |||
To control what each user can see, each customer Web user should be assigned a '''Privilege Group'''. See more details in [[Customer Privileges]]. | |||
==Generating and Printing Reports Using the Web Interface== | ==Generating and Printing Reports Using the Web Interface== | ||
When using the Web Interface, users can generate reports and save them as PDF files. These files are automatically downloaded to the user’s local computer, from where they can be printed | When using the Web Interface, users can generate reports and save them as PDF files. These files are automatically downloaded to the user’s local computer, from where they can be printed. | ||
To print a report for an entity | To print a report for an entity , open the entity’s window in the Web Interface. Click on the ”Print to PDF” option which opens a drop-down list of all the reports available for the entity. In this list you can can choose from any of the reports available for the entity in the client application. The report is generated and saved as a PDF file and downloaded to the local PC/mobile device. | ||
[[File:Web_interface_options_print_details.png|center]] | |||
==Working with Subcontractors== | |||
RangerMSP [[Subcontractors]] feature allows you to effectively manage subcontractors and track their work. | |||
Subcontractor licenses are fully-featured RangerMSP Employee licenses. You can let subcontractors access the system via the RangerMSP Web Interface, restrict them to view only specific Accounts and give them limited privileges. | |||
See more details about using RangerMSP Web Interface to work with subcontractors in [[Subcontractors]]. | |||
==Timers== | |||
Just like the Timers you can run in the desktop application to log time for work done and convert to Charges, now you can run a Timer at any time and anywhere, through the Web Interface so technicians on the road can use the timer to log their work on-site. | |||
To activate the web based Timer simply view the appropriate record (Account/Ticket/Contract) and click the Timer link which appears at the top right. A popup timer window will appear where you can stop & start logging time and convert to a Charge. | |||
[[File:Web-timer.png|center]] | |||
==To-do Lists== | |||
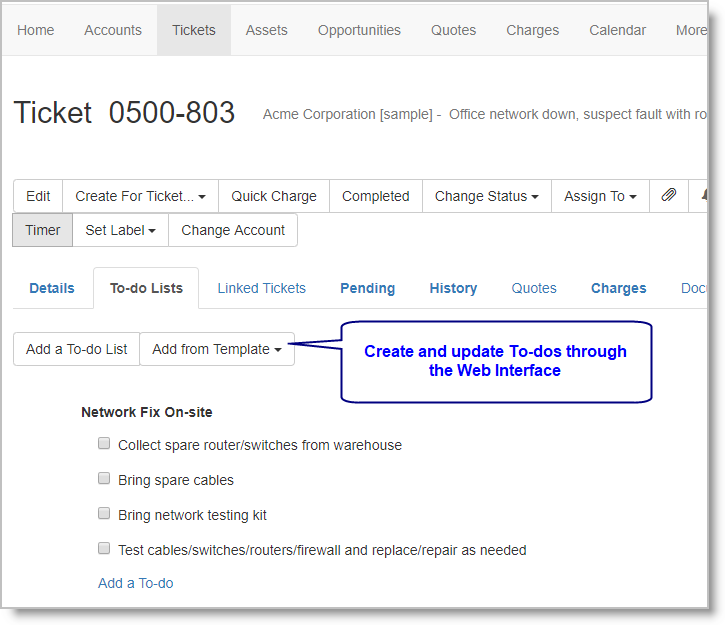
The new and powerful To-do List feature in the desktop application also exists in the Web Interface so you're always within reach of those important to-dos. You can instantly create, add, edit and complete them. To-do Lists can be created from pre-made templates so technicians can quickly use and manage them whenever needed. | |||
[[File:Web-todo.png|center]] | |||
To add a new To-do list: | |||
# View the appropriate record (Account/Ticket/Contract) | |||
# Click the '''Add a To-do List''' button OR click the down arrow on the right of the button and select a template to create the To-do List from. | |||
# If adding a new list, you must then enter the list name and then you can start adding To-do items by clicking the '''Add a To-do''' link and entering the to-do details. | |||
To edit a To-do item: | |||
# Point to it with your mouse cursor which will bring up the edit menu. | |||
# Click Edit and modify to suit. | |||
To delete an item: | |||
# Point to it which will bring up the edit menu. | |||
# Click the trashcan icon - the item will be removed from your To-do list immediately. | |||
==Charges - Quick Time Entry== | |||
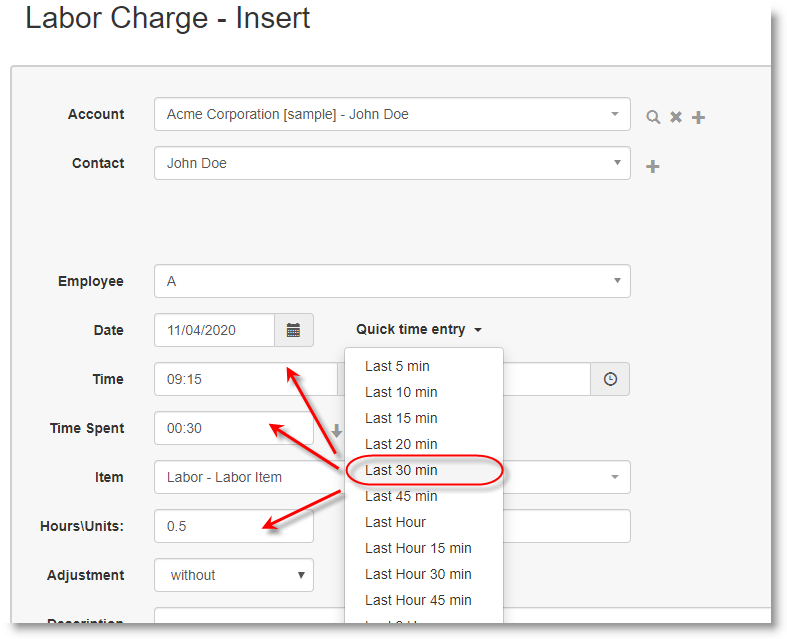
Adding Charges is even easier now as it can be done by selecting the time span from the drop down '''Quick Time Entry''' list of periods, such as '''Last 15 min''' or '''Last 2 Hours''' which will then automatically fill in the Start/End times for you, saving you from having to type it all in each box manually. Once you have selected the time span the total amount of time also appears on the button to the right of the '''Quick Time Entry''' link and if you click this it will add that time to the Hours/Units box below. | |||
[[File:Web-quick-time-entry.png|center]] | |||
==Tickets - Resolution from Charge Descriptions== | |||
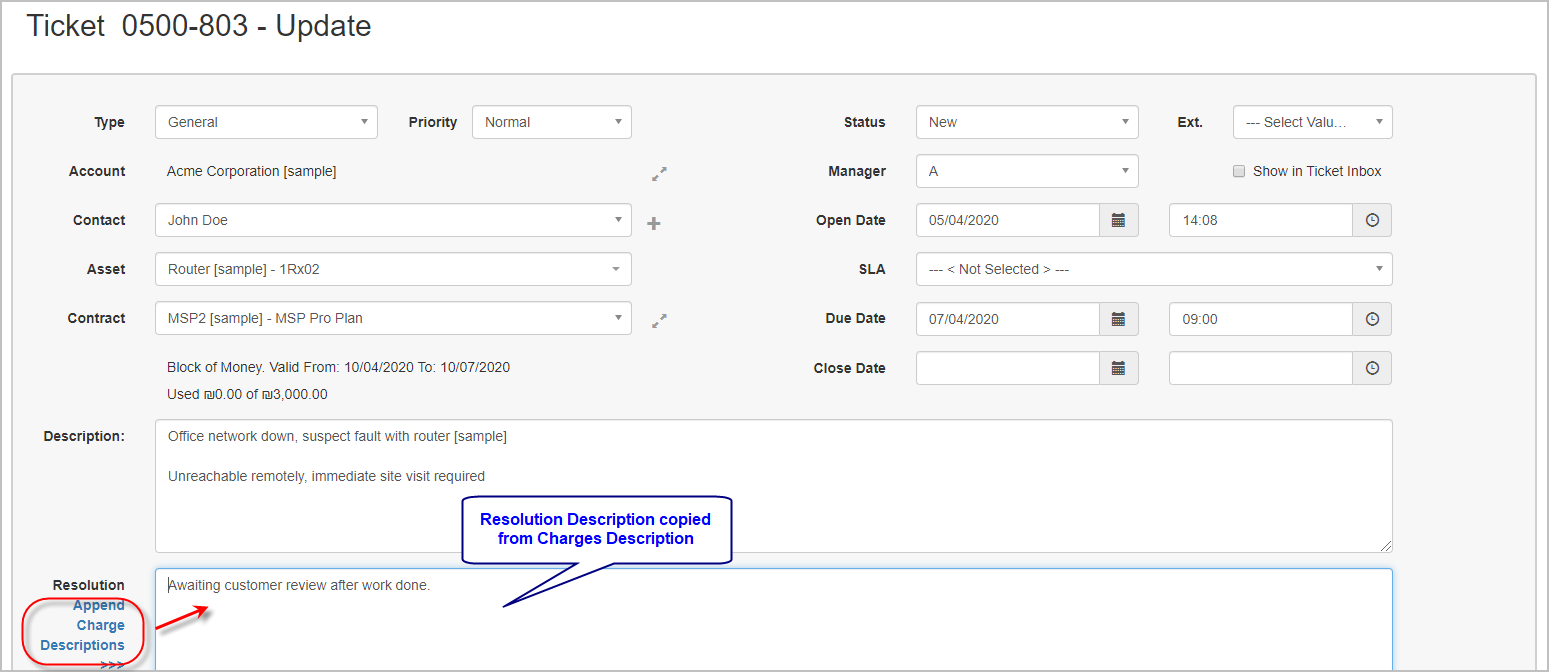
You can now easily add the Charges description to the Ticket resolution when completing a Ticket. To add the charge descriptions, simply go to the Resolution box on the Edit Ticket form and click '''Append Charge Descriptions''' - all the Charge descriptions for this Ticket will appear in the resolutions box ready to save. | |||
[[File:Web-resolution-from-charge-description.png|center]] | |||
==File Uploads by Customers== | |||
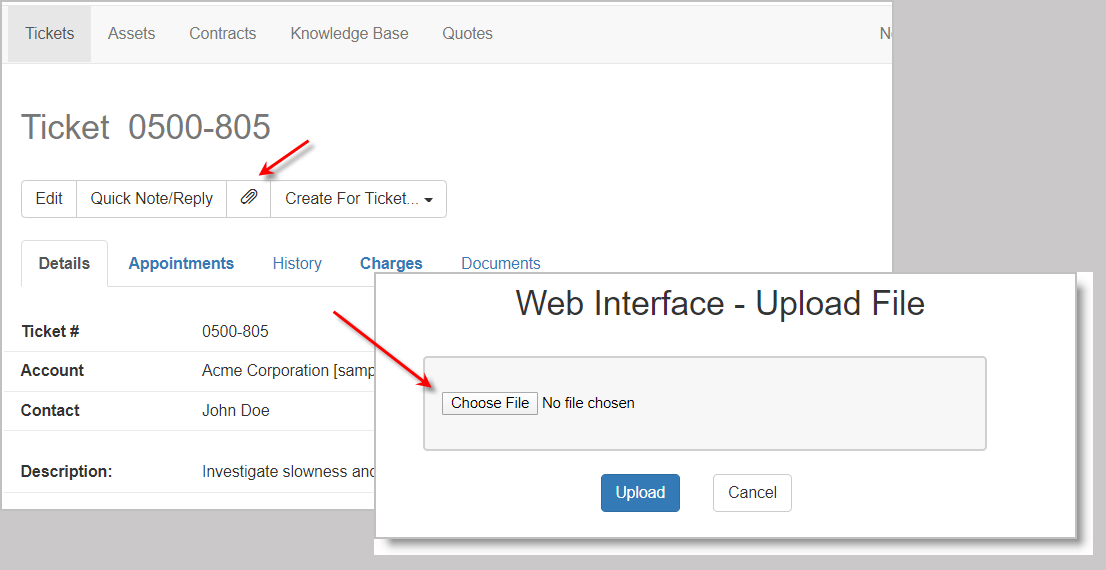
Customers can now upload files directly through the Web Interface, subject to the [[Customer_Privileges|privileges]] you define for them. No more asking them to email files to you for you to attach to their Account or Ticket. | |||
To upload a file, the customer must: | |||
# Login to the Web interface | |||
# Go to the '''Documents''' tab | |||
# Click the '''Upload''' link | |||
# Select the file to upload. | |||
[[File:Web-upload.png|center]] | |||
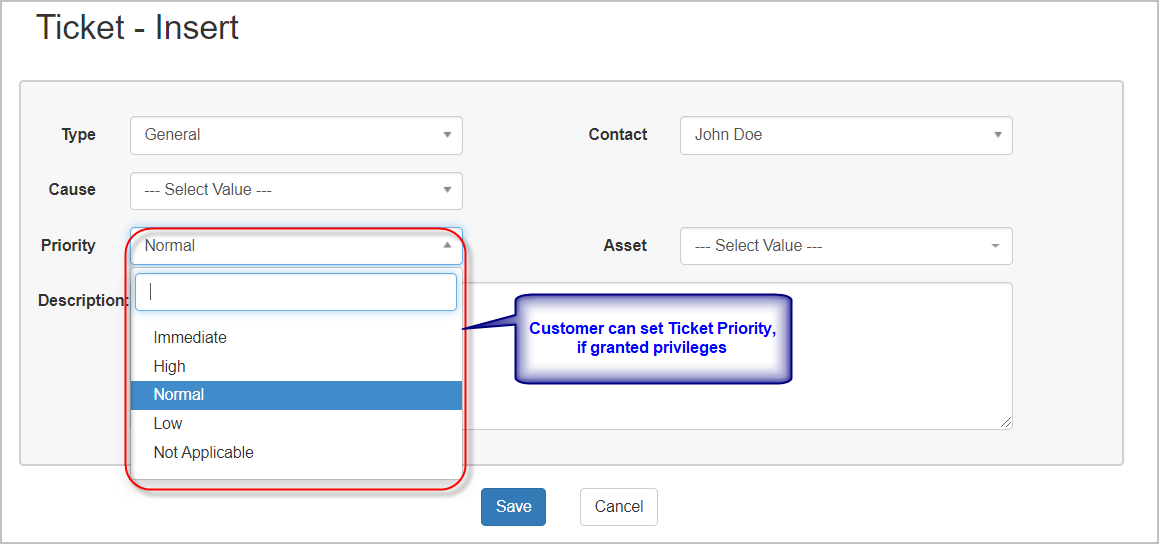
==View or Edit Ticket Priorities== | |||
Customers can login to the Web Interface and view priority of a Ticket and even change the priority if they want, subject to Privilege settings. To change the priority the customer must: | |||
# Login | |||
# Select a Ticket | |||
# Click Edit | |||
# Select the required Priority from the drop down list | |||
# Save the changes. | |||
[[File:Web-set-priority.png|center]] | |||
<br> | |||
==Tips & Tricks== | ==Tips & Tricks== | ||
===Embedding a login page in your web site=== | ===Embedding a login page in your web site=== | ||
All user logins are performed through a browser login page. This login page is usually accessed from your existing web site. | All user logins are performed through a browser login page. This login page is usually accessed from your existing web site. | ||
You can choose to use a | You can choose to use a predefined login page or customize your own login page (advanced. | ||
| Line 234: | Line 409: | ||
<u>Note</u>: You should edit this link to reflect your IP/URL address and Port (127.0.0.1 to your IP/URL and 4961 to the port in use). | <u>Note</u>: You should edit this link to reflect your IP/URL address and Port (127.0.0.1 to your IP/URL and 4961 to the port in use). | ||
<table id="mp-tfp" style="margin:7px 0 0 0; width:100%; background:none;"> | |||
<tr> | |||
<td class="MainPageBG" style="width:50%; border:1px solid #FFCB99; background:#ffffff; vertical-align:top; color:#000;"> | |||
<table id="mp-left" cellpadding="2" cellspacing="5" style="width:100%; vertical-align:top; background:#ffffff;"> | |||
<tr> | |||
<th> <h4 id="mp-tfa-h2" style="margin:0; background:#fff3e1; font-size:120%; font-weight:bold; border:1px solid #FFCB99; text-align:left; color:#000; padding:0.2em 0.4em;">Tip</h4> | |||
</th></tr> | |||
<tr> | |||
<td style="color:#000;"> <div id="mp-tfa">Your name and logo may also be displayed on the login page. See the Tips & Tricks section below.</div> | |||
</td></tr></table> | |||
</td></tr></table> | |||
| Line 253: | Line 433: | ||
Copy and paste this section to your HTML <HEADER> section: | Copy and paste this section to your HTML <HEADER> section: | ||
<u>Note</u>: Copying from here may contain some illegal characters (depending on the web browser). If you are encountering any problems embedding this code, please try copying the HTML part from the Tips&Tricks section inside the readme file at: '''<Installation_DIR>\ | <u>Note</u>: Copying from here may contain some illegal characters (depending on the web browser). If you are encountering any problems embedding this code, please try copying the HTML part from the Tips&Tricks section inside the readme file at: '''<Installation_DIR>\RangerMSP\WebInterface\Readme.txt''' file instead. | ||
<pre> | |||
<SCRIPT Language="JavaScript"> | |||
<!-- | |||
function CmtCheckInput() | |||
{ | |||
if (document.CmtForm.CmtUsrNamePrm.value=="" ) | |||
{ | |||
alert('Please enter a value for Name'); | |||
document.CmtForm.CmtUsrNamePrm.focus(); | |||
return false; | |||
} | |||
else if (document.CmtForm.CmtUsrPWPrm.value=="") | |||
{ | |||
alert('Please enter a value for Password'); | |||
document.CmtForm.CmtUsrPWPrm.focus(); | |||
return false; | |||
} | |||
else | |||
{ | |||
return true; | |||
} | |||
} | |||
function CmtKeyPress(event) | |||
{ | |||
if (event.keyCode == 13) | |||
{ | |||
CmtCheckInput(); | |||
} | |||
} | |||
//--> | |||
</SCRIPT> | |||
</pre> | |||
Copy the following HTML code, paste it in the HTML <BODY> area and modify the IP and Port as described above: | Copy the following HTML code, paste it in the HTML <BODY> area and modify the IP and Port as described above: | ||
===Adding your name and logo to | <pre> | ||
You can add your name, logo, etc. to pages displayed by | <FORM name="CmtForm" method="post" action="http://127.0.0.1:4961" onSubmit="return CmtCheckInput()"> | ||
<TABLE> | |||
<TR> | |||
<TD>User Name:</TD> | |||
<TD><input name="CmtUsrNamePrm" type="text" id="CmtUsrNamePrm"></TD> | |||
</TR> | |||
<TR> | |||
<TD>Password:</TD> | |||
<TD><input name="CmtUsrPWPrm" type="password" id="CmtUsrPWPrm"></TD> | |||
</TR> | |||
<TR> | |||
<TD> </TD><TD><input type="submit" value="Login"></TD> | |||
</TR> | |||
</TABLE> | |||
</FORM> | |||
</pre> | |||
===Adding your name and logo to RangerMSP Web Interface pages=== | |||
You can add your name, logo, etc. to pages displayed by RangerMSP Web Interface. Your name and logos should be formatted using HTML code, which will automatically be embedded in all pages generated by RangerMSP Web Interface. | |||
You can design a header and footer for the page. | You can design a header and footer for the page. | ||
To display headers and footers, login to | To display headers and footers, login to RangerMSP, open the Options window, go to the Web Interface page and check the Header/Footer checkboxes (these are checked by default). | ||
Click ''Edit Header'' and ''Edit Footer'' to design these parts using HTML. | |||
You can also place the HTML for the Header and Footer in these files: | |||
Header: <Installation_DIR>\ | Header: <Installation_DIR>\RangerMSP\WebInterface\Files\MyOfficeSetting1.txt<br> | ||
Footer: <Installation_DIR>\ | Footer: <Installation_DIR>\RangerMSP\WebInterface\Files\MyOfficeSetting2.txt | ||
You can open these files in an editor (Notepad etc.) either navigate to their location using Windows file explorer or by clicking on the dedicated buttons in the Options window - Web Interface page. | You can open these files in an editor (Notepad etc.) either navigate to their location using Windows file explorer or by clicking on the dedicated buttons in the Options window - Web Interface page. | ||
| Line 333: | Line 516: | ||
them using the "/Files/" token.<br> | them using the "/Files/" token.<br> | ||
For example, to use the image file called "mylogo.jpg" in your HTML code, save it as | For example, to use the image file called "mylogo.jpg" in your HTML code, save it as | ||
<Installation_DIR>\ | <Installation_DIR>\RangerMSP\WebInterface\Files\mylogo.jpg and link to it in the HTML as follows: | ||
<img src="/Files/mylogo.jpg"> | <img src="../Files/mylogo.jpg"> | ||
If you are using the predefined login page (i.e. you've added a link to it from your web site) you need to restart the | If you are using the predefined login page (i.e. you've added a link to it from your web site) you need to restart the RangerMSP WebInterface service each time you modify the header and/or the file(s). | ||
=== | ===Testing RangerMSP Web Interface on your LAN prior to installing it for internet use=== | ||
#Set the ServerIP in CRMWebInterface.ini to your internal server’s IP | |||
# | #Make sure that the default ServerPort is not already in use, or modify it if necessary | ||
# | #Restart RangerMSP WebInterface service | ||
#To login, open the following file in Internet Explorer <Installation_DIR>\RangerMSP\WebInterface\Files\cmtcustlogin.htm | |||
===Sending Account Login Credentials to Customers=== | |||
After defining a Web User for your customer (see [[Web Interface#Define Web Users|Defining Web Users]]), you can send them an email with the Customer Account Credentials (username and password). This can help you streamline the process of providing your customers with Web user credentials to log into the Customer Web portal. | |||
To send an email with the customer account login credentials: | |||
# Open the Account window and go to the Web Users tab. | |||
# Select the customer's Web User you want to send to. | |||
# | # On the bottom part of the tab, click the Email icon. This will open a popup menu with available email templates that contain the Web User's username and password. | ||
# Choose the template you want to send. An email window will open with the template and details of the selected user. | |||
# | |||
Notes: | |||
# The default email template provided for this purpose includes the account credentials, including the username and password. You can create your own templates via the [[Email Templates]] feature. | |||
# If the customer has already modified the password or has already used the password (even once), it is not possible to send the password to the customer, to avoid security issues. In this case, it is only possible to reset the password and change it to another password. | |||
<br><br> | |||
[[File:web_interface_send_account_login_credentials.png]] | |||
==Troubleshooting == | ==Troubleshooting == | ||
'''Changing | '''Changing CRMWebInterface.ini parameters does not take effect''' | ||
'''Solution:''' After modifying <Installation_DIR>\ | '''Solution:''' After modifying <Installation_DIR>\RangerMSP\WebInterface\CRMWebInterface.ini, restart RangerMSP WebInterface service for the changes to take effect. | ||
| Line 370: | Line 557: | ||
'''Solution:''' | '''Solution:''' | ||
#If a connection cannot be established through the Internet/LAN, and the | #If a connection cannot be established through the Internet/LAN, and the RangerMSP WebInterface service is running, make sure no other applications or services on the server are using the same port as that set for RangerMSP Web Interface, and that you have set up the correct IP/URL address. | ||
#If a connection cannot be established through the internet, but can be established on your LAN, make sure you have opened up the port used by | #If a connection cannot be established through the internet, but can be established on your LAN, make sure you have opened up the port used by RangerMSP Web Interface in your firewall/proxy. | ||
#A common problem which can result with no response from the server, relates to DEP (Data Execution Prevention). You should open Window's DEP settings and allow | #A common problem which can result with no response from the server, relates to DEP (Data Execution Prevention). You should open Window's DEP settings and allow RangerMSP WebInterface service to accept connections.<br>DEP can be found under System Properties -> Advanced -> Performance - Settings -> tab DATA EXECUTION PREVENTION.<br>Make sure you allow the RangerMSP WebInterface service (its executable is found in <server>\RangerMSP\WebInterface\CRMWebInterface.exe)<br>Usually this requires reboot of the server for the changes to take effect. | ||
'''Session timeout is too short''' | '''Session timeout is too short''' | ||
'''Solution: '''If a user doesn't perform any action within a specified period of time his session expires and he needs to reenter the system. The default timeout value is 60 minutes. You can modify the default by editing the TimeOutAmount value in file <Installation_DIR>\ | '''Solution: '''If a user doesn't perform any action within a specified period of time his session expires and he needs to reenter the system. The default timeout value is 60 minutes. You can modify the default by editing the TimeOutAmount value in file <Installation_DIR>\RangerMSP\WebInterface\CRMWebInterface.ini | ||
'''Can't download documents from the web interface''' | '''Can't download documents from the web interface''' | ||
'''Solution:''' Using the Web Interface, employees can download | '''Solution:''' Using the Web Interface, employees can download RangerMSP documents which are located on your server, directly from the browser.<br>In order to allow file downloads, you should first map the folder locations for the download, so that the Web Interface Service will be able to access them for download. You can also define folders which will deny download, in case you need to protect sensitive information from being accessed via the web interface. To setup the documents download settings, go to Tools > Options > Web Interface. Read more about this under Document Download Settings. | ||
==See Also== | ==See Also== | ||
*[[ | *[[Microsoft IIS as the Web Server for the Web Interface]] | ||
*[[ | *[[Web Interface Troubleshooting | RangerMSP Web Interface Troubleshooting]] | ||
*[[ | *[[Two_Factor_Authentication]] | ||
*[[Web Interface FAQ]] | *[[Web Interface FAQ]] | ||
[[Category:Setup]] | [[Category:Setup]] | ||
[[Category:Installation]] | [[Category:Installation]] | ||
[[Category:User Manuals]] | [[Category:User Manuals]] | ||
Latest revision as of 06:20, 9 July 2020
Introduction
This document contains information about how to install, configure and run the Web Interface application.
This document is also available as Readme.txt file:
<Installation_DIR>\RangerMSP\WebInterface\Readme.txt
Note: "<Installation_DIR>" refers to the path on the server (drive and directory) where the RangerMSP server files are installed.
General Settings and Configuration
Setting the Port
RangerMSP Web Interface communicates with users/browsers through a port.
RangerMSP's default configuration uses Port 4961.
If you want to change the default port number, to a port number other than the default (4961) follow these instructions:
- Edit the Properties File: <Installation_DIR>\RangerMSP\WebInterface\CRMWebInterface.ini.
- Modify the port number under the token: 'ServerPort'.
- Note that you must use a port number greater than 1024 in order for the Web Interface service to work.
- Make sure that the port you choose is not being used by any other application or service.
- If you use a firewall, proxy, etc. it is recommended that you open Port 4961 (or the port defined in the properties file) in order to allow a connection to be established with RangerMSP Web Interface. If this port is blocked by a firewall, a connection cannot be established.
Setting the Server IP or URL
** Required only for version 6.1 and older **
From version 6.2 and up you do not need to configure this.
RangerMSP Web Interface uses a permanent IP address or URL. This IP/URL is the external Internet address of the computer on which RangerMSP Web Interface is running.
You can set up the server IP or URL by editing the file <Installation_DIR>\RangerMSP\WebInterface\CRMWebInterface.ini and changing the token: 'ServerIP' (e.g. ServerIP=212.140.210.143 or ServerIP=www.mydomainname.com).
Note that by default the Web Interface uses IP 127.0.0.1 (localhost), which means you can use the Web Interface on your local computer only.
Checking the Port
You can check the port is open and reachable by your customers and remote technicians by using My Port Checker which is a free web based utility.
Activating RangerMSP Web Interface
Install/Uninstall RangerMSP Web Interface
RangerMSP Web Interface runs as a Windows Service on your server.
Install
Note: Make sure to run RangerMSP client at least once before installing the Web interface service for the first time.
This part of the installation should be performed on the server itself.
Automatic installation (requires RangerMSP 14 and up)
Log in to to your Server with a Window's Administrator account and run the installer from:
<Installation_DIR>\RangerMSP\Utils\Install\InstallServerSideWindowsServices.exe
OR -
Manual installation
- Open a command prompt window: Right-click the command prompt icon and and choose 'Run As Adminsitrator'.
- Type the following command:
Note: The <Installation_Dir> must refer to a LOCAL server path (e.g. C:\ or D:\Software, etc.) and NOT to a shared network name/path.<Installation_DIR>\RangerMSP\WebInterface\CRMWebInterface.exe -install
- Wait for a success message to appear, indicating the service was installed successfully.
- Open the Windows Services Management windows from Control Panel > Administration Tools > Services.
- Verify that a Window's service called RangerMSP Web Interface is now displayed the services list.
- If the service is not there, make sure again that you are running the command prompt Window using 'Run as Administrator' and try again.
Notes: In case you wish to install and run the Web Interface service on Vista, you should run the command prompt from Start > Accessories > Command Prompt > right-click it and select > Run as administrator.
Running RangerMSP Web Interface Service
After a successful service installation, a service called RangerMSP Web Interface is now displayed in the system services management window (Control Panel > Administration Tools > Services).
Using the Services Management window, start the service and make sure that the service is defined to start automatically with a Delayed Start (Startup type > Automatic (Delayed Start)) each time the server is restarted.
Uninstall
To Uninstall RangerMSP Web Interface stop the RangerMSP WebInterface service and then type the following command in a command prompt window on the server:
<Installation_DIR>\RangerMSP\WebInterface\CRMWebInterface.exe -uninstall
Starting To Use Web Interface
To start using the Web Interface, you should first define Web Users for Employees and for Customers. Then, browse to the login page and log in to the system.
Note that logging in via mobile devices will automatically adjust the display to be optimized for small screens. See more details in Web Interface From Mobile Devices.
Define Web Users
To test the installation and start using RangerMSP Web Interface, create web users for employees and customers.
Web user management is done within the RangerMSP application. Login to RangerMSP and follow these instructions:
Creating web users for Employees
- Open the Employees/Accounts window and navigate to the desired employee record.
- Select the "Employee" tab and click on the "Configure Web User" Button.
- Set a web username and password and confirm.
Note: You can use Employee Web Users to work with Subcontractors. See more details in Activating Subcontractors.
Creating web users for customer Accounts
- Open the Accounts window and navigate to the desired Account record.
- Select the "Web Users" page, click on the "New" button at the bottom of the page.
- Set the web user username, password and other information and confirm.
Note: After defining the user, you can send them an email with the Account login credentials. See more details in Sending Account Login Credentials to Customers.
Notes:
- RangerMSP Web Interface will identify the newly created users within several minutes.
- All passwords are case sensitive.
- Since each username must be unique in the entire system, it may be a good idea to add a common prefix to all the web users of each Account, i.e. BIZ_1_John, BIZ_1_Mary, BIZ_2_John, BIZ_2_Phil etc.
If you set an Account number for each of your accounts (using the Account# field), you can set the system to automatically add the Account# as a prefix for each new web user you create. Use the Options > Web Interface to set this feature.
Login to the Web Interface
In your web browser, enter in the URL: http://127.0.0.1:4961
Note: You should modify this link to reflect your IP/URL address and Port.
A login page will be displayed. Enter the username and password you defined. Click the Login button to log-in.
You can also embed the login page in your web site.
Web Interface From Mobile Devices
When using the Web Interface from Mobile devices, RangerMSP Web Interface uses an optimized display for mobile devices with small displays. The mobile display allows you to easily view and manage tickets, get customer contact details, log time and parts charges and much more directly from your phone.
Options for mobile devices:
- All HTML templates are adjusted to fit mobile screen resolution (minimum screen width 320 pixels).
- Instead of the existing tabs in regular browsers (i.e. Account/Tickets etc.), a quick selection list will switch between the tabs.
- Users can adjust the amount of characters to make long textual fields look better on mobile devices. To make the adjustment go to Tools > Options > Web Interface.
- It is possible to switch to mobile display also on any browser using the new switch to mobile / switch to standard option.
Document Download and Upload Settings
Using the Web Interface, employees can download and upload RangerMSP documents which are located on your server, directly from the browser.
In order to allow file downloads and uploads, you should first enable file download and upload to allow the Web Interface Service to access the documents for downloads and uploads.
To enable uploads and downloads, go to Tools > Options > Web Interface (Admin):
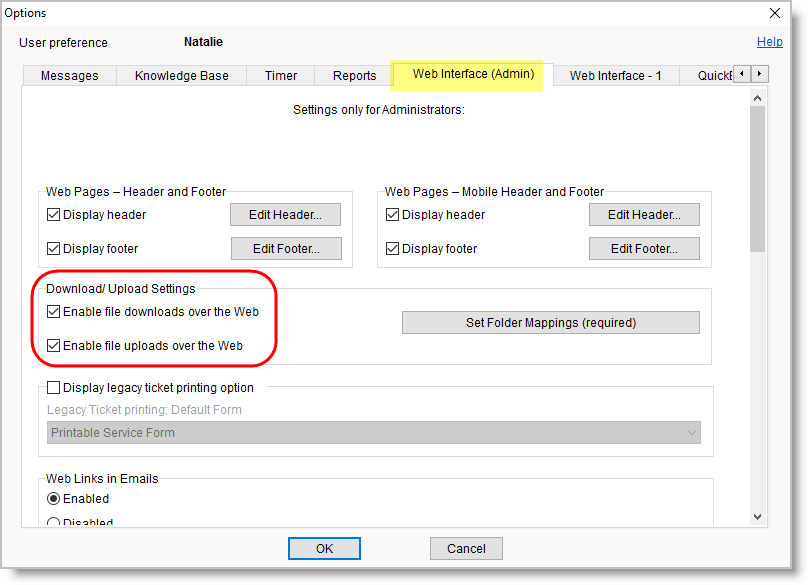
In this window an administrator user can determine whether Web Interface users will be able to download and upload documents:
- Check the Enable file downloads over the Web option to allow files download.
- Check the Enable file uploads over the Web option to allow files uploads.
In any case, both for download and for upload, the administrator should also take care of folders mapping (see below).
Document Folders Mapping
In order to allow file downloads and uploads, you should first map the folder locations for the documents, so that the Web Interface Service will be able to access them for download and uploads. You can also define folders which will deny access, in case you need to protect sensitive information from being accessed via the web interface.
The RangerMSP Document files can be physically stored in various places on your server. The system has a default documents folder (as mapped in Tools > Options > Documents > Default Document Folder), which is usually physically located on the server. Note that the documents UNC path in the Document's properties is stored in the same way the client PCs sees it.
When the Web Interface tries to access a file on the server, this is done via the Web Interface service, running on your server. This means that the paths that are specified in the document properties in RangerMSP will probably not be comprehensible to the Web Interface Service running on your server.
For the service to be able to access these files, you need to 'teach' the server how to access the files locally, when encountering a mapped drive in the file path.
To setup the documents folders mapping settings, go to Tools > Options > Web Interface:
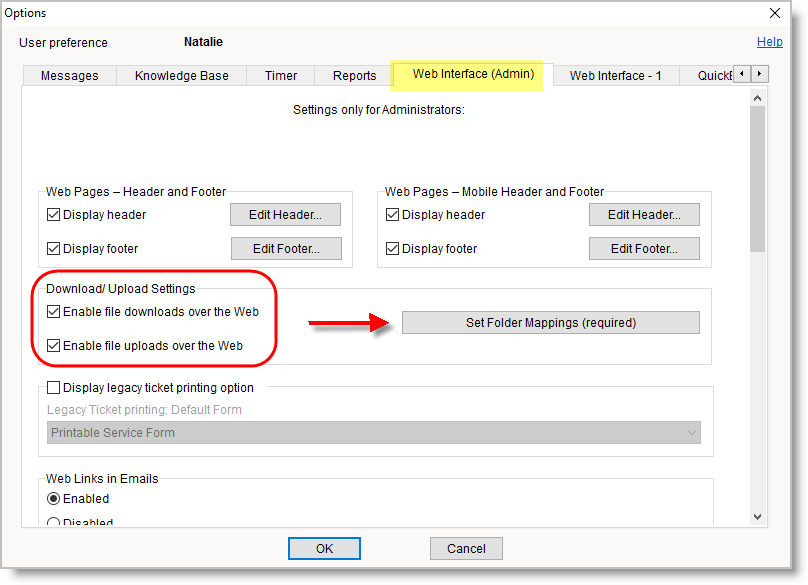
To map the folders, click the Setup folder mappings button to open the download folders settings window.
Allow Folders Settings
In the Allow Web Access To Folders tab, you should map the folders in order for the web interface service to be able to access them from the Web Interface.
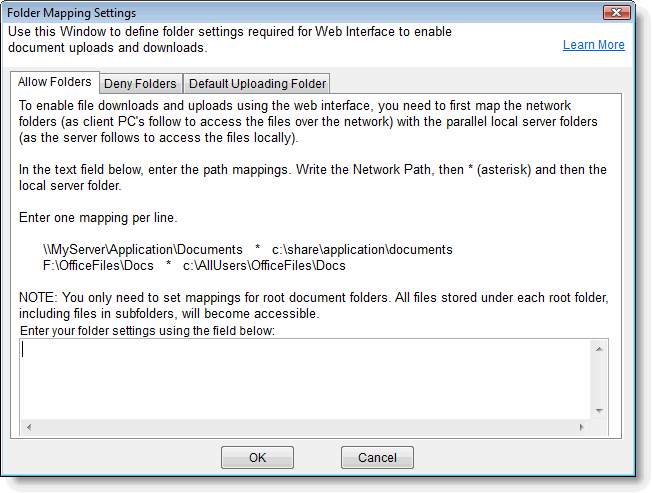
In this tab, you can enter the path mappings, which will map the 'network' path to the 'local' server path.
In the edit box, enter the Network Path (as client PCs see it), then an * (asterisk), and then the local server folder.
You should enter one mapping per line. For Example: F:\OfficalFiles\Docs * C:\AllUserOfficeFiles\Docs
Where:
F:\OfficalFiles\Docs - Mapped path as Client PCs see it.
* - Divides between the network and local path of the mapping.
C:\AllUserOfficeFiles Docs - Local path as the server sees it.
Note: You only need to set mappings for root document folders. All files stored under each root folder, including files in subfolders, will become available from the Web Interface automatically.
For example, if you map the folder F:\OfficalFiles\Docs then files stored at F:\OfficalFiles\Docs\your customer\ will be available.
Deny Folders Settings
In the Deny Web Interface Access To Folders tab, you can define the folders for which you want to deny access from the Web Interface.
In this tab, you can deny access to certain folders, in order to protect a document folder from unauthorized downloads and uploads
In the edit box, you should type in the paths you wish to deny access to. It's better to use a server's local path, although network paths are also allowed (they should appear in the same way they appear in the document's properties).
You should enter one folder path per line. For Example:
C:\OfficeFiles\Private
D:\ITDocs\Passwords
Note: The system will automatically block access to files stored under each specified folder, including files in subfolders.
For example, if you block the folder D:\ITDocs\Passwords, files stored at D:\ITDocs\Passwords\RDP\ will be blocked too.
Default Uploading Folder Settings
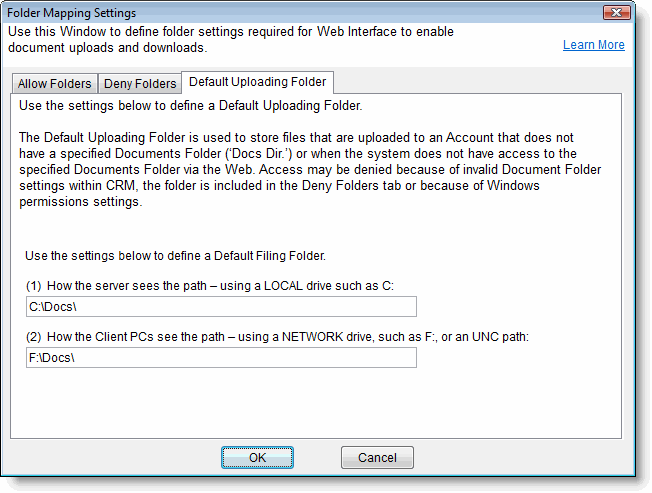
When files are uploaded via the Web Interface, they are automatically saved in the account's “Docs Dir” folder (which can be defined in the account window, under the Details tab). However under certain circumstances the Docs Dir folder cannot be accessed over the Web Interface, such as when no Docs Dir folder has been created for an account, or when it has been placed in the Deny Folders list.
For this reason, users should define an “Uploads Default Folder.” When a file cannot be uploaded to the account’s Docs Dir folder, it will be automatically uploaded to this default folder. To define the Uploads Default Folder, go to Tools > Options > Web Interface > Download/Upload Settings > Click Set Folder Mapping. In the Folder Mapping Settings window > Default Uploading Folder:
Web Interface Options
Web Interface Options control different aspects of the way the Web Interface behaves. To customize the Web Interface, go to Tools > Options > Web Interface tab.
Note: Always make sure to restart the RangerMSP Web Interface service after performing any changes, so they will take effect in the Web Interface.
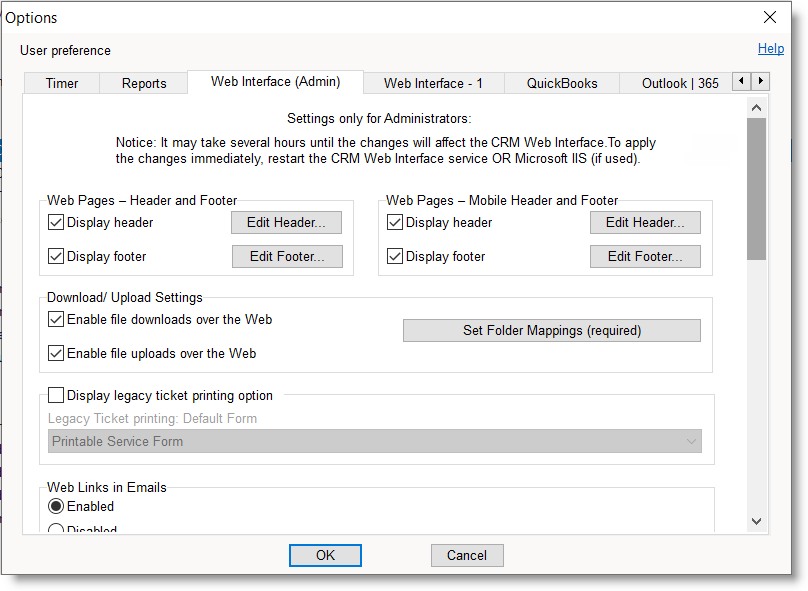
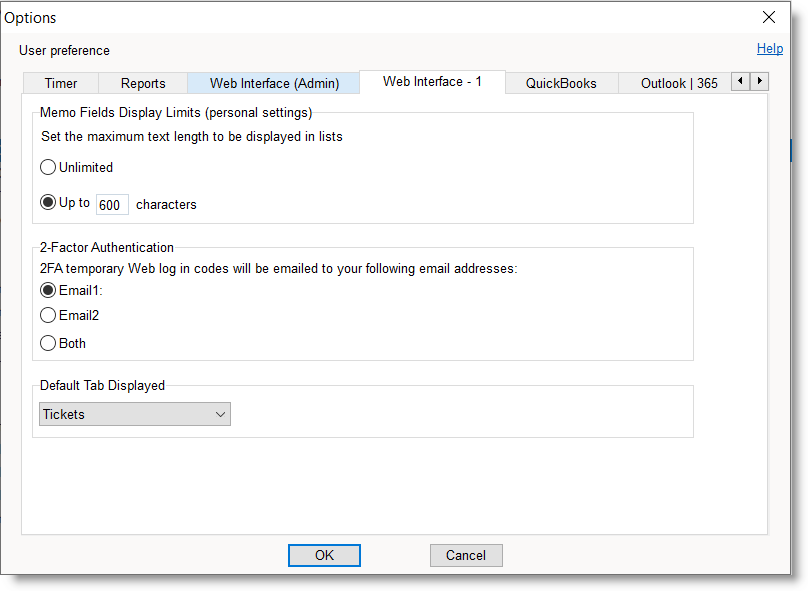
In this window you can set up the following (note there are more options when you scroll down, see more screenshots below):
Default Web Calendar View
The Default Web Calendar view options allow you to choose how you want to see your appointments when using the Web Interface. Your options are:
- Graphic weekly Calendar.
- List of Appointments (non graphic).
Memo Fields Display Limits
The Memo Fields Display Limits Option controls the amount of characters that will be displayed for long textual fields (Memo fields) showing up in lists on the Web Interface. This feature helps you manage the way you see the list, and the amount of data that will be displayed when showing long (Memo) fields.
In situations where the text is very long and exceeds the length defined here, a linkable '...' sign will appear at the end of the truncated text and this will open for viewing the full details for this entity.
The length of text to show in the lists is defined separately for standard Web browsers and for mobile devices' browsers (small display).
The length settings are personal, and affect each user's display separately.
The Header and Footer option lets you design the Web pages for the Web Interface. This affects both customers and employees view.
Click Edit Header and Edit Footer to design these parts using HTML.
See also:
- Embedding a login page in your web site.
- Adding your name and logo to RangerMSP Web Interface pages.
Download/Upload Settings
Using the Web Interface, employees and customers can download and upload (only employees) RangerMSP documents which are located on your server, directly from the browser. In order to allow file downloads and uploads, you should first enable file download and upload to allow the Web Interface Service to access the documents for downloads and uploads. See more details in Document Download and Upload Settings.
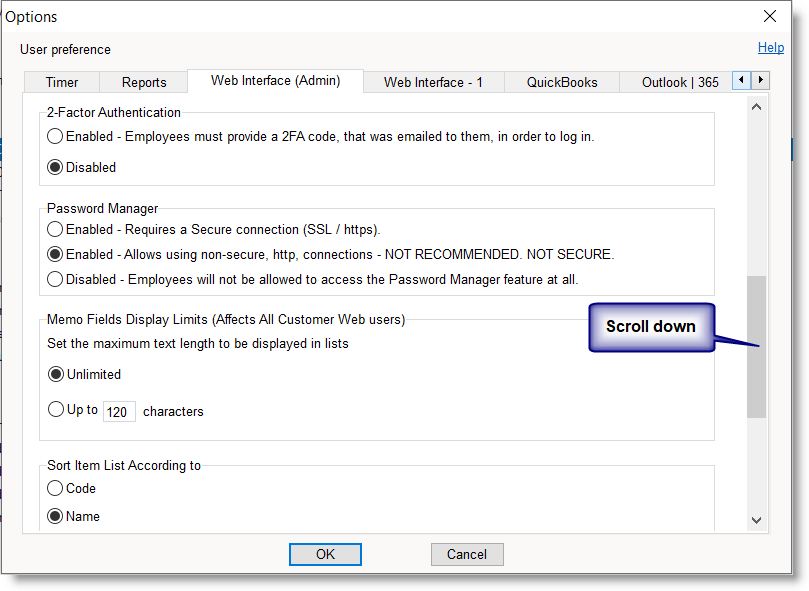
More Options (scroll Down):
Default Technician Service Form
Choose the report which will be printed when clicking the Print icon from the Ticket page in the Employees Web Interface.
Web Links in Emails
Web Links refer to email Alerts being sent via RangerMSP Alerts Server. When enabled, the system will add a link to the relevant entity in the email alert body. This allows employees to quickly open RangerMSP Web Interface and view or edit the details of the entity being referred in the email. This saves the need to go explicitly to the Web Interface site, login and search for the entity in order to see its details.
Web Links Options:
- Enable - enabling this option will automatically add links to email Alerts sent by RangerMSP Alerts Server.
- Disable - disabling this option will not add the links to the emails sent by RangerMSP Alerts Server.
- Use SSL/Https - when the Web Interface is configured with IIS as a Web Server and with SSL - the special tokens should be configured Web Links in Emails (see more details in Web Links in Emails).
Note: When using Alerts to Customers, which send email alerts regarding new Tickets and Tickets being closed, it is possible to add Web Links to the email template sent to the customer. This requires using RangerMSP Web Interface for Customers. See more details in Alerts to Customers Settings.
Memo Fields Display Limits (for Customer Users)
The Memo Fields Display Limits Option controls the amount of characters that will be displayed for long textual fields (Memo fields) showing up in lists on the Web Interface. This feature helps Administrators manage the way customers see lists, and the amount of data that will be displayed when showing long (Memo) fields.
In situations where the text is very long and exceeds the length defined here, a linkable '...' sign will appear at the end of the truncated text and this will open for viewing the full details for this entity.
The length of text to show in the lists is defined separately for standard Web browsers and for mobile devices' browsers (small display).
These settings are global for all customer users.
Sort Items List According To
This option determines the sort criteria for Items when choosing Items from the list, i.e. when creating a new Charge and choosing the Item. Possible options are to sort the list either by the Item Code or Item Name.
Initialize Customer Web Usernames
When using the "Initialize new Web users with the account number" option, new Customer Web Users will be automatically copied to the username so all this customer's Web users will start with the same prefix. This can help standardize the usernames for customers.
The Account number is copied only if defined for the Account in Details tab > Accnt #.
Setting Customer Privileges
Using the Web Interface, customers can create new tickets and view their open and closed tickets. When given additional privileges, customers can also optionally view contract information, charges, assets, and Knowledge Base articles; download files; and more.
To control what each user can see, each customer Web user should be assigned a Privilege Group. See more details in Customer Privileges.
Generating and Printing Reports Using the Web Interface
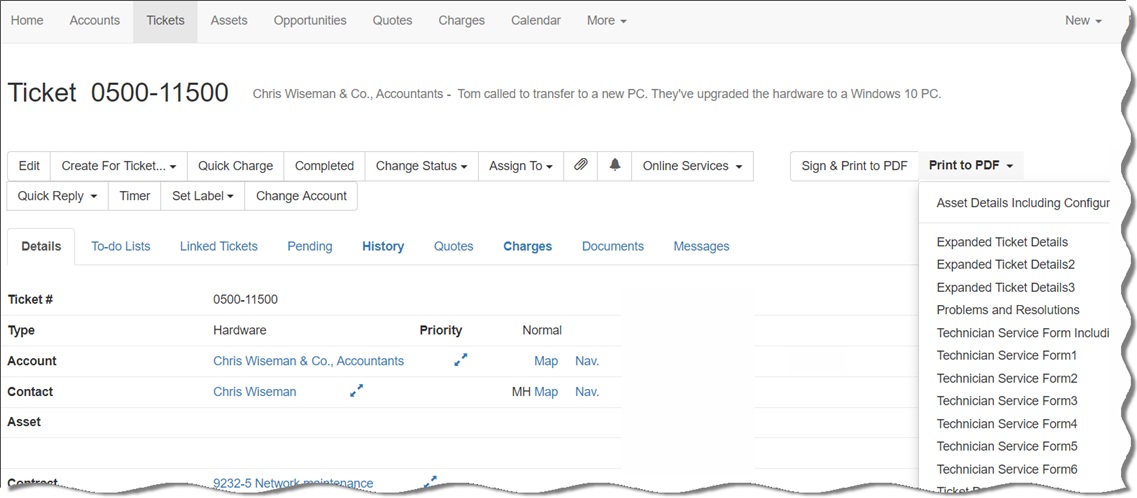
When using the Web Interface, users can generate reports and save them as PDF files. These files are automatically downloaded to the user’s local computer, from where they can be printed.
To print a report for an entity , open the entity’s window in the Web Interface. Click on the ”Print to PDF” option which opens a drop-down list of all the reports available for the entity. In this list you can can choose from any of the reports available for the entity in the client application. The report is generated and saved as a PDF file and downloaded to the local PC/mobile device.
Working with Subcontractors
RangerMSP Subcontractors feature allows you to effectively manage subcontractors and track their work.
Subcontractor licenses are fully-featured RangerMSP Employee licenses. You can let subcontractors access the system via the RangerMSP Web Interface, restrict them to view only specific Accounts and give them limited privileges.
See more details about using RangerMSP Web Interface to work with subcontractors in Subcontractors.
Timers
Just like the Timers you can run in the desktop application to log time for work done and convert to Charges, now you can run a Timer at any time and anywhere, through the Web Interface so technicians on the road can use the timer to log their work on-site.
To activate the web based Timer simply view the appropriate record (Account/Ticket/Contract) and click the Timer link which appears at the top right. A popup timer window will appear where you can stop & start logging time and convert to a Charge.

To-do Lists
The new and powerful To-do List feature in the desktop application also exists in the Web Interface so you're always within reach of those important to-dos. You can instantly create, add, edit and complete them. To-do Lists can be created from pre-made templates so technicians can quickly use and manage them whenever needed.
To add a new To-do list:
- View the appropriate record (Account/Ticket/Contract)
- Click the Add a To-do List button OR click the down arrow on the right of the button and select a template to create the To-do List from.
- If adding a new list, you must then enter the list name and then you can start adding To-do items by clicking the Add a To-do link and entering the to-do details.
To edit a To-do item:
- Point to it with your mouse cursor which will bring up the edit menu.
- Click Edit and modify to suit.
To delete an item:
- Point to it which will bring up the edit menu.
- Click the trashcan icon - the item will be removed from your To-do list immediately.
Charges - Quick Time Entry
Adding Charges is even easier now as it can be done by selecting the time span from the drop down Quick Time Entry list of periods, such as Last 15 min or Last 2 Hours which will then automatically fill in the Start/End times for you, saving you from having to type it all in each box manually. Once you have selected the time span the total amount of time also appears on the button to the right of the Quick Time Entry link and if you click this it will add that time to the Hours/Units box below.
Tickets - Resolution from Charge Descriptions
You can now easily add the Charges description to the Ticket resolution when completing a Ticket. To add the charge descriptions, simply go to the Resolution box on the Edit Ticket form and click Append Charge Descriptions - all the Charge descriptions for this Ticket will appear in the resolutions box ready to save.
File Uploads by Customers
Customers can now upload files directly through the Web Interface, subject to the privileges you define for them. No more asking them to email files to you for you to attach to their Account or Ticket.
To upload a file, the customer must:
- Login to the Web interface
- Go to the Documents tab
- Click the Upload link
- Select the file to upload.
View or Edit Ticket Priorities
Customers can login to the Web Interface and view priority of a Ticket and even change the priority if they want, subject to Privilege settings. To change the priority the customer must:
- Login
- Select a Ticket
- Click Edit
- Select the required Priority from the drop down list
- Save the changes.
Tips & Tricks
Embedding a login page in your web site
All user logins are performed through a browser login page. This login page is usually accessed from your existing web site.
You can choose to use a predefined login page or customize your own login page (advanced.
To use the predefined login page
Add the following line to the relevant page/s in your existing web site:
<A HREF="http://127.0.0.1:4961">Click to login</A>
Note: You should edit this link to reflect your IP/URL address and Port (127.0.0.1 to your IP/URL and 4961 to the port in use).
|
Customize your own login page (advanced)
If you prefer that a login area will be embedded in one of your web site pages (i.e. the actual login fields will be displayed in the page and not only a link to a login page) complete the following instructions.
Embed the following HTML/script code in one of your web pages.
The <SCRIPT> code should be added beween the HTML <HEADER> and </HEADER>.
The <FORM> code should be added in the HTML <BODY> area; You need to update the default IP/URL (127.0.0.1) to your IP/URL, and the default port number (4961) to your port settings.
Please embed the following HTML code.
Copy and paste this section to your HTML <HEADER> section:
Note: Copying from here may contain some illegal characters (depending on the web browser). If you are encountering any problems embedding this code, please try copying the HTML part from the Tips&Tricks section inside the readme file at: <Installation_DIR>\RangerMSP\WebInterface\Readme.txt file instead.
<SCRIPT Language="JavaScript">
      <!--
        function CmtCheckInput()
        {

          if (document.CmtForm.CmtUsrNamePrm.value=="" )
          {
            alert('Please enter a value for Name');
            document.CmtForm.CmtUsrNamePrm.focus();
            return false;
          }
          else if (document.CmtForm.CmtUsrPWPrm.value=="")
          {
            alert('Please enter a value for Password');
            document.CmtForm.CmtUsrPWPrm.focus();
            return false;
          }
          else
          {
            return true;
          }
        }

        function CmtKeyPress(event)
        {
          if (event.keyCode == 13)
          {
            CmtCheckInput();
          }
        }
      //-->
</SCRIPT>
Copy the following HTML code, paste it in the HTML <BODY> area and modify the IP and Port as described above:
<FORM name="CmtForm" method="post" action="http://127.0.0.1:4961" onSubmit="return CmtCheckInput()">
      <TABLE>
 	<TR>
 	  <TD>User Name:</TD>
	  <TD><input name="CmtUsrNamePrm" type="text" id="CmtUsrNamePrm"></TD>
        </TR>
        <TR>
          <TD>Password:</TD>
          <TD><input name="CmtUsrPWPrm" type="password" id="CmtUsrPWPrm"></TD>
        </TR>
        <TR>
          <TD> </TD><TD><input type="submit" value="Login"></TD>
	</TR>
      </TABLE>
</FORM>
Adding your name and logo to RangerMSP Web Interface pages
You can add your name, logo, etc. to pages displayed by RangerMSP Web Interface. Your name and logos should be formatted using HTML code, which will automatically be embedded in all pages generated by RangerMSP Web Interface.
You can design a header and footer for the page.
To display headers and footers, login to RangerMSP, open the Options window, go to the Web Interface page and check the Header/Footer checkboxes (these are checked by default). Click Edit Header and Edit Footer to design these parts using HTML.
You can also place the HTML for the Header and Footer in these files:
Header: <Installation_DIR>\RangerMSP\WebInterface\Files\MyOfficeSetting1.txt
Footer: <Installation_DIR>\RangerMSP\WebInterface\Files\MyOfficeSetting2.txt
You can open these files in an editor (Notepad etc.) either navigate to their location using Windows file explorer or by clicking on the dedicated buttons in the Options window - Web Interface page.
Notes:
These files are not standalone HTML pages and should NOT include the standard HTML page tags
like <HEAD>, <BODY>, etc.
The HTML code should include only HTML code related to the design of your name, logo etc. and not
to any other page related HTML tags.
If you use image files in the HTML, you should save these images in the same directory and link to
them using the "/Files/" token.
For example, to use the image file called "mylogo.jpg" in your HTML code, save it as
<Installation_DIR>\RangerMSP\WebInterface\Files\mylogo.jpg and link to it in the HTML as follows:
<img src="../Files/mylogo.jpg">
If you are using the predefined login page (i.e. you've added a link to it from your web site) you need to restart the RangerMSP WebInterface service each time you modify the header and/or the file(s).
Testing RangerMSP Web Interface on your LAN prior to installing it for internet use
- Set the ServerIP in CRMWebInterface.ini to your internal server’s IP
- Make sure that the default ServerPort is not already in use, or modify it if necessary
- Restart RangerMSP WebInterface service
- To login, open the following file in Internet Explorer <Installation_DIR>\RangerMSP\WebInterface\Files\cmtcustlogin.htm
Sending Account Login Credentials to Customers
After defining a Web User for your customer (see Defining Web Users), you can send them an email with the Customer Account Credentials (username and password). This can help you streamline the process of providing your customers with Web user credentials to log into the Customer Web portal.
To send an email with the customer account login credentials:
- Open the Account window and go to the Web Users tab.
- Select the customer's Web User you want to send to.
- On the bottom part of the tab, click the Email icon. This will open a popup menu with available email templates that contain the Web User's username and password.
- Choose the template you want to send. An email window will open with the template and details of the selected user.
Notes:
- The default email template provided for this purpose includes the account credentials, including the username and password. You can create your own templates via the Email Templates feature.
- If the customer has already modified the password or has already used the password (even once), it is not possible to send the password to the customer, to avoid security issues. In this case, it is only possible to reset the password and change it to another password.
Troubleshooting
Changing CRMWebInterface.ini parameters does not take effect
Solution: After modifying <Installation_DIR>\RangerMSP\WebInterface\CRMWebInterface.ini, restart RangerMSP WebInterface service for the changes to take effect.
Cannot login using newly defined web users
Solution: If you cannot login using web users you've just created/enabled, please note that it may take up to five minutes until your new settings take effect, and that the password is case sensitive.
No response from the server (seeing a blank page or an access error message)
Solution:
- If a connection cannot be established through the Internet/LAN, and the RangerMSP WebInterface service is running, make sure no other applications or services on the server are using the same port as that set for RangerMSP Web Interface, and that you have set up the correct IP/URL address.
- If a connection cannot be established through the internet, but can be established on your LAN, make sure you have opened up the port used by RangerMSP Web Interface in your firewall/proxy.
- A common problem which can result with no response from the server, relates to DEP (Data Execution Prevention). You should open Window's DEP settings and allow RangerMSP WebInterface service to accept connections.
DEP can be found under System Properties -> Advanced -> Performance - Settings -> tab DATA EXECUTION PREVENTION.
Make sure you allow the RangerMSP WebInterface service (its executable is found in <server>\RangerMSP\WebInterface\CRMWebInterface.exe)
Usually this requires reboot of the server for the changes to take effect.
Session timeout is too short
Solution: If a user doesn't perform any action within a specified period of time his session expires and he needs to reenter the system. The default timeout value is 60 minutes. You can modify the default by editing the TimeOutAmount value in file <Installation_DIR>\RangerMSP\WebInterface\CRMWebInterface.ini
Can't download documents from the web interface
Solution: Using the Web Interface, employees can download RangerMSP documents which are located on your server, directly from the browser.
In order to allow file downloads, you should first map the folder locations for the download, so that the Web Interface Service will be able to access them for download. You can also define folders which will deny download, in case you need to protect sensitive information from being accessed via the web interface. To setup the documents download settings, go to Tools > Options > Web Interface. Read more about this under Document Download Settings.

