Customer Privileges: Difference between revisions
No edit summary |
|||
| (10 intermediate revisions by 3 users not shown) | |||
| Line 3: | Line 3: | ||
Using the [[Web Interface]], customers can create new tickets; view their open and closed tickets; view contract information, charges, [[assets]], and [[Knowledge Base]] articles; download files; and more. | Using the [[Web Interface]], customers can create new tickets; view their open and closed tickets; view contract information, charges, [[assets]], and [[Knowledge Base]] articles; download files; and more. | ||
All customers are given the privilege of viewing tickets and adding new tickets via the Web Interface. Other types of data can be allowed or denied to customers via | All customers are given the privilege of viewing tickets and adding new tickets via the Web Interface. Other types of data can be allowed or denied to customers via Customer Privilege Groups. | ||
Setting up customer privileges includes two steps: | |||
# Define Privilege Groups (optional - you can use the predefined system groups). | |||
# Assign the Privilege Group to the Customer Web Users. | |||
__TOC__ | |||
===Define Privilege Groups=== | |||
To manage Customer Privilege Groups go to ''File > Users & Privileges > Customer Privileges – For Web Users''. | |||
The following window opens: | |||
In any case, make sure to restart the | [[File:Customer_privilege_groups.png|center]] | ||
The system comes with 3 predefined Customer Privilege Groups (Full, Partial and Limited) which cannot be modified, however, new groups can be added and customized. | |||
By selecting or deselecting the privileges in this window you can determine which privileges are made available to customers assigned with this group: | |||
# '''Tickets (Add/Edit)''' <br>Selecting Add controls whether or not the customer can add new Tickets. Selecting Edit controls whether or not the customer can edit the Ticket description. | |||
# '''Ticket - View/Edit Ticket Priorities''' <br> This option controls whether or not the customer can view and change Ticket priority. | |||
# '''Ticket - View/Edit Asset linked to a Ticket''' <br> This option controls whether or not the customer can view and select/change Ticket Asset. | |||
# '''Charges''' <br>Selecting this option allows the customer Web user to see charges when viewing tickets and contracts. Deselecting this option will hide the Charges area in the ticket and contracts view for the user. | |||
# '''Assets'''<br>Selecting this option will allow customer Web users to see the Assets tab and the list of all assets linked to their account. <br>Deselecting this option will hide the Assets tab altogether for these customers and they will not be able to see the list of existing assets. | |||
# '''Asset Configuration Note - View''' <br> Selection this options allows customer to see Asset Configuration Notes, if they are allowed to see their account Assets. | |||
#'''History Notes'''<br>Selecting this option allows customer Web users to see the History tab and to view all of their existing Ticket history or add to it.<br>Deselecting this option hides the History tab altogether for these users and prevents them from viewing or updating Ticket history. | |||
#'''Contract Status'''<br>Selecting this option will allow customer Web users to see the contracts tab and view all of their existing contracts.<br>Deselecting this option will hide the contracts tab altogether for these users and they will not be able to view their contracts and terms. | |||
#'''View public email messages under Tickets'''<br>In this section you can define whether the customer Web user can view email messages filed under the Ticket. Note that only emails marked as Public in the email properties will be available to customers via the Web Interface.<br>You can also find more details on the public flag for email messages under Tickets in the [[Ticket Management]] user guide under [[Ticket_Management#Email_Public_Flag|Email Public Flag section]]. | |||
# '''Download public Document files linked to their account''' <br>In this section you can define whether the customer Web user can download and view documents linked to their account. Note that only documents marked as Public in the document properties will be available to customers via the Web interface. <br>You can also find more details on setting up the Web Interface for files download in [[Web_Interface#Document_Download_and_Upload_Settings|Document Download Settings]]. | |||
# '''Upload files''' <br> This option allows you to define whether the customer can upload files to their Tickets. | |||
# '''Public Knowledge Base Articles and Download Linked Files'''<br>In this section, you can define whether customer Web users can view Knowledge Base articles. You can also further define whether the user can download files linked to these articles. Note that only articles marked as Public will be available to customers via the Web interface. For more details on articles privileges, see the Knowledge Base Manual, [[Knowledge_Base#Security_and_Privileges|Security and Privileges]] section. | |||
# '''Quotes''' <br>Enable customers to view Quotes online or also to accept a Quote through the Web Interface. | |||
# '''Change Password''' <br>Allow the customer to change their own password through the Web Interface. | |||
===Add a new Privilege Group=== | |||
To add a new group, click the blue Privileges Group caption and choose ''New''. | |||
Enter the Group name in the window that opens, and click OK to create the new Privilege Group. | |||
Select the privileges using the checkboxes. When done, click ''Close'' to save your changes. | |||
You can now assign the new group to Customer Web users. | |||
===Assign Privilege Groups to Customer Web Users=== | |||
Each Customer Web User must be assigned with a Privilege Group. This determines the specific user's permissions. This means that you can assign different permissions to different people in your customer's company. This is a powerful management tool which allows you flexible permissions according to the person's role in the company. | |||
Assigning a privileges group can be done when creating a new Customer Web user, or by editing an existing user. | |||
To assign a privilege group to a new user, go to the ''Account window > Web Users tab > New''. | |||
To assign a privilege group to an existing user, go to the ''Account window > Web Users tab'' > double click the Web User line to edit its details. | |||
In the window that opens, choose the Privilege Group from the list. | |||
[[File:Customer_privilege_groups_assign.gif|center]] | |||
''Note: The Privilege Groups feature is available starting with RangerMSP 5.5. When '''upgrading''' to RangerMSP 5.5, a new custom group will be automatically created, based on the current Web Interface Customer Privileges settings defined under Tools > Options > Web Interface (in versions prior to 5.5). This custom group is automatically assigned to all customer Web users to assure the privileges stay the same. You can customize the groups from > Users & Privileges > Web Users Privileges – Customers.'' | |||
===Default Privilege Group=== | |||
You can define a default privilege group which will be assigned automatically to all new customer Web users. When choosing a group in the ''Customer Privilege Groups Administration'' window, the default group will appear with the word "Default" in brackets. | |||
<br>For example: | |||
<br>Group: Full for Customer Web Users [System, '''Default'''] | |||
<br>To set a default group, choose the group you want to use as the default from the drop-down list, and click Set as Default. | |||
<br> | |||
[[File:Customer_privilege_groups_default.gif|center]] | |||
<br><br>In any case, make sure to restart the CRM Web Interface service after performing any changes, so they will take effect in the Web Interface. | |||
==See Also== | ==See Also== | ||
Latest revision as of 08:06, 8 July 2020
Using the Web Interface, customers can create new tickets; view their open and closed tickets; view contract information, charges, assets, and Knowledge Base articles; download files; and more.
All customers are given the privilege of viewing tickets and adding new tickets via the Web Interface. Other types of data can be allowed or denied to customers via Customer Privilege Groups.
Setting up customer privileges includes two steps:
- Define Privilege Groups (optional - you can use the predefined system groups).
- Assign the Privilege Group to the Customer Web Users.
Define Privilege Groups
To manage Customer Privilege Groups go to File > Users & Privileges > Customer Privileges – For Web Users.
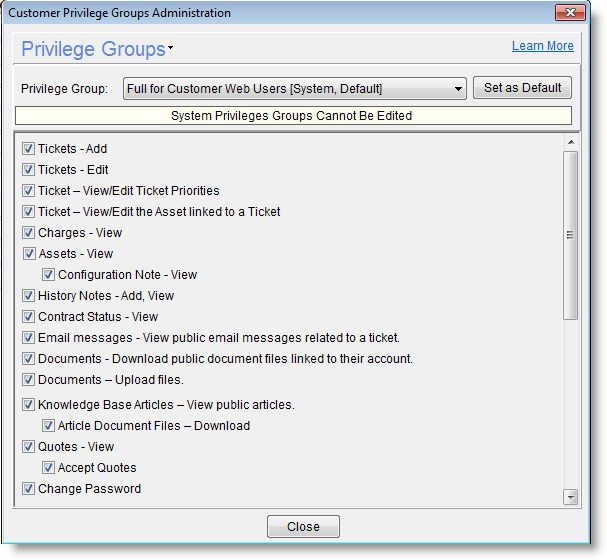
The following window opens:

The system comes with 3 predefined Customer Privilege Groups (Full, Partial and Limited) which cannot be modified, however, new groups can be added and customized.
By selecting or deselecting the privileges in this window you can determine which privileges are made available to customers assigned with this group:
- Tickets (Add/Edit)
Selecting Add controls whether or not the customer can add new Tickets. Selecting Edit controls whether or not the customer can edit the Ticket description. - Ticket - View/Edit Ticket Priorities
This option controls whether or not the customer can view and change Ticket priority. - Ticket - View/Edit Asset linked to a Ticket
This option controls whether or not the customer can view and select/change Ticket Asset. - Charges
Selecting this option allows the customer Web user to see charges when viewing tickets and contracts. Deselecting this option will hide the Charges area in the ticket and contracts view for the user. - Assets
Selecting this option will allow customer Web users to see the Assets tab and the list of all assets linked to their account.
Deselecting this option will hide the Assets tab altogether for these customers and they will not be able to see the list of existing assets. - Asset Configuration Note - View
Selection this options allows customer to see Asset Configuration Notes, if they are allowed to see their account Assets. - History Notes
Selecting this option allows customer Web users to see the History tab and to view all of their existing Ticket history or add to it.
Deselecting this option hides the History tab altogether for these users and prevents them from viewing or updating Ticket history. - Contract Status
Selecting this option will allow customer Web users to see the contracts tab and view all of their existing contracts.
Deselecting this option will hide the contracts tab altogether for these users and they will not be able to view their contracts and terms. - View public email messages under Tickets
In this section you can define whether the customer Web user can view email messages filed under the Ticket. Note that only emails marked as Public in the email properties will be available to customers via the Web Interface.
You can also find more details on the public flag for email messages under Tickets in the Ticket Management user guide under Email Public Flag section. - Download public Document files linked to their account
In this section you can define whether the customer Web user can download and view documents linked to their account. Note that only documents marked as Public in the document properties will be available to customers via the Web interface.
You can also find more details on setting up the Web Interface for files download in Document Download Settings. - Upload files
This option allows you to define whether the customer can upload files to their Tickets. - Public Knowledge Base Articles and Download Linked Files
In this section, you can define whether customer Web users can view Knowledge Base articles. You can also further define whether the user can download files linked to these articles. Note that only articles marked as Public will be available to customers via the Web interface. For more details on articles privileges, see the Knowledge Base Manual, Security and Privileges section. - Quotes
Enable customers to view Quotes online or also to accept a Quote through the Web Interface. - Change Password
Allow the customer to change their own password through the Web Interface.
Add a new Privilege Group
To add a new group, click the blue Privileges Group caption and choose New.
Enter the Group name in the window that opens, and click OK to create the new Privilege Group.
Select the privileges using the checkboxes. When done, click Close to save your changes. You can now assign the new group to Customer Web users.
Assign Privilege Groups to Customer Web Users
Each Customer Web User must be assigned with a Privilege Group. This determines the specific user's permissions. This means that you can assign different permissions to different people in your customer's company. This is a powerful management tool which allows you flexible permissions according to the person's role in the company.
Assigning a privileges group can be done when creating a new Customer Web user, or by editing an existing user.
To assign a privilege group to a new user, go to the Account window > Web Users tab > New. To assign a privilege group to an existing user, go to the Account window > Web Users tab > double click the Web User line to edit its details.
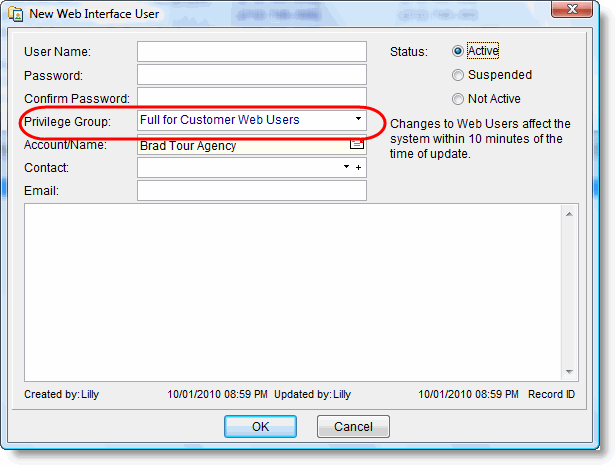
In the window that opens, choose the Privilege Group from the list.

Note: The Privilege Groups feature is available starting with RangerMSP 5.5. When upgrading to RangerMSP 5.5, a new custom group will be automatically created, based on the current Web Interface Customer Privileges settings defined under Tools > Options > Web Interface (in versions prior to 5.5). This custom group is automatically assigned to all customer Web users to assure the privileges stay the same. You can customize the groups from > Users & Privileges > Web Users Privileges – Customers.
Default Privilege Group
You can define a default privilege group which will be assigned automatically to all new customer Web users. When choosing a group in the Customer Privilege Groups Administration window, the default group will appear with the word "Default" in brackets.
For example:
Group: Full for Customer Web Users [System, Default]
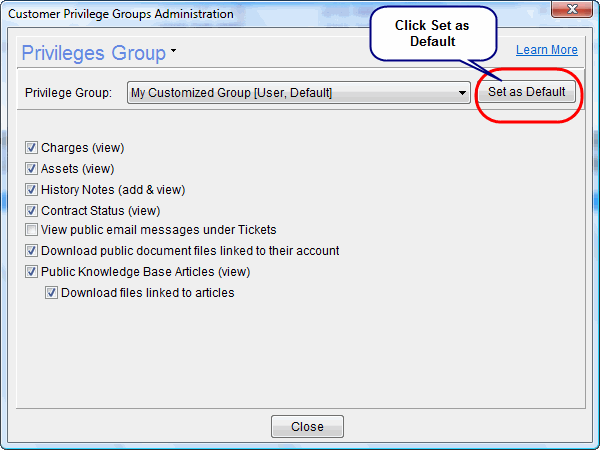
To set a default group, choose the group you want to use as the default from the drop-down list, and click Set as Default.

In any case, make sure to restart the CRM Web Interface service after performing any changes, so they will take effect in the Web Interface.