QuickBooks Link Invoice Creation Options: Difference between revisions
No edit summary |
|||
| (19 intermediate revisions by 3 users not shown) | |||
| Line 1: | Line 1: | ||
{{usermanualsquickbookslink}} | {{usermanualsquickbookslink}} | ||
With the [[QuickBooks Link| | With the [[QuickBooks Link|RangerMSP-QuickBooks Link]] you can create invoices in QuickBooks based on charges entered in RangerMSP. | ||
This feature allows you to manage all the aspects of your service in one program: | This feature allows you to manage all the aspects of your service in one program: RangerMSP. You can manage [[Tickets]], enter [[Charges]], etc. in RangerMSP, while all billing is managed in QuickBooks. | ||
QuickBooks invoices can easily be created from | QuickBooks invoices can easily be created from RangerMSP at the customer level, the service contract level and the ticket level. | ||
All invoices created from | All invoices created from RangerMSP are based on Charge records added in RangerMSP. Each Charge record is either a labor charge for work performed, a parts charge describing a part that has been used, or an expense charge for expenses spent on behalf of the customer, i.e. for special deliveries. | ||
It is recommended that you familiarize yourself with the following terms in | It is recommended that you familiarize yourself with the following terms in RangerMSP: | ||
[[Tickets]] – Every incident, problem, or job you handle for a customer is managed in | [[Tickets]] – Every incident, problem, or job you handle for a customer is managed in RangerMSP using a Ticket record. Click here to learn more. | ||
[[Contracts]] – Contract records are used to manage your service contracts and track their status. Click here to learn more. | [[Contracts]] – Contract records are used to manage your service contracts and track their status. Click here to learn more. | ||
| Line 18: | Line 18: | ||
==Creating New Invoice== | ==Creating New Invoice== | ||
RangerMSP lets you create QuickBooks Invoices at the Account/Ticket/Contract levels. | |||
If you create an invoice at the Account level, all Billable charges related to the Account that haven't been billed yet will be included in the invoice, including charges related to Tickets and Contracts. | If you create an invoice at the Account level, all Billable charges related to the Account that haven't been billed yet will be included in the invoice, including charges related to Tickets and Contracts. | ||
| Line 26: | Line 26: | ||
If you create an invoice at the Ticket level, only Billable charges that haven't been billed yet which are related to the selected Ticket will be included in the invoice. | If you create an invoice at the Ticket level, only Billable charges that haven't been billed yet which are related to the selected Ticket will be included in the invoice. | ||
In all cases, you can also include not-billable charges in the invoice, which will be displayed in the invoice with a zero billable total amount. This way you can include all the charges without actually billing for not-billable charges. | In all cases, you can also include not-billable charges in the invoice, which will be displayed in the invoice with a zero billable total amount. This way you can include all the charges without actually billing for not-billable charges. See more details in [[QuickBooks_Link#QuickBooks_Link_Settings|QuickBooks Link Settings]]. | ||
There are two ways to create an invoice. The first option is creating an invoice for a specific Account, Ticket or Contract, and the second option is creating invoices for open balances in general. | There are two ways to create an invoice. The first option is creating an invoice for a specific Account, Ticket or Contract, and the second option is creating invoices for open balances in general. | ||
| Line 32: | Line 32: | ||
<u>Option 1:</u> Go to the Accounts/Tickets/Contracts window, and select Create Invoice... on the QuickBooks drop down toolbar menu. | <u>Option 1:</u> Go to the Accounts/Tickets/Contracts window, and select Create Invoice... on the QuickBooks drop down toolbar menu. | ||
[[File: | [[File:accounts_window_create_invoice_menu.png|center]] | ||
or | or | ||
[[File: | [[File:tickets_window_create_invoice_menu.png|center]] | ||
or | or | ||
[[File: | [[File:contracts_window_create_invoice_menu.png|center]] | ||
<u>Option 2:</u> Go to the File menu, select New and then QuickBooks Invoice. | <u>Option 2:</u> Go to the File menu, select New and then QuickBooks Invoice. | ||
[[File: | [[File:New_quickbooks_invoice_menu.png|center]] | ||
After selecting this option the Generate QuickBooks Invoice dialog box is displayed: | After selecting this option the Generate QuickBooks Invoice dialog box is displayed: | ||
[[File: | [[File:general_new_invoice_window.png|center]] | ||
Select the level at which you want to generate the invoice (either Accounts, Tickets, or Contracts). | Select the level at which you want to generate the invoice (either Accounts, Tickets, or Contracts). | ||
| Line 54: | Line 54: | ||
View all the open Billable charges for the level you selected: | View all the open Billable charges for the level you selected: | ||
[[File: | [[File:all_tickets_to_be_invoiced.png|center]] | ||
In the example above, the Ticket level was selected. All the Tickets with open Billable charges are displayed. Select the Ticket for which you want to create an invoice and click Select Ticket and Continue. | In the example above, the Ticket level was selected. All the Tickets with open Billable charges are displayed. Select the Ticket for which you want to create an invoice and click Select Ticket and Continue. | ||
| Line 60: | Line 60: | ||
After selecting the Account/Contract/Ticket record for which you want to create an invoice, the following window is displayed (this window is also displayed when the Create Invoice... option has been selected from the Account/Contact/Ticket window in Option 1 above): | After selecting the Account/Contract/Ticket record for which you want to create an invoice, the following window is displayed (this window is also displayed when the Create Invoice... option has been selected from the Account/Contact/Ticket window in Option 1 above): | ||
[[File: | [[File:invoice_wizard_step2.gif|center]] | ||
In the charge list you can select which charges will be included in the invoice by selecting or unselecting them by clicking on the checkbox to the left of the record. | |||
===Quick Select/Unselect=== | |||
Using the Quick Select/Unselect menus, you can easily select or deselect charges by the following criteria: | |||
[[File:Quick_select_quickbooks_options.png]] | |||
To include or exclude the not-billable charges click the Include Not-Billable Charge/Exclude Not-Billable Charges button. Note that Administrators can set the system to always include the Not-Billable charges from Tools > Options > QuickBooks. | * Charged Item type - select or deselect according to the charged item '''type''' (Labor, Expense or Product/Part). | ||
* Contract Code - Select or deselect all charges from specific Contract. | |||
* Ticket # - Select or deselect all charges related to a specific Ticket. | |||
* Charged Item - Select or deselect all charges related to a specific Item. | |||
* Employee - Select or deselect all charges created by a specific Employee. | |||
* Not Billable - Select or deselect all Not-Billable Charges (see also [[QuickBooks_Link_Invoice_Creation_Options#Including_and_Excluding_Not-Billable_Charges|Including and Excluding Not-Billable Charges]]). | |||
* Charges from Open Tickets - Select or deselect all charges which are linked to Open Tickets. This way you can make sure you bill your customer only for Tickets which are already completed. See more details in [[QuickBooks_Link#QuickBooks_Link_Settings|QuickBooks Link Settings]]. | |||
===Including and Excluding Not-Billable Charges=== | |||
All Billable charges that haven't been billed yet and are related to the selected Account, Contract or Ticket record (Contract in the example above) are displayed in the wizard's secod step. By default all are selected (using the check mark) to be included in the invoice. | |||
<br> | |||
'''Include/Exclude Not-Billable Charges'''<br> | |||
In addition to the billable charges, you can include Not-billable charges in the invoice. When adding them, Not-Billable charges are displayed in the invoice, however, they do not affect the invoice total. | |||
To include or exclude the not-billable charges click the Include Not-Billable Charge/Exclude Not-Billable toggle Charges button. Note that Administrators can set the system to always include the Not-Billable charges from Tools > Options > QuickBooks. | |||
<br><br> | |||
===To be Printed/To be Emailed=== | |||
'''To be Printed/To be Emailed Flags'''<br> | |||
Depending on your QuickBooks edition, Invoices in QuickBooks may include the following options: ‘To be printed’ and ‘To be emailed’. | |||
By default, when creating new invoices from RangerMSP, the values for these options are taken from the default settings in QuickBooks (see the selected 'by QuickBooks' option). When un-checking the 'by QuickBooks' option, you can control the values to be used when generating the QuickBooks Invoice. | |||
See more details in [[QuickBooks_Link#QuickBooks_Link_Settings|QuickBooks Link Settings]]. | |||
{| id="mp-tfp" style="margin:7px 0 0 0; width:100%; background:none;" | {| id="mp-tfp" style="margin:7px 0 0 0; width:100%; background:none;" | ||
| Line 72: | Line 98: | ||
| class="MainPageBG" style="width:50%; border:1px solid #FFCB99; background:#ffffff; vertical-align:top; color:#000;" | | | class="MainPageBG" style="width:50%; border:1px solid #FFCB99; background:#ffffff; vertical-align:top; color:#000;" | | ||
{| id="mp-left" cellpadding="2" cellspacing="5" style="width:100%; vertical-align:top; background:#ffffff;" | {| id="mp-left" cellpadding="2" cellspacing="5" style="width:100%; vertical-align:top; background:#ffffff;" | ||
! <h3 id="mp-tfa-h2" style="margin:0; background:#fff3e1; font-size:120%; font-weight:bold; border:1px solid #FFCB99; text-align:left; color:#000; padding:0.2em 0.4em;">Tip | ! <h3 id="mp-tfa-h2" style="margin:0; background:#fff3e1; font-size:120%; font-weight:bold; border:1px solid #FFCB99; text-align:left; color:#000; padding:0.2em 0.4em;">Tip</h3> | ||
|- | |- | ||
| style="color:#000;" | <div id="mp-tfa">You can use the Quick Select and/or Quick Unselect and/or Advanced Sort buttons to more easily select the Charges to be billed (this is usually required when a lot of charges are displayed). </div> | | style="color:#000;" | <div id="mp-tfa">You can use the Quick Select and/or Quick Unselect and/or Advanced Sort buttons to more easily select the Charges to be billed (this is usually required when a lot of charges are displayed). </div> | ||
| Line 78: | Line 104: | ||
|} | |} | ||
===Setting Other Parameters=== | |||
At this stage you can also set different parameters for the invoice itself. The following options are located at the top of the Generate QuickBooks Invoice window: | At this stage you can also set different parameters for the invoice itself. The following options are located at the top of the Generate QuickBooks Invoice window: | ||
#<u>Bill To</u> - This is the invoice billing address. By default it is taken from the Bill To data defined for the customer in QuickBooks. You can enter a different address in this box if necessary.<br>If you have modified this information by mistake and want to use the QuickBooks defaults, right-click above the field and select Set by QuickBooks. | #<u>Bill To</u> - This is the invoice billing address. By default it is taken from the Bill To data defined for the customer in QuickBooks. You can enter a different address in this box if necessary.<br>If you have modified this information by mistake and want to use the QuickBooks defaults, right-click above the field and select Set by QuickBooks. | ||
| Line 90: | Line 117: | ||
The lines of the invoice are now displayed as they will appear in the QuickBooks invoice. | The lines of the invoice are now displayed as they will appear in the QuickBooks invoice. | ||
[[File: | [[File:invoice_wizard_step3.gif|center]] | ||
In this step you can modify the text which will be displayed on the invoice lines. Note that all modifications made to the invoice lines here are not applied to Charges in | In this step you can modify the text which will be displayed on the invoice lines. Note that all modifications made to the invoice lines here are not applied to Charges in RangerMSP, and only apply to the QuickBooks invoice lines. | ||
====Move Line Up/Down==== | |||
You can use the Move Line Up/Move Line Down buttons or the Advanced Sort button to modify the order of the invoice lines. | You can use the Move Line Up/Move Line Down buttons or the Advanced Sort button to modify the order of the invoice lines. | ||
====Insert Line/s==== | |||
Using the Insert Lines menu you can design your final Invoice. It allows you to add blank lines between the invoice lines in order to space the invoice up and make it more readable. | |||
You can also add Ticket information, such as Ticket Description or Ticket Resolution. The Ticket Description and/or Resolution will show only once, even in cases where many Charges for this specific Ticket were converted into Invoice Lines. | |||
[[File:Qb_ticket_information_menu.png|center]] | |||
====Incl. in Description==== | |||
You can also use the "Incl. in Description" button to include additional information to all invoice line simultaneously, such as: | You can also use the "Incl. in Description" button to include additional information to all invoice line simultaneously, such as: | ||
[[File: | [[File:include_in_description_button.gif|center]] | ||
Click on Incl. in Description and select the data you wish to be added to the description for every invoice line. To add this information to all invoices by default go to Tools > Options > QuickBooks and select the information you want to include in invoice lines. | Click on Incl. in Description and select the data you wish to be added to the description for every invoice line. To add this information to all invoices by default go to Tools > Options > QuickBooks and select the information you want to include in invoice lines. | ||
| Line 111: | Line 142: | ||
As mentioned above, these changes will take affect only on the invoice lines in QuickBooks. The original charges will not be affected by these changes. | As mentioned above, these changes will take affect only on the invoice lines in QuickBooks. The original charges will not be affected by these changes. | ||
[[File: | [[File:edit_invoice_line_description.png|center]] | ||
===Generate The QuickBooks Invoice=== | |||
In the image below, you can see that additional information has appeared in the Description column of the invoice lines. | In the image below, you can see that additional information has appeared in the Description column of the invoice lines. | ||
[[File: | [[File:invoice_wizard_step3_with_changes.gif|center]] | ||
When the invoice information is complete, click Generate QuickBooks Invoice. | When the invoice information is complete, click Generate QuickBooks Invoice. | ||
RangerMSP will now verify all the settings with QuickBooks and will add the QuickBooks invoice. Once an invoice has been created, the following unofficial invoice will be displayed. This invoice is just to give you an idea of how the invoice was created in QuickBooks. For complete details, view the invoice details in QuickBooks. | |||
[[File: | [[File:Quickbooks_invoice_details.png|center]] | ||
If you wish to create another invoice, click on Create New Invoice'. Otherwise, you can close the window. | If you wish to create another invoice, click on Create New Invoice'. Otherwise, you can close the window. | ||
| Line 127: | Line 159: | ||
The invoice we've created looks like the following in QuickBooks: | The invoice we've created looks like the following in QuickBooks: | ||
[[File: | [[File:Quickbooks_invoice_in_quickbooks.png|center]] | ||
==Batch Invoice Creation== | |||
With the RangerMSP-QuickBooks Link you can create invoices in QuickBooks based on charges entered in RangerMSP. | |||
There are two ways to create an invoice. The first option is creating an invoice for a specific Account, Ticket or Contract, as described above. The second option is batch-creating invoices using a wizard. This section explains how to use the batch creation option. | |||
The Batch Invoice Creation Wizard allows you to create many invoices at once at the customer level, the service contract level or the ticket level. | |||
If you create an invoice at the Account level, all Billable charges related to the Account that haven't been billed yet will be included in the invoice, including charges related to Tickets and Contracts. | |||
If you create an invoice at the Contract level, only Billable charges that haven't been billed yet which are related to the selected Contract will be included in the invoice, including all Ticket-related charges. | |||
If you create an invoice at the Ticket level, only Billable charges that haven't been billed yet which are related to the selected Ticket will be included in the invoice. | |||
In all cases, you can also include not-billable charges in the invoice, which will be displayed in the invoice with a zero billable total amount. This way you can include all the charges without actually billing for not-billable charges. When using the Batch Invoice Creation Wizard, you need to set the desired behavior for not-billable Charges from the ''Tools > Options > QuickBooks'' options. See more details in [[QuickBooks_Link#QuickBooks_Link_Settings|QuickBooks Link Settings]]. | |||
To activate the Batch Invoice Creation Wizard: | |||
# Go to ''File > New > QuickBooks Batch Invoice Wizard''. The following window appears: <br> [[File:Qb_batch_invoice_wizard_1.gif]] | |||
# Select the level at which you want to generate the invoice (either Accounts, Tickets, or Contracts). | |||
# Click Next to continue. | |||
# In this example, the Account level was selected and all the Accounts with open Billable charges are displayed. <br>[[File:Qb_batch_invoice_wizard_2.gif]]<br> | |||
# Select the Accounts for which you want to create an invoice and click Continue. | |||
# When the process is completed, a window with the Invoice numbers totals of each Invoice is displayed. | |||
===Special flags=== | |||
* '''Include/Exclude Not-Billable Charges'''. <br>You can include Not-billable charges in the invoice. When adding them, Not-Billable charges are displayed in the invoice, however, they do not affect the invoice total. <br><br>When creating the invoices via the Batch Invoice Creation Wizard, you can include or exclude the not-billable charges by default for all invoices. This can be determined from ''Tools > Options > QuickBooks''.<br><br> | |||
* '''To be Printed/To be Emailed Flags'''.<br> Depending on your QuickBooks edition, Invoices in QuickBooks may include the following options: ‘To be printed’ and ‘To be emailed’. <br><br>By default, when creating new invoices via the Batch Invoice Creation Wizard, the values for these options are taken from the default settings in QuickBooks. You can control the values to be used by default from ''Tools > Options > QuickBooks''. <br><br> | |||
* '''Include/Exclude Open Tickets' Charges.''' <br> You can choose whether to include charges of open Tickets in the invoice (or only closed Tickets). <br><br>When creating the invoices via the Batch Invoice Creation Wizard, you can include or exclude the open Tickets' charges by default for all invoices. This can be determined from ''Tools > Options > QuickBooks''. | |||
See more details in [[QuickBooks_Link#QuickBooks_Link_Settings|QuickBooks Link Settings]]. | |||
==Creating Invoices - Advanced Invoice Creation Topics== | ==Creating Invoices - Advanced Invoice Creation Topics== | ||
This chapter provides more details about the invoice creation process. | This chapter provides more details about the invoice creation process. | ||
===Handling Unsynced Accounts === | |||
<br>When creating an invoice, an asterisk * may appear near the Account's name. The asterisk means that the Account is not synchronized with QuickBooks. | |||
In this case, you can still create the invoice. Continue with the invoice creation wizard, and at a later stage | In this case, you can still create the invoice. Continue with the invoice creation wizard, and at a later stage RangerMSP will let you create a link between the Account in RangerMSP and the Customer in QuickBooks, or create a new Customer in QuickBooks. | ||
[[File: | [[File:all_accounts_to_be_invoiced.png|center]] | ||
In the example above, the selected Account has not been synchronized with QuickBooks. | In the example above, the selected Account has not been synchronized with QuickBooks. | ||
===Handling Unsynced Items === | |||
<br>In the second stage of the Invoice creation wizard - Charge Selection, you might see an asterisk * sign near some of the Item's name. The asterisk means, that these Items are not synced with QuickBooks Items. To handle this situation, RangerMSP has automatically created 3 new Items in QuickBooks: | |||
#CMT Service Taxable Item | #CMT Service Taxable Item | ||
#CMT Expense Taxable Item | #CMT Expense Taxable Item | ||
#CMT Products Taxable Item | #CMT Products Taxable Item | ||
[[File: | [[File:cmt_items_in_quickbooks.gif|center]] | ||
All unsynchronized Labor Items in | All unsynchronized Labor Items in RangerMSP that have been used in Billable charges will be automatically replaced with CMT Service Taxable Item in the invoice lines.<br>All unsynchronized Expense Items in RangerMSP that have been used in Billable charges will be automatically replaced with CMT Expense Taxable Item in the invoice lines.<br>All unsynchronized Products/Parts Items in RangerMSP that have been used in Billable charges will be automatically replaced with CMT Products Taxable Item in the invoice lines. | ||
Therefore, you may proceed with the invoice creation process, and the system will replace the Items in the invoice lines with already existing Items in QuickBooks based on their type. The rest of the charge information will pass intact to the QuickBooks invoice; rates, totals, descriptions, etc. will be the same in the QuickBooks invoice as they were defined in Charges in | Therefore, you may proceed with the invoice creation process, and the system will replace the Items in the invoice lines with already existing Items in QuickBooks based on their type. The rest of the charge information will pass intact to the QuickBooks invoice; rates, totals, descriptions, etc. will be the same in the QuickBooks invoice as they were defined in Charges in RangerMSP. | ||
(To learn more about the CMT Items, | (To learn more about the CMT Items, see [[#Using_Special_QuickBooks_Items_and_Accounts|Using Special QuickBooks Items and Accounts]].) | ||
Example: | Example: | ||
[[File: | [[File:invoice_wizard_step2.gif|center]] | ||
In the example above, one of the Items has not been synchronized with QuickBooks. | In the example above, one of the Items has not been synchronized with QuickBooks. | ||
[[File: | [[File:invoice_wizard_step3.gif|center]] | ||
When invoice lines are displayed, the unsynchronized product/part Item – in this case the Hard Disk - is replaced with CMT Products Taxable Item. The Charge's description, units, date, total, etc are the same as in the original Charge. | When invoice lines are displayed, the unsynchronized product/part Item – in this case the Hard Disk - is replaced with CMT Products Taxable Item. The Charge's description, units, date, total, etc are the same as in the original Charge. | ||
| Line 167: | Line 233: | ||
If the selected Account is synchronized with QuickBooks, the invoice will be created. However, if the selected Account has not been synchronized with QuickBooks ( and an asterisk sign has appeared near the selected Account's name indicating that it has not been synchronized, as mentioned above), the system will provide you with three options: | If the selected Account is synchronized with QuickBooks, the invoice will be created. However, if the selected Account has not been synchronized with QuickBooks ( and an asterisk sign has appeared near the selected Account's name indicating that it has not been synchronized, as mentioned above), the system will provide you with three options: | ||
[[File: | [[File:account_sync_settings_window.png|center]] | ||
#'''Link Account to Existing QuickBooks Customer/Job''' - Select this option when the Account exists in QuickBooks as a Customer, but they are not linked. You will be asked to select the parallel Customer in QuickBooks.<br<br>[[File: | #'''Link Account to Existing QuickBooks Customer/Job''' - Select this option when the Account exists in QuickBooks as a Customer, but they are not linked. You will be asked to select the parallel Customer in QuickBooks.<br<br>[[File:quickbooks_customer_selection_window3.png|center]]<br>After creating the link between the RangerMSP and QuickBooks records, the system will immediately create the invoice.<br> | ||
#'''Add Account as a New QuickBooks Customer''' - select this option if the selected Account doesn't exist in QuickBooks and you want to create a QuickBooks customer based on this | #'''Add Account as a New QuickBooks Customer''' - select this option if the selected Account doesn't exist in QuickBooks and you want to create a QuickBooks customer based on this RangerMSP Account. The system will create the Customer in QuickBooks and then file the invoice under this record. | ||
#'''Cancel Invoice Creation''' - this option will close the invoice creation wizard in | #'''Cancel Invoice Creation''' - this option will close the invoice creation wizard in RangerMSP. | ||
If you select the first or second option, the following window will appear: | If you select the first or second option, the following window will appear: | ||
[[File: | [[File:quickbooks_invoice_details.png|center]] | ||
The invoice looks like the following in QuickBooks: | The invoice which is created at the end of the process looks like the following in QuickBooks: | ||
[[File: | [[File:quickbooks_invoice_in_quickbooks.png|center]] | ||
===Using Special QuickBooks Items and Accounts=== | ===Using Special QuickBooks Items and Accounts=== | ||
As explained above, there are cases when charged Items in | As explained above, there are cases when charged Items in RangerMSP have not been synchronized with QuickBooks Items. In these cases, the system cannot create the invoice since it does not know with which QuickBooks Items to link the invoice lines. To make the invoicing process easier and smoother, RangerMSP-QuickBooks Link automatically creates the following Items in QuickBooks during the initial synchronization process: | ||
[[File: | [[File:cmt_items_in_quickbooks.gif|center]] | ||
These special items are used when a | These special items are used when a RangerMSP Charge record uses an a RangerMSP Item that is not synced with QuickBooks, and therefore RangerMSP doesn't know what item should be used in QuickBooks for the invoice line. | ||
These Items are used as follows: | These Items are used as follows: | ||
| Line 193: | Line 259: | ||
#Product/Part Items are replaced with CMT Products Taxable Item in QuickBooks. | #Product/Part Items are replaced with CMT Products Taxable Item in QuickBooks. | ||
Since each Item in QuickBooks must be linked to an Account in QuickBooks, | Since each Item in QuickBooks must be linked to an Account in QuickBooks, RangerMSP-QuickBooks Link also automatically creates the following Accounts in QuickBooks during the initial synchronization process, and uses them in conjunction with the CMT Items: | ||
[[File: | [[File:cmt_accounts_in_quickbooks.gif|center]] | ||
Note that the CMT Accounts in QuickBooks are also used for creating new Items in QuickBooks based on Items in | Note that the CMT Accounts in QuickBooks are also used for creating new Items in QuickBooks based on Items in RangerMSP. However, you can configure RangerMSP to use other QuickBooks Accounts for this purpose (the directions appear below). | ||
In cases where | In cases where RangerMSP default Items are used, as explained above, the invoice's amount will appear in the 'CMT Income Account' in QuickBooks as follows: | ||
[[File: | [[File:cmt_income_account_details.gif|center]] | ||
You can modify this and move the invoice income to another QuickBooks Account by going to the relevant items in QuickBooks and changing their default Accounts. For the changes to apply to future and past transactions, you need to confirm the following message: | You can modify this and move the invoice income to another QuickBooks Account by going to the relevant items in QuickBooks and changing their default Accounts. For the changes to apply to future and past transactions, you need to confirm the following message: | ||
| Line 207: | Line 273: | ||
'You changed an account for this item. All future transactions with this item will use this new account. Would you like existing transactions with this item to use this new account?' | 'You changed an account for this item. All future transactions with this item will use this new account. Would you like existing transactions with this item to use this new account?' | ||
To prevent a situation where default Accounts are used, you can direct | To prevent a situation where default Accounts are used, you can direct RangerMSP to use your preferred QuickBooks Accounts for new Items in QuickBooks that will be created for new Items in RangerMSP. To do this, go to Tools > Options > QuickBooks tab > Advanced Settings. | ||
[[File: | [[File:Options_quickbooks_tab_advanced_settings.png|center]] | ||
The Advanced Setting for the | The Advanced Setting for the RangerMSP-QuickBooks Link dialog box will appear. Click on the button to the right of each type to select other QuickBooks Accounts. | ||
[[File: | [[File:options_quickbooks_tab_advanced1.png|center]] | ||
The search window for QuickBooks Accounts will display. | The search window for QuickBooks Accounts will display. | ||
[[File: | [[File:quickbooks_accounts_selection_window.png|center]] | ||
Search for the relevant QuickBooks Account, select it, and click OK. | Search for the relevant QuickBooks Account, select it, and click OK. | ||
| Line 223: | Line 289: | ||
The QuickBooks Account for Invoice Income will be replaced with your selection. | The QuickBooks Account for Invoice Income will be replaced with your selection. | ||
[[File: | [[File:options_quickbooks_tab_advanced1.png|center]] | ||
From now on, | From now on, RangerMSP will use these QuickBooks accounts when creating new QuickBooks Items. | ||
==See Also== | ==See Also== | ||
*[[QuickBooks Link| | *[[QuickBooks Link|RangerMSP-QuickBooks Link]] | ||
[[Category:User Manuals]] | [[Category:User Manuals]] | ||
[[Category:QuickBooks]] | [[Category:QuickBooks]] | ||
Latest revision as of 13:25, 8 July 2020
With the RangerMSP-QuickBooks Link you can create invoices in QuickBooks based on charges entered in RangerMSP.
This feature allows you to manage all the aspects of your service in one program: RangerMSP. You can manage Tickets, enter Charges, etc. in RangerMSP, while all billing is managed in QuickBooks.
QuickBooks invoices can easily be created from RangerMSP at the customer level, the service contract level and the ticket level.
All invoices created from RangerMSP are based on Charge records added in RangerMSP. Each Charge record is either a labor charge for work performed, a parts charge describing a part that has been used, or an expense charge for expenses spent on behalf of the customer, i.e. for special deliveries.
It is recommended that you familiarize yourself with the following terms in RangerMSP:
Tickets – Every incident, problem, or job you handle for a customer is managed in RangerMSP using a Ticket record. Click here to learn more.
Contracts – Contract records are used to manage your service contracts and track their status. Click here to learn more.
Charges – Charge records are used to track all activities that will be charged to customers, such as labor, parts and expenses. Click here to learn more.
Creating New Invoice
RangerMSP lets you create QuickBooks Invoices at the Account/Ticket/Contract levels.
If you create an invoice at the Account level, all Billable charges related to the Account that haven't been billed yet will be included in the invoice, including charges related to Tickets and Contracts.
If you create an invoice at the Contract level, only Billable charges that haven't been billed yet which are related to the selected Contract will be included in the invoice, including all Ticket-related charges.
If you create an invoice at the Ticket level, only Billable charges that haven't been billed yet which are related to the selected Ticket will be included in the invoice.
In all cases, you can also include not-billable charges in the invoice, which will be displayed in the invoice with a zero billable total amount. This way you can include all the charges without actually billing for not-billable charges. See more details in QuickBooks Link Settings.
There are two ways to create an invoice. The first option is creating an invoice for a specific Account, Ticket or Contract, and the second option is creating invoices for open balances in general.
Option 1: Go to the Accounts/Tickets/Contracts window, and select Create Invoice... on the QuickBooks drop down toolbar menu.
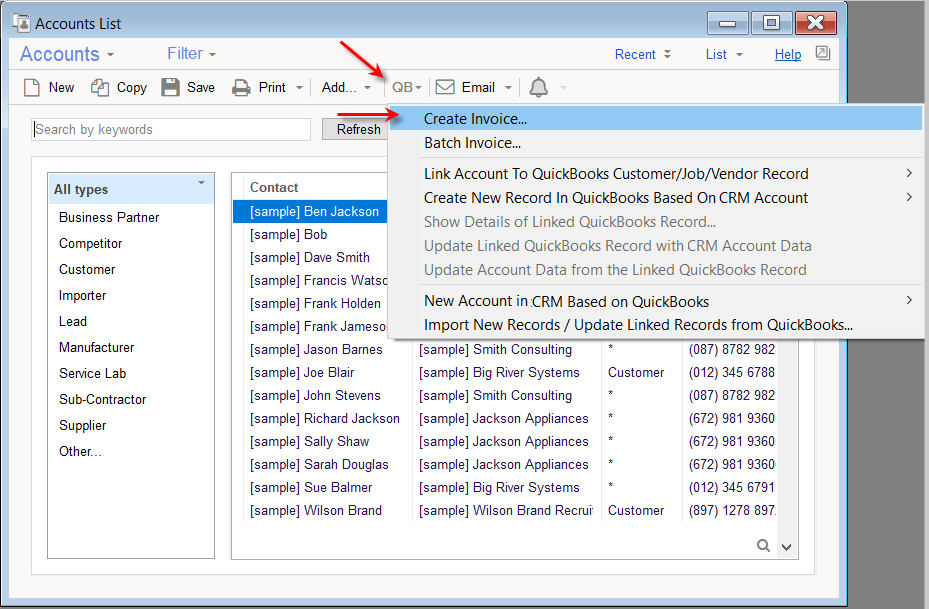
or

or

Option 2: Go to the File menu, select New and then QuickBooks Invoice.
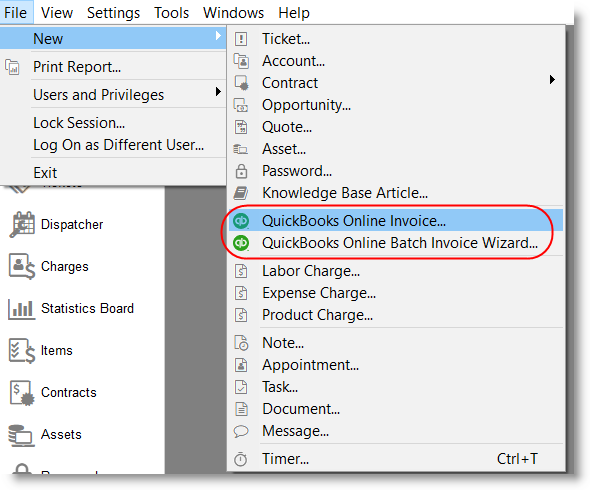
After selecting this option the Generate QuickBooks Invoice dialog box is displayed:
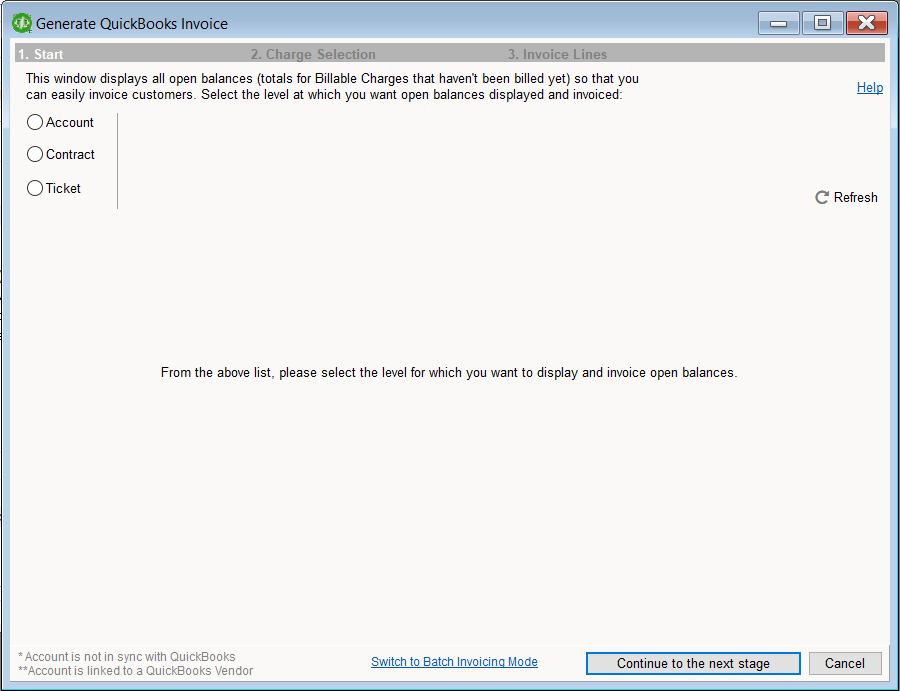
Select the level at which you want to generate the invoice (either Accounts, Tickets, or Contracts).
View all the open Billable charges for the level you selected:
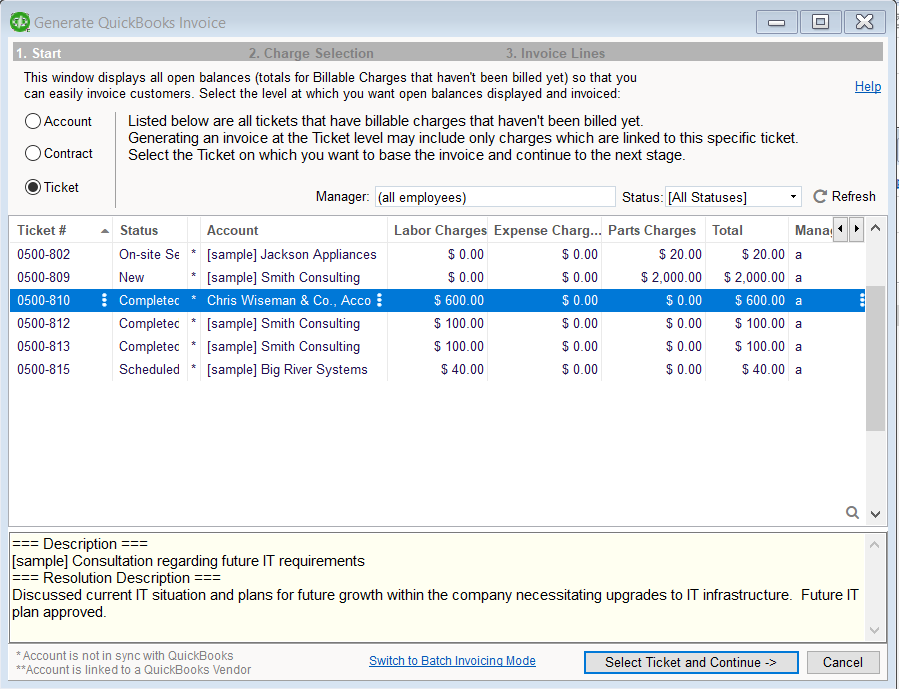
In the example above, the Ticket level was selected. All the Tickets with open Billable charges are displayed. Select the Ticket for which you want to create an invoice and click Select Ticket and Continue.
After selecting the Account/Contract/Ticket record for which you want to create an invoice, the following window is displayed (this window is also displayed when the Create Invoice... option has been selected from the Account/Contact/Ticket window in Option 1 above):
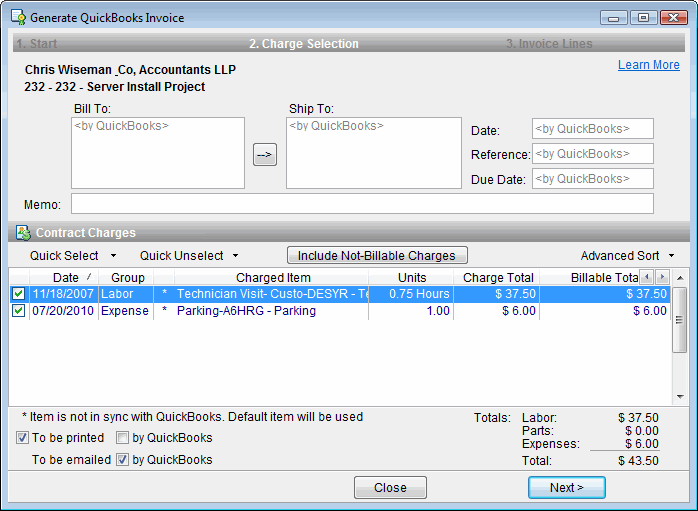
In the charge list you can select which charges will be included in the invoice by selecting or unselecting them by clicking on the checkbox to the left of the record.
Quick Select/Unselect
Using the Quick Select/Unselect menus, you can easily select or deselect charges by the following criteria:
- Charged Item type - select or deselect according to the charged item type (Labor, Expense or Product/Part).
- Contract Code - Select or deselect all charges from specific Contract.
- Ticket # - Select or deselect all charges related to a specific Ticket.
- Charged Item - Select or deselect all charges related to a specific Item.
- Employee - Select or deselect all charges created by a specific Employee.
- Not Billable - Select or deselect all Not-Billable Charges (see also Including and Excluding Not-Billable Charges).
- Charges from Open Tickets - Select or deselect all charges which are linked to Open Tickets. This way you can make sure you bill your customer only for Tickets which are already completed. See more details in QuickBooks Link Settings.
Including and Excluding Not-Billable Charges
All Billable charges that haven't been billed yet and are related to the selected Account, Contract or Ticket record (Contract in the example above) are displayed in the wizard's secod step. By default all are selected (using the check mark) to be included in the invoice.
Include/Exclude Not-Billable Charges
In addition to the billable charges, you can include Not-billable charges in the invoice. When adding them, Not-Billable charges are displayed in the invoice, however, they do not affect the invoice total.
To include or exclude the not-billable charges click the Include Not-Billable Charge/Exclude Not-Billable toggle Charges button. Note that Administrators can set the system to always include the Not-Billable charges from Tools > Options > QuickBooks.
To be Printed/To be Emailed
To be Printed/To be Emailed Flags
Depending on your QuickBooks edition, Invoices in QuickBooks may include the following options: ‘To be printed’ and ‘To be emailed’.
By default, when creating new invoices from RangerMSP, the values for these options are taken from the default settings in QuickBooks (see the selected 'by QuickBooks' option). When un-checking the 'by QuickBooks' option, you can control the values to be used when generating the QuickBooks Invoice.
See more details in QuickBooks Link Settings.
|
Setting Other Parameters
At this stage you can also set different parameters for the invoice itself. The following options are located at the top of the Generate QuickBooks Invoice window:
- Bill To - This is the invoice billing address. By default it is taken from the Bill To data defined for the customer in QuickBooks. You can enter a different address in this box if necessary.
If you have modified this information by mistake and want to use the QuickBooks defaults, right-click above the field and select Set by QuickBooks. - Ship To - This is the invoice shipping address. By default it is taken from the Ship To data set defined for the customer in QuickBooks. You can enter a different address in this box if necessary.
If you have modified this information by mistake and want to use the QuickBooks defaults, right-click above the field and select Set by QuickBooks. - Date - This is the invoice date. By default, the date used is today's date. You can modify the date if necessary by typing an alternate date in this field.
- Reference - This is the invoice Reference number. This number is set by default by QuickBooks. You can modify this number if necessary by typing an alternate Reference number in the field.
- Due Date - This is the invoice Due Date. By default, the date is one month from today's date. You can modify this date if necessary by entering an alternate due date in the field.
- Memo - This field is for invoice memo/notes. If necessary, enter a memo that will appear as part of the QuickBooks invoice.
After entering the invoice details and selecting the relevant Charges, click Next.
The lines of the invoice are now displayed as they will appear in the QuickBooks invoice.
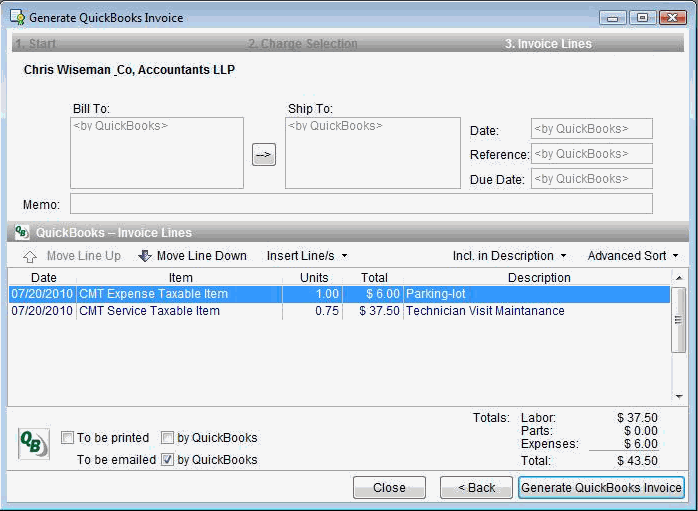
In this step you can modify the text which will be displayed on the invoice lines. Note that all modifications made to the invoice lines here are not applied to Charges in RangerMSP, and only apply to the QuickBooks invoice lines.
Move Line Up/Down
You can use the Move Line Up/Move Line Down buttons or the Advanced Sort button to modify the order of the invoice lines.
Insert Line/s
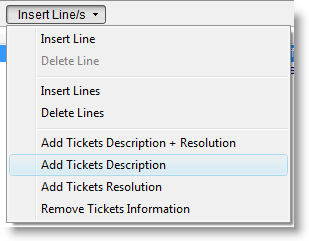
Using the Insert Lines menu you can design your final Invoice. It allows you to add blank lines between the invoice lines in order to space the invoice up and make it more readable.
You can also add Ticket information, such as Ticket Description or Ticket Resolution. The Ticket Description and/or Resolution will show only once, even in cases where many Charges for this specific Ticket were converted into Invoice Lines.
Incl. in Description
You can also use the "Incl. in Description" button to include additional information to all invoice line simultaneously, such as:
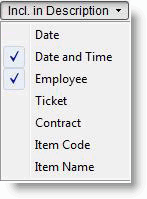
Click on Incl. in Description and select the data you wish to be added to the description for every invoice line. To add this information to all invoices by default go to Tools > Options > QuickBooks and select the information you want to include in invoice lines.
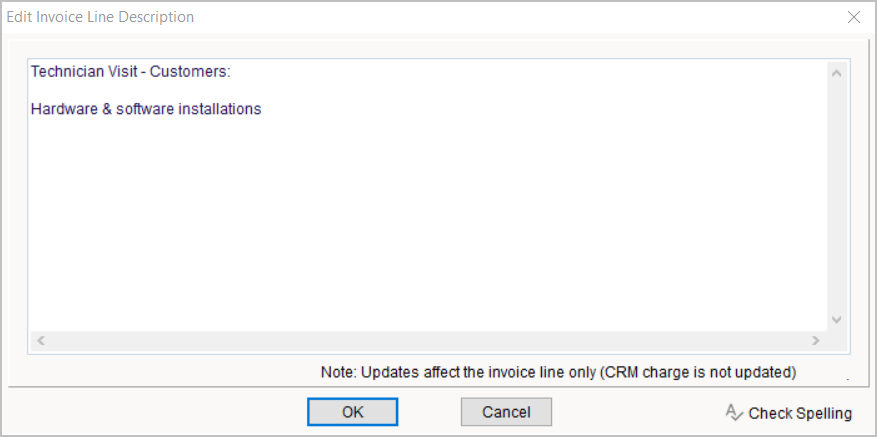
You can double-click on each invoice line to add or edit the text/description of the selected line.
As mentioned above, these changes will take affect only on the invoice lines in QuickBooks. The original charges will not be affected by these changes.
Generate The QuickBooks Invoice
In the image below, you can see that additional information has appeared in the Description column of the invoice lines.
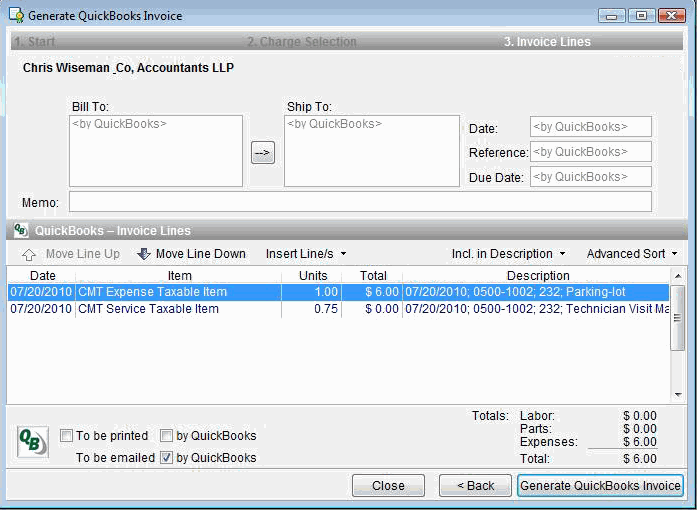
When the invoice information is complete, click Generate QuickBooks Invoice.
RangerMSP will now verify all the settings with QuickBooks and will add the QuickBooks invoice. Once an invoice has been created, the following unofficial invoice will be displayed. This invoice is just to give you an idea of how the invoice was created in QuickBooks. For complete details, view the invoice details in QuickBooks.
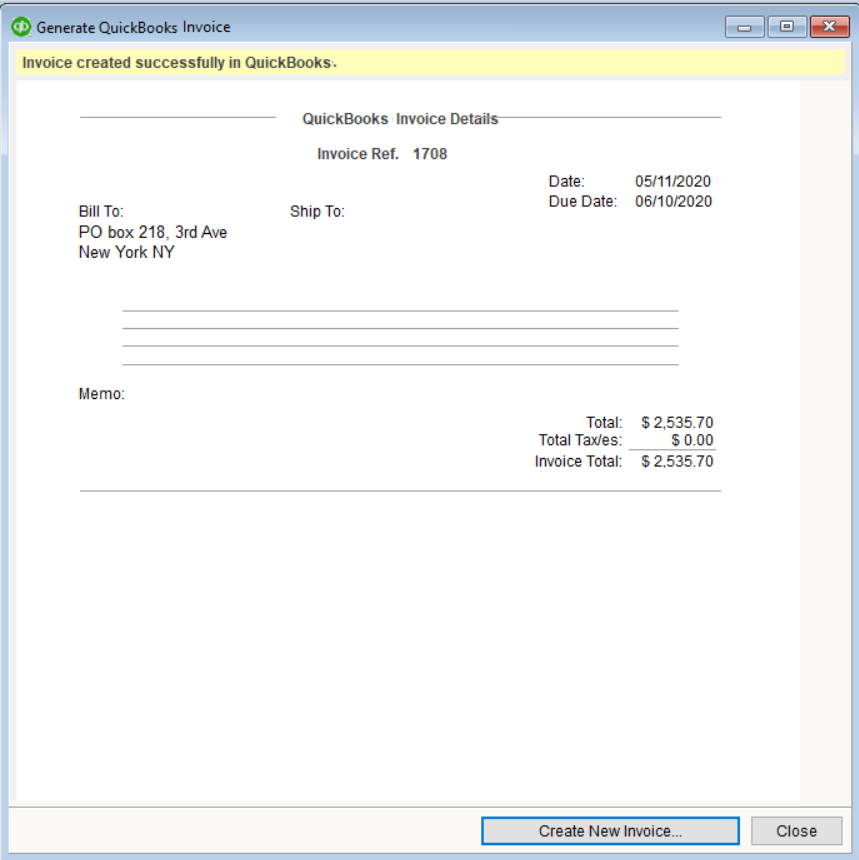
If you wish to create another invoice, click on Create New Invoice'. Otherwise, you can close the window.
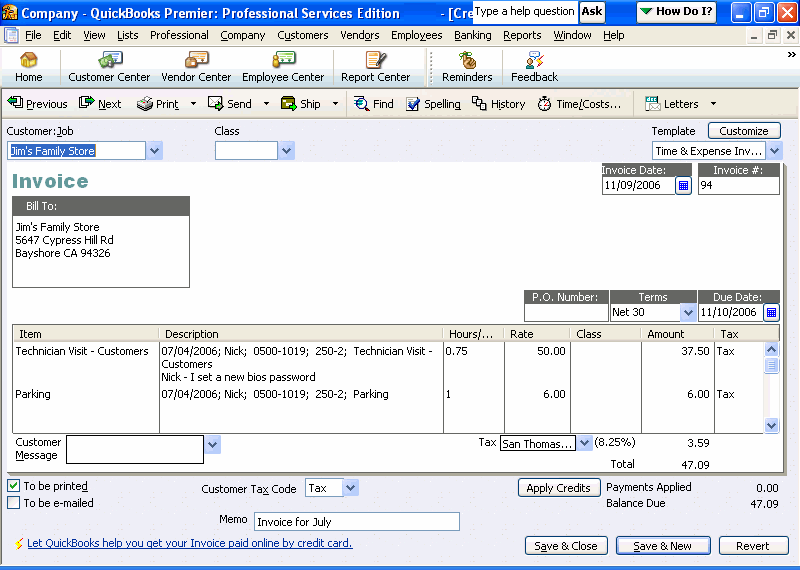
The invoice we've created looks like the following in QuickBooks:
Batch Invoice Creation
With the RangerMSP-QuickBooks Link you can create invoices in QuickBooks based on charges entered in RangerMSP.
There are two ways to create an invoice. The first option is creating an invoice for a specific Account, Ticket or Contract, as described above. The second option is batch-creating invoices using a wizard. This section explains how to use the batch creation option.
The Batch Invoice Creation Wizard allows you to create many invoices at once at the customer level, the service contract level or the ticket level.
If you create an invoice at the Account level, all Billable charges related to the Account that haven't been billed yet will be included in the invoice, including charges related to Tickets and Contracts.
If you create an invoice at the Contract level, only Billable charges that haven't been billed yet which are related to the selected Contract will be included in the invoice, including all Ticket-related charges.
If you create an invoice at the Ticket level, only Billable charges that haven't been billed yet which are related to the selected Ticket will be included in the invoice.
In all cases, you can also include not-billable charges in the invoice, which will be displayed in the invoice with a zero billable total amount. This way you can include all the charges without actually billing for not-billable charges. When using the Batch Invoice Creation Wizard, you need to set the desired behavior for not-billable Charges from the Tools > Options > QuickBooks options. See more details in QuickBooks Link Settings.
To activate the Batch Invoice Creation Wizard:
- Go to File > New > QuickBooks Batch Invoice Wizard. The following window appears:

- Select the level at which you want to generate the invoice (either Accounts, Tickets, or Contracts).
- Click Next to continue.
- In this example, the Account level was selected and all the Accounts with open Billable charges are displayed.

- Select the Accounts for which you want to create an invoice and click Continue.
- When the process is completed, a window with the Invoice numbers totals of each Invoice is displayed.
Special flags
- Include/Exclude Not-Billable Charges.
You can include Not-billable charges in the invoice. When adding them, Not-Billable charges are displayed in the invoice, however, they do not affect the invoice total.
When creating the invoices via the Batch Invoice Creation Wizard, you can include or exclude the not-billable charges by default for all invoices. This can be determined from Tools > Options > QuickBooks. - To be Printed/To be Emailed Flags.
Depending on your QuickBooks edition, Invoices in QuickBooks may include the following options: ‘To be printed’ and ‘To be emailed’.
By default, when creating new invoices via the Batch Invoice Creation Wizard, the values for these options are taken from the default settings in QuickBooks. You can control the values to be used by default from Tools > Options > QuickBooks. - Include/Exclude Open Tickets' Charges.
You can choose whether to include charges of open Tickets in the invoice (or only closed Tickets).
When creating the invoices via the Batch Invoice Creation Wizard, you can include or exclude the open Tickets' charges by default for all invoices. This can be determined from Tools > Options > QuickBooks.
See more details in QuickBooks Link Settings.
Creating Invoices - Advanced Invoice Creation Topics
This chapter provides more details about the invoice creation process.
Handling Unsynced Accounts
When creating an invoice, an asterisk * may appear near the Account's name. The asterisk means that the Account is not synchronized with QuickBooks.
In this case, you can still create the invoice. Continue with the invoice creation wizard, and at a later stage RangerMSP will let you create a link between the Account in RangerMSP and the Customer in QuickBooks, or create a new Customer in QuickBooks.
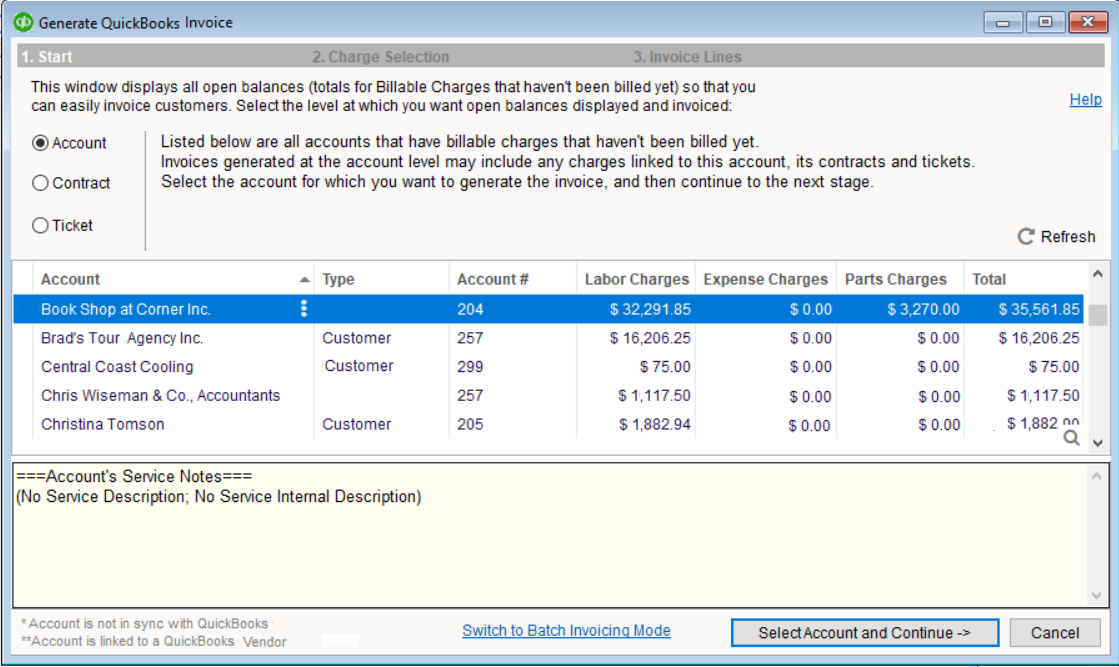
In the example above, the selected Account has not been synchronized with QuickBooks.
Handling Unsynced Items
In the second stage of the Invoice creation wizard - Charge Selection, you might see an asterisk * sign near some of the Item's name. The asterisk means, that these Items are not synced with QuickBooks Items. To handle this situation, RangerMSP has automatically created 3 new Items in QuickBooks:
- CMT Service Taxable Item
- CMT Expense Taxable Item
- CMT Products Taxable Item
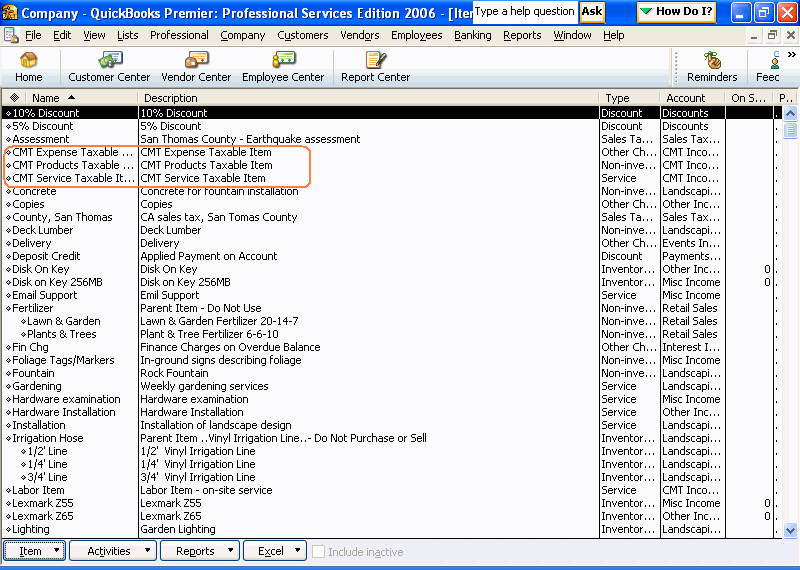
All unsynchronized Labor Items in RangerMSP that have been used in Billable charges will be automatically replaced with CMT Service Taxable Item in the invoice lines.
All unsynchronized Expense Items in RangerMSP that have been used in Billable charges will be automatically replaced with CMT Expense Taxable Item in the invoice lines.
All unsynchronized Products/Parts Items in RangerMSP that have been used in Billable charges will be automatically replaced with CMT Products Taxable Item in the invoice lines.
Therefore, you may proceed with the invoice creation process, and the system will replace the Items in the invoice lines with already existing Items in QuickBooks based on their type. The rest of the charge information will pass intact to the QuickBooks invoice; rates, totals, descriptions, etc. will be the same in the QuickBooks invoice as they were defined in Charges in RangerMSP.
(To learn more about the CMT Items, see Using Special QuickBooks Items and Accounts.)
Example:

In the example above, one of the Items has not been synchronized with QuickBooks.

When invoice lines are displayed, the unsynchronized product/part Item – in this case the Hard Disk - is replaced with CMT Products Taxable Item. The Charge's description, units, date, total, etc are the same as in the original Charge.
To proceed, click Generate QuickBooks Invoice.
If the selected Account is synchronized with QuickBooks, the invoice will be created. However, if the selected Account has not been synchronized with QuickBooks ( and an asterisk sign has appeared near the selected Account's name indicating that it has not been synchronized, as mentioned above), the system will provide you with three options:
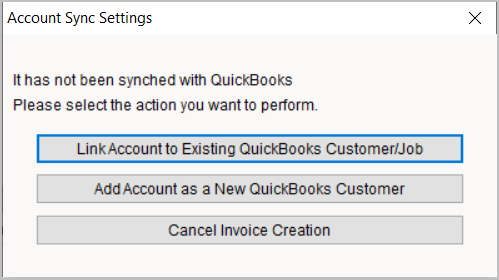
- Link Account to Existing QuickBooks Customer/Job - Select this option when the Account exists in QuickBooks as a Customer, but they are not linked. You will be asked to select the parallel Customer in QuickBooks.<br

After creating the link between the RangerMSP and QuickBooks records, the system will immediately create the invoice. - Add Account as a New QuickBooks Customer - select this option if the selected Account doesn't exist in QuickBooks and you want to create a QuickBooks customer based on this RangerMSP Account. The system will create the Customer in QuickBooks and then file the invoice under this record.
- Cancel Invoice Creation - this option will close the invoice creation wizard in RangerMSP.
If you select the first or second option, the following window will appear:

The invoice which is created at the end of the process looks like the following in QuickBooks:

Using Special QuickBooks Items and Accounts
As explained above, there are cases when charged Items in RangerMSP have not been synchronized with QuickBooks Items. In these cases, the system cannot create the invoice since it does not know with which QuickBooks Items to link the invoice lines. To make the invoicing process easier and smoother, RangerMSP-QuickBooks Link automatically creates the following Items in QuickBooks during the initial synchronization process:

These special items are used when a RangerMSP Charge record uses an a RangerMSP Item that is not synced with QuickBooks, and therefore RangerMSP doesn't know what item should be used in QuickBooks for the invoice line.
These Items are used as follows:
- Labor Items are replaced with CMT Service Taxable Item in QuickBooks.
- Expense Items are replaced with CMT Expense Taxable Item in QuickBooks.
- Product/Part Items are replaced with CMT Products Taxable Item in QuickBooks.
Since each Item in QuickBooks must be linked to an Account in QuickBooks, RangerMSP-QuickBooks Link also automatically creates the following Accounts in QuickBooks during the initial synchronization process, and uses them in conjunction with the CMT Items:
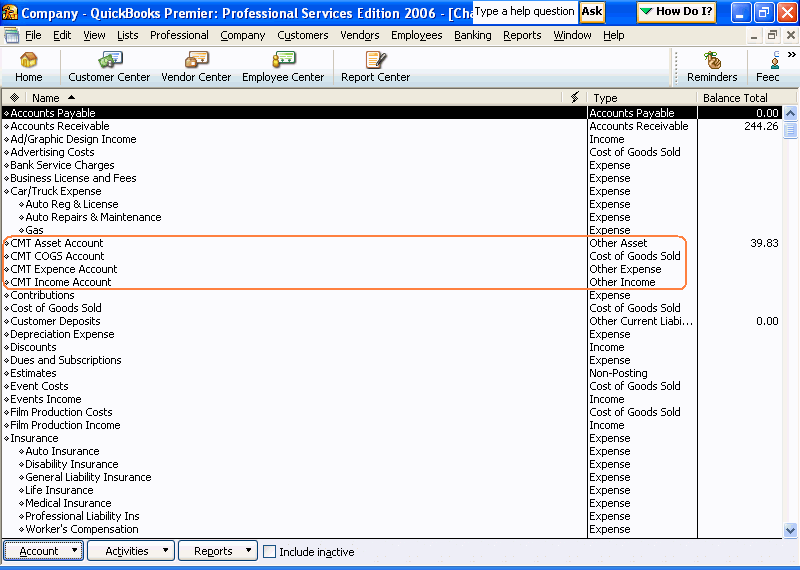
Note that the CMT Accounts in QuickBooks are also used for creating new Items in QuickBooks based on Items in RangerMSP. However, you can configure RangerMSP to use other QuickBooks Accounts for this purpose (the directions appear below).
In cases where RangerMSP default Items are used, as explained above, the invoice's amount will appear in the 'CMT Income Account' in QuickBooks as follows:
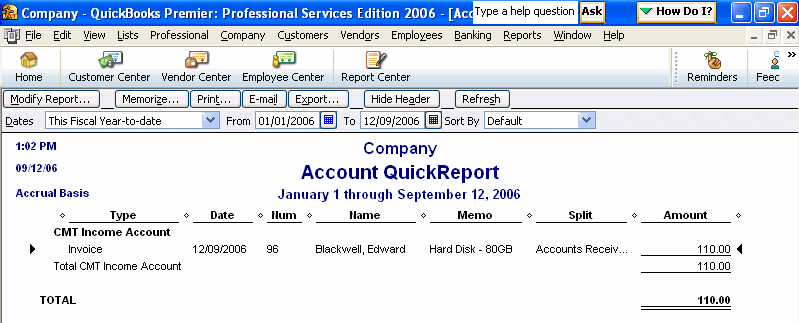
You can modify this and move the invoice income to another QuickBooks Account by going to the relevant items in QuickBooks and changing their default Accounts. For the changes to apply to future and past transactions, you need to confirm the following message:
'You changed an account for this item. All future transactions with this item will use this new account. Would you like existing transactions with this item to use this new account?'
To prevent a situation where default Accounts are used, you can direct RangerMSP to use your preferred QuickBooks Accounts for new Items in QuickBooks that will be created for new Items in RangerMSP. To do this, go to Tools > Options > QuickBooks tab > Advanced Settings.
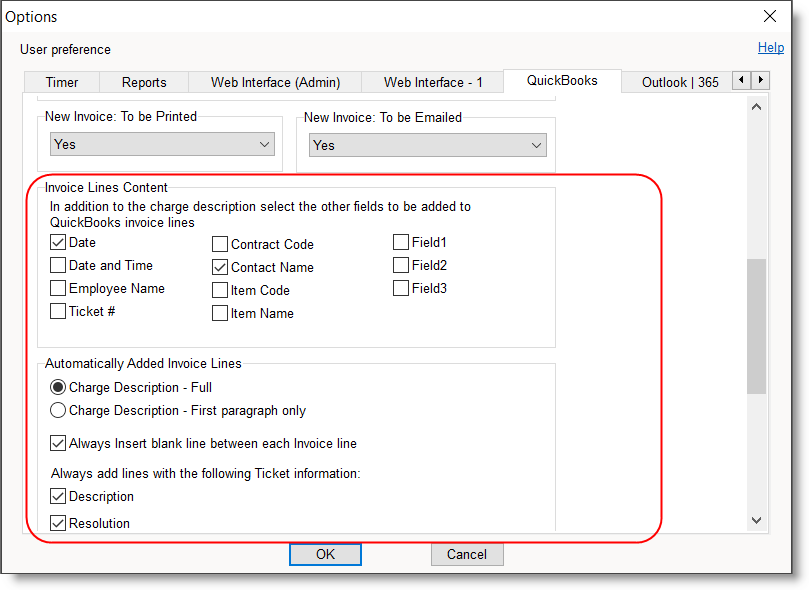
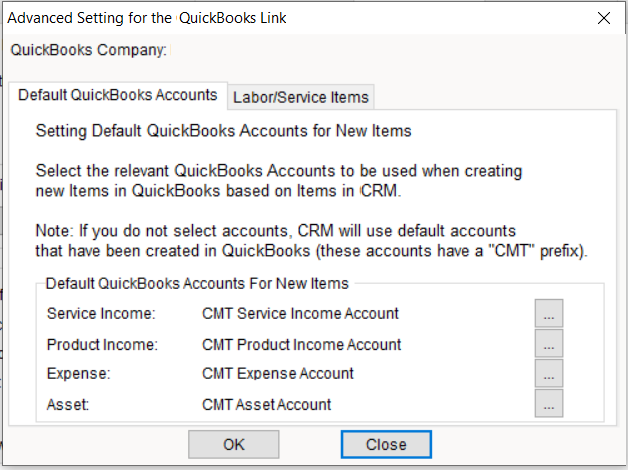
The Advanced Setting for the RangerMSP-QuickBooks Link dialog box will appear. Click on the button to the right of each type to select other QuickBooks Accounts.
The search window for QuickBooks Accounts will display.
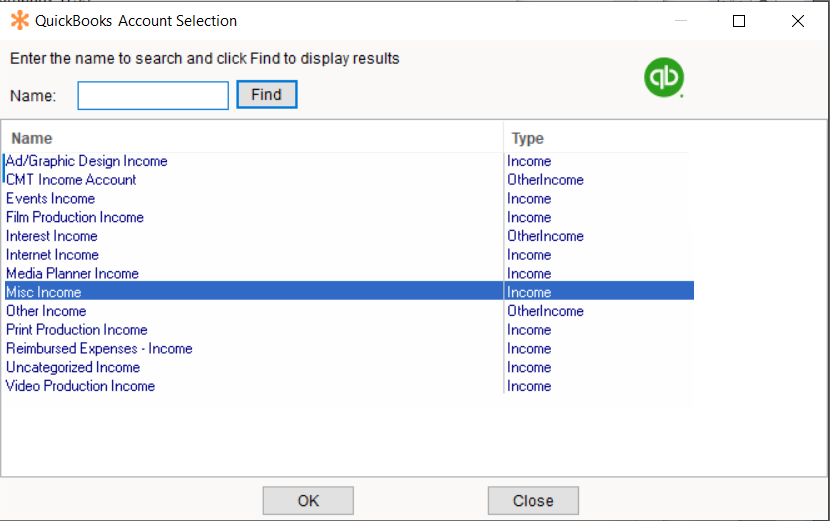
Search for the relevant QuickBooks Account, select it, and click OK.
The QuickBooks Account for Invoice Income will be replaced with your selection.

From now on, RangerMSP will use these QuickBooks accounts when creating new QuickBooks Items.
