Field Customization: Difference between revisions
No edit summary |
|||
| (9 intermediate revisions by 3 users not shown) | |||
| Line 1: | Line 1: | ||
{{customization}} | {{customization}} | ||
RangerMSP is very flexible. You can customize reports, rename field labels, create new tabs and new data fields, and manage values for drop-down lists, etc. | |||
__TOC__ | __TOC__ | ||
==Customizing Existing Fields== | ==Customizing Existing Fields== | ||
Fields in | Fields in RangerMSP can be customized when needed. You should modify the default settings only when required; the system defaults are usually sufficient. | ||
Fields in | Fields in RangerMSP can be customized with the following settings: | ||
*The Name of the fields as displayed throughout the system where a field name is displayed | *The Name of the fields as displayed throughout the system where a field name is displayed | ||
*The field Label and Hint | *The field Label and Hint | ||
| Line 16: | Line 16: | ||
*Enabling lists to be sorted by this field | *Enabling lists to be sorted by this field | ||
To modify the field settings, log in to | To modify the field settings, log in to RangerMSP as a user with full privileges, and double-click on the field label. The field's Settings window will open. All modifications will be saved when you confirm before closing the window. | ||
<u>Managing drop-down list values</u><br>You can also manage values for drop down lists throughout the system. For example, you can add values to the Ticket Types (e.g. Hardware, Installation, Software etc.). To add or modify values in the list, select '''[edit list...]''' from the drop down list. | <u>Managing drop-down list values</u><br>You can also manage values for drop down lists throughout the system. For example, you can add values to the Ticket Types (e.g. Hardware, Installation, Software etc.). To add or modify values in the list, select '''[edit list...]''' from the drop down list. | ||
| Line 23: | Line 23: | ||
==Adding New Tabs== | ==Adding New Tabs== | ||
[[ | For instructions on adding new tabs, go to [[Tab Management#Adding_New_Tabs|Tab Management]]. | ||
<br> | |||
You can | |||
==Creating New Fields== | |||
To add new fields to user-defined tabs you can use two options: | |||
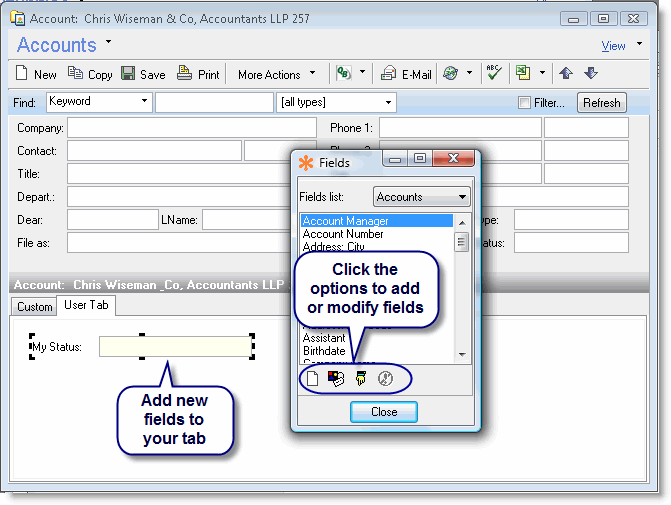
# Right-click the tab area and choose Add New Field to Tab. | |||
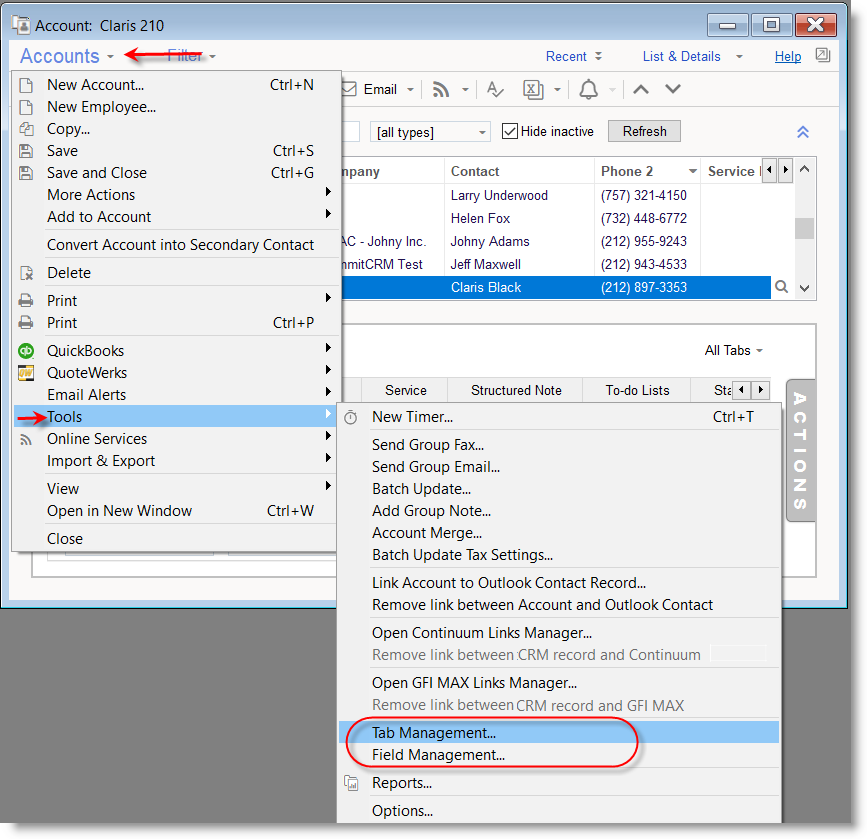
# Go to Tools > Field Management and from the Field Management Window, click the New icon to add a new field. | |||
You can either add existing fields to be displayed in your tab, or create totally new fields in the database that will be displayed in your tab. | |||
[[File:setup_guide_field_new_window.gif|center]] | |||
When adding a new field (as opposed to an existing field), you should choose the field type from the field types list. | |||
[[File:Tab-management3.png|center]] | |||
Field type can be a simple text or numeric field, or a selection field pointing to objects from your database, such as Account, Document, or when using the Linked Object Type, you can choose between Asset, Ticket, Opportunity or Contract. | |||
You can create as many new tabs as needed and create as many new fields as needed. You can also design the layout of the tab page as best suits your needs. | You can create as many new tabs as needed and create as many new fields as needed. You can also design the layout of the tab page as best suits your needs. | ||
In any case, it is always recommended to backup your | In any case, it is always recommended to backup your RangerMSP installation before performing any customization! | ||
==See Also== | |||
* [[Tab Management]] | |||
[[Category:Customization]] | [[Category:Customization]] | ||
Latest revision as of 08:10, 8 July 2020
RangerMSP is very flexible. You can customize reports, rename field labels, create new tabs and new data fields, and manage values for drop-down lists, etc.
Customizing Existing Fields
Fields in RangerMSP can be customized when needed. You should modify the default settings only when required; the system defaults are usually sufficient.
Fields in RangerMSP can be customized with the following settings:
- The Name of the fields as displayed throughout the system where a field name is displayed
- The field Label and Hint
- The field title on data grids/tables – Column Title
- The default value for new records
- The drop-down list that will be displayed for drop-down selection list fields
- Enabling the field to be updated in batch update (Accounts fields only)
- Enabling lists to be sorted by this field
To modify the field settings, log in to RangerMSP as a user with full privileges, and double-click on the field label. The field's Settings window will open. All modifications will be saved when you confirm before closing the window.
Managing drop-down list values
You can also manage values for drop down lists throughout the system. For example, you can add values to the Ticket Types (e.g. Hardware, Installation, Software etc.). To add or modify values in the list, select [edit list...] from the drop down list.
There are pre-defined fields labeled Field (e.g. Field1, Field2) which can be customized as you see fit (you can also rename their label to your needs). For example, you can use Charge Field1, modify its label to "Status", and edit the values list to include possible values for the Status of a Charge.
Adding New Tabs
For instructions on adding new tabs, go to Tab Management.
Creating New Fields
To add new fields to user-defined tabs you can use two options:
- Right-click the tab area and choose Add New Field to Tab.
- Go to Tools > Field Management and from the Field Management Window, click the New icon to add a new field.
You can either add existing fields to be displayed in your tab, or create totally new fields in the database that will be displayed in your tab.

When adding a new field (as opposed to an existing field), you should choose the field type from the field types list.

Field type can be a simple text or numeric field, or a selection field pointing to objects from your database, such as Account, Document, or when using the Linked Object Type, you can choose between Asset, Ticket, Opportunity or Contract.
You can create as many new tabs as needed and create as many new fields as needed. You can also design the layout of the tab page as best suits your needs.
In any case, it is always recommended to backup your RangerMSP installation before performing any customization!