Switching to QuickBooks Online from QuickBooks Desktop: Difference between revisions
No edit summary |
|||
| (10 intermediate revisions by 2 users not shown) | |||
| Line 1: | Line 1: | ||
This | This guide explains the steps required to switch from integrating RangerMSP with QuickBooks Desktop to integrating with QuickBooks Online. | ||
NOTE: | IMPORTANT NOTE: QuickBooks Online internals are entirely different than the desktop edition and when migrating your QuickBooks Desktop data to QuickBooks Online all internal identifiers of customer and item records are changed. | ||
This means that you '''must re-link''' your RangerMSP Accounts to QuickBooks Online Customers and RangerMSP Items to QuickBooks Online Items. | |||
Do '''not''' import customers and items from QuickBooks Online before linking existing records first, otherwise duplicate records will be created. | |||
| Line 9: | Line 11: | ||
==Installation Instructions== | ==Installation Instructions== | ||
To connect to your '''QuickBooks Online''' company please follow [[QuickBooks_Online_Link_Configuration_Instructions|QuickBooks Online Link Configuration Instructions]]. | To connect to your '''QuickBooks Online''' company please follow [[QuickBooks_Online_Link_Configuration_Instructions|QuickBooks Online Link Configuration Instructions]]. | ||
We strongly recommend to '''backup''' | We strongly recommend to '''backup''' RangerMSP data before configuring the QuickBooks Online Link. | ||
You should backup <server>\ | You should backup <server>\RangerMSP\DB folder including all files while no one is using RangerMSP. | ||
This option | ==Link RangerMSP Account To QuickBooks Online Customer, Job or Vendor Record== | ||
This option lets you to link between an existing Account record in RangerMSP and an existing record in QuickBooks Online. | |||
This option is very useful when the same customer already exists in RangerMSP and also exists in QuickBooks Online. It tells the system that both these records are actually the same and there should be a link between them when synchronizing data. Also, when generating QuickBooks Online invoices from RangerMSP the link tells RangerMSP to which customer to link the invoice to. | |||
[[File: | To link between an existing Account record in RangerMSP and an existing Customer, Job or Vendor in QuickBooks Online, go to the Accounts window and select '''''Link Account To QuickBooks Customer/Job/Vendor Record''''' on the QuickBooks drop down toolbar menu. | ||
[[File:link_account_to_quickbooks_online_record.png|center]] | |||
The QuickBooks Customer/Job Selection dialog box will appear: | The QuickBooks Customer/Job Selection dialog box will appear: | ||
[[File: | [[File:quickbooks_online_customer_selection_window.png|center]] | ||
Type the name of the QuickBooks Customer/Job/Vendor in the Name field in QuickBooks, and click Find. The relevant records in QuickBooks will be displayed. Select the record that matches the record in RangerMSP and click OK. | |||
==Link RangerMSP Item To QuickBooks Onlince Products/Services == | |||
You can create a link between an existing Item in RangerMSP with an existing Item in QuickBooks Online.<br>This option is useful when the same Item already exists in both RangerMSP and QuickBooks Online. The linking function tells the system that these records are the same Item and they should e synchronized with each other. | |||
To link between an existing Item record in RangerMSP and an existing Item in QuickBooks Online, select '''''Link Item To QuickBooks Item''''' on the QuickBooks drop down toolbar menu. | |||
[[File:link_item_to_quickbooks_online_record.png|center]] | |||
[[File: | |||
The QuickBooks Online Item Selection window will appear: | The QuickBooks Online Item Selection window will appear: | ||
[[File: | [[File:quickbooks_online_item_selection_window.png|center]] | ||
Type the name of the Item in the Name field in QuickBooks Online, and click ''Find''. The relevant Items in QuickBooks Online will be displayed. Select the Item that matches the Item in RangerMSP and click OK.<br>Done! You have created the link between the two records. Updates in RangerMSP to this Item can now be synchronized with to QuickBooks Online, and vice versa. | |||
==Setting invoice numbers automatically by QuickBooks Online== | |||
In order QuickBooks Online will number the invoices automatically, you should '''turn off''' the option '''''Custom transaction numbers''''' under the QuickBooks Online company settings page and as a result invoices generated from RangerMSP will get automatically numbered. | |||
#Go to the Gear icon and select '''Account and Settings'''. | |||
#Click the '''Sales''' tab. Then select '''Edit''' in the Sales form content section. | |||
#Tap '''Custom transaction numbers''' and turn off the option. | |||
#Hit '''Save''' and then '''Done'''. | |||
Note: RESTART RangerMSP after changing the settings in QuickBooks Online in order to clear any local caches and then generate the invoice again. | |||
[[File: | [[File:Quickbooks_online_company_settings_invoice_number.png]] | ||
==See Also== | ==See Also== | ||
Latest revision as of 10:05, 18 July 2022
This guide explains the steps required to switch from integrating RangerMSP with QuickBooks Desktop to integrating with QuickBooks Online.
IMPORTANT NOTE: QuickBooks Online internals are entirely different than the desktop edition and when migrating your QuickBooks Desktop data to QuickBooks Online all internal identifiers of customer and item records are changed. This means that you must re-link your RangerMSP Accounts to QuickBooks Online Customers and RangerMSP Items to QuickBooks Online Items. Do not import customers and items from QuickBooks Online before linking existing records first, otherwise duplicate records will be created.
Installation Instructions
To connect to your QuickBooks Online company please follow QuickBooks Online Link Configuration Instructions. We strongly recommend to backup RangerMSP data before configuring the QuickBooks Online Link. You should backup <server>\RangerMSP\DB folder including all files while no one is using RangerMSP.
Link RangerMSP Account To QuickBooks Online Customer, Job or Vendor Record
This option lets you to link between an existing Account record in RangerMSP and an existing record in QuickBooks Online.
This option is very useful when the same customer already exists in RangerMSP and also exists in QuickBooks Online. It tells the system that both these records are actually the same and there should be a link between them when synchronizing data. Also, when generating QuickBooks Online invoices from RangerMSP the link tells RangerMSP to which customer to link the invoice to.
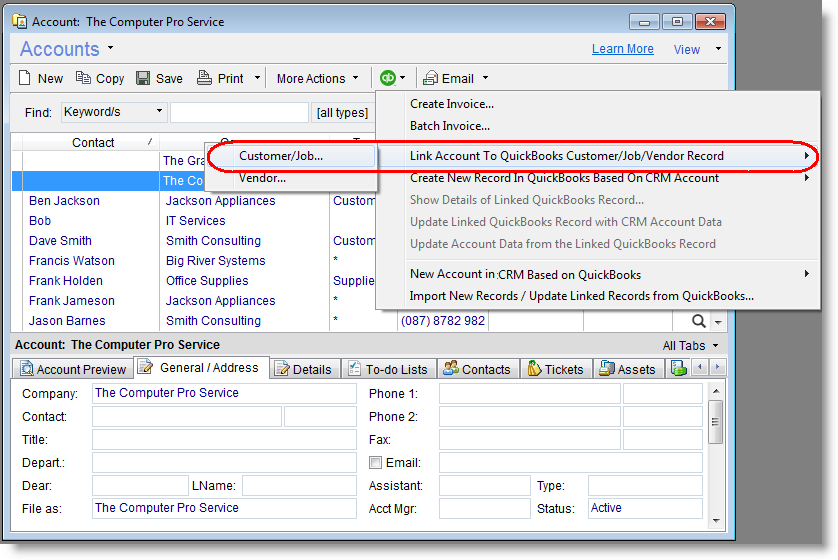
To link between an existing Account record in RangerMSP and an existing Customer, Job or Vendor in QuickBooks Online, go to the Accounts window and select Link Account To QuickBooks Customer/Job/Vendor Record on the QuickBooks drop down toolbar menu.

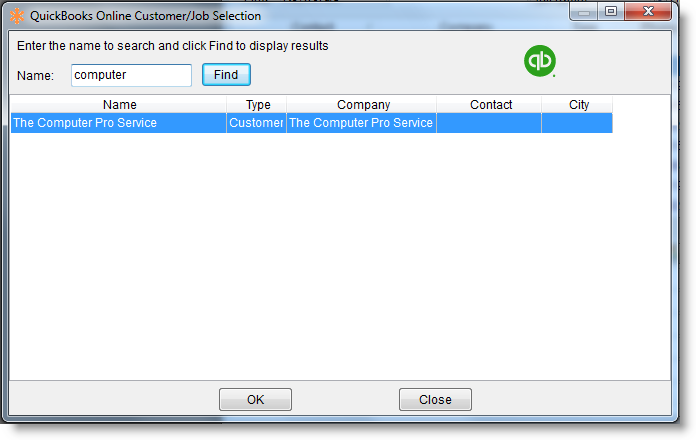
The QuickBooks Customer/Job Selection dialog box will appear:

Type the name of the QuickBooks Customer/Job/Vendor in the Name field in QuickBooks, and click Find. The relevant records in QuickBooks will be displayed. Select the record that matches the record in RangerMSP and click OK.
Link RangerMSP Item To QuickBooks Onlince Products/Services
You can create a link between an existing Item in RangerMSP with an existing Item in QuickBooks Online.
This option is useful when the same Item already exists in both RangerMSP and QuickBooks Online. The linking function tells the system that these records are the same Item and they should e synchronized with each other.
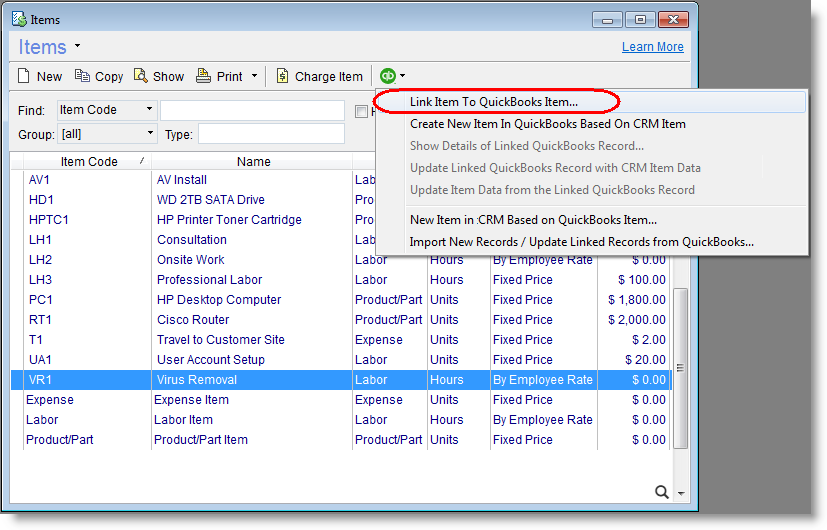
To link between an existing Item record in RangerMSP and an existing Item in QuickBooks Online, select Link Item To QuickBooks Item on the QuickBooks drop down toolbar menu.

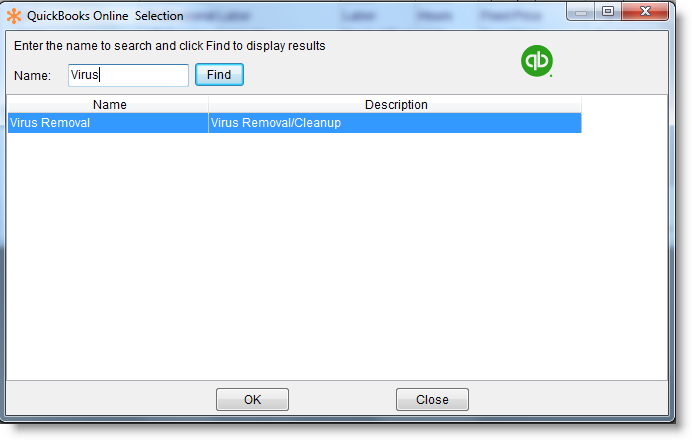
The QuickBooks Online Item Selection window will appear:

Type the name of the Item in the Name field in QuickBooks Online, and click Find. The relevant Items in QuickBooks Online will be displayed. Select the Item that matches the Item in RangerMSP and click OK.
Done! You have created the link between the two records. Updates in RangerMSP to this Item can now be synchronized with to QuickBooks Online, and vice versa.
Setting invoice numbers automatically by QuickBooks Online
In order QuickBooks Online will number the invoices automatically, you should turn off the option Custom transaction numbers under the QuickBooks Online company settings page and as a result invoices generated from RangerMSP will get automatically numbered.
- Go to the Gear icon and select Account and Settings.
- Click the Sales tab. Then select Edit in the Sales form content section.
- Tap Custom transaction numbers and turn off the option.
- Hit Save and then Done.
Note: RESTART RangerMSP after changing the settings in QuickBooks Online in order to clear any local caches and then generate the invoice again.
