Xero Link: Difference between revisions
No edit summary |
|||
| Line 80: | Line 80: | ||
==Invoice Creation Options== | |||
===Creating New Invoice=== | |||
CommitCRM lets you create Xero Invoices at the '''Account, Contract and Ticket''' levels. | CommitCRM lets you create Xero Invoices at the '''Account, Contract and Ticket''' levels. | ||
| Line 202: | Line 204: | ||
==Batch Invoice Creation== | ===Batch Invoice Creation=== | ||
The '''''Batch Invoice Creation Wizard''''' allows you to general many invoices at once at the customer level, the service contract level or the ticket level. | The '''''Batch Invoice Creation Wizard''''' allows you to general many invoices at once at the customer level, the service contract level or the ticket level. | ||
Revision as of 10:52, 25 June 2015
Overview
Using the CommitCRM-Xero Link you can run your computer services business more efficiently. It was designed to simplify routine business, accounting and financial management tasks. With the CommitCRM-Xero Link, you only need to enter data once and it will appear in both CommitCRM and Xero. This feature not only saves you the time of manually entering data, but it also minimizes the problems of duplicate, redundant and wrong data common to manual data entry. Now you can export your data from CommitCRM and Xero and ensure data accuracy, enhance your flexibility, and increase your control over your bottom line.
Getting Started
To enjoy the benefits of the CommitCRM-Xero Link you first need to configure the settings.
From CommitCRM’s main menu select Tools > Options... and then navigate to the Accounting tab (The tab may be called QuickBooks in case QuickBooks has been the one selected before) and select Xero as your accounting package:
Once selected all configuration options regarding the Xero Link will be displayed. See below
Tax Settings
When Xero receives invoices from CommitCRM (or other external sources) it ignores any customer’s Tax or Sales Account setting in Xero and relies on the values received from the CommitCRM.
The actual tax rates, however, are taken from the tax setting in Xero.
Under Tools > Options > Xero tab click Xero Tax Settings to map tax codes used in CommitCRM with tax codes used in Xero.
Tax Settings for Customers
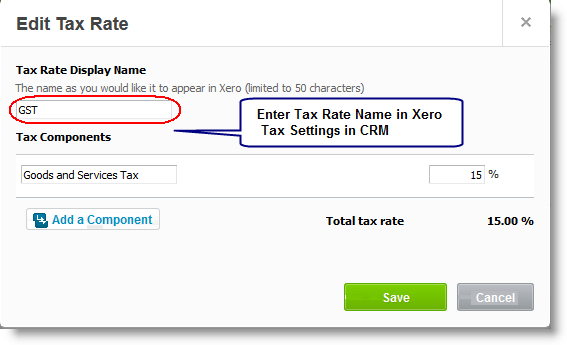
Enter the name of the Xero Tax Rate that will be applied for all customer and/or enter other Xero Tax Rate for specific Customers:
Tax Rate details in Xero:

Tax Settings for Items
Taxes can be optionally set for Items Group (Products/Expense/Labor) or for specific Items:
Sale Accounts Settings
Go to Tools > Option > Xero tab and click Xero Account Settings button to set Sale Accounts for customers and/or Items:
Sales Accounts for Customers
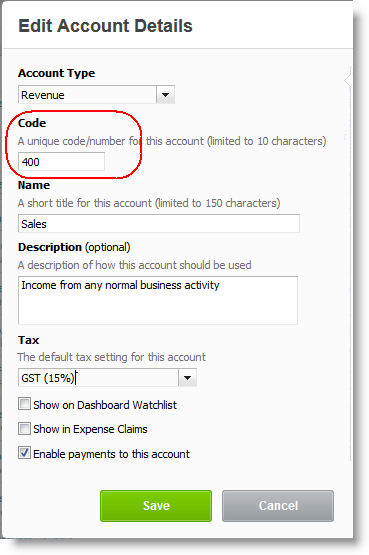
Enter the Sales Account Code that will be used for all customers or specify Sales Account Code for selected customer:
Account Code set in CommitCRM must be the SAME as Account Code in Xero:

Sales Accounts for Items
Sales Account can be optionally set for Items Group (Products/Expense/Labor) or for specific Items:
Customers
When invoices are imported to Xero they get linked to the relevant customers by the customer name. The CommitCRM customer Account ‘File As’ field is matched with the Contact Name in Xero. In case no match is found Xero adds a new customer.
To link existing CommitCRM Accounts to existing Xero customers/contacts verify that the CommitCRM.Account.File As field exactly matches Xero.Customer/Contact.Name field.
To batch send all CommitCRM Account to Xero export Accounts from CommitCRM to an Excel or a text file and then import them as Xero Contacts. To batch send all Xero customers into CommitCRM export Contacts from Xero to an Excel file then import them to CommitCRM as Accounts.
Invoice Creation Options
Creating New Invoice
CommitCRM lets you create Xero Invoices at the Account, Contract and Ticket levels.
If you create an invoice at the Account level, all Billable charges related to the Account that haven't been billed yet will be included in the invoice, including charges related to Tickets and Contracts.
If you create an invoice at the Contract level, only Billable charges that haven't been billed yet which are related to the selected Contract will be included in the invoice, including all Ticket-related charges.
If you create an invoice at the Ticket level, only Billable charges that haven't been billed yet which are related to the selected Ticket will be included in the invoice.
In all cases, you can also include not-billable charges in the invoice, which will be displayed in the invoice with a zero billable total amount. This way you can include all charges (billable or not) in the Invoice without actually billing your customer for ‘not-billable’ charges.
There are two ways to generate a single invoice file. The first option is creating an invoice for a specific Account, Ticket or Contract, and the second option is creating invoices for open balances in general.
Option 1 - Generating a Single Invoice Go to the Accounts, Tickets, Contracts or Tickets window, in the list - select the record that you want to invoice and then click the Xero button on the toolbar. Then, select Create Invoice file...
For example:
Another example - generating an Invoice file for a Ticket:
Option 2 - Generating a Single Invoice
From the menu select File > New > Xero Invoice...
After selecting this option the Generate Xero Invoice dialog window is displayed:
Select the level at which you want to generate the invoice file (either Accounts, Contracts or Tickets).
Once the level is selected a list of all Accounts, Contracts or Tickets (according to your selection) that have open balances, e.g. Billable Charges logged under them that have not yet been billed, will be displayed:
In the example above, the Account level was selected. All Accounts with open Billable charges are displayed.
Select the Account for which you want to create an invoice file and click Select Account and Continue.
After selecting the record for which you want to create an invoice and clicking the button to continue the following window is displayed:
Note: This is the same window that is displayed when initializing invoice creation from the Accounts, Contracts or Tickets window, as described in Option 1 above).
All Billable Charges that have not been billed yet and are related to the selected Account, Contract or Ticket record (Account in the example above) are displayed.
By default all such Charges are selected for inclusion in the invoice and you can un-select Charges that you do not wish to include in this invoice by clicking the checkbox.
Include/Exclude Not-Billable Charges In addition to the Billable Charges, you can also include Not-billable charges in the invoice. When adding them, Not-Billable charges are displayed in the invoice, however, they do not affect the invoice total. To include or exclude the Not-Billable Charges click the Include Not-Billable Charge - or - Exclude Not-Billable toggle Charges button accordingly. Administrators can default the inclusion of Not-Billable Charges by visiting Tools > Options > Xero tab.
Tip
You can use the Quick Select and/or Quick Unselect and/or Advanced Sort buttons to more easily select the Charges to be billed (this is usually required when a lot of charges are displayed).
At this stage you can also set different parameters for the invoice itself:
Date - This is the invoice date. By default, the date used is today's date. You can modify the date if necessary by typing an alternate date in this field.
Due Date - This is the invoice Due Date. By default, the date is one month from today's date. You can modify this date if necessary by entering an alternate due date in the field.
Reference - This is the invoice Reference in Xero (note: this is NOT an invoice number). You can modify the reference if necessary by typing an alternate Reference value in the field.
Click Next
The following window/step is displayed:
In this step you can modify the text which will be displayed on the invoice lines. Note that all modifications made to the invoice lines here are not applied to Charges in CommitCRM, and only apply to the Xero invoice lines.
Move Line Up/Down You can use the Move Line Up/Move Line Down buttons or the Advanced Sort button to modify the order of the invoice lines.
Insert Line/s You can also use the Add Blank Line button to include blank lines between the invoice lines in order to space the invoice up and make it more readable
Incl. in Description You can also use the "Incl. in Description" button to include additional information to all invoice line simultaneously, such as:
Click Incl. in Description and select the data you wish to be added to the description for every invoice line. To add this information for all invoices by default go to Tools > Options > Xero tab and select the information you want to include in invoice lines.
Editing the Text Line - You can double-click on each invoice line to add or edit the text/description of the selected line.
As mentioned above, these changes will take effect only on the invoice lines in Xero. The original Charges will not be affected by these changes.
When the invoice information is complete, click Next.
In this step you can select the folder to save the exported invoice file and to then generate it:
To generate the invoice file click Generate Xero Invoice.
Congratulation! Invoice file created successfully and can be imported in Xero.
If you wish to create another invoice, click on Create New Invoice. Otherwise, you can close the window.
Batch Invoice Creation
The Batch Invoice Creation Wizard allows you to general many invoices at once at the customer level, the service contract level or the ticket level.
If you create an invoice at the Account level, all Billable Charges related to the Account that haven't been billed yet will be included in the invoice, including Charges related to Tickets and Contracts.
If you create an invoice at the Contract level, only Billable Charges that haven't been billed yet which are related to the selected Contract will be included in the invoice, including all Ticket-related Charges.
If you create an invoice at the Ticket level, only Billable Charges that haven't been billed yet which are related to the selected Ticket will be included in the invoice.
In all cases, you can also include not-billable Charges in the invoice, which will be displayed in the invoice with a zero billable total amount. This way you can include all the Charges without actually billing for not-billable charges. When using the Batch Invoice Creation Wizard, you need to set the desired behavior for not-billable Charges from the Tools > Options > Xero tab .
To activate the Batch Invoice Creation Wizard: Go to File > New > Xero Batch Invoice Wizard. The following window appears:
Select the level at which you want to generate the invoices (either Accounts, Tickets, or Contracts).
Click Next to continue.
In this example, the Account level was selected and all the Accounts with open Billable charges are displayed.
Select the Accounts for which you want to create an invoice and click Next.
In this step you can select the folder to save the exported invoices file and to then generate it:
To generate the invoice file click Generate Xero Invoice.
Congratulation! Invoices file created successfully and can be imported in Xero
Importing Invoices to Xero
To import the invoice into Xero:
- Open Xero and select Accounts > Sales menu option.
- Click Import under the Xero Sales page.
- Click Browse, under ‘Step 3’ in the import page and select the file that was just created by CommitCRM.
Tip: Click ‘Copy to Clipboard’ to copy the file path and past it in the Xero file selection option.
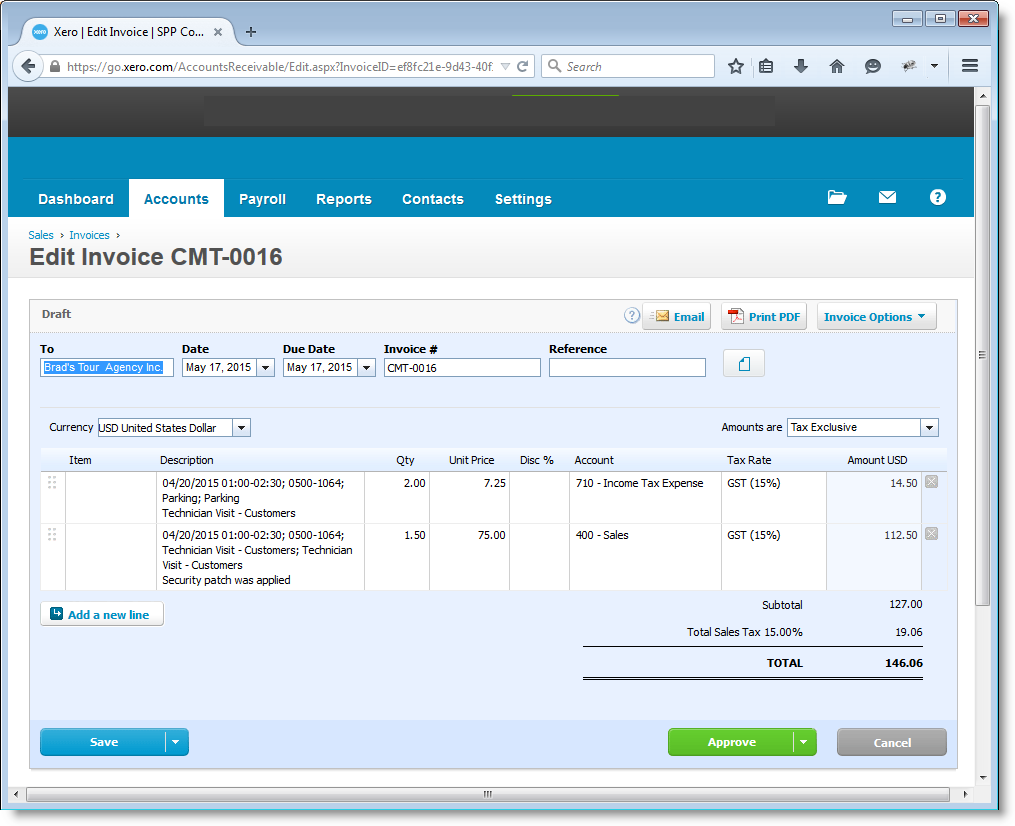
The invoice we've created successfully:

CommitCRM-Xero Link - Additional Options
Configuring The Invoice Number
Go to Tools > Options > Xero tab and click the Increment Invoice Number button:
Set the number for next Invoice:
Canceling Exported Invoices
CommitCRM keeps track on the Invoices it exported to Xero.
In some cases exported invoices do not end up generating Xero Invoices. For example, if you decided not to import exported invoice to Xero or imported them but decided to cancel one or more of the imported invoices.
CommitCRM lets you can cancel such exported invoices.
Canceling exported invoices in CommitCRM marks all involved Charges in CommitCRM as Unbilled again so they can be used again for invoicing.
In order to cancel exported invoices click the Xero drop down in the Charges window and select the option Cancel Exported Invoices:
nvoices can be canceled both on a one-by-one basis or in batches.
Single invoices can also be canceled from a batch. For example, if you exported 50 invoices to Xero using the Batch Invoice Creation Wizard, pushed the invoices to Xero and are only happy with 49 of them while need to cancel one that’s easy - cancel that one invoice in Xero and then cancel it in CommitCRM. Done!
The following window lists all exported invoice files and the invoices included in each.
Select the one you wish to cancel and click Cancel by Selected File or, in case you wish to cancel by an invoice number, click Cancel by Invoice Number instead.
All Charges related to invoices being canceled will become Unbilled again and be available for inclusion in future invoices.
See the screenshot below:
Linking Charges to an Existing Invoice in Xero
You can link Charges to existing Xero invoice.
In some cases, after an invoice got created in Xero you decide to include another line (e.g. service/product) in it or update an existing line. In order to keep things in sync with CommitCRM you can also add that new line to CommitCRM as a Charge, and then link it to the relevant invoice in Xero.
Note: Linking a Charge to an invoice does not modify the invoice details in Xero.
To link a single Charge to an existing invoice in Xero, first manually set the Charge to Billed by clicking on Mark as Billed. Once the Charge is marked as billed and selected, select Link to Existing Invoice in Xero... from the Xero drop down:
The Filter by invoice reference number will display:
Filter by Invoice Reference
This option enables you to find all the CommitCRM Charges that were included in a specific Xero invoice according to invoice reference number.
To do this, go to the Charges main window, and select Filter by Invoice Reference on the QuickBooks drop down toolbar menu.
The Filter by invoice reference number dialog box will open.
Enter the Invoice Reference number and click OK.
All the charges that were included in this invoice will be displayed.