QuickBooks Link Account Options: Difference between revisions
No edit summary |
No edit summary |
||
| Line 1: | Line 1: | ||
{{usermanualsquickbookslink}} | {{usermanualsquickbookslink}} | ||
Your company has ongoing interactions with customers, vendors, business partners, friends, leads, and so on. In RangerMSP, each of these types of contacts is called an [[Accounts|Account]]. You can manage your Account contact data and all other related data in the Accounts window. | |||
In Accounts, related data is any information related to the Account that is presently being managed in RangerMSP, such as scheduled Appointments, open Tasks, Phone Call monitoring, Ticket/incident [[history]], [[Assets]] (customer equipment and software licenses), [[Charges]], linked [[Documents]] (MS-Word, emails, Excel etc.), [[Sales|Sales Opportunities]] and so on. | |||
Account information is organized in separate information tabs that display different types of data. | |||
To view all information related to an Account, open the Accounts window, locate the required Account, and browse through its data by clicking on the information tabs. | |||
Accounts can be easily imported from [[QuickBooks Link|QuickBooks]], and changes can be synchronized between both systems. | |||
__TOC__ | |||
==Actions in RangerMSP-QuickBooks Link== | |||
Aside from importing your Customers into RangerMSP, the [[QuickBooks Link|RangerMSP-QuickBooks Link]] includes many other useful functions. | |||
You can view all of the synchronization options that are available between Account records in RangerMSP and Customers/Vendors in QuickBooks in the Accounts window under the QuickBooks drop down toolbar menu. | |||
There you will see one of the following two menus: | |||
The first menu is displayed when a selected Account is not linked to the parallel Customer/Vendor in QuickBooks. | |||
[[File:quickbooks_options_in_accounts_window1.png|center]] | |||
The second menu is displayed when a selected Account is already linked to the parallel Customer/Vendor record in QuickBooks. | |||
[[File: | [[File:quickbooks_options_in_accounts_window2.png|center]] | ||
All the options are accessible from the Accounts window, so it is not necessary to open the QuickBooks Company while those actions are being performed (although if QuickBooks is open you may notice performance improvements). | |||
==Create Invoice== | |||
This option enables you to create a QuickBooks invoice from RangerMSP for the selected Account, based on billable charges entered in RangerMSP that haven't been billed yet. You can also include not-billable charge in the invoice, without it affecting the invoice total amount. | |||
[[QuickBooks Link Invoice Creation Options|Click Here for a detailed step–by-step guide on how to manage invoices.]] | |||
==Link Account To QuickBooks Customer/Job/Vendor Record== | |||
This option enables you to link between an existing record in RangerMSP and an existing record in QuickBooks. | |||
This option is very useful when the same customer already exists in RangerMSP and also exisst in QuickBooks. It tells the system that both these records are actually the same contact and there should be a link between them when synchronizing data. Also, when generating QuickBooks invoices from RangerMSP the link tells RangerMSP to which customer to link the invoice to. | |||
To link between an existing Account record in RangerMSP and an existing Customer/Job/Vendor in QuickBooks, go to the Accounts window and select Link Account To QuickBooks Customer/Job/Vendor Record on the QuickBooks drop down toolbar menu. | |||
[[File: | [[File:link_account_to_quickbooks_record.png|center]] | ||
The QuickBooks Customer/Job Selection dialog box will appear: | |||
[[File:quickbooks_customer_selection_window1.png|center]] | |||
Type the name of the QuickBooks Customer/Job/Vendor in the Name field in QuickBooks, and click Find. The relevant records in QuickBooks will be displayed. Select the record that matches the record in RangerMSP and click OK. | |||
==Create New Record in QuickBooks Based on RangerMSP Account== | |||
This option allows you to create a new Customer/Vendor in QuickBooks based on the existing Account in RangerMSP, instead of retyping all the information again in QuickBooks. It also creates a link between the record in RangerMSP and the newly created corresponding record in QuickBooks. | |||
This option is useful when a new Account record was created in RangerMSP and you want to add it to QuickBooks, without having to type the Account details again in QuickBooks. | |||
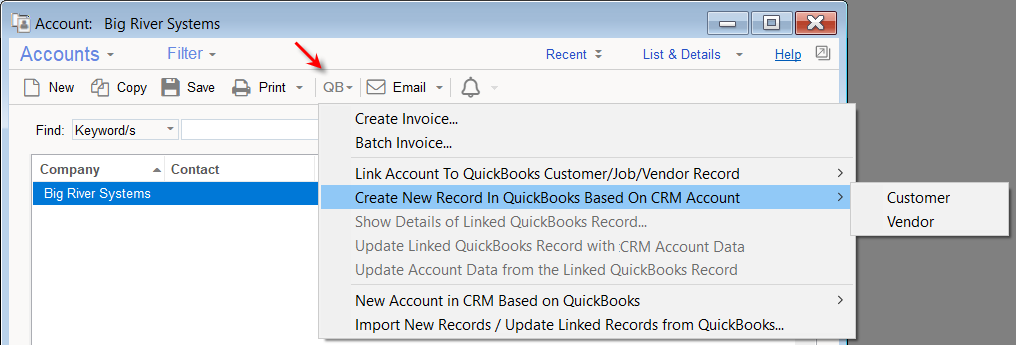
To create a new Customer/Vendor in QuickBooks based on an existing RangerMSP Account, select the relevant record in the Accounts window in RangerMSP and then select Create New Record in QuickBooks Based on RangerMSP Account in the QuickBooks menu. | |||
[[File: | [[File:new_record_in_quickbooks_based_on_account.png|center]] | ||
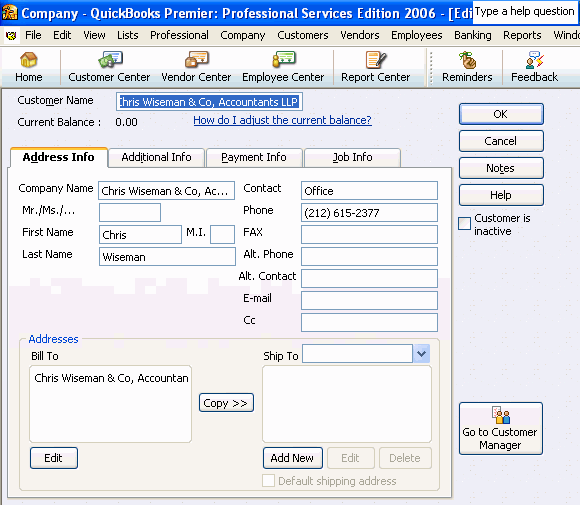
The Account record will now be transferred to QuickBooks as a Customer/Vendor. You can open QuickBooks and view the newly created record. | |||
[[File:new_customer_in_quickbooks.gif|center]] | |||
==Update Linked QuickBooks Record with RangerMSP Account Data== | |||
You can update a linked QuickBooks Customer/Job/Vendor with RangerMSP Account data. This option is useful when you've updated an Account in RangerMSP and want to automatically transfer these updates to the corresponding linked Customer/Job/Vendor in QuickBooks. | |||
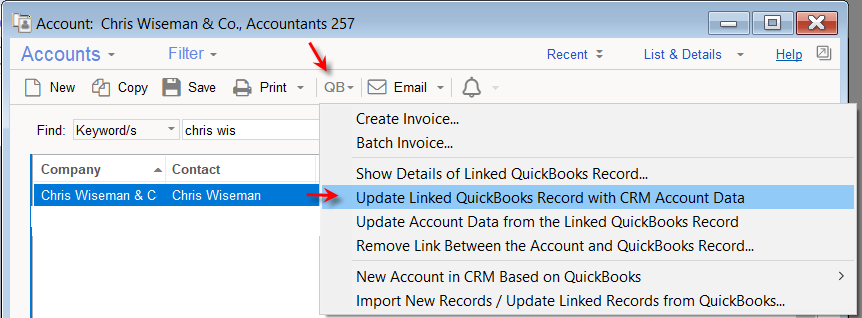
To update a linked Customer/Job/Vendor in QuickBooks with RangerMSP Account data, select the relevant Account in the Accounts window in RangerMSP and then select Update Linked QuickBooks Record with RangerMSP Account Data on the QuickBooks drop down toolbar menu. | |||
[[File:update_quickbooks_record_with_accounts_data.png|center]] | |||
The relevant Customer/Job/Vendor will be automatically updated in QuickBooks. You can open QuickBooks and view the updated information. | |||
[[File:updated_customer_in_quickbooks.gif|center]] | |||
The two images above, show that a 'Fax' number that was added in to the record in RangerMSP and how it has been updated in the parallel record in QuickBooks after activating this option. | |||
<u>Note:</u> If the linked Customer/Job/Vendor in QuickBooks was also updated since the last synchronization took place, you will receive a system warning. | |||
==Update Account Data from the Linked QuickBooks Record== | |||
You can update a linked RangerMSP Account with QuickBooks Customer/Job/Vendor data. This option is useful when you've updated a Customer/Job/Vendor in QuickBooks and want to automatically transfer the changes to RangerMSP. | |||
In the following example, the E-mail field was updated in QuickBooks: | |||
[[File:updated_customer_in_quickbooks2.gif|center]] | |||
To update the linked RangerMSP Account with the changed data from the parallel record in QuickBooks, select the relevant Account in RangerMSP and then select Update Account Data from the Linked QuickBooks Record on the QuickBooks drop down toolbar menu. | |||
[[File:update_account_with_quickbooks_data.png|center]] | |||
The selected record in RangerMSP will be updated with the changes made in QuickBooks. | |||
[[File:updated_account.png|center]] | |||
In the example above, you can see that the E-mail field in RangerMSP has been updated with the new information from the linked QuickBooks record. | |||
<u>Note:</u> If the linked Account in RangerMSP was also updated since the last synchronization took place, you will receive a system warning. | |||
==Remove Link Between the Account and QuickBooks Record== | |||
You can remove the link between a RangerMSP Account and QuickBooks Customer/Job/Vendor. This feature is useful for removing links that were created by mistake, removing links to QuickBooks records that were deleted, or when you don't want to continue synchronizing data between records. | |||
When you remove a link between records, you will no longer be able to synchronize changes between them. You can always link the records again in the future with the Link Account To QuickBooks Customer/Job/Vendor Record option on the QuickBooks drop down toolbar menu as described above. | |||
To remove the link between the records, select the relevant Account in RangerMSP and then select Remove Link Between the Account and QuickBooks Record on the QuickBooks drop down toolbar menu. | |||
[[File: | [[File:remove_link_between_accounts.png|center]] | ||
==New Account in RangerMSP Based on a QuickBooks Record== | |||
This option allows you to create a new Account record in RangerMSP based on an existing Customer/Job/Vendor in QuickBooks. It also creates a link between the record in QuickBooks and the newly created corresponding record in RangerMSP. | |||
This option is useful when a new Customer/Job/Vendor record was created in QuickBooks and you want to add it to RangerMSP, without typing the details again in RangerMSP. | |||
To create a new Account in RangerMSP based on a Customer/Job/Vendor in QuickBooks, select New Account in RangerMSP Based on QuickBooks from the Accounts window in RangerMSP. | |||
[[File:new_account_based_on_quickbooks_record.png|center]] | |||
The QuickBooks Selection dialog box will appear. | |||
[[File: | [[File:quickbooks_customer_selection_window2.png|center]] | ||
Search for the Customer/Job/Vendor in QuickBooks that you want to use to create the new Account in RangerMSP. | |||
Enter the name of the Customer/Job/Vendor in the Name field in QuickBooks, and click Find. Any related QuickBooks Customers/Jobs/Vendor will be displayed. Select the relevant record and click OK. | |||
[[File:new_account.png|center]] | |||
Done! The new Account will now be created in RangerMSP. | |||
==Import New Records / Update Linked Records from QuickBooks== | |||
If you have added or updated any Customers/Vendors/Jobs in QuickBooks, you can import these changes into RangerMSP using the same function as the one you used initially to import all the records from QuickBooks into RangerMSP. | |||
Using this option after the initial import enables you to import all the QuickBooks records that have been added to QuickBooks after the initial import. It also syncs all updates performed to records in QuickBooks and applies them to the corresponding linked records in RangerMSP. | |||
During the first import, all the relevant Account records from QuickBooks will be imported into RangerMSP. | |||
From the second import and on: | |||
#All the new records in QuickBooks that were created during the period between the last import and the current import, will be imported to RangerMSP as new records. | |||
#All the records in QuickBooks that were updated during the period between the last import and the current import, will be updated in RangerMSP as well. | |||
Please note, that Jobs are not imported in the batch import from QuickBooks to RangerMSP. You can import the jobs on one by one basis using the 'New Account in RangerMSP Based on QuickBooks' option. However, updates to Jobs that have been are already linked to RangerMSP Accounts will be synchronized and will update the corresponding record in RangerMSP. | |||
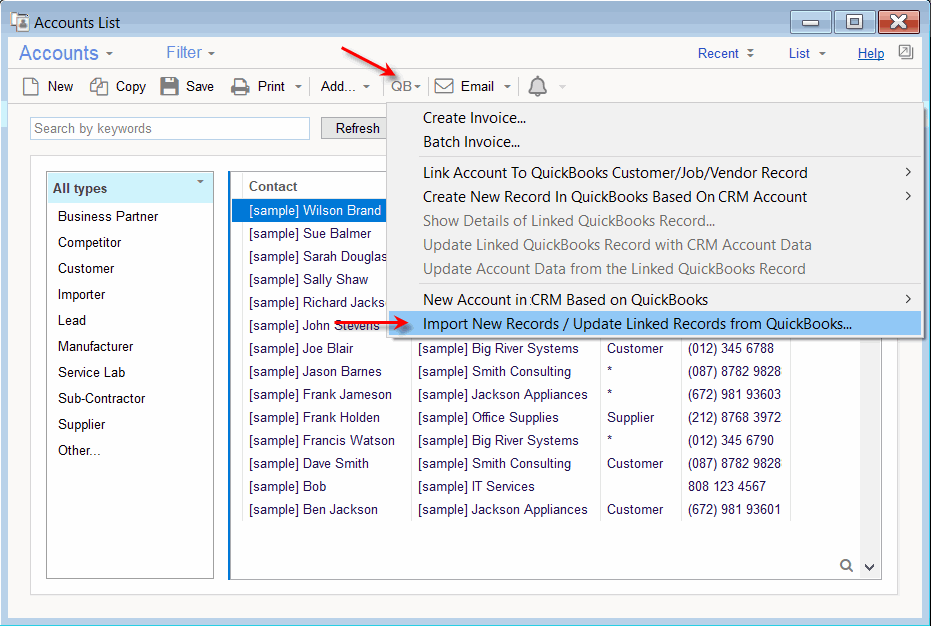
To sync/import all the records, go to Accounts window > QuickBooks drop down toolbar menu and select the option 'Import New Records / Update Linked Records from QuickBooks...' | |||
[[File:importing_accounts_from_qb.gif|center]] | |||
==See Also== | ==See Also== | ||
*[[QuickBooks Link|RangerMSP-QuickBooks Link]] | *[[QuickBooks Link|RangerMSP-QuickBooks Link]] | ||
*[[Accounts]] | |||
[[Category:User Manuals]] | [[Category:User Manuals]] | ||
[[Category:QuickBooks]] | [[Category:QuickBooks]] | ||
Latest revision as of 12:03, 9 July 2020
Your company has ongoing interactions with customers, vendors, business partners, friends, leads, and so on. In RangerMSP, each of these types of contacts is called an Account. You can manage your Account contact data and all other related data in the Accounts window.
In Accounts, related data is any information related to the Account that is presently being managed in RangerMSP, such as scheduled Appointments, open Tasks, Phone Call monitoring, Ticket/incident history, Assets (customer equipment and software licenses), Charges, linked Documents (MS-Word, emails, Excel etc.), Sales Opportunities and so on.
Account information is organized in separate information tabs that display different types of data.
To view all information related to an Account, open the Accounts window, locate the required Account, and browse through its data by clicking on the information tabs.
Accounts can be easily imported from QuickBooks, and changes can be synchronized between both systems.
Actions in RangerMSP-QuickBooks Link
Aside from importing your Customers into RangerMSP, the RangerMSP-QuickBooks Link includes many other useful functions.
You can view all of the synchronization options that are available between Account records in RangerMSP and Customers/Vendors in QuickBooks in the Accounts window under the QuickBooks drop down toolbar menu.
There you will see one of the following two menus:
The first menu is displayed when a selected Account is not linked to the parallel Customer/Vendor in QuickBooks.
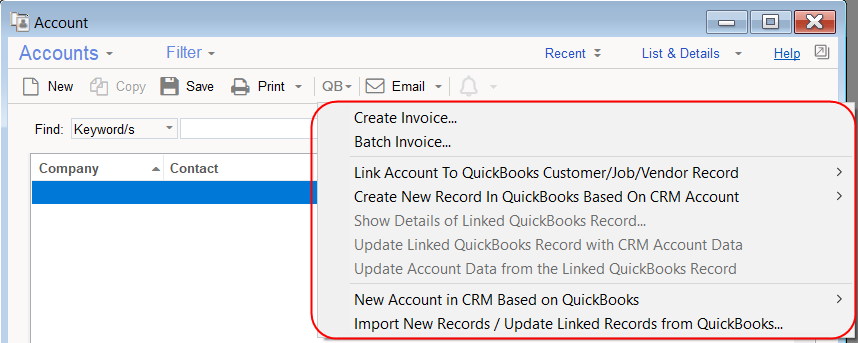
The second menu is displayed when a selected Account is already linked to the parallel Customer/Vendor record in QuickBooks.
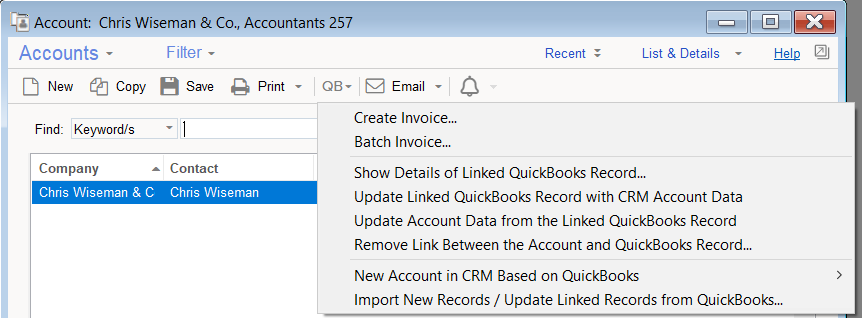
All the options are accessible from the Accounts window, so it is not necessary to open the QuickBooks Company while those actions are being performed (although if QuickBooks is open you may notice performance improvements).
Create Invoice
This option enables you to create a QuickBooks invoice from RangerMSP for the selected Account, based on billable charges entered in RangerMSP that haven't been billed yet. You can also include not-billable charge in the invoice, without it affecting the invoice total amount.
Click Here for a detailed step–by-step guide on how to manage invoices.
Link Account To QuickBooks Customer/Job/Vendor Record
This option enables you to link between an existing record in RangerMSP and an existing record in QuickBooks.
This option is very useful when the same customer already exists in RangerMSP and also exisst in QuickBooks. It tells the system that both these records are actually the same contact and there should be a link between them when synchronizing data. Also, when generating QuickBooks invoices from RangerMSP the link tells RangerMSP to which customer to link the invoice to.
To link between an existing Account record in RangerMSP and an existing Customer/Job/Vendor in QuickBooks, go to the Accounts window and select Link Account To QuickBooks Customer/Job/Vendor Record on the QuickBooks drop down toolbar menu.

The QuickBooks Customer/Job Selection dialog box will appear:
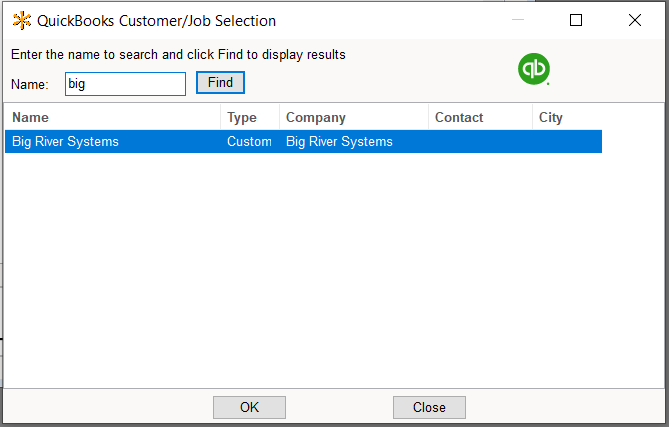
Type the name of the QuickBooks Customer/Job/Vendor in the Name field in QuickBooks, and click Find. The relevant records in QuickBooks will be displayed. Select the record that matches the record in RangerMSP and click OK.
Create New Record in QuickBooks Based on RangerMSP Account
This option allows you to create a new Customer/Vendor in QuickBooks based on the existing Account in RangerMSP, instead of retyping all the information again in QuickBooks. It also creates a link between the record in RangerMSP and the newly created corresponding record in QuickBooks.
This option is useful when a new Account record was created in RangerMSP and you want to add it to QuickBooks, without having to type the Account details again in QuickBooks.
To create a new Customer/Vendor in QuickBooks based on an existing RangerMSP Account, select the relevant record in the Accounts window in RangerMSP and then select Create New Record in QuickBooks Based on RangerMSP Account in the QuickBooks menu.
The Account record will now be transferred to QuickBooks as a Customer/Vendor. You can open QuickBooks and view the newly created record.
Update Linked QuickBooks Record with RangerMSP Account Data
You can update a linked QuickBooks Customer/Job/Vendor with RangerMSP Account data. This option is useful when you've updated an Account in RangerMSP and want to automatically transfer these updates to the corresponding linked Customer/Job/Vendor in QuickBooks.
To update a linked Customer/Job/Vendor in QuickBooks with RangerMSP Account data, select the relevant Account in the Accounts window in RangerMSP and then select Update Linked QuickBooks Record with RangerMSP Account Data on the QuickBooks drop down toolbar menu.
The relevant Customer/Job/Vendor will be automatically updated in QuickBooks. You can open QuickBooks and view the updated information.
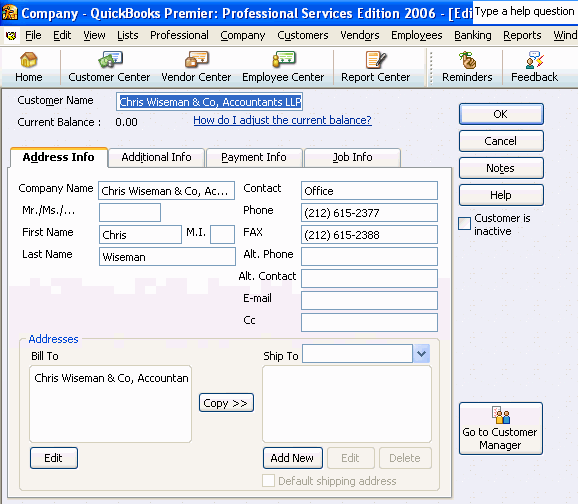
The two images above, show that a 'Fax' number that was added in to the record in RangerMSP and how it has been updated in the parallel record in QuickBooks after activating this option.
Note: If the linked Customer/Job/Vendor in QuickBooks was also updated since the last synchronization took place, you will receive a system warning.
Update Account Data from the Linked QuickBooks Record
You can update a linked RangerMSP Account with QuickBooks Customer/Job/Vendor data. This option is useful when you've updated a Customer/Job/Vendor in QuickBooks and want to automatically transfer the changes to RangerMSP.
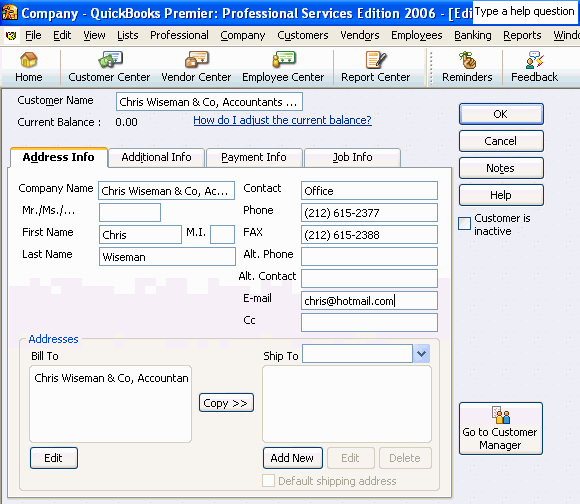
In the following example, the E-mail field was updated in QuickBooks:
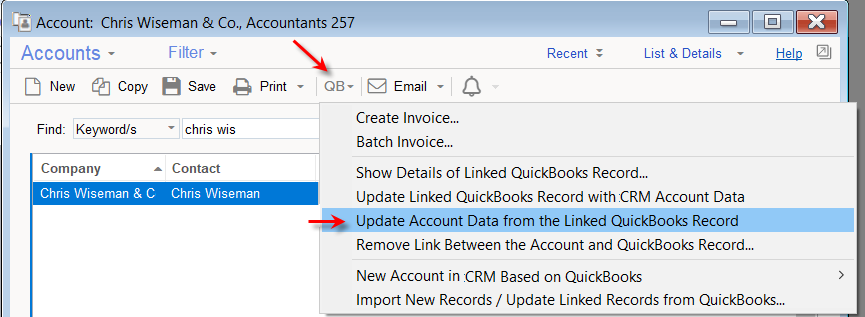
To update the linked RangerMSP Account with the changed data from the parallel record in QuickBooks, select the relevant Account in RangerMSP and then select Update Account Data from the Linked QuickBooks Record on the QuickBooks drop down toolbar menu.
The selected record in RangerMSP will be updated with the changes made in QuickBooks.
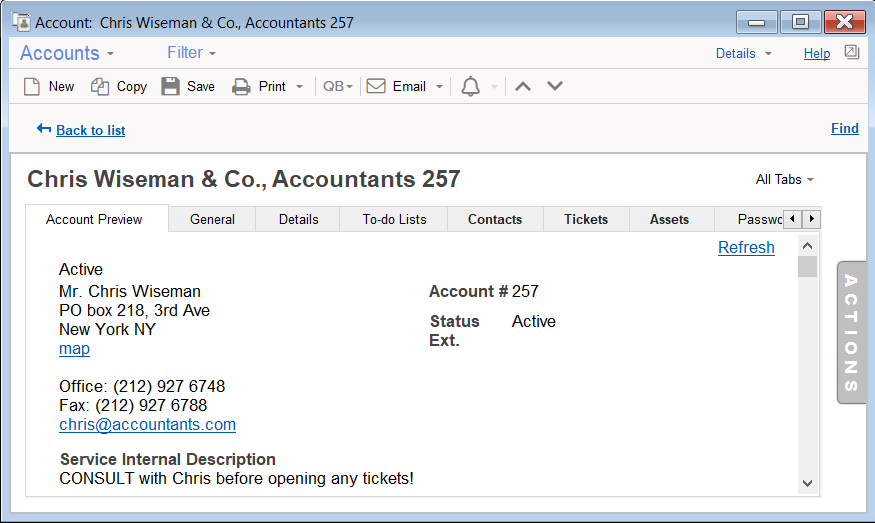
In the example above, you can see that the E-mail field in RangerMSP has been updated with the new information from the linked QuickBooks record.
Note: If the linked Account in RangerMSP was also updated since the last synchronization took place, you will receive a system warning.
Remove Link Between the Account and QuickBooks Record
You can remove the link between a RangerMSP Account and QuickBooks Customer/Job/Vendor. This feature is useful for removing links that were created by mistake, removing links to QuickBooks records that were deleted, or when you don't want to continue synchronizing data between records.
When you remove a link between records, you will no longer be able to synchronize changes between them. You can always link the records again in the future with the Link Account To QuickBooks Customer/Job/Vendor Record option on the QuickBooks drop down toolbar menu as described above.
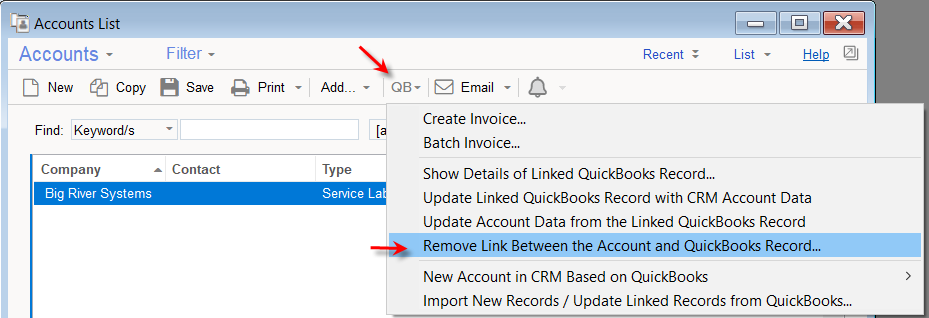
To remove the link between the records, select the relevant Account in RangerMSP and then select Remove Link Between the Account and QuickBooks Record on the QuickBooks drop down toolbar menu.
New Account in RangerMSP Based on a QuickBooks Record
This option allows you to create a new Account record in RangerMSP based on an existing Customer/Job/Vendor in QuickBooks. It also creates a link between the record in QuickBooks and the newly created corresponding record in RangerMSP.
This option is useful when a new Customer/Job/Vendor record was created in QuickBooks and you want to add it to RangerMSP, without typing the details again in RangerMSP.
To create a new Account in RangerMSP based on a Customer/Job/Vendor in QuickBooks, select New Account in RangerMSP Based on QuickBooks from the Accounts window in RangerMSP.

The QuickBooks Selection dialog box will appear.
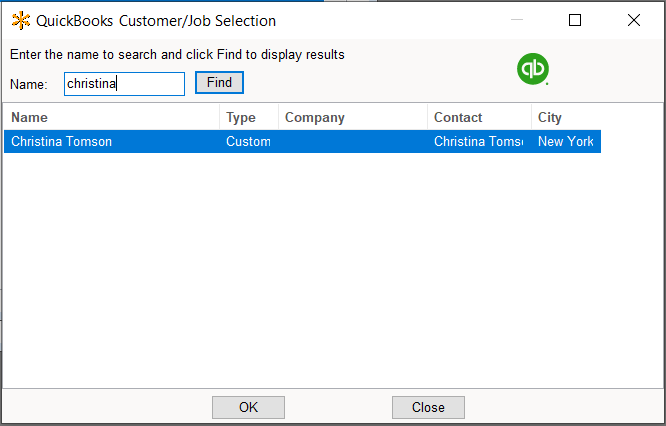
Search for the Customer/Job/Vendor in QuickBooks that you want to use to create the new Account in RangerMSP.
Enter the name of the Customer/Job/Vendor in the Name field in QuickBooks, and click Find. Any related QuickBooks Customers/Jobs/Vendor will be displayed. Select the relevant record and click OK.
Done! The new Account will now be created in RangerMSP.
Import New Records / Update Linked Records from QuickBooks
If you have added or updated any Customers/Vendors/Jobs in QuickBooks, you can import these changes into RangerMSP using the same function as the one you used initially to import all the records from QuickBooks into RangerMSP.
Using this option after the initial import enables you to import all the QuickBooks records that have been added to QuickBooks after the initial import. It also syncs all updates performed to records in QuickBooks and applies them to the corresponding linked records in RangerMSP.
During the first import, all the relevant Account records from QuickBooks will be imported into RangerMSP.
From the second import and on:
- All the new records in QuickBooks that were created during the period between the last import and the current import, will be imported to RangerMSP as new records.
- All the records in QuickBooks that were updated during the period between the last import and the current import, will be updated in RangerMSP as well.
Please note, that Jobs are not imported in the batch import from QuickBooks to RangerMSP. You can import the jobs on one by one basis using the 'New Account in RangerMSP Based on QuickBooks' option. However, updates to Jobs that have been are already linked to RangerMSP Accounts will be synchronized and will update the corresponding record in RangerMSP.
To sync/import all the records, go to Accounts window > QuickBooks drop down toolbar menu and select the option 'Import New Records / Update Linked Records from QuickBooks...'
