Alerts Server: Difference between revisions
No edit summary |
No edit summary |
||
| Line 99: | Line 99: | ||
# In the window that opens, click the Alerts Server tab:<br><br> | # In the window that opens, click the Alerts Server tab:<br><br> | ||
[[File: | [[File:email_alerts_system_settings.png|center]] | ||
In this window, you should define the Alerts Server Settings as follows: | In this window, you should define the Alerts Server Settings as follows: | ||
Revision as of 17:49, 16 April 2020
The CommitCRM Alerts Server modules provide the following features:
- Notifies technicians by email when they have new tasks they need to perform, and when any updates have taken place in the system which concern them. These email Alerts are triggered by various system events.
- Notifies customers when a new ticket is created or a ticket is closed. See more details in Alerts to Customers.
Using CommitCRM Alerts Server helps automate many workflow-related tasks so that employees are constantly up-to-date on their tasks and responsibilities. Each user can define their own Alert settings and decide when they wish to receive Alerts. The Alerts they are eligible to receive are determined by their user role in each case.
Note that CommitCRM Alerts Server runs as a part of the CommitCRM Server service. The CommitCRM Server Service must be installed as a Windows service on your server and running in order to use the CommitCRM Alerts.
Using CommitCRM Alerts Server
CommitCRM Alerts are sent when certain events happen in the system, like a new Ticket is created, new Appointments are scheduled, updates are made to existing records, and more. Some alerts are also proactively sent when the system automatically detects a situation that you requested to be alerted on, such as tickets becoming due.
Each user can defined their Alerts settings and decide in which cases they wish to receive Alerts. The ability to set up Alerts is determined by the role of the user in each case. Possible roles are: Account Manager, Ticket Manager, Appointment Manager, Task Manager and Receive Alerts for any Opened/Closed Ticket.
For each role you hold, you can decide whether you wish to receive Alerts for events related to every role or not. For example, if you select Account Manager Alerts, this means that when you are the Account Manager of an Account, you will receive Alerts for events which are related to this Account. Note that this includes related data Alerts, such as new Charges added to this Account, new Contracts created for this Account, etc.
Note that when you are the Account Manager and Ticket manager of a Ticket, you will receive a single Alert for all events which relate to this Ticket. You will receive the Alerts through your role as the Ticket Manager (Account Manager Alerts are eliminated to avoid duplicate Alerts).
Note: You will not receive Alerts for changes you have made.
CommitCRM Alert Format
The Email Alert Subject line is made up of the following parts:
The Prefix can be one of the following:
- [acc-mgr] - when you receive Alerts as the Account Manager
- [tkt-mgr] - when you receive Alerts as the Ticket Manager
- [info] - when you receive Alerts for any Ticket opened/closed
- [ASSIGNED] - when you are assigned a Ticket/Account
- [assign-removed] - when you are removed from being a Ticket/Account manager
The following events can trigger an Alert: New, Updated, Deleted.
CommitCRM Alerts Setup
Setting up CommitCRM Alerts includes Server Side setup and User Setup and requires the following steps:
- Enable Outgoing Emails - setting up the parameters in order for the system to be able to send out email alerts.
- Activate the Alerts Option in the Server - setting up the Alerts to ON.
- Start the Service - settings up and running the CommitCRM Server service.
- Define Each Client's Settings - each user should define their own alert settings.
- Test - Testing is done in two levels:
- Testing the server side settings while setting up the server.
- By performing updates in the application and receiving the alert email. Note that the updates must be performed with a user other than your own in order to receive alerts. See more details in Troubleshooting.
All setup steps are described in the sections below.
Setting up CommitCRM Alerts Server
CommitCRM Alerts runs in the CommitCRM Server Service.
The CommitCRM Server Service must be installed as a Windows service on your server. Only then you can start the service in order to use the CommitCRM Alerts.
Setting up the CommitCRM Alerts Server includes server-side settings (explained in this section) and also client-side settings, performed by each user in CommitCRM (see CommitCRM Alerts User Settings).
Server-side setup includes:
- Outgoing email settings.
- Alerts settings.
- Installing and activating the CommitCRM Server Service.
Outgoing Email Settings
The Outgoing Email Settings are used to send Alert emails from CommitCRM Server.
Make sure to test your settings once defined, using the Test button in the configuration program, to make sure the emails can be sent using your settings.
Note that the same settings are used both by CommitCRM Alerts and Email Connector, and should be define only once. If you already defined this for the Email Connector, you can skip this part.
To define Outgoing emails settings:
- Log into the Server with a Windows Administrator user. Note that the setup program must run from the same server as the one where the CommitCRM installation sits and from where you plan to run the Email Connector.
- Run <Installation_DIR>\CommitCRM\Server\ServerConfig.exe.
Note: there are two executable files under the server folder, make sure you are running the configuration program (ServerConfig.exe). - In the window that opens, click the Outgoing Mail Server tab:
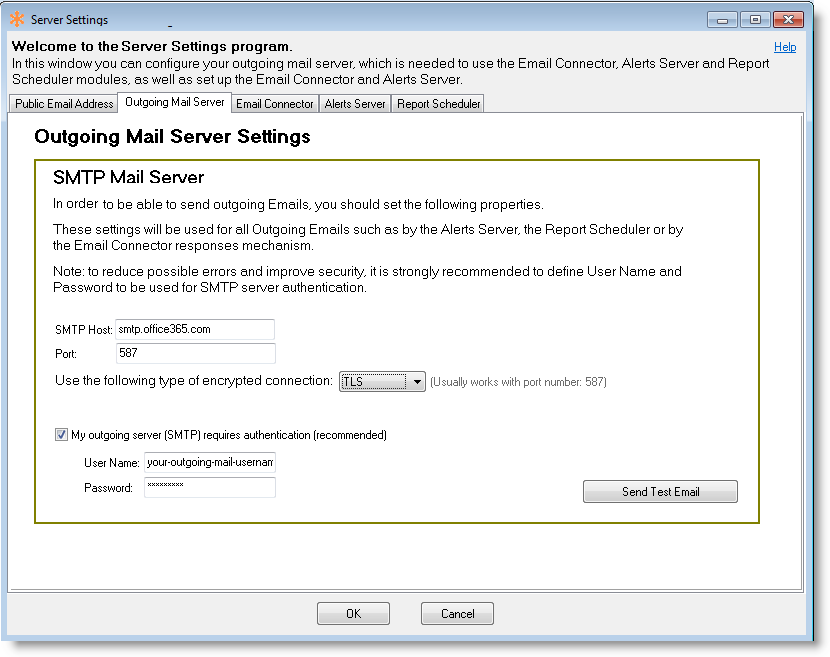
In this tab, you should define the following:
- SMTP Host - enter your Outgoing SMTP Mail Server.
- Port - enter the Outgoing SMTP port.
- My outgoing server (SMTP) requires authentication - if checked, must fill in the authentication details below:
- User Name - the User Name to be used for SMTP authentication
- Password - the password related to the specified User Name
To reduce errors and improve security it is strongly recommended to use SMTP authentication, using a user name and password for SMTP access.
Note: If you use SSL on your Email servers, this should be automatically supported (for users working with CommitCRM 6.0 or higher). If for some reason you are facing problems connecting via SSL, please contact our support directly ar support@commitcrm.com.
- Test SMTP Connection - use the test button to verify that your account is working. If there is missing or incorrect information, such as your password, you will be prompted to supply or correct it.
- Send Test Email - use this test button to send a test email using the settings you defined. After clicking it you need to specify the From email address and the To email address that will be used for sending the Test Email message.
CommitCRM Alerts System Settings
Setting up the Alerts part should be performed only after the outgoing email settings were set and tested. This is to make sure you actually receive Alerts once they are ready, and to avoid the unnecessary accumulation of Alerts that could not be sent due to wrong outgoing emails settings, etc.
To set up the Alerts:
- Log into the Server with a Windows Administrator user. Note that the setup program must run from the same server as the one where the CommitCRM installation sits and from where you plan to run the Email Connector.
- Run <Installation_DIR>\CommitCRM\Server\ServerConfig.exe.
Note: there are two executable files under the server folder, make sure you are running the configuration program (ServerConfig.exe). - In the window that opens, click the Alerts Server tab:
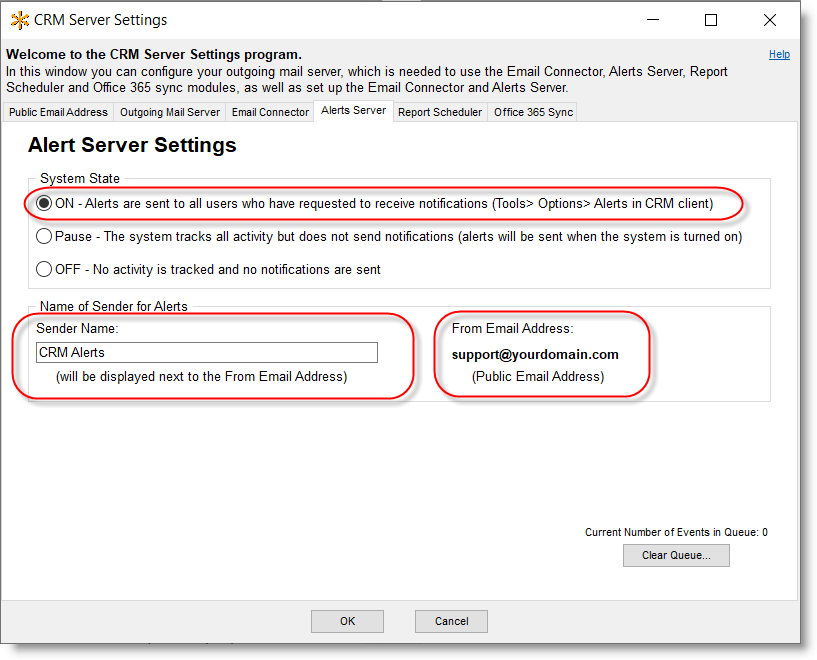
In this window, you should define the Alerts Server Settings as follows:
- Alerts Mode – The Alerts mode can be one of the following: On, Off or Pause.
On - You should use the On setting when you wish to activate the Alerts mechanism. Note that if you activate the Alerts after they have been Paused (see below), you may wish to consider deleting some old Events from the queue in order to avoid Alerts for old Events from being sent once you reactivate the server. See more details on how to delete Events from the queue below in the Clearing the Activity Queue option.
Off (default) - This mode should be used when you do not want the system to prepare or send Alerts at all. This means events in the system will not create any Alerts, and when you re-activate the CommitCRM Alerts Server, no Alerts will be waiting to be sent. When installing the CommitCRM Alerts Server, the system is OFF by default, and should be set to ON when you wish to activate the Alerts mechanism.
Pause - This mode should be used when you want the system to create Alerts for events in the system, but avoid sending them until you switch the mode to On. This can be helpful when you have SMTP/mail server problems and you want to fix them before activating the Alerts. Note that in this Pause mode, the Alerts accumulate until you reactivate the Alerts system. Once you reactivate the system, you should consider deleting old Alerts from the queue, as they may already be irrelevant (see Delete Alerts option below).
Note that if you have SMTP/mail problems, it is advisable to use the Pause option, since it collects the Alerts before sending them to the outgoing email. This allows you to delete old Alerts later from the queue since they have not been sent. If you leave the system working, the Alerts will be accumulated as outgoing emails, and once the problem is fixed, they will all be sent, and you will not be able to clean up older Alerts.
- From Email Address, Email Sender Name - Here you define the Email From Address that will be used when sending the Alerts. You can define an Alias to be used which will reflect the source of this email (such as "CommitCRM Alert"). The Email address is taken from the Public Email Address tab.
- Clearing the Activity Queue - This is an advanced option, which should be used carefully. You should use this option in cases where you wish to delete pending Events which haven't been sent as Alerts yet. For example, if you have SMTP/mail Server problems, and you paused the CommitCRM Alerts system, you may wish to clean up the queue of Events and keep only the last day or two. This is to avoid sending a large number of Alerts at once when reactivating the system, and also to avoid sending Alerts for old events which are no longer relevant.
Important Notes:
- Alerts will start to be sent only after each user defines their own Alert settings (and only when CommitCRM Server service is running)
- System Alert setup may take some time to take effect in the CommitCRM Server. In order for it to take effect immediately, you should restart the CommitCRM Server Service.
Running CommitCRM Alerts Server
The CommitCRM Alerts Server runs as part of the CommitCRM Server service.
The CommitCRM Server service runs as a Windows Service on your server. You should first install the Service and run it, to activate the CommitCRM Alerts Server.
Note that running CommitCRM Server service is used both by the Alerts and by Email Connector. If you already installed the service for the Email Connector, you can skip this step and move on to the Alerts Server Settings.
Before you install CommitCRM Alerts Server
Before you install, make sure you have allowed the CommitCRM Server Service in your Windows' Server DEP settings.
DEP can be found under Windows: System Properties -> Advanced -> Performance - Settings -> tab DATA EXECUTION PREVENTION.
Install Service
This part of the installation should be performed on the server itself.
Automatic installation (requires CommitCRM 14 and up)
Log in to to your Server with a Window's Administrator account and run the installer from:
<Installation_DIR>\CommitCRM\Utils\Install\InstallServerSideWindowsServices.exe
OR -
Manual installation
- Open a command prompt window: Right-click the command prompt icon and and choose 'Run As Adminsitrator'.
- Type the following command:
Note: The <Installation_Dir> must refer to a LOCAL server path (e.g. C:\ or D:\Software, etc.) and NOT to a shared network name/path.<Installation_DIR>CommitCRM\Server\CommitServer.exe -install
- Wait for a success message to appear, indicating the service was installed successfully.
- Open the Windows Services Management windows from Control Panel > Administration Tools > Services.
- Verify that a Window's service called CommitCRM Server is now displayed the services list.
- If the service is not there, make sure again that you are running the command prompt Window using 'Run as Administrator' and try again.
Running CommitCRM Server Service
- Once the CommitCRM Server Service is installed, setup the CommitCRM Alerts Server as explained in CommitCRM Alerts System Settings.
- You should also make sure all the users (employees) configure their own Email Alert settings so they will receive Alerts.
- Open the Windows Services Management windows from Control Panel > Administration Tools > Services.
- Locate the CommitCRM Server service and start the service (right-click > Start).
- Make sure that it is set to start automatically with a Delayed Start (Startup type > Automatic Delayed Start) each time the server is restarted.
- (Optional) Allow the CommitCRM Server Service in your Windows' Server DEP settings. DEP can be found under Windows: System Properties -> Advanced -> Performance - Settings -> tab DATA EXECUTION PREVENTION.
CommitCRM Alerts User Settings
In order to receive Alerts, each user should open the Tools > Options > Alerts window and define their own Alerts settings. The following window will appear:
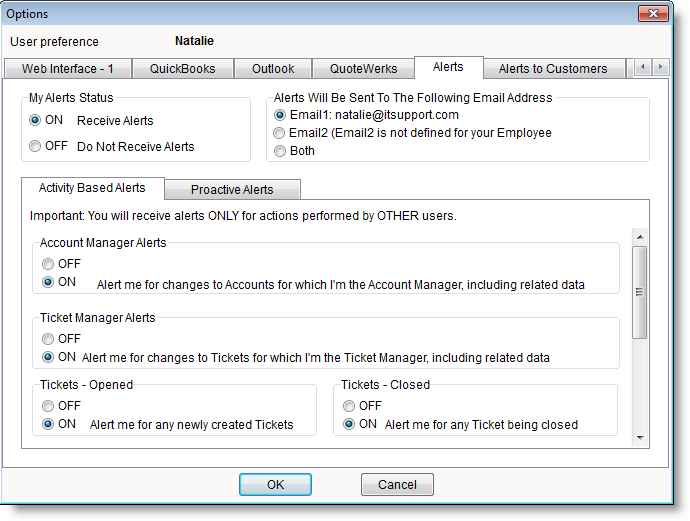
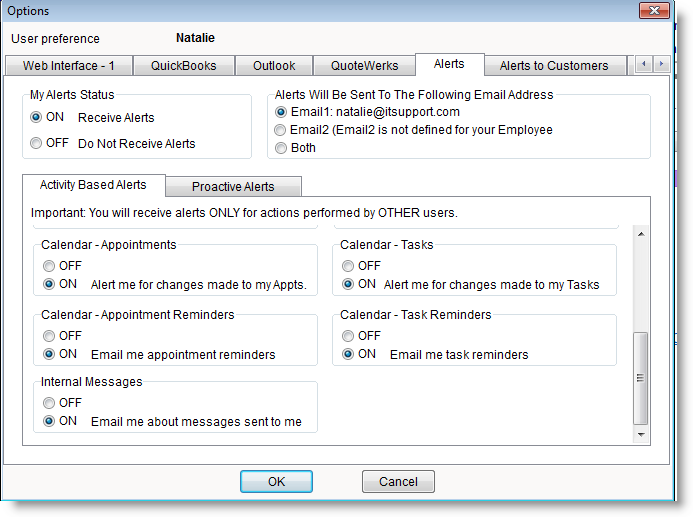
In this window you should define your Alert settings as follows:
My Alert Status
You should use the ON setting (which is the default settings) when you wish to activate the Alerts mechanism for yourself. Note that only if you activate the Alerts setup below, you will be receiving alerts.
Alerts will be Sent to the Following Email Address
Here you define which of your Email addresses defined in your Employee Record in CommitCRM will be used when sending the Alerts to you. You can define Email1, Email2 or Both.
Account Manager Alerts
The Account Manager of a specific Account is set by assigning an Account to a specific employee in the Account's "Acct Mgr." field.
The Account Manager can receive Alerts or any event in the system which relates to this Account, even when the specific event is not directly related to them, such as a new Appointment scheduled for a different employee that is linked to the Account.
Events which trigger Alerts for Account Managers:
- Account assigned to you
- Account Deleted
- Account Updated - Name, Phone number, Address, etc.
- Account related data updated - Tickets, Charges, Documents, Appointments, Tasks, Assets, Contracts
Ticket Manager Alerts
The Ticket Manager is set in the Ticket's "Manager" field. The Ticket Manager may be the assigned technician who is going to perform the actual work for this Ticket, or a manager who overseas the Ticket's completion, and assigns Tasks and Appointments to other employees.
The Ticket Manager can receive Alerts for any event in the system which relates to this Ticket, even when the specific event is not directly related to them (such as a new appointment scheduled that is linked to the Ticket that is assigned to a different employee).
Events which trigger Alerts for Ticket Managers:
- Ticket is assigned to you
- Ticket Deleted
- Ticket Updated - Due Date, Status, Priority, Contract, etc.
- Ticket related data updated - Charges, Documents, Appointments, Tasks, Assets
Note that when you are the Account Manager and the Ticket manager of a Ticket, you will receive a single alert for all events which relate to this Ticket. The Alerts will be received as the Ticket Manager (Account manager alerts are eliminated in this case to avoid duplicate alerts).
Tickets - Opened, Tickets - Closed
This is a special role that allows you to receive Alerts when ANY Ticket in the system is opened or closed. If you have this role, you do not need to be the actual manager of a Ticket or Account, or related to them in any way, in order to receive updates for it.
This is useful for employees who need to be aware of all new/closed Ticket activity. For example:
- The "office dispatcher/helpdesk manager" needs to be aware of any new Tickets created in the system in order to dispatch them to the relevant technician.
- The "office financing person/admin" needs to be aware of any Tickets that have closed and need to be billed to the customer.
These Alerts are sent for the following events:
- Ticket - New
- Ticket – Closed
Calendar - Appointment
An Appointment Manager is the Employee assigned to the Appointment in the "Employee" field of the Appointment. Only one Employee may be assigned to each Appointment.
As an Appointment Manager you can receive Alerts for any event related to the Appointment:
- New Appointment assigned/unassigned to you.
- Appointment Updated - Date, Time, Linked Account, Linked Contracts, etc.
- Appointment Deleted.
Calendar - Tasks
A Task Manager is the Employee assigned to the Task in the "Employee" field of the Task. Only one Employee may be assigned to each Task.
As the Task Manager you can receive Alerts for any event related to your Task:
- New Task assigned/unassigned to you.
- Task Updated - Date, Timer, Linked Account, Linked Contract, etc.
- Task Done.
Calendar - Appointment Reminders
An Appointment Manager can be notified when their Appointment Reminders are due.
Calendar - Task Reminders
A Task Manager can be notified when their Task Reminders are due.
Internal Messages
You can receive an email alert about internal messages sent to you.
Important Notes:
- You will NOT receive an email Alert for changes you have made.
- It takes some time for alert setting changes to affect the CommitCRM Server component. In order for it to take effect immediately, you should restart the CommitCRM Server Service on your server.
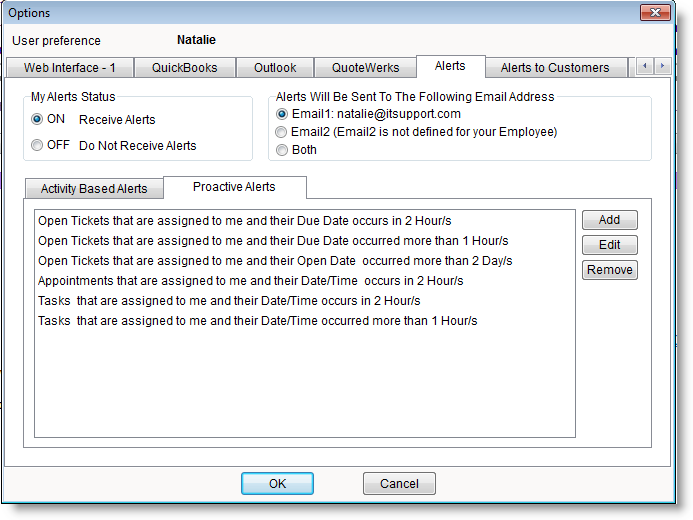
Proactive Alerts
Each employee can configure their personal proactive alerts to monitor ticket open and due dates, scheduled appointments and due tasks.
Testing The Alerts System
Testing that the Alerts are defined properly and work require the following:
- Testing Outgoing Emails Settings - When defining the Outgoing email settings the system provides several test points to make sure all is defined correctly. Follow the instructions in the Outgoing Email Settings section. Tests include:
- Verifying your SMTP Connection setting and that your account is working.
- Sending a Test Email.
- Testing User Alerts Settings - To test that you actually receive the Alerts you want to receive, you first need to complete all the setup steps described above. Only then you should perform updates in the application and see that alerts arrive:
- Make sure your CommitCRM Alerts User Settings are defined.
- Login to CommitCRM using a different user than your own user.
- Make the relevant changes, e.g. update a Ticket you are the manager of.
- Check if an email alert has arrived at your mailbox.
Make sure to check out the Troubleshooting section in any case of a problem.
Uninstall Service
To Uninstall CommitCRM Server service:
- Open the Windows Services Management windows from Control Panel > Administration Tools > Services.
- Stop the CommitCRM Server service.
- Open a command prompt window: Right-click the command prompt icon and and choose 'Run As Administrator'.
- Type the following command:
<Installation_DIR>\CommitCRM\Server\CommitServer.exe -uninstall
Tips & Tricks
Tips for filtering incoming Alerts in Outlook
In some cases, you may wish to filter the Alerts and move emails that don't interest you to a different Outlook folder so they don't clutter your Inbox.
You can create Outlook rules to filter incoming email according to the Sender (the Alias name you set in the Alerts Server System Settings) or the email's subject.
For example, you may wish to receive Ticket Manager Alerts, but not Alerts for each Document added to the Ticket. To accomplish this, create a rule in Outlook that moves email to another folder based on the subject's prefix. Here is an example of the subject line of a Ticket Manager Alert:
[tkt-mgr] CommitCRM Document - New [0500-0002, Completed, Natalie, Internet - Cafe, Inc.]
You can therefore create a rule that any email starting with: "[tkt-mgr] CommitCRM Document" will be moved to another folder.
Adding Web Links to Email Alerts
When using Web Links the system will add a link to the relevant entity in the email alert body. This allows employees to quickly open Commit Web Interface and view or edit the details of the entity being referred in the email. This saves the need to go explicitly to the Web Interface site, login and search for the entity in order to see its details.
See more details in the Web Interface user guide under Setting Web Links Options.
Troubleshooting
I set my user to receive Alerts but I do not get any email alerts
Solution: You should check the following options:
- It can take up to 10 minutes for new Alerts preferences to take effect. You can wait, or restart the CommitCRM Server service in order for the settings to take effect immediately.
- Make sure your system administrator has activated the system alerts (set the system to ON using the ServerConfig utility) and that the CommitCRM Server Windows service is running).
- When testing the alerts, note that you will not receive Alerts for changes you have made. You should perform the changes with a different CommitCRM user.
I checked all of the settings, the alerts system is activated, and and I still don't get email alerts
Solution: In some cases, old settings already created wrong email alerts which are "stuck" in the outgoing queue and prevent the system from going on to the new alerts. In this case, you should first cleanup the outgoing queue:
- Stop CommitCRM Server service
- Run <server>\CommitCRM\Server\ServerConfig.exe and make sure all settings are correct. Check that the "From Email Address" is correct. Save any changes you make.
- To delete old pending alerts, delete all the files in the following folder: <server>\CommitCRM\Server\QSysEDOutbox\
- Restart CommitCRM Server service and verify email alerts are being sent
For more Outgoing Emails troubleshooting, please refer to the Email Connector Troubleshooting section (both the Email Connector and the Alerts Server use the same Outgoing mechanism).
I made changes in CommitCRM (i.e. added a new Ticket, etc.) and I am not getting any Alerts
Solution: You only receive Alerts for changes made by other people. When you make a change in the system on entities related to you (e.g. you assign yourself a new Ticket), you will not receive an Alert.
See more troubleshooting at CommitCRM Email Connector Troubleshooting.