Email Templates: Difference between revisions
No edit summary |
No edit summary |
||
| Line 270: | Line 270: | ||
To add the Signature to a template, click ''Add Data Field'', and from the available fields list, choose ''Current User'' and then select the ''Signature'' option. | To add the Signature to a template, click ''Add Data Field'', and from the available fields list, choose ''Current User'' and then select the ''Signature'' option. | ||
[[File: | [[File:setup_guide_email_template_signature_add_to_template.gif|center]] | ||
When adding the signature to an Email Template which is Text-based, the system will automatically use the Text signature for this user. | When adding the signature to an Email Template which is Text-based, the system will automatically use the Text signature for this user. | ||
| Line 283: | Line 283: | ||
To copy a template, right-click the template and select Copy, or click the Copy option on the toolbar. | To copy a template, right-click the template and select Copy, or click the Copy option on the toolbar. | ||
[[File: | [[File:setup_guide_email_template_copy.gif|center]] | ||
Revision as of 06:18, 20 May 2020
Introduction
An Email Template contains a group of pre-programmed email formats that can be used in different parts of the application when sending an email. Emails can be sent by clicking the Email icon, which is available from various windows in the system.
Users can create their own email templates or use the predefined system templates for sending emails out to customers or to other employees. Using the right template can make the email contain more helpful information in the format that is customized to your preferences.
Each Email Template can contain fixed text and may include dynamic data fields from the application. You can merge data fields within the email template so the data will be populated to the email. Each Email Template can be based on Text format or HTML format.
When sending an email from within CommitCRM, you can choose the email template you wish to use, by clicking the arrow in the Email icon to open the select list. This will let you choose from the available templates for this entity.
You can define an email template for each entity.
The default template is the template that is used when clicking on the email icon. (Note: Clicking the arrow gives you the list of available templates).
CommitCRM comes with a set of predefined email templates. You can also define your own templates by choosing the Manage Email Templates option.
In the following sections you will find more details regarding creating and using Email Templates:
Email Template Types
Each Email Template applies to a specific entity in the system. When defining a new Email Template, the system lets you add data fields, which are relevant to the specific entity to the template.
For example, when creating an Email Template for Tickets, you can design the email text and layout, and merge Ticket data fields in the template. The system will let you choose the fields from the available fields list for Tickets, and fields of entities which are linked to the Ticket, such as the linked Account.
The following table provides a summary of each Email Template type, when it is used, and the scope of available fields you can choose from for this template, ie. in the case of Linked Asset under Tickets you can add all Asset related fields to your Email Template for Tickets.
| Email Template Type | Available From | Available Data Fields | Comments |
|---|---|---|---|
| Generic |
|
*Current User (data fields linked to the currently logged-in user) | The Generic template, which is defined as Default will be automatically used from the relevant windows. There is no option to select a Generic template from a list. |
| Accounts |
|
|
|
| Tickets |
|
|
When using data fields for linked entities, , the fields will contain the data in the email only if there is a selected entity of this type.
Note: When using the CommitCRM Email Connector, it is recommended to include the Ticket Number data field in the email Subject. This will allow the system to file these emails if the customer replies to them and they arrive at the Email Connector. |
| Assets |
|
|
When using data fields for linked entities, the fields will contain the data in the email only if there is a selected entity of this type. |
| Sales Opportunities |
|
|
When using data fields for linked entities, the fields will contain the data in the email only if there is a selected entity of this type. |
| Quotes |
|
|
When using data fields for linked entities, the fields will contain the data in the email only if there is a selected entity of this type. |
| Calendar (Appointments and Tasks) |
|
|
Tasks and Appointments can be linked to only one of the following:
Opportunity, Ticket, Contract or Asset. When using data fields for linked entities, the fields will contain the data in the email only if there is a selected entity of this type. |
| Knowledge Base Articles |
|
|
|
| Documents |
|
|
Documents can only be linked to one of the following:
Opportunity, Ticket, Contract, Asset or Article. When using data fields for linked entities, only if there is actually a selected entity of this type, the fields will contain the data in the email. |
| Messages |
|
|
Messages can be linked to one of the following only:
Opportunity, Ticket, Contract or Asset. When using data fields for linked entities, , the fields will contain the data in the email only if there is a selected entity of this type. |
| History Notes |
|
|
History Notes can only be linked to one of the following:
Opportunity, Ticket, Contract or Asset. When using data fields for linked entities, , the fields will contain the data in the email only if there is a selected entity of this type. |
| None |
|
In these windows, no template will be used when sending an email, as there are no entities involved in the email |
Creating Email Templates
To create a new Email Template, from the main menu, go to Settings and select the “Email Templates” option. This opens the Email Templates management window, where you can see a list of Email Templates.
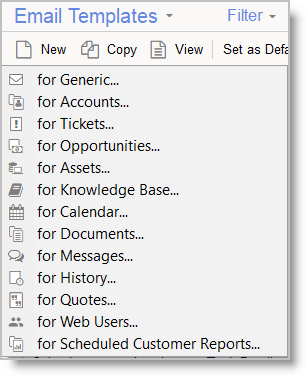
To create a new template, click New at the top left-hand corner of this window. A menu appears, letting you choose from the available Email Templates type.

Select the type, and the New Email Template window appears
This window contains two tabs: Email Content and Details.
In the Contents tab you can define the template itself, including the following fields:
- Subject
Here you determine the way the email subject will look. You can include data fields, which will be merged from the real data when creating a real email from this template. - Contents
Here you determine the way the email body will look. You can include data fields, which will be merged from the real data when creating a real email from this template. - Email Format
Select whether the email contents is in Text or HTML format. Note that when selecting HTML format, this means you actually need to enter real HTML code in the contents field. - Add Data Fields
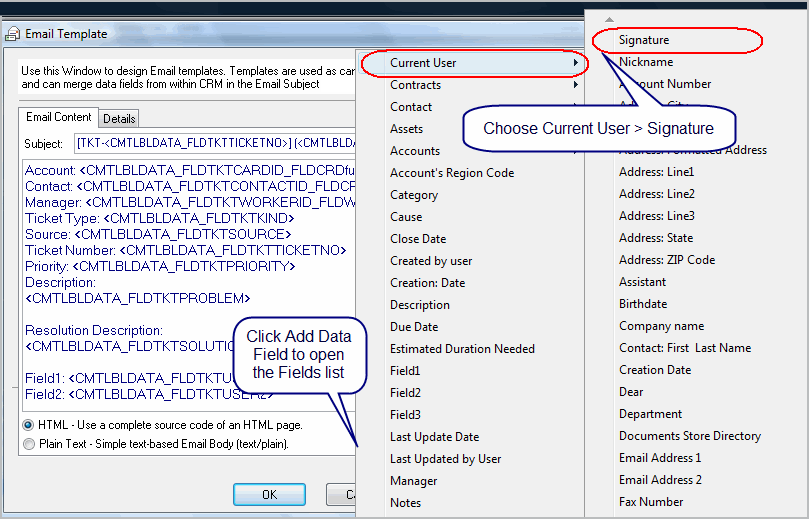
One of the most powerful features of the Email Template is the ability to merge fields from within the database automatically to the email. The email Subject and Contents may include data fields from the entity for which you create the email. Use the Add Data Field button to select the field and to automatically add it in the correct format within the subject or the contents.
Each email may contain a signature. In order to include the signature in the templates you must add it explicitly as a data field--which is part of the template. The signature should be added from the Current User > Signature field.
When using a Text template, the system will use a text signature. When using an HTML template the system will automatically use the HTML signature defined for the user. See more details in Email Signature.
- Send Test Email
Use this button to create a test email and see what the email will look like when used with data from a real entity.
For example, this is how an plain-text designed Ticket template can look like:
In the Details tab, you can set the template name, and determine whether it is active (i.e. will appear in selection lists when choosing a template).
Sharing Email Templates
Starting with CommitCRM 5.4 you can easily share Email Templates with other CommitCRM users, using a dedicated forum.
Each of the shared Email Templates can be exported to a file, and uploaded to a community sharing forum, so other users can download it and use in CommitCRM.
By sharing your work you’ll help other members, and you’ll enjoy other members work. This can save you tremendous amount of time as you can take advantage of a lot of work already invested by other users creating templates which may be very well-suited for your needs. All templates can then be further adjusted like any other Email Template, to fit your specific requirements.
For further instructions on how to export and import Email Templates, refer to the Email Templates Sharing Center forum ( Enter Email Templates Sharing Center.)
Default Template
For each entity type, you can determine a default template. This template will be the template automatically used when clicking the Email icon for the entity (without choosing a template from the list with the arrow).
To set a template as the Default Email Template, right-click the template in the list, and select the Set as Default option.
After setting an Email Template as default, it will show the Default indication in the templates list.
Only one template of each type can be the default template at a certain time, so setting a template as default will switch an existing default template.
Email Signature
Each user can define his or her own Email Signature to be used when sending an email from within the application. When defining Email Templates, this signature can also be included in the email body, either for text or HTML emails.
To include your signature in Email Templates, a user should:
- Define the user's signature (in text and HTML formats)
- Include the Signature field in the Email Template explicitly
Define the user's signature
To define a user's signature, click Edit Email Signature.
In the Email Signature window, you can define both a plain text signature and an HTML formatted signature. Note that the HTML signature should contain real HTML code.
Include the Signature field in the Email Template explicitly
Once the signatures are defined for the user, you can include the signature in Email Templates. Note that the signature must be explicitly added to the template as a data field which is part of the template.
To add the Signature to a template, click Add Data Field, and from the available fields list, choose Current User and then select the Signature option.

When adding the signature to an Email Template which is Text-based, the system will automatically use the Text signature for this user.
When adding the signature to an Email Template which is HTML-based, the system will automatically use the HTML signature for this user.
System Templates vs. User Defined Templates
The CommitCRM system comes with a set of predefined Email Templates which can be used as-is for sending emails from within the application. The system templates cannot be edited by the user or modified in any way. You can set a system template as inactive if you do not want it to appear in the available templates list when sending an email.
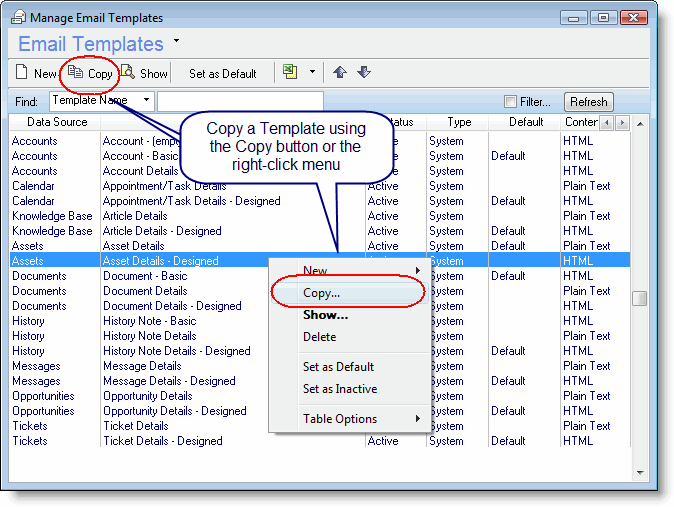
If you want to customize a system template, you should first copy the template, and then edit the new template. This will copy the template and will let you give it a new name. If you want this template to replace the system template, you can then set the template as default by right-clicking and selecting Set as Default.
To copy a template, right-click the template and select Copy, or click the Copy option on the toolbar.
