Sales
The Sales Opportunities features of the CommitCRM system assist users with generating and pursuing leads—and finalizing new business deals. This document explains how to utilize these features to increase sales and keep better track of revenue.
Overview
Helping our users win more business is the purpose of the Sales Opportunities management section of CommitCRM.
The Sales Opportunities features help our users track business opportunities from the first step of the sales cycle to the closing of the sale. Using these features can help increase business from both new and existing customers, and help managers forecast future revenues.
By using the Sales Opportunities features, you can track business opportunities, store detailed information about prospective customers and contacts, track all the interactions for each customer up to the sale point (phone calls, meetings, tasks, events, information requests, etc.), pursue sales opportunities and track the status of each opportunity, forecast potential revenue, measure the effectiveness of sales efforts, and more.
Whether setting up a new server for an existing customer, signing a service contract with a new customer, or pursuing an opportunity to win a large network-installation project, the Sales Opportunities section will help you manage the sale.
Opportunities Window
The Sales Opportunities features in CommitCRM help to track business opportunities from the first step of the sales cycle to the closing of a deal.
Sales Opportunities are managed in the Opportunities window (from the main CommitCRM screen), which displays a list of all of your Opportunities. This list can be easily filtered to show only open Opportunities, won Opportunities, Opportunities managed by a specific employee, and more. To filter the Opportunities list, use the Search pane at the top part of the window.
From the search pane you can also search for Opportunities by keyword or by specific Opportunities fields.
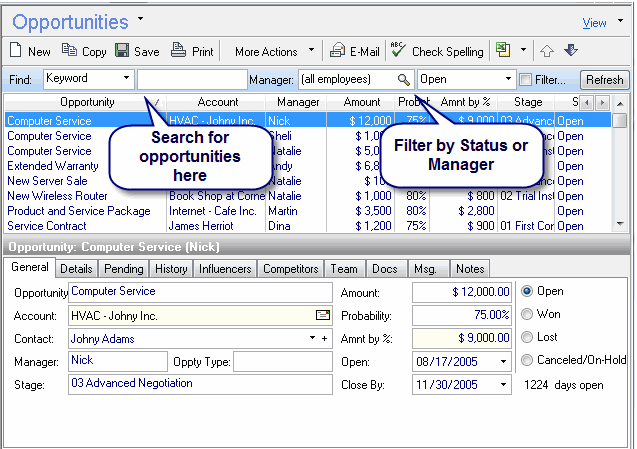
You can store a lot of information for each sales Opportunity, helping you track all information relevant to the potential sale.
Creating new Sales Opportunities
A new Sales Opportunity record can be created in two ways:
1. From the Opportunities window: From the main CommitCRM window, open the Opportunities window and press the New button at the top of the screen. A new Opportunity window now opens in which you can enter the basic information about this Opportunity.
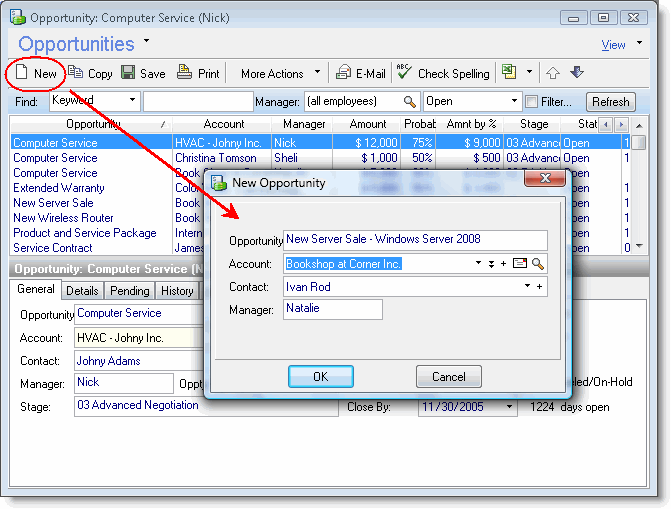
When this window is completed, a more detailed Opportunity window opens in which you can store many more details concerning the potential deal. For more information see the Opportunity Fields section.
2. From the Accounts window: You can also create a new Opportunity from the Accounts window. To do this, open the Accounts window of the potential client, or, for a new client, create a new Account. In the Accounts window, select the Opportunities tab and click the New button at the bottom of the screen. A new Opportunity window now opens in which you can enter basic information about this Opportunity. When this window is completed, a more detailed Opportunity window opens in which you can store many more details concerning the potential
deal.
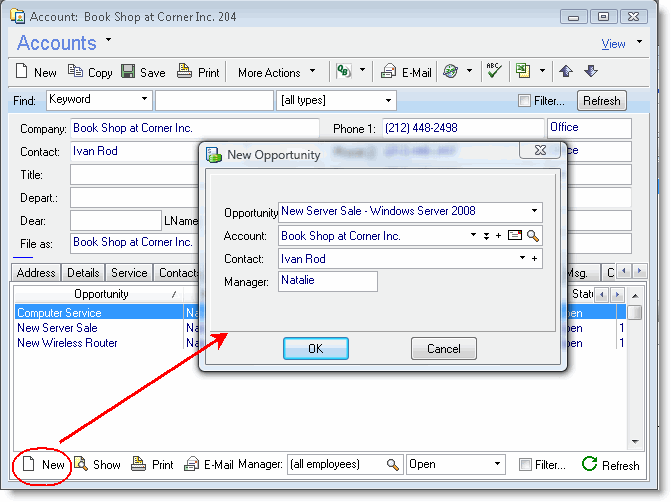
For more information about the fields in the detailed Opportunities window, see the Opportunity Fields section.
Opportunity Fields and Tabs
Below is a main Opportunity window.
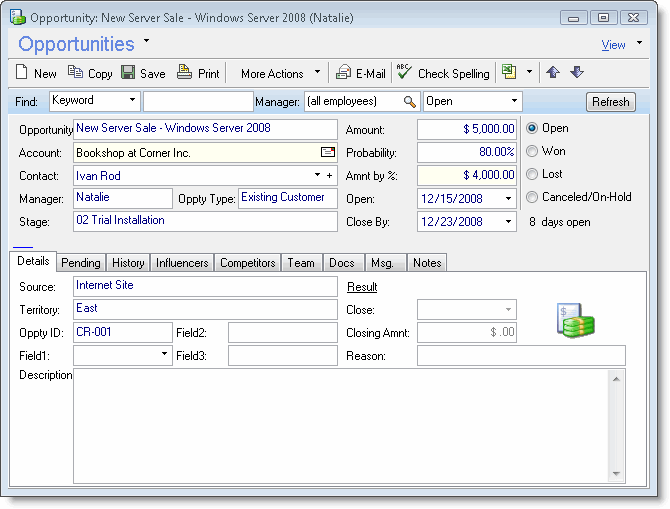
The following is an explanation of the fields in the main Opportunity window:
Field List
| Field | Description |
|---|---|
| Opportunity
(mandatory) |
In this field you should enter a short, descriptive title of the Opportunity. Every Opportunity is given its own name so you will be able to easily identify it when viewing the Opportunities list.
To save time, you can customize this field and select “template” values from a drop-down list rather than enter a new title each time. Even when using the drop-down list to name the Opportunity, we still recommend that you consider modifying the Opportunity title a little so it can be easily identified when appearing in the Opportunities list. To customize the drop-down list, select the “Edit List” option in the field's pull-down menu. |
| Manager | The Manager field should be used to assign an Opportunity to a specific employee. Each employee can then easily see which Opportunities are assigned to them and perform the actions required to win the sales.
This field can also be used in dedicated Opportunities reports, in which you can sort Opportunities by manager, allowing you to see forecasted sales by employee. This information is also helpful with performance reviews. Note that by using CommitCRM’s Privilege features you can also define whether a user can view all Opportunities or just the ones assigned to them. Click here for more details about the Privileges features in CommitCRM. |
| Opportunity Type (abbreviated as Oppty Type) | In this field, the user can classify the Opportunity into a category from a number of predefined types that come with the system, or into categories that the business has created for its specific needs. For example, you can use it to distinguish between Opportunities for existing customers and new ones, hardware sales opportunities, server-oriented opportunities etc.
This is a customizable field. The user can either enter values or add values to the possible values list by selecting the “Edit List” option in the field's pull-down menu. This way you can easily customize the system to the relevant sales opportunities types in your business. |
| Stage | In this field you should enter the stage the project is currently at in the sales cycle. The system comes with predefined values for this field such as: first contract; trial installation; advanced negotiations; and purchased.
You may also add values to the possible values list by selecting the “Edit List” option in the field's pull-down menu. This way you can easily customize the system to the relevant sales stages in your business. You can also use this field to filter Opportunities by stage, allowing you to view only those Opportunities that are in specific stages. (For example, you can view all sales Opportunities in the “First Contact” stage and make sure to follow-up with a phone call or sending collateral.) |
| Amount Probability Amount by % | These three fields can help in forecasting future revenues. In the “Amount” field, you should enter the expected revenue for this Opportunity. In the “Probability” field, you should assign a probability of succeeding in this Opportunity. The “Amount by percentage” field is then automatically generated from these two figures, providing a figure that can be used in revenue forecasting.
For example: the “Amount” of a new server Opportunity is $5,000, meaning that the customer will pay this amount for a new server. The CommitCRM user estimates the probability of winning this opportunity at 80 percent (chances of winning the opportunity are fairly high). The system then automatically calculates the “Amount by percentage” field, in this example $4,000, which is the amount used in forecasting future revenues. Click here for more details on this feature. |
|
By choosing one of these buttons, a user marks the current status of the Opportunity. By default, an Opportunity is created with a status of Open. If you change the status of an Opportunity from Open to any of the other options (either Won, Lost, or Cancelled/on hold), the opportunity will be “closed.” The Close date is then automatically updated and a new window opens allowing you to enter the closing information. For more information about closing an Opportunity, see the Closing an Opportunity section. |
| Close By | In this field you should use enter your estimate of when the opportunity will be closed (i.e. won/lost). This date can then be used for revenue forecasting or to help prioritize your actions and determine which sales opportunities require the most immediate attention.
Opportunity Status vs. Close By Note that the Opportunity Close By date is not connected to the Opportunity Status. It is possible to be in the initial stage of the sales process with a Close-by date very close, and vice-versa. For example, let's say a customer contacts you and wants to buy new hardware in a few days—in this case, the Stage may be defined as “First Contact,” yet the Close By date might be only two days ahead. In a different case, this may be a case where the real decision making is due in only 6 weeks from now. In this case the Stage can be 'Advanced Negotiations' however, the Close By date will be set to 6 weeks ahead. |
| Source | In this field you should enter how the customer reached you, or how you contacted the customer (online advertisement, conference, internet site, magazine ad, etc.). You may add values to the values list by selecting the “Edit list” option in the field’s pull-down menu, allowing you to easily customize the system to reflect the relevant marketing sources in your business.
You may also filter Opportunities by their Source, allowing you to analyze the ROI of your marketing activities. |
| Territory | In this field you can define the geographical area of an Opportunity. This is a customizable field. You can add values to the list by selecting the “Edit List” option in the field's pull-down menu.
Using this field can help you assign Opportunities to the appropriate sales rep, analyze performance by territory (by using reports), etc. . |
| Opportunity ID
(abbr: Oppty ID) |
The Opportunity ID field allows you to assign an internal ID to a specific sales opportunity. Although this is not a mandatory field, it can often be helpful for managing an Opportunity. |
|
When closing an opportunity by changing its status from Open to any other status (Won, Lost, Canceled/On-Hold), this triggers a window which allows you to update the opportunity closing fields.
See more details in the Closing Opportunities section. |
In addition to the basic fields in the Opportunity window, each Opportunity also contains information in other tabs at the bottom of the screen:
Pending Tab
The Opportunities Pending tab helps you manage all pending appointments and tasks for this Opportunity. To add a new task or appointment to this Opportunity, click the New button at the bottom of the Pending tab window.
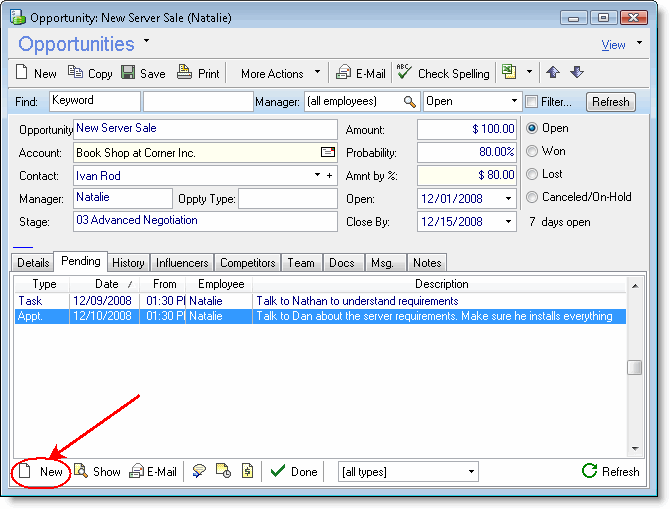
Clicking the New button will open a menu that allows you to create a new task or appointment. The menu also allows you to create activities from a template, which can help you to speed-up activities creation for common activities. You can read more about this in the Activity Templates user guide.
After entering an activity, it will be displayed in a list in this tab and it will be linked to this Opportunity. In this list you can see the date and time of the activity, a brief description, and the employee who is assigned to this activity.
Should the opportunity be won, you may wish to charge the customer for some of the tasks or appointments performed for this sales Opportunity. This can be done before you set the activity as Done by right-clicking the task or appointment and selecting the “Charge Appointment” or “Charge Task” option. This way you can track all the work performed during the sales process and charge the customer only if you win the sale. If the activity was already removed from the Pending tab, you can charge for it from the History Tab.
When the activity is done, you can set it as Done by selecting the activity in the list and clicking on the Done button at the bottom part of the tab. You may also mark is as Done from the Tasks/Appointment window. Marking an activity as Done will remove it from this tab. This way you can easily track whether there are any outstanding activities for this sales opportunity.
History Tab
The History tab is used to track the overall activity of the Opportunity. You can add History Notes directly from this window by clicking the New button at the bottom part of the tab.
Note that in addition to History Notes, any activity that is linked to the Opportunity will also be documented in the History tab. This includes any new documents added to this Opportunity, new messages linked to the Opportunity, and any audit records for updates made to the Opportunity details.
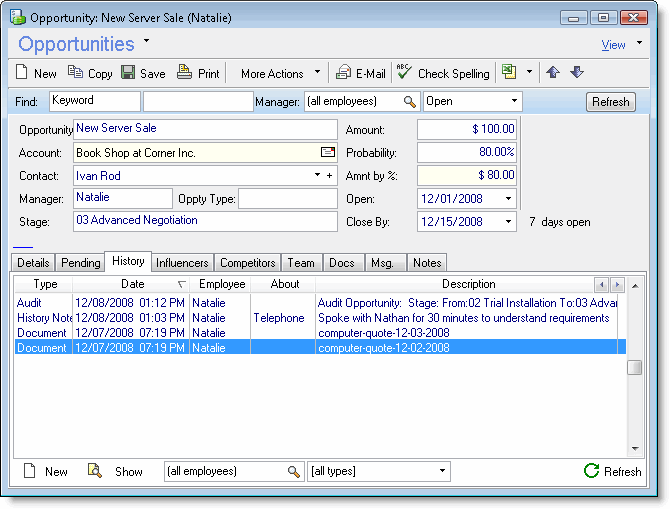
History Notes are usually the way to document important phone calls you wish to log with date and time, or any other communication that was performed with anyone related to this Opportunity.
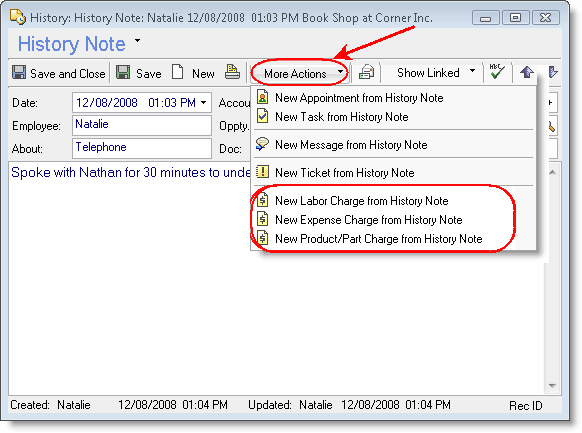
Note that should the Opportunity be won and you wish to charge the customer for work already performed concerning the sale, you can easily transform a History Note into a Charge by opening the History Note window and clicking on “More Actions”.
Influencers Tab
In the Influencers tab you can record all the people who influence the decision of the customer. Influencers may be anyone in the client's business involved in the decision-making process for this sale. This might include the client's employees, external consultants, and the like. For each influencer you can keep information such as their role, their approach towards the sale (e.g. positive, negative), etc. This tab can help you keep track of the different forces in the organization and make sure you approach the right person for each matter.
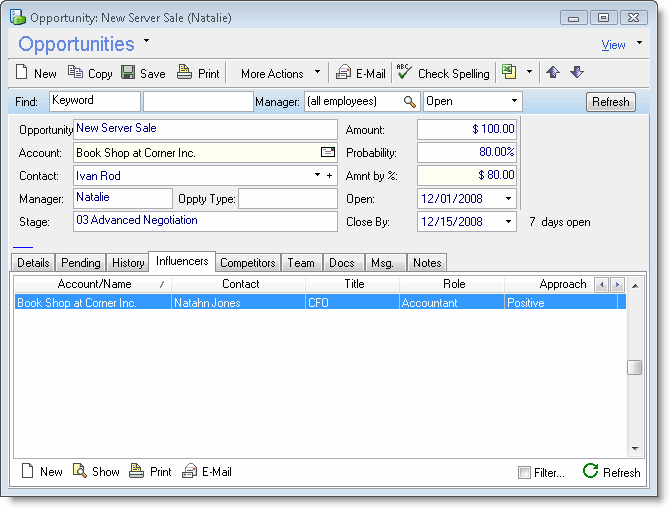
Clicking the New button at the bottom part of the tab will open the New Influencer window:
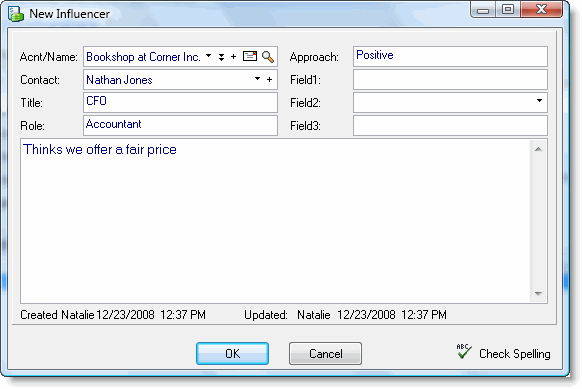
An influencer can be selected from the existing Accounts list in CommitCRM, or you can simply enter a name without creating an account for it. If an existing Account is selected, then you can also choose the Contact from a drop-down list or simply enter a name, if you prefer not to choose a contact who exists in the account's contacts list.
All the other fields are fully customizable, and you can edit the possible value lists to contain the types you need. You can select the “Edit List” option for each of the values, which allows you to edit the possible values list.
Competitors Tab
In the Competitors tab you can track information regarding your competitors in this Opportunity. For each competitor you can keep information such as their strengths and weaknesses, their overall rating as providers, the current stage they are at with this Opportunity, and more. Monitoring your competitors can help keep track of your odds for this sale.
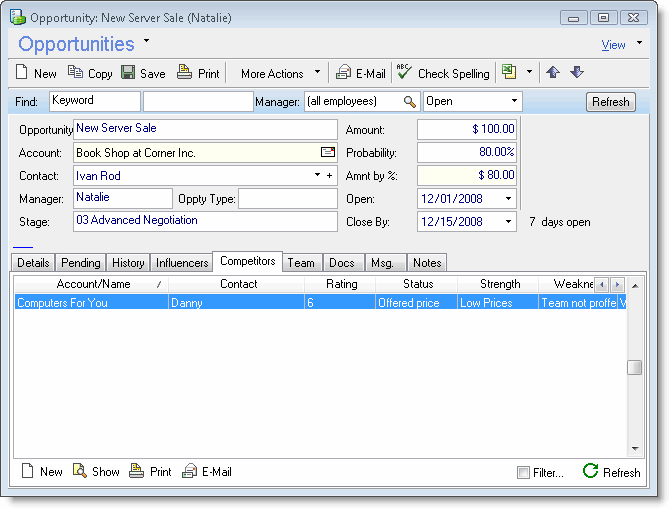
Clicking the New button at the bottom part of the tab will open the New Competitor window
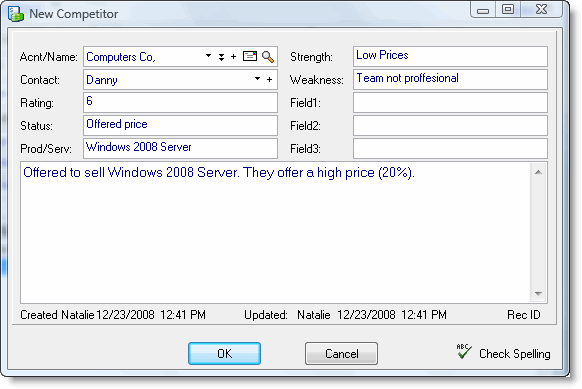
Opportunity Competitor Window
A Competitor can be selected from the existing Accounts list in CommitCRM (if you track your competitors as accounts in the system, which is usually a good practice), or you can simply type in a name, without creating and Account for it. If an existing Account is selected, then you can choose the Contact from a drop-down list. Or just simply enter a name.
In the Rating field, you can rate your competitor on a scale like 1 to 10, with 1 being very poor and 10 being very strong in the market.
In the Status field you can enter the current sales status on the competitor’s side, as far as you know. For example: first negotiation, after first demo, not in contact.
All fields are totally customizable, and you can edit the possible values lists to contain the types you need. You can select the “Edit List” option for each of the values, allowing you to edit the possible values list.
Team Tab
The Team tab helps you manage all the people on your side who are involved in the sale. You can manage internal employees who are helping with this sale—technicians, other sales reps, etc.—as well as external consultants, companies, or sales reps who are working with you on this sale.
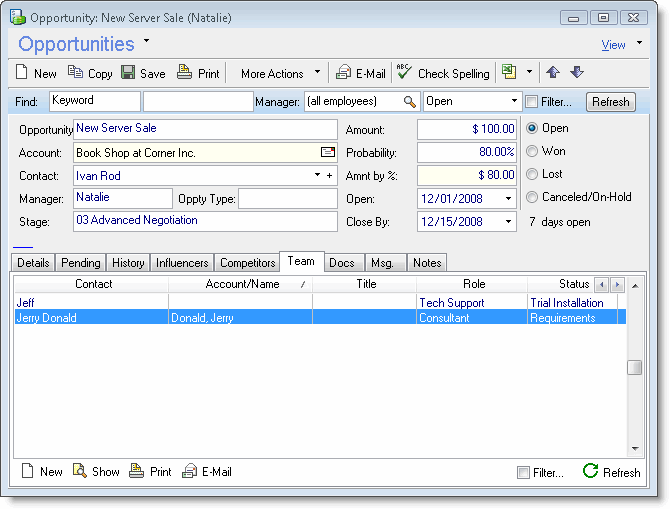
Clicking the New button at the bottom part of the tab will open the New Team Member window:
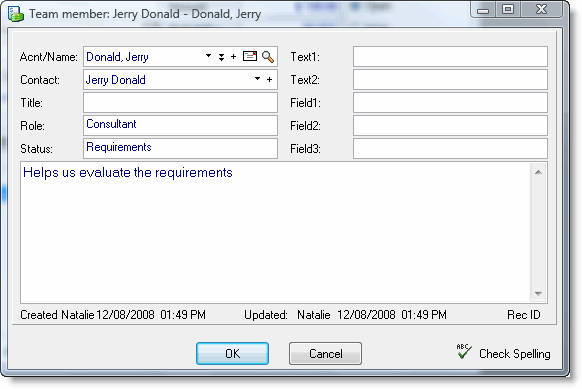
Opportunity Team Member Window
A Team member can be selected from the Employee or Accounts lists in CommitCRM. You can also simply type in a name, without creating an Account for it. If an Account that already exists in the system is selected, then you can also choose the Contact from a drop-down list. Or just simply enter a name.
All the other fields are totally customizable, and you can edit the possible values lists to contain the types you need. You can select the “Edit List” option for each of the values, and this will let you edit the possible values list.
Docs, Msg. and Notes Tabs
In these tabs you can keep information which should be linked to the opportunity:
Use the Docs tab to link documents associated with the Opportunity.
Use the Message (Msg.) tab for internal messages that have been transferred between team members and are relevant to this Opportunity. You can use this tab to send other employees internal messages which relate to this opportunities.
Use the Notes tab to keep internal notes regarding this sales opportunity.
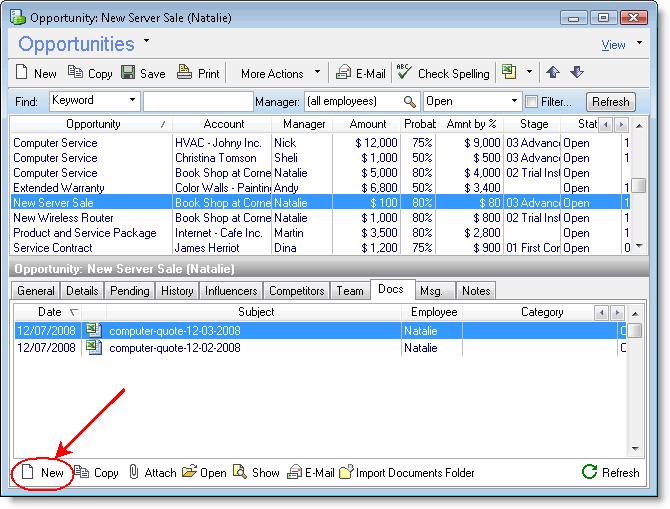
To add new documents or messages to this Opportunity, click the New button at the bottom of each tab’s window.
Closing Opportunities
Each Opportunity can be classified as either open or closed. By default, an Opportunity is created with status of Open. Should an Opportunity end, either positively or negatively, you should change its status from Open to one of the other statuses: Won, Lost, or Canceled/On Hold. This will close the opportunity.
Changing an Opportunity’s status from Open to another status (Won, Lost or Canceled/On-Hold) automatically triggers a window that allows you to update the Opportunity closing fields and remove any unnecessary activity from this Opportunity:
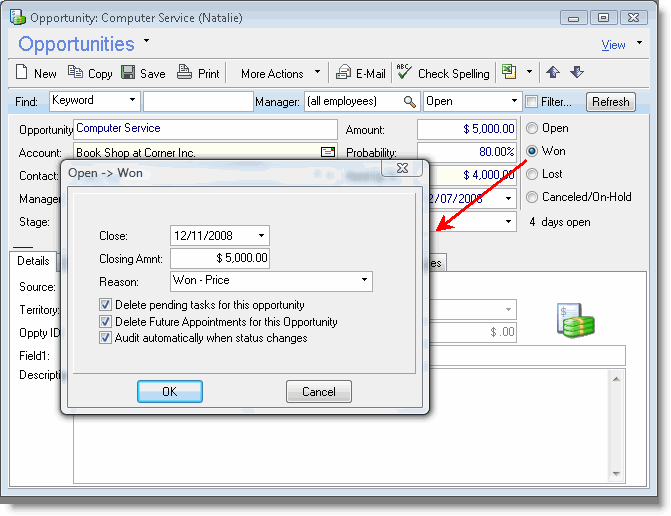
In this window you can enter the date of the closing, the closing amount (the final amount of the sale), and the reason for the closing. The Reason field can be customized to contain the typical reasons you would like to document. Tracking closing information can help you analyze the Opportunity's results later on.
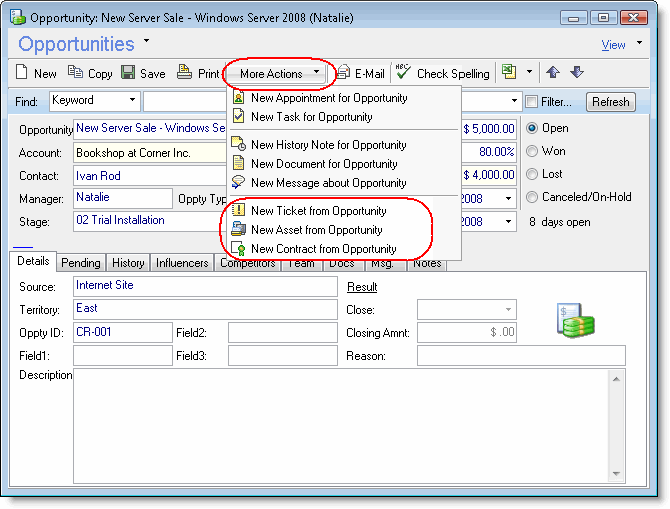
If an Opportunity is won, you can also turn it into actual jobs. Each Opportunity can be transformed into a ticket, a service contract, or an asset, depending on the nature of the Opportunity. This will help you streamline your work flow and convert it into action items.
To do this, go to the Opportunity’s window, click the More Actions button on the toolbar, and select one of the following options:
- New Ticket from Opportunity
- New Asset from Opportunity
- New Contract from Opportunity
For example:
- You win a new service contract with a customer. You can easily convert the Opportunity into a contract, which is automatically linked to the Account and contains the job service agreement description.
- You win a server sales opportunity with an existing customer. Just create an Asset, which automatically links it to the Account and contains the sale details (type, price, description, etc.).
- You win an installation job at an existing customer's site. You turn it into a Contract or Ticket (depending on the size of the job) that is automatically linked to the Account and contains the job description, etc.
- Creating Tickets, Assets or Contracts from a Sales Opportunity automatically links them to the relevant Account and Manager, and copies details from the Sales Opportunity, such as the Description, Name (for Contracts), Price (for Assets), and more.
Charging for Work Performed
When working on an Opportunity, you can log your work using History Notes or Tasks and Appointments. Once an Opportunity is won and you wish to bill the customer for the work already performed (usually for actual technical work already performed, not for your efforts to win the sale), you can convert History Notes, Tasks, and Appointments to charges, and bill your customer for the time.
For History Notes this can be done from the History Notes window, by using the More Actions button > New Charge options. Creating a charge this way copies the description and other details from the History Note, and will creates a charge. You can read details in the History Tab section.
You can turn pending appointments and tasks into charges before you set them as Done by right-clicking the task or appointment in the opportunity's Pending tab, and charging it. You can read more details about this in the Pending Tab section.
You can also turn won Opportunities into action items. See more details in the Closing Opportunities section.
Managing Quotes
Quotes are your way to propose products and services to your customers.
CommitCRM provides an internal built-in Quoting module that provide an easy way to define and create sales quotes and proposals for products and services, using your Items list and your Account database.
>> Click for the complete Quoting module user manual.
Note: In case you want to create your Quotes elsewhere (e.g. using an external Quoting program), you may wish to manage the Quotes in CommitCRM. This can be done by linking the external Quote to Sales Opportunities. See more details in Managing Quotes using Opportunities below.
Managing Quotes using Opportunities
Note: CommitCRM provides an internal built-in Quoting module for your convenience.
In case you want to use other external Quoting system, you can manage the quotes in CommitCRM under Sales Opportunities in one of the following ways:
- File Quotes as Documents:
File the quotes you send to your customers as CommitCRM Documents (e.g. Excel, PDF, etc.) under the specific sales Opportunity they are related to. See more details in Storing external Quotes in CommitCRM. - Use CommitCRM-QuoteWerks Link:
Users working with QuoteWerks as their quoting system can use CommitCRM-QuoteWerks Link to create and manage Quotes directly in QuoteWerks. See more details in CommitCRM-QuoteWerks Link.
Storing External Quotes in CommitCRM
In case you want to use an external Quoting system (besides QuoteWerks), you can then store the file as a document under the Opportunity. To do this, save the quote as an external file (such as a Word, Excel, PDF, RTF document) and link it to the relevant Opportunity in CommitCRM by dragging the file and dropping it onto the CommitCRM application window. If the quoting software you use does not support the saving-to-file option, simply try printing it to PDF and file the PDF file under the opportunity in CommitCRM. You can then send quotes by e-mail, either as an attached file.
Note: CommitCRM provides an internal built-in Quoting module for your convenience.
Managing Prospects
Each prospect (i.e. lead or potential customer) is managed in CommitCRM as an Account.
See Managing Prospects.
Forecasting Revenues
A Sales Opportunity record consists of a short description of the Opportunity, the related Account, the potential revenue, the stage of the Opportunity, and the probability of winning business.
You can generate reports in order to track opportunities by status (Open, Won, Lost and Canceled/On Hold) and analyze your performance and success. You can also use the Amount and Estimated Probability in order to analyze your current expected income, and more.
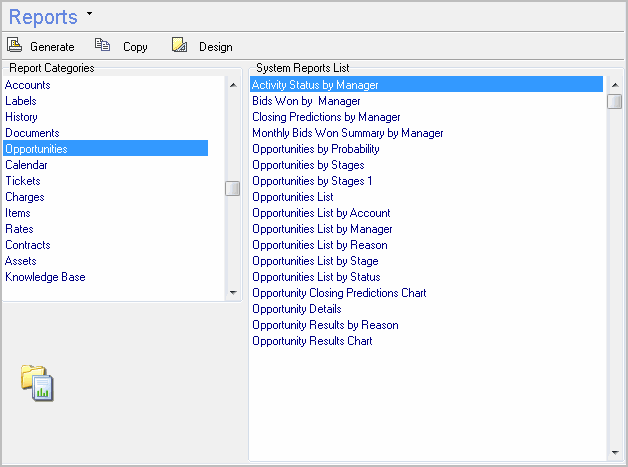
CommitCRM can generate many different reports, such as Opportunity Closing Prediction Chart, Closing Prediction by Manager, and more. These report forecast sales by employees (the employee classified as the opportunity’s “manager”), customer, territory, etc. To generate these reports, and many others, open the Reports window and select the Opportunities category.
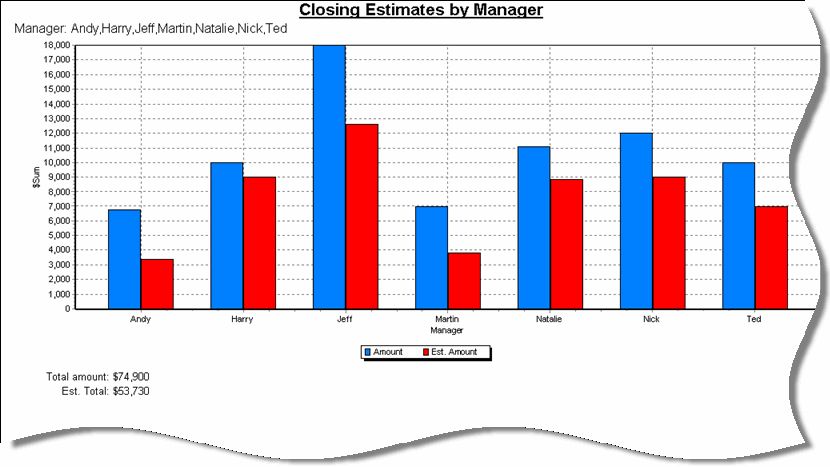
Opportunities Reports
All open/won/lost Opportunities for a selected Account are visible in the Opportunities tab in the Account window. Reports can be generated from the Reports Window, under the Opportunities category. You can also generate reports that show Opportunity won/lost by employee, statistics, and more.
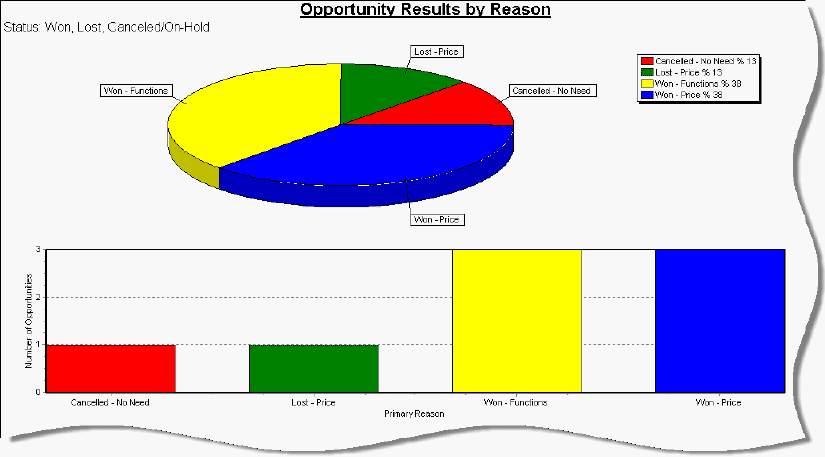
For example, generating the Opportunity Results Report by Reason report:
Activity Templates for Opportunities
To create a new entry in an Opportunity Activity Template, go to the Entries tab of the template and click on the New button in the bottom-left corner. A pop-up menu now appears where you can select either “Task” or “Appointment.”
See Activity Templates for Opportunities.