This document covers the basic Ticket life cycle, from creating a new Ticket until it is completed and billed to the customer.
Other recommended reading:
Ticket Management - This user guide covers new concepts and features regarding Ticket Management introduced with the release of CommitCRM version 5.3. The main features include New Ticket Navigation, New Ticket Inbox View and enhanced Email Correspondence Management.
This section will demonstrate how to create a new Ticket for an Account, and how to easily dispatch it to the relevant technician.
Before you start
This guide assumes you already have some Accounts in the system. You can create Accounts by importing Accounts from Outlook, QuickBooks or any other data source. You can read more about how to import Accounts into CommitCRM in the CommitCRM Setup Guide.
You can also create an Account manually from within CommitCRM:
From the Accounts Window, click the New icon .
Fill in the Account details.
Click OK to save.
Open the Account Window
At the top of the Account window, there is a Search pane. Using the Find field, you can search for an Account by any keyword, or you can search according to specific fields, such as phone numbers, company name, etc.
Once the search word has been typed, hit the Enter key or click Refresh.
You will now see a filtered list of Accounts which includes only those who match the search criteria.
Note that you can also do a quick search by type, by selecting the [all types] drop down list and selecting the relevant type.
Once the desired Account appears in the search results list, double-click it to see its complete details.
Note that the Accounts list has several possible Views: Complete Details, List and Details, List, Business Cards, List and Complete Details. You can select the display using the View menu on the top right-corner of the window
Also note that the blue Accounts on this tool bar is a menu which contains options which are relevant for Accounts only, this menu is also available in the Main menu > Accounts.
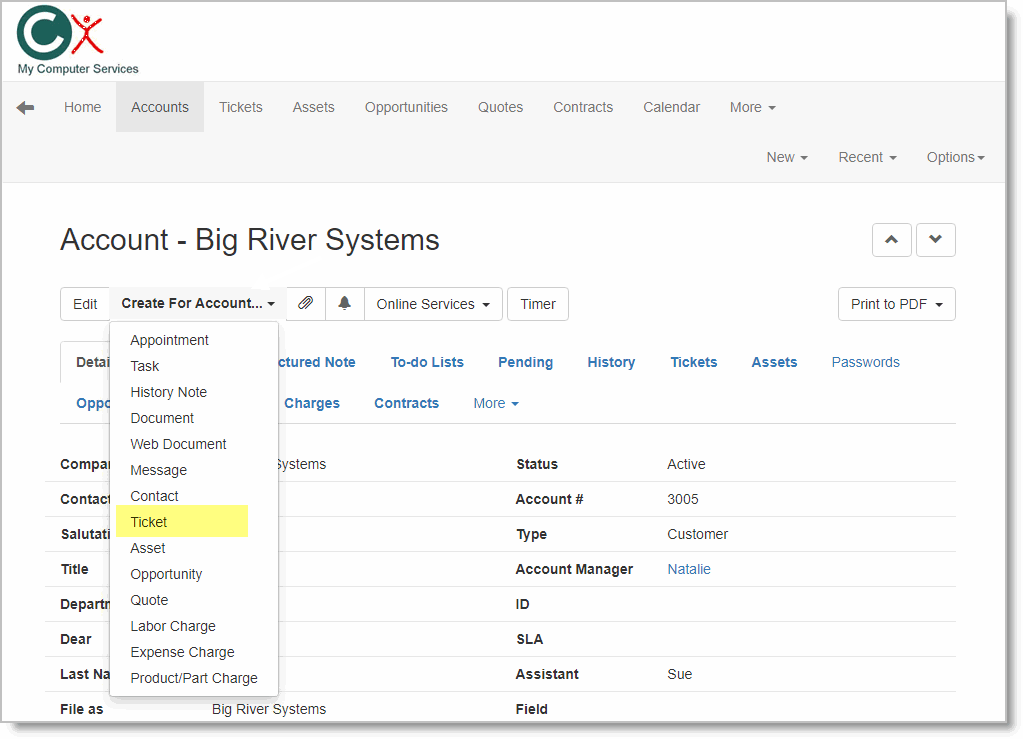
Create a New Ticket
From the Account window, you can create a new Ticket in the following ways:
From the Tickets, tab, click the New icon on the bottom of the tab.
Click the More Actions button on the tool bar and select New ticket for Account.
From the Main menu, select File > New > Ticket... Note that this option will not automatically use the selected Account - you need to use one of the Account options (the first two) for this.
Repeat the first step (click the new icon from the Tickets tab).
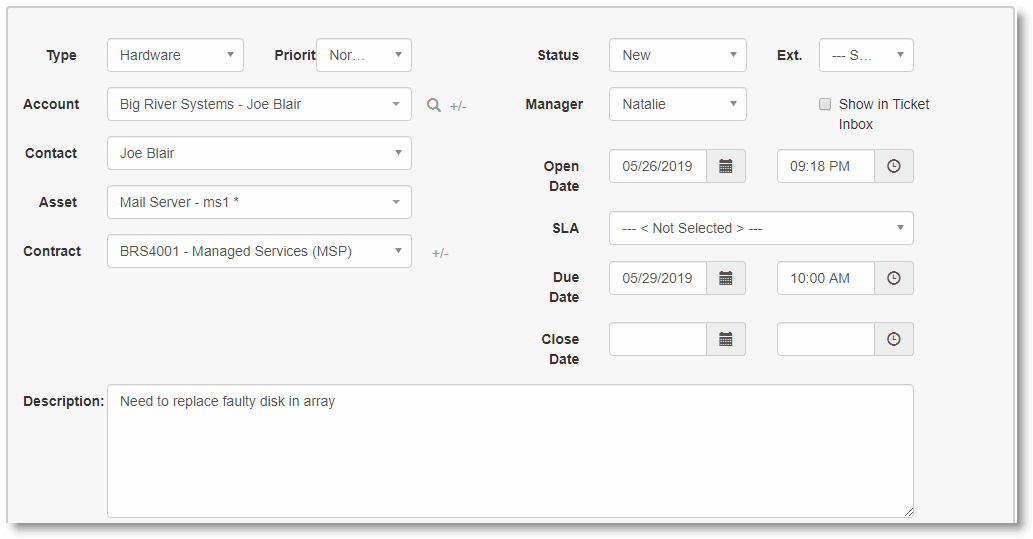
Account - The Account is already selected since the Ticket was opened from within a specific Account. Note: If you wish to open a Ticket for a new Account, you can click the '+' in the Account field to add a new Account.
The Account's Description In the box beneath the Account name, you will see a summary of the Account's Description and the Service Internal Description. You can use the Account's Internal Description in order to keep special comments regarding the service level for this customer, which should be displayed to the user whenever opening a Ticket.
Other Open Tickets for the Account In the box beneath the description, you can see a list of other Tickets which already exist for this Account. By reviewing this list before creating new Tickets, you can make sure that duplicate tickets are not created for reported issues. If you do find a matching Ticket during the process of creating a new one, you can simply double-click the existing ticket, and the new Ticket creation will be aborted and the existing Ticket's details will be displayed.
Contract - If no other contract was defined for the Account, the Global System Contract will be used as the default contract. At this stage, we will use the default contract to demonstrate a simple scenario.
Show ticket in Dispatcher - When this flag is set, the Ticket will be available for dispatching in the Dispatcher window tickets list. Note that Tickets that should not be dispatched for appointments should be set with an un-checked flag.
Manager - The manager is the person who is in charge of the Ticket. This is not necessarily the same person who will actually perform the work for the Ticket. Each Ticket can later be dispatched to several technicians to perform the actual work in several appointments/tasks.
Ticket Description - The Ticket Description should be entered in this field.
Click OK to Save
The New Ticket is now displayed with all the other Ticket details. You can now fill in the rest of the Ticket information as follows:
You can set a different Ticket Priority (the default is Normal)
You can set the Due Date for the Ticket. When the Due Date is reached, it will appear in Red.
In the Details Tab you can update details about the cause, source and category for this Ticket.
The Estimated Work Duration is there to help when dispatching. For example, when you set it to 120 minutes, and drag/drop the Ticket from the Tickets list on to the Dispatcher window, the duration of the scheduled on-site visit is automatically set for 120 minutes, rather than the default of 30 minutes.
You can also add additional Notes in the Notes field.
Save your changes once done.
Dispatch the Ticket
The CommitCRM Dispatcher allows you to easily view tickets pending and the technicians calendars in order to dispatch tickets for on-site visits. Once the Ticket is entered into CommitCRM, it appears in the Dispatcher window as "Waiting for Dispatching". Note that you can set the Ticket to not appear in the Dispatcher, for example when there is no need to set any appointments for this Ticket.
The Dispatcher lets you appoint the relevant technicians to the Appointments set for this Ticket.
Open the Dispatcher Window, and on the bottom you will see the Tickets Marked for Dispatching tab.
Above this list you can see the Dispatcher window which consists of a daily view of Appointments per technician. You can view technicians' calendars using the magnifying glass tutorial_magnifying_glass
Select the Ticket in the list using the mouse and drag it to the Dispatcher view above, dropping it on the relevant technician calendar in the desired time for the Appointment.
Most of the relevant information is already there since it is taken from the Ticket – the Ticket Description, the Account, the Ticket, the owner (who is the employee which you dropped the ticket onto in the Dispatcher window), the date and the duration (taken from the Ticket).
Add details to the description if needed, such as describe what is the purpose of the appointment for the technician.
You can optionally set different background colors to represent different technicians' appointments, priority levels, etc.
Click OK to save the Appointment.
Tip
You can easily add Account details, such as Name, Phone Number, etc, to Appointments set in the Dispatcher window by clicking the yellow arrow next to the Account name in the Appointment window.
You can also set Appointments to automatically contain the Account details in the Appointment description. To do this, go to Tools > Options > Calendar > Miscellaneous and check the Attach Account Details to Description box.
At this point, technicians can view their new Appointments in their Calendars using the Application or the Web Interface - See the On-Site Visits section.
You can also view the Ticket scheduled appointments in the Ticket's Pending tab (see Viewing Ticket History).
Add Tasks for Tickets
Other than Dispatching a Ticket and setting Appointments to the technicians, you can also manage Tasks for the Ticket.
You can set reminders to Tasks so this may help you set reminders to perform certain actions before going on site (e.g. remember to take an additional cartridge for the Printer).
You can also use the Tasks in order to track complex Tickets which require several on-site visits and should be coordinated and actively tracked. For example, a technician may need to install a new network at a customer site, which involves buying parts and then installing them over a series of on-site visits. You may set a daily reminder to follow up on the project's status by adding a recurring task over the duration of the project.
Another helpful option is adding tasks and appointments from activity templates. This allows you to add a predefined group of common tasks and appointments to the ticket at once. You can read more about activity templates in the Activity Templates user guide here.
Once you create a Task that is linked to a certain Ticket, you can view all the tasks for a Ticket in the Ticket's Pending tab.
The following steps assume the Web Interface is installed and that Web users were defined for the relevant employee (Learn more about the Commit Web Interface).
To open a new Ticket, login to the Web Interface
Go to the Accounts tab and click View for a certain Account.
From the Account window, click Create for Account, and select Ticket.
In the New Ticket window, the Account is already selected , as we created the Ticket from within the Account (you can click +/- to expand the Account details). The System Global Contract will already be selected. All you need to do is enter the Description and you are done. You can set also other values such as the Ticket Type, Cause, Due date, etc. Note that the Web Interface New Ticket window contains more information than the Client Application. Not all the information is mandatory, and you may fill it in now or at a later stage.
Click Save to add the Ticket.
Create New Tickets from the Web Interface as a Customer
Your customers may use the Web Interface for Customers module which allows them to view, edit and create data in CommitCRM.
Customers can create new Tickets from the Tickets window.
In the Tickets tab, click the New Ticket link or click Create New and select Ticket.
The new Ticket window will open.
Fill in the Description. You may also enter the Cause and Type.
Click Save
Tip
You can set a default Type to be used when creating new Tickets. To do this, use the Client Application, double-click on the "Type:" field label, and the field setting window will open. Go to the Field Behavior tab and set the Default Value.
The new Ticket is immediately updated in the CommitCRM database, and can be viewed from any CommitCRM Client Application.
You can also automatically send email alerts to predefined lists of email addresses.
Learn more about setting up automatic emails in our FAQ section.
On-Site Visits
When you have an on-site appointment, it is helpful to be able to view the Ticket details before and during the visit, or while on the road:
Before You Leave the Office
Before you leave the office to go on-site, you may wish to:
Print out the Ticket details.
View the Account address on a map.
Print Technician Service Forms
Before leaving on an on-site appointment, you can print a hard-copy of the Ticket details, including the Account details (address, phone number, etc.) and the Ticket description and history. You may use one of the pre-defined Technician Service Forms or customize your own form.
You can create a Service Form for each Ticket from the Ticket window, using the Print icon. You can view the form before printing a hard-copy by clicking the Print Preview icon. You can also print it directly to a PDF file (English fonts only) by clicking the Print to PDF icon.
Click the arrow near the icon to open the available Service Forms list.
Click the Icon itself to print out the default report. You can view which is the default report by opening the list with the arrow - the first report in the list, which appears in bold is the default for printing (you can set a different default for Tickets in Tools > Options > Tickets > Default Detailed Report).
View the Account address using the Online Services
You may wish to find the address of the Account you will be visiting before you set out. You can define your own Online Service which will open map sites (e.g. Google Maps, Yahoo! Maps etc.), and the map will automatically open to address of the Account or Contact stored in CommitCRM.
To activate the Online Service from within the Ticket, you can right click on the Account Name field to open a pop up menu, and select the Online Services menu option.
While on the road, or when you are already at the customer's site, you may wish to Access CommitCRM's data in order to view the Ticket details, Account and Contract terms or print a service form to give to the customer.
Commit Web Interface
If you have Internet access, you can use the Commit Web Interface in order to view the Ticket details, History Notes, Contract information, Account address, phone numbers and more.
To install and use the Web Interface, read our simple Web Interface installation instructions on our Web site, under Support > Documents.
Account list on the Web
Service Forms
You can also print a Service Form via the Web interface:
Click a Ticket to view its details.
On the top-right corner, select the Service Form and click Print Preview... menu or click the Print Preview icon to print the default form
The Print Preview window opens.
Click the Print link.
Optionally, you can also print the report to a PDF file. This option lets you print any ticket form report, including customized reports. To print to PDF files, click the Print report to PDF file menu and select the report you wish to print.
Charges are the way to log the work performed for the Ticket. Charges can be billable or not-billable (read more about Charges in the Introduction to Charges and Billing in CommitCRM), depending on the service agreement that was agreed upon with the customer.
In this demonstration, we will add a simple Labor Charge using the System Global Contract, and will set the Rate during the process:
Open the Ticket window.
Go to the Charges tab.
Click the New icon at the bottom on the screen.
Select Labor Charge.
The new charge window will open. Note that the Account, Ticket and Contract are already selected according to the Ticket information.
Select the default Labor Item.
Fill in the To-From time and click the total time button to copy it to the Hours field (you can manually enter the hours if you prefer).#Add a description of the work performed to keep a log of the activity.
Save & Close.
Note:The Billable flag will be set by default. This is the default behavior for Global Contracts.
Tip
Adding the Charge appears as an event in the activity History of the Ticket Resolution/History tab, and in the Account History tab (check the Detail check box on the bottom-right corner of the History tab in order to view internal history events).
Note that you can go directly to the Account window from the Ticket by right-clicking the Account field in the ticket General tab and selecting Show Account
Using the Timer to Add Charges
You can use the CommitCRM Timer in order to record activity for a certain Ticket and then convert it into a Charge. This is usually useful for activities like phone support.
You can activate the Timer from various places. First display the Ticket details and then:
Click the Timer Icon.
Or go to the Ticket Menu > Tools > New Timer option
Or use the Ctrl+T keyboard shortcut, but make sure to have the correct Ticket/Account selected when performing this action.
How to activate the Timer
You can start and stop the Timer as many times as you need, and all time spent will be added to the total time (clicking on the magnifying glass will display all the time logged and you can right-click each line and delete it if needed).
Timer window
Once you are finished timing and have completed the service, click the Add Charge button, and a new Charge window will open with the relevant Ticket and Account already selected. The total time from the Timer will be copied to the Charge Hours field.
Using the Web Interface to Add Charges
To add new Charges from the Web Interface:
Go to the Ticket Details Window (click View for a specific Ticket)
Click the Create for Ticket menu, and select the new Charge (Labor, Expense or Product/Part). You can also scroll down to the Charges tab and click the New Charge at the top of the Charges list.
The New Charge window will open.
Select the default Labor Item, and fill in the Units and the Rate.
Click Save.
Note that the Billable flag will be set by default – this is the default behavior for Global Contracts.
Set Ticket Status to Completed
After performing the work for the Ticket and adding Charges, the Ticket can be resolved:
Open the Ticket window.
Go to the Resolution tab and fill in the resolution description. This should be a short summary of the work performed in order to resolve the ticket.
Click the Completed button on the toolbar.
At this point, the Ticket's status becomes Completed.
You can view the Completed Ticket list in the Tickets window by selecting [closed] on the status filter. This will display all Tickets that have a status which is considered "closed".
Ticket Resolution vs. Charges
The Ticket Resolution/History tab contains:
Charges list - the Charges are the way to log the work performed for a Ticket.
Resolution - once the Ticket is resolved, you can add a short summary which is the Ticket Resolution. You can edit the Resolution in the top edit area in the Resolution/History tab.
Benefits of using Charges to log the work Using Charges to log work performed for a Ticket provides a much more detailed history log of the Ticket activity, and it allows you to better analyze the work at a later date. You will be able to analyze which Items you use most, how much time you spend on each customer or on each type of Ticket, view charges by Employees, etc. The more information you keep in your system, the better analyses can be performed on it later.
Charges are also the way you can bill your customer - each Charge can be sent to the customer using CommitCRM Reports or can be the base for a new QuickBooks Invoice (see Billing).
Using Resolution rather than Charges
In some cases you may not wish to log the work performed for the Ticket using a Charge (i.e. you do not plan to bill the customer for this work). In this case the Ticket resolution can be used to log the work, rather than the Charges.


