Generating Reports User Guide
Generating Reports
The Report Generation window opens when you wish to generate a report. This window shows the fields available for filtering according to the report type. This is useful because we want to be able to filter and sort the data in our reports by different fields, depending on the type of report.
Report Generation Options
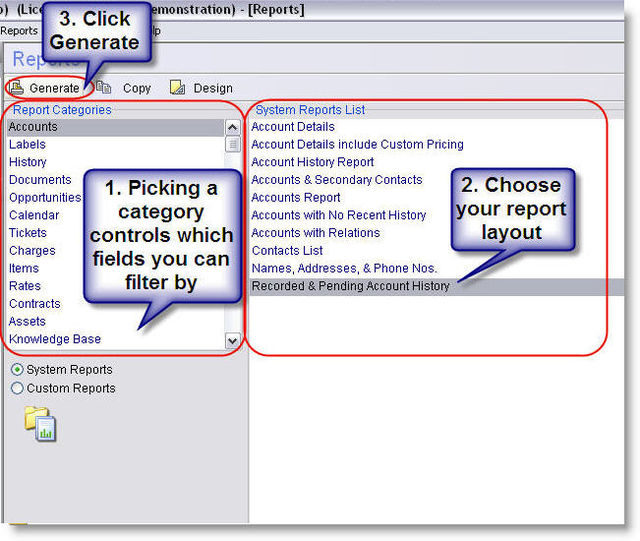
The report generator displays different options for each category of reports you choose to generate. In this section, we’ll cover the different filtering options for each screen, and explain their benefits. The report category can be selected from the CommitCRM > Reports Screen, and selecting the appropriate category. In this section, we will cover the more popular report categories and their options.
Account Report Generating Options
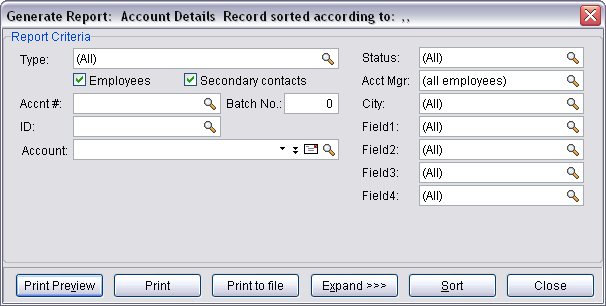
Account reports are used to display account details, and the generation window allows you to filter the results by various filtering options.
| Field | Description |
|---|---|
| Type | In this field you can choose which account type you wish to include in the report results. In addition, you can choose whether you wish to include Employees and Secondary Contacts in the report. |
| Accnt # | Allows you to filter the results by a specific account code so all accounts which contain this code in this field will be included in the results. The Accnt # code is alpha-numeric in essence, so numbers and letters can be used in the code. |
| Batch No | When importing accounts using the import tools, each imported account receives a batch number. This number can bee seen in the account's Notes tab. This way you can filter reports to show only account which were imported in a specific import. |
| ID | Allows you to filter the results by a specific account ID so all accounts which contain this number in this field will be included in the results. |
| Account | Allows you to filter the results to show only a single account. This option is similar to printing the report directly from the account window. |
| Status | Allows you to show only accounts with a specific status in your report. |
| Acct Mgr | Allows you to filter accounts by their Account Manager. The Account Manager is the employee assigned for this account. Note that if you wish to show accounts which do not have any account manager assigned to them, you can do this via the Advanced filters (use the Expand option), and using the "Empty" criteria. |
| City | Filtering accounts by a specific city is a common option, and therefore it is available from the main filtering window. For filtering according to other address fields, use the Expand option to reach other account fields. |
| Field1, Field2, etc. | The custom fields called Field1,2,3,4,5 that are user defined fields (many users rename these to their own needs) and are available in this window for filtering purposes. |
| Expand>> | Use this option to reach other Account fields in order to filter by advanced options. Use this option to find more robust filtering and sorting options for your report. |
Asset Report Generation Window
| Field | Description |
|---|---|
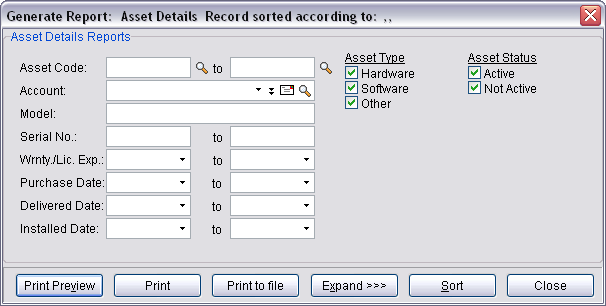
| Asset Code | This option will allow you to generate reports that are filtered to show assets with codes that are within the range defined. This is useful when you when you want to generate reports about assets that share similar codes. |
| Account | Allows you all assets for a specific Account. This is useful for periodic status reports regarding all assets filed under a single account. |
| Model | Allows you all assets with a specific model number. This is useful when generating reports that show all assets that you maintain that have the same model number/service tag. |
| Serial No | Allows you all assets within a range of serial numbers. This is useful when generating reports with similar serial numbers. |
| Wrnty./Lic. Exp | This option will display all assets whose warranties or licenses (HW/SW) are going to expire within a specific date range. This is useful when you want to notify your customers that these services need to be renewed before they expire. |
| Purchase Date | This option will allow you to show all assets purchased within a date range. This is useful when generating reports for any assets that have been purchased within a specific date range. |
| Delivery Date | This option will allow you to show all assets delivered from the vendor within a date range. This is useful when you need to generate reports for assets that you’ve received within a given date range. |
| Installed Date | This option will allow you to show all assets installed within a date range. This is useful when you need to report all work on assets that were installed within a given date range. |
| Asset Type (Hardware/Software/Other) | Marking any of these flags will trigger the selected asset types to be displayed in a generated report. This is useful when you want to monitor the the service you’ve provided for specific asset types. |
| Asset Status (Active/Not Active) | Marking any of these flags will trigger assets to be added to the report based on their activity status. This is useful when you only want to generate reports that have active or not-active assets. |
Charge Reports Generation Window
| Field | Description |
|---|---|
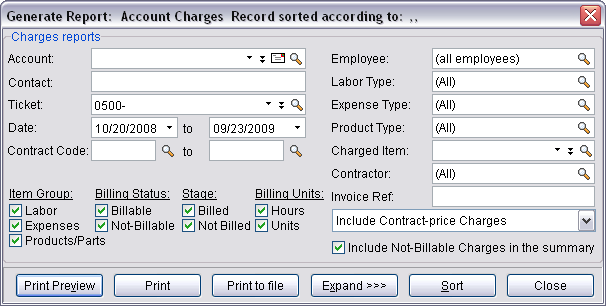
| Account | Allows you all charges for a specific Account. This is useful for periodic status reports regarding all charges filed under a single account. |
| Contact | This option will filter your reports to only display charges related to a specific secondary contact. This is useful when you want to report charges to your customers based on the specific contact the work was performed for specific contacts within a company. |
| Ticket | This option will filter your reports to only display charges related to a specific ticket. This is useful when generating reports based on a specific service ticket/call. |
| Date | This option will filter your reports to only display charges logged for dates within the specified date range. This is useful when you want to only show the charges issued within a specific time period (Last month, Last year). |
| Contract Code | This option will filter your reports to only display charges related to a contract within a specified range of contract codes. This is useful when you have several projects/contracts that you’re managing, that you want to view their charges in a consolidated report. The first time you renew a contract, the contract code is automatically suffixed with a numeric incremental value that grows each time you renew the contract. This makes generating charge reports that cross over multiple contract terms possible, so that you can generate your reports without being restricted to a specific contract. |
| Employee | This option will filter your report to only display charges created by specific employees. This is useful when periodically issuing payment to your technicians for work performed at customer venues. |
| Labor Type (Labor, Expense, Products/Parts) | Marking any option in the magnifying glass will show all charges with items of these types. This is useful when generating charge reports that only show Labor, Expense, and Product/Part charges. |
| Expense Type | This option will filter your report to only show charges of specific expense types. This is useful when filtering the different types of expenses from your report. |
| Charged Item | This option will filter your report to only show charges with a specific item charged. |
| Field1 | This option will filter your report to only show charges that match the criteria in the Field1 field. This is useful for customers that customize this field, and adopt their own internal use for the field, so that they can filter reports based on the customized field data. |
| Invoice Ref | Allows you to generate a report based on charges that have the same Invoice Reference Code given by QuickBooks. |
| Contract Price Charges | This option will control whether or not Contract Price Charges will be displayed in the report. Contract price charges are charges given to a contract, which represents the price charged for the contract. The Contract Price Charges can be copied to subsequent contracts, so that when a contract is copied, the price charge associated with the contract is copied it to the next account. |
| Include non billable charges in summary | This option controls whether non billable charges are also counted in the report summary section, which contains tax and total charge information for a charge report. This option helps to show your customers how much they are to be charged for a ticket, while still allowing you to print a similar report that will serve your back office workflow by showing you the real expense of the charges. |
| Item Group (Labor/Expenses/Products/Parts) | This option will filter your reports so they only display Charges with items in specific item groups. This option is useful in cases such as needing to generate a report for your employee, while only displaying the Labor Charges that were issued for your employee, so your employee can see how much he has earned. |
| Billing Status (Billable/Not-Billable) | This option will filter your reports so they only display billable or not-billable charges. This helps when running profit statistics based on the charge you do or do not bill for. |
| Stage | Here you can determine whether to include charges which are billed or not-billed in your report. |
| Billing Units | This option will filter your reports so they only display Charges with items billed by the unit/hour. |
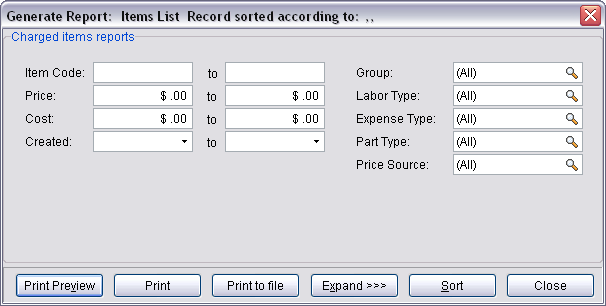
Items Reports generation Window
| Field | Description |
|---|---|
| Item Code | This option will filter your reports so they only display items within a specific Item Code range. This is helpful when running reports for all items with similar item codes determined by your business. |
| Price | This option will filter your reports so they only display items within a specific price range. This is useful when running reports for your items based on pricing grades, offered to your customers. |
| Cost | This option will filter your reports so they only display items within a specific cost range. The Cost field represents the price charged to your business to purchase the part/product, before selling the item. Your profit from each item consists of: Price – Cost = Profit. |
| Created | This option will filter your reports so they only display items created during a specific date range. This is useful when creating reports based on items that were created in CommitCRM in similar dates. |
| Group | This option will filter your reports so they only display items within a specific item group. Item Groups are divided into 3 different types of chargeable items:
Filtering these item groups comes in handy when you want to see how many expense charges were issued by specific employees in specific times, or even maintaining employee profitability based on labor charges issued by specific employees. |
| Item Sub Groups |
|
| Price Source (Fixed Price / By Employee Rate) | This option will filter your reports so they only display items using a specific price source. |
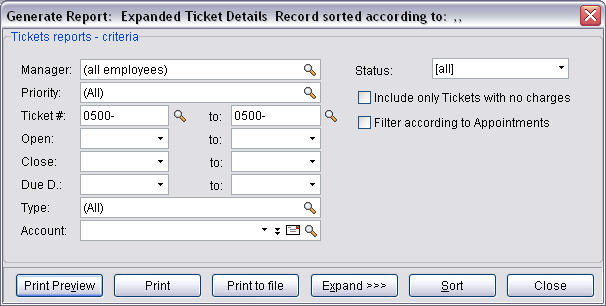
Ticket Reports Generation Window
| Field | Description |
|---|---|
| Manager | Filters your reports so they only display tickets assigned to specific managers. Ticket managers are the employees in charge of each tickets workflow, and customer relation. Each ticket managers responsibility is to see the tickets opened for him resolved and closed in the timeliest manner possible. |
| Priority | Filters your reports so they only display tickets according to their priority. Ticket priorities indicate how quick a ticket should be serviced, and the haste to perform the work needed to resolve the ticket. |
| Ticket # | Filters your reports so they only display tickets within a specific ticket number range. Ticket numbers are numeric in nature, and the number automatically progresses from ticket to ticket. once a ticket has been given a number, that number cannot be changed unless the ticket has been copied to a new ticket. |
| Open | Filters your reports so they only display tickets opened within a specific date range. This is useful when you want to follow the tickets opened for a specific customer or manager in a specific timeframe meaning the last day/week/month/year. |
| Close | Filters your reports so they only display tickets closed within a specific date range. This option is useful if you want a filtered list sorted and displayed in relation to the time that the ticket has been closed in. |
| Due D. | Filters your reports so they only display tickets marked as due within a specific date range. This option helps to generate reports that take into account the time a ticket was marked as due. |
| Type | Filters your reports so they only display tickets marked with specific types. Ticket types refer to the type category which includes types such as Hardware, Installation, Software, Upgrade, etc. This helps to generate statistics to see what types of additional staff you would need to upgrade your business with. |
| Account | Filters your reports so they only display tickets opened for a specific account. Filtering your ticket reports for specific accounts allows you to generate verbose customer activity reports that you can use if extensive research of the account is necessary. |
| Status | Filters your reports so they only display tickets marked with specific statuses. This way you can easily see only New tickets, Assigned tickets, etc. Note that you can also filter by ticket status groups (Open, In Service, Closed, All). |
| Include only tickets with no charges | Shows only tickets that do not have any charges created for them. Filtering your ticket list to reflect only the tickets without any charges helps to generate reports that follow all the tickets you forgot to charge, helping you to charge more and bill your customers for all the work you've performed. |
| Filter according to appointments | Shows only tickets that have been dispatched to have appointments created for them. Using this feature allows you to reports based on whether appointments have been scheduled for them. When selecting this option, more fields are displayed allowing you to print reports for only for tickets that have appointments scheduled within the time frame you've set. also, this option also allows you to filter these reports by the employee that has the appointment. For example, Brian can print all the Technician Service Forms he needs for the whole day and take them with him onsite. |
Appointments/Tasks Reports Generation Window

- Appointment and Task reports allow you to easily monitor time scheduled to service customer tickets as well the assigned tasks and meetings with customers.
| Field | Description |
|---|---|
| Calendar | This switch will localize your report to show either tasks or appointments in your report. |
| Type |
|
| From - To | Allows you to limit your report to specific time periods. I.e. “All tasks in the last month”; or All appointments up until Jan 2011. |
| Account | Limits your report to only reflect Appointments and Tasks issued for a specific account. This is useful when offering a customer a service report based on scheduled history. |
| Status | Allows you to control whether or not completed or incomplete tasks and appointments will be shown in your generated report. This is useful when generating weekly status reports for your employees ongoing/completed jobs. |
| Fields1-5 | These fields will allow you to filter your generated reports based on the information you store in the Accounts screen > Details tab CommitCRM customizable fields. These fields can be enabled and disabled in the system for all users by adjusting the Tools > Options > Calendar tab > User Fields Display Settings option, so they don’t always have to be shown if not used. Since these fields can be renamed, the field names here will be updated accordingly to any name you decide to give these fields within the accounts screen. When selecting the data to be filtered in your report from these fields, you can use the magnifying glass option on each field to select All, Multiple, or None of the options in that field. For more information see Field Customization. |
Contracts Reports Generation Window
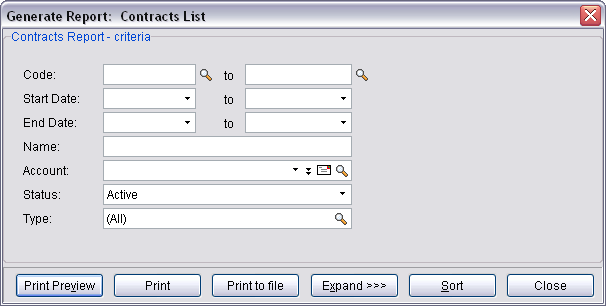
Contracts reports are unique in their ability do display extended information localized to your service contracts and projects, such as block values set for your contracts, the amount used, and if you’ve gone over the initial value you’ve set. These reports are useful when periodic inspections of your profit on these contracts comes up, and you need to see if you’re losing any finances on them. These contract reports keep you on top of your billing needs with your customers, and allow you to report progress on your service and financial history between you and your customers. Another useful feature these reports serve is with the ability to report to you the service contracts that are about to expire in the near future. Using this type of report will ensure continuation of your service contracts beyond their own end date.
| Field | Description |
|---|---|
| Code | These fields allow you to select an alpha-numeric range of the Contract Codes you use in the system for your contract report. This is useful when you want to include subsequent contracts and their information in your report, or when you a lot contract code ranges for specific types of contracts that you want to report on together. Using the code filter you can filter the report to see all contracts/projects that starts with a prefix regardless of any account or order. If someone uses branches as separate accounts using this filtering option he can see all contracts of all of these "separated" accounts but still together – this is used as a work around for ones that cannot use secondary contacts for branches. |
| Start Date–To | Allows you to set a range for the Contract Start Date value for your report. This method is useful when you want to create contract reports that include information from all contracts that start in a specific time range. This is great when you start promotional maneuvers, and would like to monitor the contracts that began just after you started promotions. |
| End Date-To | Allows you to set a range for the Contract End Date value for your report. This is useful when you want to issue end of contract statements, and also when organizing contract renewal negotiations and other tasks. |
| Name | Allows you to type a free text string to filter your contracts report to only reflect data from contracts that include the string in the Contract Name Field. |
| Account | Allows you to select the account to reflect contract data for. Using this filtering option by itself will filter your report to show all contract associated data relevant to the report for the account chosen. |
| Status | Allows you to limit your report to only show contracts which have a specific status category. This is useful when you want to generate report that only contains contract information for active contracts, or completed contracts. |
| Type | Allows you to limit your report to show contracts with the types selected in the magnifying glass list. Contract types help to categorize your service contracts and projects so they can be easily sorted, and you can generate reports that can be filtered based on these contract types. |
Documents Reports Generation Window
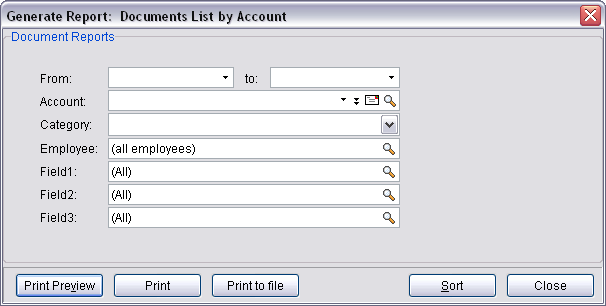
Documents reports are useful when you want to create file lists for the documents you manage in CommitCRM, in addition to managing document templates that can be applied into your documents while merging data into the documents themselves. Using the Documents screen, you can manage all your customers’ documents needs without needing to manage your folder hierarchy, or importing newer documents you create in CommitCRM. These lists can be filtered by the associated account, Employee, or other assorted data that you can choose to store in the customizable fields. These are really useful when you want to clear out older documents that are not relevant anymore.
| Field | Description |
|---|---|
| From-To | Allows you to filter your documents report to only include documents information imported into the system within a specific time range. This is useful when you’re looking for old information that you don’t want to keep anymore. |
| Account | Allows you to limit your documents report to only include documents imported for a specific account. This is useful when you no longer work with a customer and do not need the irrelevant documents in your system. |
| Category | Allows you to filter your report based on the Document Category Tree. This is useful when you want to print document reports for specific categories such as Administration, Documentation, Invoices, etc. |
| Employee | Allows you to generate reports based on specific employees who import them. This method can be used to single out an employee’s imported documents or multiple employee documents. |
| Field 1-3 | Allow you to filter your generated reports based on the information you store in the Documents screen > Right Click a Document > Show Document Properties > Field 1-3 CommitCRM customizable fields. Since these fields can be renamed, the field names here will be updated accordingly to any name you decide to give these fields within the Documents screen. When selecting the data to be filtered in your report from these fields, you can use the magnifying glass option on each field to select All, Multiple, or None of the options in that field. For more information see Field Customization. |
History Reports Generation Window
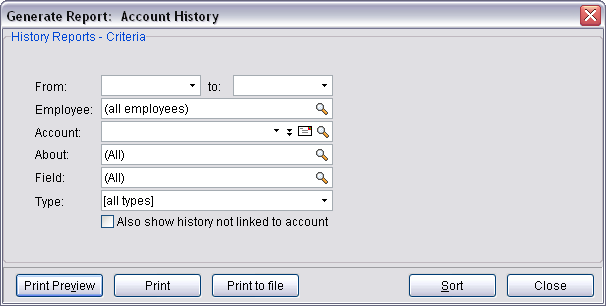
History reports are useful when you need to review and audit everything that has happen in your business. This happens when complaints regarding customer service, service management, or technician support arise and need to be investigated. This is also useful if your customer asks for a 30 day summary of all interactions with your business.
| Field | Description |
|---|---|
| From-To | Allows you to specify a specific time range for your history report to reference. This is useful when generating periodic history reports. |
| Employee | Allows you to single out the audits and history notes created for specific employees. This field can be set to use one, multiple, or all employees in your report. This is useful when you’re following up on new staff and how they’re integrating into your business. |
| Account | Allows you to limit your history report to only reflect history notes and audits referenced under a specific account. This is useful when you are monitoring the specific service and treatment between your business and your customers. |
| About | Using this field, you can filter your reports to only show specific history note types based on the History Screen About field. The About field includes categories for history notes such as appointments, charges, tickets, etc. |
| Field | These fields will allow you to filter your generated reports based on the information you store in the History Screen > New History Note Window > Field CommitCRM customizable fields. Since these fields can be renamed, the field names here will be updated accordingly to any name you decide to give these fields within the History screen. When selecting the data to be filtered in your report from these fields, you can use the magnifying glass option on each field to select All, Multiple, or None of the options in that field. For more information see Field Customization. |
Knowledge Base Reports Generation Window
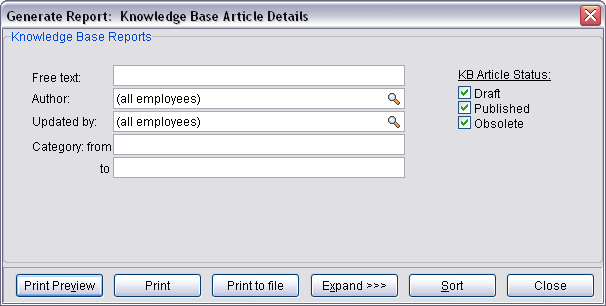
Knowledge Base reports allow you to print lists of KB articles stored in the system. These reports can be used to keep track of newer KB articles, and the development rate of your KB.
| Field | Description |
|---|---|
| Free Text | Allows you to generate KB reports filtered to only show articles that include the string typed in this field. This is useful when you’re looking for duplicate articles and wish to clean them up. |
| Author | Allows you to filter your KB reports to include articles only created by specific employees. This field can be set to use one, multiple, or all employees in your report. |
| Updated By | Filters your report to only include articles which were updated by the employees you choose last. This field can be set to use one, multiple, or all employees in your report. |
| Category | Allows you to filter your reports that have category values between the range values typed in the Category fields. These are free text fields which will remove any articles without Category values between the values typed on an alphabetical basis. |
Labels Reports Generation Window

Label Reports are useful when you want to mark paperwork with account labels, and even have barcodes that you can use to easily locate the account referenced in the system. These stickers can be handy for easy management and identification of your back office. The fields available in the labels reports are essentially from the Account Data Source, so the filterable fields are all from the accounts screen.
| Field | Description |
|---|---|
| Type | Allows you to filter the labels you’re generating to not include specific account types. Account types include Customers, Suppliers, Leads, Opportunities, etc. and can have more values added to the list and filtered in these reports. |
| Employees | Controls whether sticker labels will be created for employee accounts. Removing the flag will disable employee accounts in this set of labels. |
| Secondary Contacts | Controls whether or not secondary contacts will have labels created in this batch of labels. Removing the flag will disable label creation for secondary contacts. |
| Accnt# | Allows you to filter the labels you’re generating to a specific accnt #. Accnt # is used to group separate accounts and to be able to filter data lists and reports on the value in this list. This is useful when you want to create stickers for all accounts in multiple groups. |
| Batch No | Allows you to create labels for all accounts imported together with the same import batch number. The import batch number is given to each account that you import into the CommitCRM database, in order to easily group these accounts together. This is useful when you need to process multiple accounts into the system, and need labels created only for the accounts you just imported. |
| ID | This option is useful when selecting multiple accounts to have sticker labels made for. This is useful when you only need a handful of different labels to be created. |
Sales Opportunities Reports Generation Window
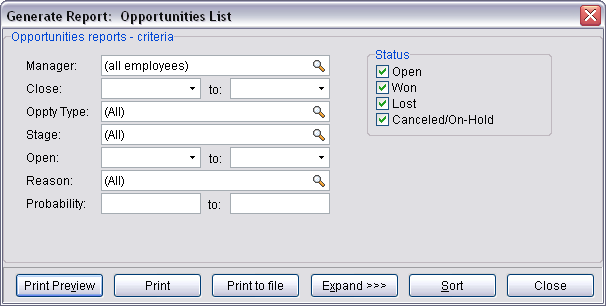
Sales Opportunities reports are useful when you want to track the progress of your marketing and promotional campaigns and opportunities. These reports are useful when you want to generate bid reports, charts, and success rates of your employees’ negotiations. When using these reports, you can have them generated for each employee, for an account, or for the whole business if needed in board meetings.
| Field | Description |
|---|---|
| Manager | Allows you to select which employees will be reflected in the reports with their opportunities. This is useful when monitoring the assimilation of new employees in your business, maintaining sales bonuses on an individual basis or on team basis. |
| Close-To | Allows you to filter your reports to only reflect opportunities that were closed in the date range set in these fields. This is useful when observing the latest opportunities that have been completed, to see how many were won against the opportunities that have been lost. |
| Oppty Type | Allows you to filter your opportunity report to only show the opportunities categorized with one of the opportunity type categories selected in the magnifying glass screen. This is useful when you’re monitoring your negotiations for specific types of opportunities, such as Existing Customer, New Customer, One-Time Customer. |
| Stage | Allows you to base your opportunities report on opportunities in specific stages of their negotiations. This helps to monitor your staff’s ability to complete specific tasks in the negotiation process, so that if they can’t, you can bring additional manpower that specializes in the area that your business requires the added staff. |
| Open-To | Allows you to generate opportunity reports based on the time the opportunity was created in the system. This type of filter can directly tell you if any of your opportunities are falling between the cracks and not being address. Using this type of filter can also raise attention to employees that do not complete their tasks in a timely manner, which can harm your businesses reputation. |
| Reason | When closing your opportunities, the system asks you to provide information regarding the reason the opportunity was closed. These reasons can include reasons like Lost – Price, Lost – Contacts, Won – Price, Won – Functions, etc. These reasons can be edited and adjusted to better fit your negotiations process, and include the values that are more relevant to your business. This filter is useful when you want to monitor how many opportunities have been won or lost for different reasons, and create a statistic based on this data. |
Advanced Filtering
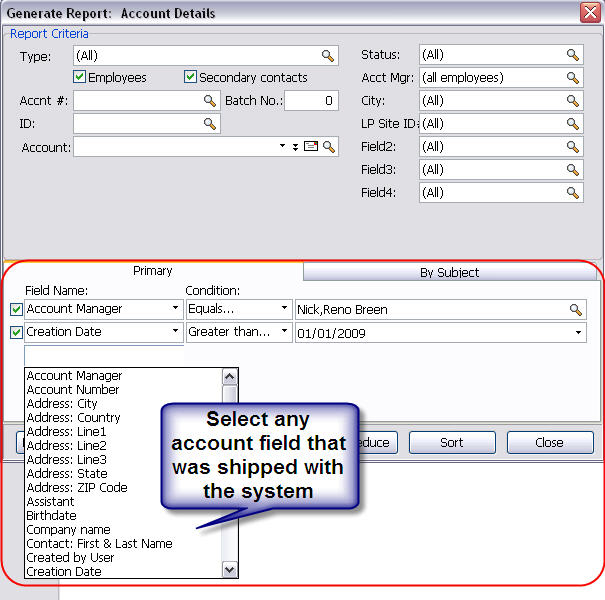
Using the Advanced filtering tools via the Expand >> button, you can set the system to generate reports based on advanced filtering settings. Advanced Filtering lets you filter by fields which are not listed in the above section. These filters can be set to decide if to generate a report based on almost any of the data set to be printed. Through these options, you can filter the report to your needs.
Primary Filters
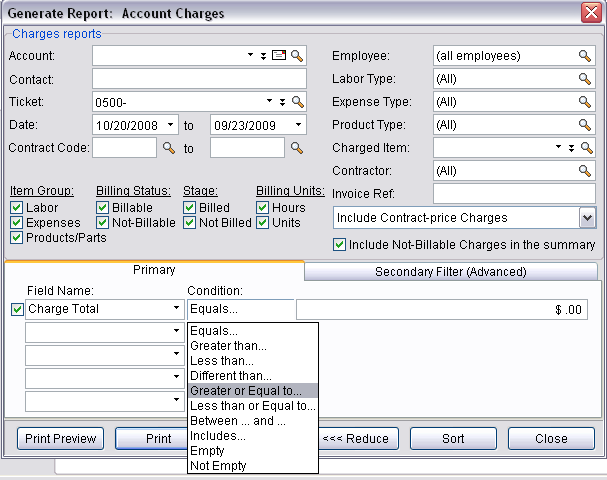
- The primary tab is used to let you filter your report based on all predefined system fields that comes with the system. in this part of the screen, you can set several filters that can be enabled at the same time. These filters would work side-by-side, and select additional entities to have reports generated for them. for each rule you want to add, you need to follow these steps:
- Select a field in the advanced filter rule list.
- Select the type of rule.
- Select the value to be shown in the report.
- Add more rules to include more data - Optional
Secondary Filters
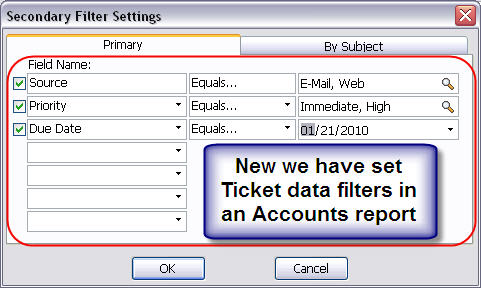
When using reports that mix multiple data sources in the same report, it may sometimes become necessary to apply second level filtering options in order to narrow the list down to the items you need to be displayed in your report. The secondary filters allow you to create super-advanced filters on the report results, and narrow down the results to exactly what you want to see. For example, this means that you can generate Charge reports, and narrow the results by specific ticket type, which reflects the type of problem (i.e. printer, mobile phone, laptop etc.,). This feature is quite powerful, and once you have all the logged work information in the database (i.e. Charges), the analytic possibilities are great Other examples:
- Filter Ticket reports to display only Tickets related to Accounts to which a specific employee is assigned
- Filter Charge reports to display all Charges logged for Block of Time Contracts that belong to Accounts which are assigned to a specific employee
- Filter Charge reports to display only Charges for Completed Tickets that belong to Accounts of the type 'Law Office'
Using Secondary Filters
The mentioned above, the secondary filter is available in specific report categories that mix data sources. These categories include Charges, Tickets, Opportunities, Assets and Contracts, and can be accessed by:
- Opening a report generation window.
- Using the Expand>> option.
- Selecting the Secondary Filter Tab.
Once the secondary filter tab has been opened, you can select different data sources that are available in the report, and set the needed filters that each data source offers you. Once this is done, your report will be filtered to only include database entities that fall in the rules you've set.
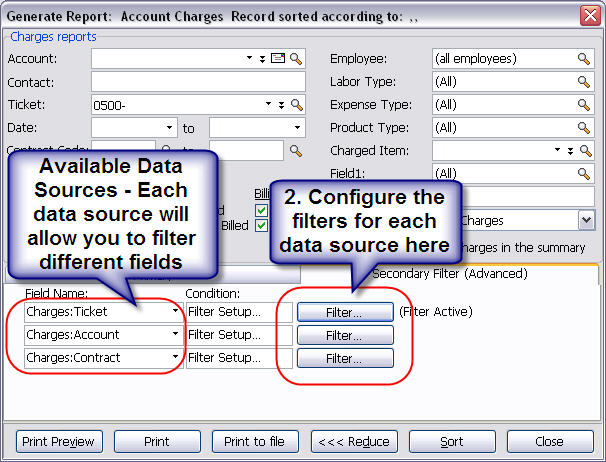
Once you've chosen the data source you want to filter your report by, you can click the filter button
Secondary Filters Based on Custom Fields
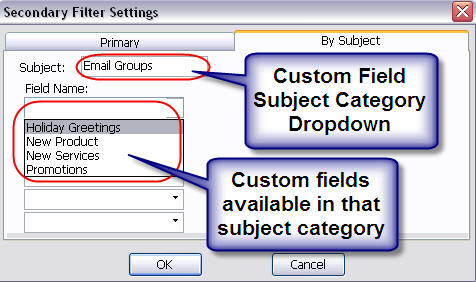
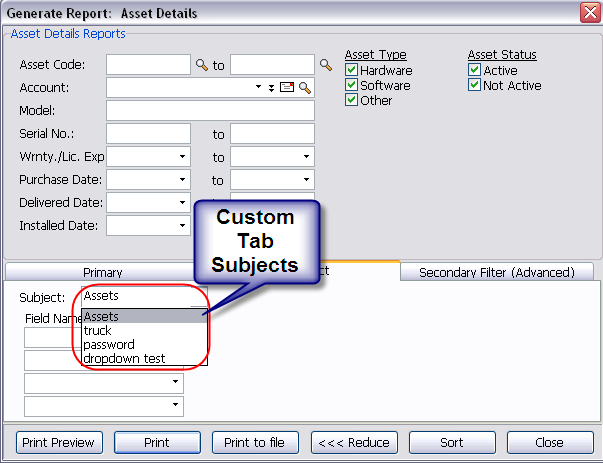
When you need to have your secondary filter applied to data that you have stored using custom fields, you can easily filter these fields by using the By Subject tab. Once you've opened the tab, the different Custom Field Subject Categories you've created in the system are displayed from the current data source you've selected, and once you've picked a Subject, you'll be able to choose the fields you want to include from that Subject.
By Subject Filters
For reports which have user-defined fields, you will notice a tab called "By Subject" which allows you to filter the report according to the user-defined fields. Here you can choose the subject you want to filter by, and this will give you the relevant field list for this subject. A subject is basically a fields-group, which can be defined when adding new fields. For more details about adding your own fields, click here.
Advanced Sorting
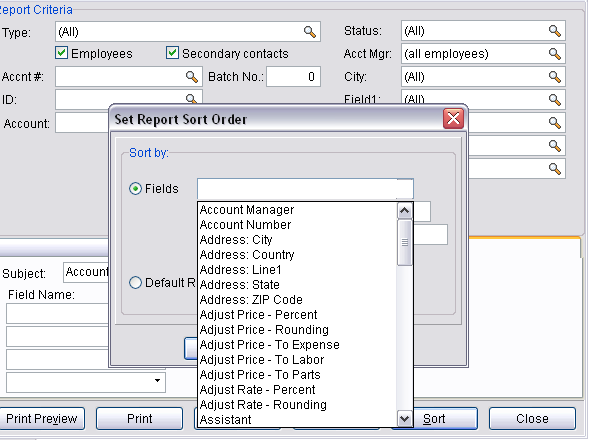
The advanced sorting feature allows you to reorganize the data printed in your reports to be sorted to your needs in your reports. Here you can tell the program to print the items in any order you choose. The options available to you in this option are system wide. We suggest sorting the list by a field displayed in the report, or just to use the default report setting.
Generating and Printing Reports Using the Commit Web Interface
The Commit Web Interface is most known for it’s portability, and the control it offers the you from any location in the world. The Commit Web Interface also has the ability to generate PDF reports for your technicians to give to your customer while your technician is onsite at your customers’ venue. For more information see Genetating and Printing Reports Using the Commit Web Interface.