KB: Managing Group Email Subscriptions
Introduction
Sometimes we like to send group emails out to customers regarding promotions, season’s greetings, new services, and new products. Since not all customers are interested in receiving such messages, business go to great lengths to keep records of which customers want to receive which types of email messages.
This article describes how you can use CommitCRM to create your own data tab that manages your email groups; whether a customer is subscribed to that group, and sending out the email to those groups.
Preparing the Database Architecture for Additional Data
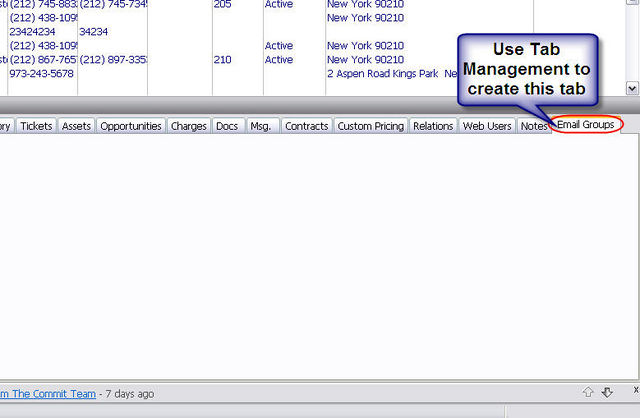
Creating a Tab for Email Groups
Before we can begin with the customizations, it is best to run a CommitCRM backup process, to make sure that you have a restore point to before you’ve customized the system. Only after the system has been backed up, create the fields that will contain the data about our email groups, we need to create a new tab that will house the data fields, while still keeping them separate from the rest of your CommitCRM data.
- We’ll need to create the new tab within the Accounts screen, and call the tab we’re creating Email Groups.
Once we have created the Email Groups tab, we can move on to the next step: Creating Data Fields for Our Email Groups.

Creating Data Fields for Our Email Groups
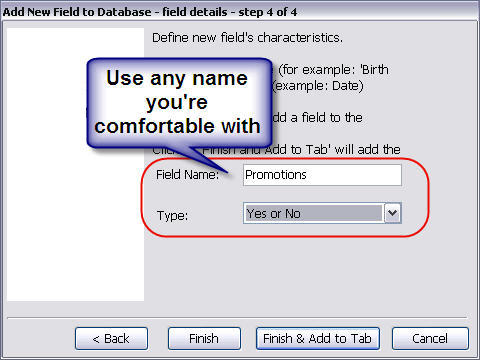
Once we have a tab that can house the user-defined fields we intend to create in this section, we can go ahead and create new data fields which need to hold only 2 values each; True and False will be fine, so we’re going to choose to create Yes or No fields (Checkbox Fields).
During the creation of the first field, you’ll need to create a subject group for the tab you’re creating. Field Subject groups allow you to easily group the fields you create so that you can filter your lists by this subject later, in order to be able to select from a dedicated list of these fields. We’ll get in to that later in this article.
- Go into Field Management. (Accounts Menu > Tools > Tab Management)
- Select ‘Add New Fields’ to Tab.
- Create a new Subject Group called ‘Email Groups’, select it and click Next.
- Give your group a name and select ‘Yes or No’ in the Field Type.
- Place your new field where you want to see it in the tab.
- Repeat the creation process for each field you want to create (each field you create represents a group and whether the account is included in this group or not).
- Add the fields you’re creating to the Email Groups Subject that you already made.
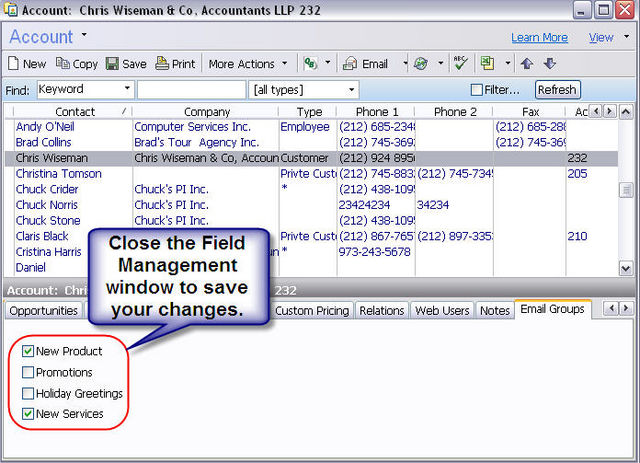
- Close the Field Management window in order to save your changes.


Subscribing Your Accounts to Email Groups
At this point, you’ve already created an Email Groups tab with checkboxes representing each email group you’re managing. The next step is to subscribe your accounts to relevant by marking fields that they want to be subscribed to. This needs to be done separately for each account; however, you can have this field updated while importing new accounts from external files.
Filtering Your List By These Fields
Before you can send out the group emails, you need to filter the accounts list according to the group you want to email to, so that the system knows which accounts you want to send the group email message to. Filtering the list is a rather simple task to perform since we’ve added all the fields to the same Field Subject Category (i.e. ‘Email Groups’). Once you’ve filtered your account list to only include the accounts in a specific email group, you can go on to sending the email message.
To filter your list by one of the Email Groups you’re managing, please follow these steps.
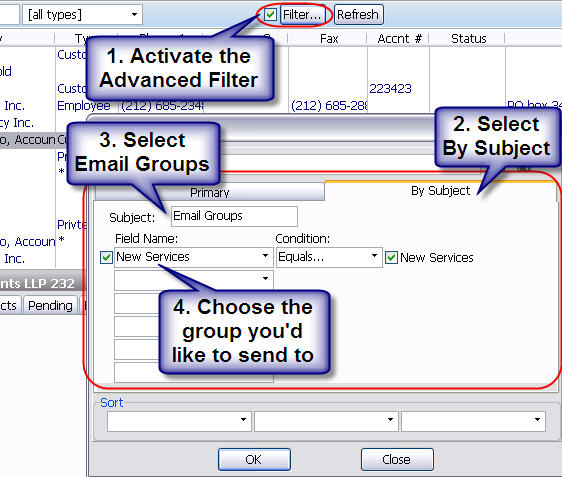
- Activate the Advanced Filter option (Mark the Filter checkbox in the blue filter bar in the accounts screen), and open the Filter window.
- Switch to the By Subject Tab.
- Select the Email Groups Subject from the Subject drop down list.
- Select the Group you’d like to filter the list by in the first filter rule line.
- Mark the checkbox in right side of the rule to indicate that you want to filter based on the True value.

Sending the Group Emails to your customers
Once your accounts list has been filtered to only reflect the accounts that are part of a specific Email Group, you can continue to the next step by preparing the email you intend to send out. Using CommitCRM, you have 2 very powerful options that can send your group email out to your customers. Each method has its benefits, so the best way to choose the correct method is to know what kind of data will need to have merged from the CommitCRM database (if any) into the message.
| Group Mail Method | Description |
|---|---|
| Internal CommitCRM Group Mail | This method allows you to create a static email message that can be emailed to the accounts list you’ve filtered, or all your accounts if the list is not filtered. The static message would not include any referenced database information; however, this method is the most quick and convenient way to send out group emails to your customers. This method includes optional fields for the Subject field and Attachments and requires Microsoft® Outlook® to be installed and configured.
For more information see CommitCRM Group Emails. |
| CommitCRM-MSWord Mail Merge | This method allows you to create a static email template in MS Word, and to have that text populated with CommitCRM referenced account data. This data can be exported from anywhere in the CommitCRM database, and can be easily added to your template so that the message sent to each customer would include the data from the account that the email address came out of. This method is useful if your group email only needs database orientated information embedded in the message.
For more information see Commit Mail Merge. |
See Also
- create a new tab
- create new data fields
- importing new accounts
- KB:_Sending_Group_Emails_to_your_CommitCRM_Accounts|CommitCRM Group Emails]]
- Commit Mail Merge