KB: Accessing the Web Interface Without A Port Number
Introduction
RangerMSP Web Interface requires that any URL accessing it will include the port number used by it; this includes the initial request to access the login page. Sometimes, like when you do not have a Web site for your company that includes a link to the Web interface login page, you may wish to access RangerMSP Web Interface login page without specifying the, usually hard to remember, port number.
This article demonstrates several possible ways to achieve this.
Solutions
In order to be able to use a URL to access RangerMSP Web Interface without specifying the port number, two methods are available to enable your server to receive the HTTP request over the standard browsing port 80.
Embedding Your Login Page
The RangerMSP Web Interface login page can be embedded on an existing web page so that your customers could enter their RangerMSP web user credentials on your existing website, so that the connection would be forwarded to the RangerMSP Web Interface on whatever port it is using.
Using this method would mean that once your employee/customer has entered his credentials, the connection would be forwarded directly to the RangerMSP Web Interface traffic port and continue to communicate from the RangerMSP Web Interface directly to your customer without specifying the port you're using on the RangerMSP Web Interface in your URL at all.
Instructions
This method will require 2 ports to be properly forwarded from your firewall to the following computers in your network:
| Port | Destination Computer | Comments |
| RangerMSP Web Interface Port (4961 by default) | RangerMSP Server | This port will need to be forwarded from your firewall to your RangerMSP server as specified by the RangerMSP Web Interface installation manual |
| HTTP Browsing Port 80 (TCP) | Web Server Hosting Your Site | This port is already being forwarded and would not need any adjustment if your website is already functional |
Once the ports are forwarded to the correct computers, you can then proceed to choose from 2 different methods of embedding the RangerMSP Web Interface into your existing web site. The methods are as follows:
Adding a Link to the RangerMSP Web Interface
If you have an existing website, then you can use the following method to add a textual link to your existing webpage which would take the user directly to the RangerMSP Web Interface login page, without the user needing to type anything in except login credentials. Also note that with minor modification to the line below, you can substitute the textual link for a bitmap link, so that you can use a banner or logo for your RangerMSP Web Interface login page link.
To create the textual link
Add the following line to the relevant page/s in your existing web site:
HREF='http://127.0.0.1:4961">Click to login</A>
Note: You should edit this link to reflect your IP/URL address and Port (127.0.0.1 to your IP/URL and 4961 to the port in use).
Using an Image/Banner for your link
The text in the method above can also be substituted by a bmp/jpg image of your choice by using the following method, based on the method above.
Now, the image file you'll be using needs to be copied to your web-servers data folder in any new file name that you like. Remember the file name you're using, because you'll need to add it to the link as explained below; for this tutorial, we'll assume the filename is Support.jpg.
The image link will be composed of 3 lines in your webpage. The first line is exactly like the textual link line; only remove the "click to login" text and the closing container from the end of the code so that it looks like this.
<a href="http://127.0.0.1:4961">
Now, don't type any text, and don't close the tag just yet. What we are going to do is place the image tag right after the opening link tag. The image we are using here is "Support.jpg". So, you would type the following:
<a href="http://127.0.0.1:4961"><br><img src="Support.jpg" />
OK, now we are going to close the link tag at the end of the image tag, so that the image tag is between the opening and closing link tags, like this:
<a href="http://127.0.0.1:4961"><br><img src="support.jpg" /><br></a>
Now that the image is between the link tags, it will operate the same way as a normal link, but now it is a visual image. This method can be used for a support pic, or even a more graphically pleasing banner.
Embedding the RangerMSP Web Interface login fields
If you prefer that a login area will be embedded in one of your web site pages (i.e. the actual login fields will be displayed in the page and not only a link to a login page) complete the following instructions.
Please note that this is an advanced option which would benefit from previous experience making these types of adjustments. Always backup your files before adjusting.
Embed the following HTML/script code in one of your web pages; the <SCRIPT> code should be added between the HTML <HEADER> and </HEADER>.
The <FORM> code should be added in the HTML <BODY> area; you need to update the default IP/URL (127.0.0.1) to your IP/URL, and the default port number (4961) to your port settings.
Please use the following HTML code.
Copy and paste this section to your HTML <HEADER> section:
Note: Copying from here may contain some illegal characters (depending on the web browser). If you are encountering any problems embedding this code, please try copying the HTML part from the Tips&Tricks section inside the readme file at: <Installation_DIR>\RangerMSP\WebInterface\Readme.txt file instead.
<SCRIPT Language="JavaScript">
      <!--
        function CmtCheckInput()
        {

          if (document.CmtForm.CmtUsrNamePrm.value=="" )
          {
            alert('Please enter a value for Name');
            document.CmtForm.CmtUsrNamePrm.focus();
            return false;
          }
          else if (document.CmtForm.CmtUsrPWPrm.value=="")
          {
            alert('Please enter a value for Password');
            document.CmtForm.CmtUsrPWPrm.focus();
            return false;
          }
          else
          {
            return true;
          }
        }

        function CmtKeyPress(event)
        {
          if (event.keyCode == 13)
          {
            CmtCheckInput();
          }
        }
      //-->
</SCRIPT>
Copy the following HTML code, paste it in the HTML <BODY> area and modify the IP and Port as described above:
<FORM name="CmtForm" method="post" action="http://1.0.0.127:4961" onSubmit="return CmtCheckInput()">
      <TABLE>
 	<TR>
 	  <TD>User Name:</TD>
	  <TD><input name="CmtUsrNamePrm" type="text" id="CmtUsrNamePrm"></TD>
        </TR>
        <TR>
          <TD>Password:</TD>
          <TD><input name="CmtUsrPWPrm" type="password" id="CmtUsrPWPrm"></TD>
        </TR>
        <TR>
          <TD> </TD><TD><input type="submit" value="Login"></TD>
	</TR>
        <TR><TD> </TD><TD><input name="CmtUsrMobPrm" type="CheckBox"> Mobile Layout</TD>
        </TR>
      </TABLE>
</FORM>
Troubleshooting
If RangerMSP Web Interface login page does not respond from within your web page, then please try to access the RangerMSP Web Interface from the direct (normal) access URL, from outside your network, so that you can verify that the RangerMSP Web Interface is online and available. If the RangerMSP Web Interface does listen on the normal access URL, then the problem would be with the HTML code you've used to embed your Login page, and should be adjusted and verified.
Port Translation
If you don't have your own website available for embedding a link or the RangerMSP Web Interface login page, then another solution would be to forward incoming traffic on port 80 to the RangerMSP Web Interface listening port, where the system would continue to process the subsequent traffic from the normal RangerMSP Web Interface traffic port (4961 by default).
Using Port Translation Software (such as [TunnelEx http://tunnelex.net/], you can configure all traffic that comes into the server where RangerMSP is installed, to be transferred to the RangerMSP Web Interface listening port to be processed by the RangerMSP Web Interface.
Instructions
This method would require that 2 ports be forwarded to the RangerMSP Server in order to enable your users to connect to the RangerMSP Web Interface without specifying the connection port.
| Port | Destination | Comments |
| RangerMSP Web Interface Port (4961 by default) | RangerMSP Server | This port will need to be forwarded from your firewall to your RangerMSP server as specified by the RangerMSP Web Interface installation manual |
| HTTP Browsing Port 80 (TCP) | RangerMSP Server |
Once you've set up port forwarding, the next step is to download and install [TunnelEx http://tunnelex.net/].
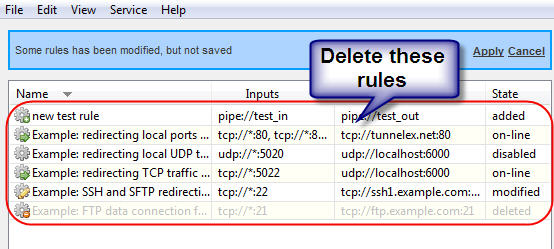
Once you've installed TunnelEx, Right Click and delete all the example rules so that the list is empty.
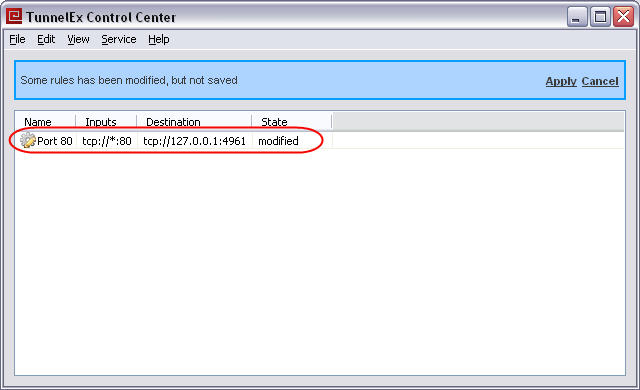
Once the list is empty, go to File > New, and create a new rule that will transfer all information from port 80 to port 4961, so that the RangerMSP Web Interface will receive the normal browsing traffic on its own port.
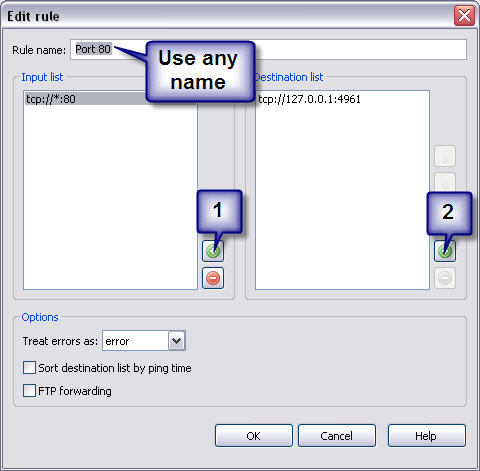
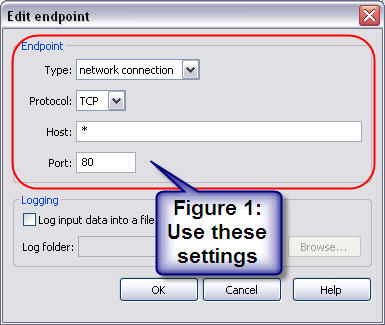
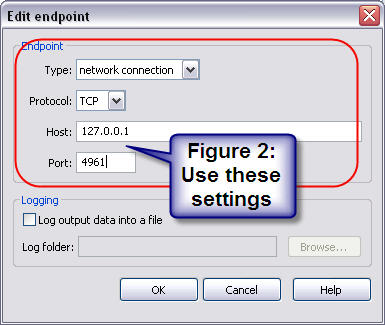
Once you've set you're rule, the main software window should look like this.
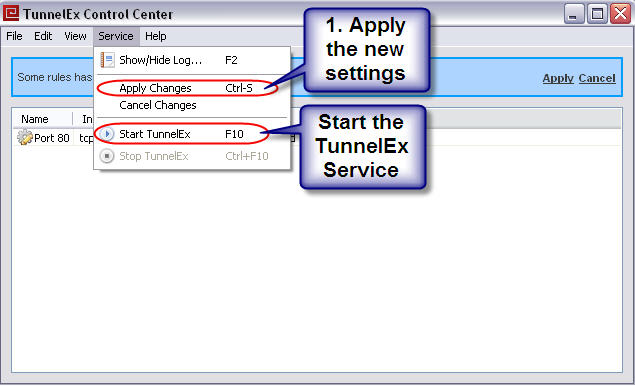
The last step is to apply the new rule, and Start the service from the Service Menu.
Summary
Once you've successfully activated TunnelEx, you should be able to receive connections to the RangerMSP Web Interface on both ports 4961 and 80. This means that your customers can log into the system using the URL without a port number, for example by navigating their Browser to http://support.yourcompany.com , and then the port number would eventually be added automatically by the RangerMSP Web Interface.