QuickBooks Link: Difference between revisions
| (57 intermediate revisions by 5 users not shown) | |||
| Line 4: | Line 4: | ||
__TOC__ | __TOC__ | ||
== Overview == | == Overview == | ||
Using the [[QuickBooks Link| | Using the [[QuickBooks Link|RangerMSP-QuickBooks Link]] you can run your computer services business more efficiently. It was designed to simplify routine business, accounting and financial management tasks. With the RangerMSP-QuickBooks Link, you only need to enter data once and it will appear in both RangerMSP and QuickBooks. This feature not only saves you the time of manually entering data, but it also minimizes the problems of duplicate, redundant and wrong data common to manual data entry. Now you can synchronize your data between RangerMSP and QuickBooks and ensure data accuracy, enhance your flexibility, and increase your control over your bottom line. | ||
This user manual will help you use the features included in the | This user manual will help you use the features included in the RangerMSP-QuickBooks Link module. | ||
The | The RangerMSP-QuickBooks Link includes the following features: | ||
'''Customers''' | '''Customers''' | ||
*Import all your QuickBooks Customers into | *Import all your QuickBooks Customers into RangerMSP | ||
*Changes made to QuickBooks Customers can be synchronized with | *Changes made to QuickBooks Customers can be synchronized with RangerMSP | ||
*Create a new Customer in QuickBooks based on a selected | *Create a new Customer in QuickBooks based on a selected RangerMSP Account | ||
*Create links between existing | *Create links between existing RangerMSP Accounts and QuickBooks Customers to automate synchronization between them | ||
*Send and receive updates for selected Accounts/Customers | *Send and receive updates for selected Accounts/Customers | ||
'''Vendors''' | '''Vendors''' | ||
*Import all your QuickBooks Vendors into | *Import all your QuickBooks Vendors into RangerMSP | ||
*Changes made to QuickBooks Vendors can be synchronized with | *Changes made to QuickBooks Vendors can be synchronized with RangerMSP | ||
*Create a new Account in | *Create a new Account in RangerMSP based on a selected QuickBooks Vendor | ||
*Create a new Vendor in QuickBooks based on a selected | *Create a new Vendor in QuickBooks based on a selected RangerMSP Account | ||
*Create links between existing | *Create links between existing RangerMSP Accounts and QuickBooks Vendors to automate synchronization between them | ||
*Send and receive updates for selected Accounts/Vendors | *Send and receive updates for selected Accounts/Vendors | ||
'''Items''' | '''Items''' | ||
*Import any/all of the following QuickBooks Items into | *Import any/all of the following QuickBooks Items into RangerMSP: | ||
**Service Items => Labor Items in | **Service Items => Labor Items in RangerMSP | ||
**Inventory Parts => Products/Parts in | **Inventory Parts => Products/Parts in RangerMSP | ||
**Non-Inventory Parts => Products/Parts in | **Non-Inventory Parts => Products/Parts in RangerMSP | ||
**Inventory Assembly Items => Products/Parts in | **Inventory Assembly Items => Products/Parts in RangerMSP | ||
**Other Charge Items => Expenses in | **Other Charge Items => Expenses in RangerMSP | ||
*Changes made to QuickBooks Items can be synchronized with | *Changes made to QuickBooks Items can be synchronized with RangerMSP | ||
*Create a new Item in | *Create a new Item in RangerMSP based on a selected QuickBooks Item | ||
*Create a new Item in QuickBooks based on a selected | *Create a new Item in QuickBooks based on a selected RangerMSP Item | ||
*Create links between existing | *Create links between existing RangerMSP Items and QuickBooks Items to automate synchronization between them | ||
*Send and receive updates for selected Items | *Send and receive updates for selected Items | ||
'''Invoices''' | '''Invoices''' | ||
*Generate QuickBooks invoices based on charges entered in | *Generate QuickBooks invoices based on charges entered in RangerMSP | ||
*Generate invoices at different levels: | *Generate invoices at different levels: | ||
**Account - Invoices generated at the Account level may include any charges linked to this account, its contracts and tickets. | **Account - Invoices generated at the Account level may include any charges linked to this account, its contracts and tickets. | ||
| Line 51: | Line 51: | ||
==Getting Started== | ==Getting Started== | ||
To enjoy the benefits of the | To enjoy the benefits of the RangerMSP-QuickBooks Link you first need to set it up. The setup is a user-friendly process that walks you through all the necessary steps to completion. | ||
===Supported Editions=== | ===Supported Editions=== | ||
Please note that currently | Please note that currently RangerMSP synchronizes with the following versions and editions of QuickBooks: | ||
The following '''US''' versions of QuickBooks are supported: | The following editions of QuickBooks Online are supported: Australia, Canada, United Kingdom, United States (requires RangerMSP 25.0.0.5 or above) | ||
The following '''US''' versions of QuickBooks Desktop are supported: | |||
*QuickBooks Enterprise 24.0 (requires RangerMSP 30 or above) | |||
*QuickBooks Desktop 2024 (requires RangerMSP 30 or above) | |||
*QuickBooks Pro 2023 (requires RangerMSP 30 or above) | |||
*QuickBooks Pro 2022 (requires RangerMSP 30 or above) | |||
*QuickBooks Premier 2022 (requires RangerMSP 30 or above) | |||
*QuickBooks Pro 2021 (requires RangerMSP 27 or above) | |||
*QuickBooks Premier 2021 (requires RangerMSP 27 or above) | |||
*QuickBooks Pro 2020 (requires RangerMSP 25 or above) | |||
*QuickBooks Premier 2020 (requires RangerMSP 25 or above) | |||
*QuickBooks Pro 2019 (requires RangerMSP 21 or above) | |||
*QuickBooks Premier 2019 (requires RangerMSP 21 or above) | |||
*QuickBooks Pro 2018 (requires RangerMSP 17 or above) | |||
*QuickBooks Premier 2018 (requires RangerMSP 17 or above) | |||
*QuickBooks Enterprise 2018 (requires RangerMSP 18 or above) | |||
*QuickBooks Pro 2017 (requires RangerMSP 15 or above) | |||
*QuickBooks Premier 2017 (requires RangerMSP 15 or above) | |||
*QuickBooks Enterprise 2017 (requires RangerMSP 15 or above) | |||
*QuickBooks Pro 2016 (requires RangerMSP 10 or above) | |||
*QuickBooks Premier 2016 (requires RangerMSP 10 or above) | |||
*QuickBooks Enterprise 2016 (requires RangerMSP 10 or above) | |||
*QuickBooks Pro 2015 (requires RangerMSP 9 or above) | |||
*QuickBooks Premier 2015 (requires RangerMSP 9 or above) | |||
*QuickBooks Enterprise 2015 (requires RangerMSP 9 or above) | |||
*QuickBooks Pro 2014 (requires RangerMSP 7.0 or above) | |||
*QuickBooks Premier 2014 (requires RangerMSP 7.0 or above) | |||
*QuickBooks Enterprise 2014 (requires RangerMSP 7.0 or above) | |||
*QuickBooks Pro 2013 (requires RangerMSP 5.5 or above) | |||
*QuickBooks Premier 2013 (requires RangerMSP 5.5 or above) | |||
*QuickBooks Enterprise 2013 (requires RangerMSP 5.5 or above) | |||
*QuickBooks Pro 2012 (requires RangerMSP 5.5 or above) | |||
*QuickBooks Premier 2012 (requires RangerMSP 5.5 or above) | |||
*QuickBooks Enterprise 2012 (requires RangerMSP 5.5 or above) | |||
*QuickBooks Pro 2011 (requires RangerMSP 5.5 or above) | |||
*QuickBooks Premier 2011 (requires RangerMSP 5.5 or above) | |||
*QuickBooks Enterprise 2011 (requires RangerMSP 5.5 or above) | |||
*QuickBooks Pro 2010 | |||
*QuickBooks Premier 2010 | |||
*QuickBooks Enterprise 2010 | |||
*QuickBooks Pro 2009 | *QuickBooks Pro 2009 | ||
*QuickBooks Premier 2009 | *QuickBooks Premier 2009 | ||
| Line 64: | Line 104: | ||
*QuickBooks Premier 2008 | *QuickBooks Premier 2008 | ||
*QuickBooks Enterprise 2008 | *QuickBooks Enterprise 2008 | ||
The following '''Canadian''' versions of QuickBooks are supported: | <u>Note for QuickBooks 2009, or above, users:</u><br>RangerMSP 4.5, or above, is required to integrate with QuickBooks 2009.<br>RangerMSP-QuickBooks Link uses a single currency. Multi-currency is not supported. | ||
The following '''Canadian''' versions of QuickBooks Desktop are supported: | |||
supported: | |||
*QuickBooks Canada Pro 2022 (requires RangerMSP 30 or above) | |||
*QuickBooks Canada Premier 2022 (requires RangerMSP 30 or above) | |||
*QuickBooks Canada Pro 2021 (requires RangerMSP 27 or above) | |||
*QuickBooks Canada Premier 2021 (requires RangerMSP 27 or above) | |||
*QuickBooks Canada Pro 2020 (requires RangerMSP 25 or above) | |||
*QuickBooks Canada Premier 2020 (requires RangerMSP 25 or above) | |||
*QuickBooks Canada Pro 2019 (requires RangerMSP 21 or above) | |||
*QuickBooks Canada Premier 2019 (requires RangerMSP 21 or above) | |||
*QuickBooks Canada Pro 2018 (requires RangerMSP 17 or above) | |||
*QuickBooks Canada Premier 2018 (requires RangerMSP 17 or above) | |||
*QuickBooks Canada Pro 2017 (requires RangerMSP 15 or above) | |||
*QuickBooks Canada Premier 2017 (requires RangerMSP 15 or above) | |||
*QuickBooks Canada Pro 2016 (requires RangerMSP 10.0 or above) | |||
*QuickBooks Canada Premier 2016 (requires RangerMSP 10.0 or above) | |||
*QuickBooks Canada Pro 2015 (requires RangerMSP 9.0 or above) | |||
*QuickBooks Canada Premier 2015 (requires RangerMSP 9.0 or above) | |||
*QuickBooks Canada Pro 2014 (requires RangerMSP 7.0 or above) | |||
*QuickBooks Canada Premier 2014 (requires RangerMSP 7.0 or above) | |||
*QuickBooks Canada Pro 2013 | |||
*QuickBooks Canada Premier 2013 | |||
*QuickBooks Canada Pro 2012 | |||
*QuickBooks Canada Premier 2012 | |||
*QuickBooks Canada Pro 2011 | |||
*QuickBooks Canada Premier 2011 | |||
*QuickBooks Canada Pro 2010 | |||
*QuickBooks Canada Premier 2010 | |||
*QuickBooks Canada Pro 2009 | |||
*QuickBooks Canada Premier 2009 | |||
*QuickBooks Canada Pro 2008 | *QuickBooks Canada Pro 2008 | ||
*QuickBooks Canada Premier 2008 | *QuickBooks Canada Premier 2008 | ||
The following '''UK''' versions of QuickBooks are supported: | The following '''UK''' versions of QuickBooks Desktop are supported: | ||
*QuickBooks UK Pro 2022 (requires RangerMSP 30 or above) | |||
*QuickBooks UK Premier 2022 (requires RangerMSP 30 or above) | |||
*QuickBooks UK Pro 2021 (requires RangerMSP 27 or above) | |||
*QuickBooks UK Premier 2021 (requires RangerMSP 27 or above) | |||
*QuickBooks UK Pro 2020 (requires RangerMSP 25 or above) | |||
*QuickBooks UK Premier 2020 (requires RangerMSP 25 or above) | |||
*QuickBooks UK Pro 2019 (requires RangerMSP 21 or above) | |||
*QuickBooks UK Premier 2019 (requires RangerMSP 21 or above) | |||
*QuickBooks UK Pro 2018 (requires RangerMSP 17 or above) | |||
*QuickBooks UK Premier 2018 (requires RangerMSP 17 or above) | |||
*QuickBooks UK Pro 2017 (requires RangerMSP 15 or above) | |||
*QuickBooks UK Premier 2017 (requires RangerMSP 15 or above) | |||
*QuickBooks UK Pro 2016 (requires RangerMSP 10 or above) | |||
*QuickBooks UK Premier 2016 (requires RangerMSP 10 or above) | |||
*QuickBooks UK Pro 2015 (requires RangerMSP 9 or above) | |||
*QuickBooks UK Premier 2015 (requires RangerMSP 9 or above) | |||
*QuickBooks UK Pro 2014 (requires RangerMSP 9 or above) | |||
*QuickBooks UK Premier 2014 (requires RangerMSP 9 or above) | |||
*QuickBooks UK Pro 2013 | |||
*QuickBooks UK Premier 2013 | |||
*QuickBooks UK Pro 2012 | |||
*QuickBooks UK Premier 2012 | |||
*QuickBooks UK Pro 2011 | |||
*QuickBooks UK Premier 2011 | |||
*QuickBooks UK Pro 2010 | |||
*QuickBooks UK Premier 2010 | |||
*QuickBooks UK Pro 2008 | *QuickBooks UK Pro 2008 | ||
The following '''Australian''' versions of QuickBooks are supported (*): | The following '''Australian''' versions of QuickBooks are supported (*): | ||
*QuickBooks Pro 2008/ | *Reckon Accounts (formerly QuickBooks Australia) Pro, Premier, Enterprise 2014-2017 (requires RangerMSP 9 or above) | ||
*QuickBooks Premier 2008/ | *QuickBooks Pro 2013 | ||
*QuickBooks Premier 2013 | |||
*QuickBooks Pro 2012 | |||
*QuickBooks Premier 2012 | |||
*QuickBooks Pro 2010/11 | |||
*QuickBooks Premier 2010/11 | |||
*QuickBooks Pro 2009/10 | |||
*QuickBooks Premier 2009/10 | |||
*QuickBooks Pro 2008/9 | |||
*QuickBooks Premier 2008/9 | |||
<u>The integration with QuickBooks Australia was tested and works in US compatibility mode.</u> | <u>*The integration with QuickBooks Australia was tested and works in US compatibility mode.</u> | ||
[multi user mode is supported] | [multi user mode is supported] | ||
===Installation Instructions=== | ===Installation Instructions=== | ||
[[ | ====QuickBooks Desktop==== | ||
To setup the integration with '''QuickBooks Desktop''' and connect to your company file please follow [[QuickBooks_Desktop_Link_Installation_Instructions|QuickBooks Desktop Link Installation Instructions]] | |||
====QuickBooks Online==== | |||
To connect to your '''QuickBooks Online''' company please follow [[QuickBooks_Online_Link_Configuration_Instructions|QuickBooks Online Link Configuration Instructions]] | |||
===Switching to QuickBooks Online from QuickBooks Desktop=== | |||
Please [[Switching_to_QuickBooks_Online_from_QuickBooks_Desktop|click here]] to learn about switching from integrating RangerMSP with QuickBooks Desktop to integrating with QuickBooks Online. | |||
===Importing Customers/Vendors from QuickBooks into | ===Importing Customers/Vendors from QuickBooks into RangerMSP for the First Time=== | ||
This section will show you how to import your Customers into RangerMSP. | |||
Important note: If all your Customers are already in | Important note: If all your Customers are already in RangerMSP, do '''not''' use this import feature until you have created links between existing records in RangerMSP and their related records in QuickBooks. To learn more about how to create these links, [[QuickBooks Link Account Options|click here.]] | ||
Note that before performing a batch import, it is recommended that you first back up all your | Note that before performing a batch import, it is recommended that you first back up all your RangerMSP data. The RangerMSP data is stored in <server>RangerMSP\DB. | ||
After backing up your data, follow the instructions below to import Customers/Vendors from QuickBooks into | After backing up your data, follow the instructions below to import Customers/Vendors from QuickBooks into RangerMSP: | ||
In the Accounts window, go to the QuickBooks drop down toolbar menu and select Import New Records/Update Linked Records from QuickBooks. | In the Accounts window, go to the QuickBooks drop down toolbar menu and select Import New Records/Update Linked Records from QuickBooks.<br> | ||
[[File: | [[File:importing_accounts_from_qb.gif|center]]<br> | ||
[[File: | [[File:backup_warning.png|center]]<br> | ||
If you have backed up your | If you have backed up your RangerMSP Data, click OK to continue with the import process. | ||
The import wizard will ask you to select the QuickBooks records you would like to import into | The import wizard will ask you to select the QuickBooks records you would like to import into RangerMSP. By default, only active Customers are imported. If you want to import your vendors as well, follow the import wizard again once you have completed importing your Customers, and select Vendors. | ||
[[File: | [[File:accounts_import_wizard.png|center]] | ||
Select the type of QuickBooks records you want to import, and click Next. | Select the type of QuickBooks records you want to import, and click Next. | ||
[[File: | [[File:accounts_import_wizard_finish.png|center]] | ||
Click Finish. | Click Finish. | ||
[[File: | [[File:start_importing_data_question.png|center]] | ||
Click Yes to begin importing the data.<br>The import process will begin. | Click Yes to begin importing the data.<br>The import process will begin. | ||
[[File: | [[File:import_accounts_progress.png|center]] | ||
Wait till the records are imported from QuickBooks to | Wait till the records are imported from QuickBooks to RangerMSP: | ||
[[File: | [[File:successful_import.png|center]] | ||
Click OK. | Click OK. | ||
The import has finished. You can now see all the imported records in | The import has finished. You can now see all the imported records in RangerMSP in the Accounts window: | ||
[[File: | [[File:imported_accounts_list.png|center]] | ||
Please note that QuickBooks Jobs are not imported in batch imports from QuickBooks. You can import jobs on one by one basis using the 'New Account in | Please note that QuickBooks Jobs are not imported in batch imports from QuickBooks. You can import jobs on one by one basis using the 'New Account in RangerMSP Based on QuickBooks' menu option. | ||
===Importing Items from QuickBooks into | ===Importing Items from QuickBooks into RangerMSP=== | ||
This section will show you how to import your QuickBooks Items into | This section will show you how to import your QuickBooks Items into RangerMSP. | ||
<u>Important Note:</u> If all your Items are already in | <u>Important Note:</u> If all your Items are already in RangerMSP, do '''not''' use this import feature until you have created links between existing records in RangerMSP and their related records in QuickBooks. To learn more about how to create these links, [[QuickBooks Link Items Options|click here]]. | ||
Every Labor/Parts/Expense Charge in | Every Labor/Parts/Expense Charge in RangerMSP is based on a selected Item. This is why Items are important to the entire billing process. The RangerMSP-QuickBooks Link enables you to import all your Items from QuickBooks, saving you from retyping Item details in RangerMSP. | ||
Note that before performing a batch import, it is recommended that you first back up all your | Note that before performing a batch import, it is recommended that you first back up all your RangerMSP data. The RangerMSP data is stored in <server>RangerMSP\DB. | ||
After backing up your data follow the instructions below to import Items from QuickBooks into | After backing up your data follow the instructions below to import Items from QuickBooks into RangerMSP: | ||
In the Items window, go to the QuickBooks drop down toolbar menu and select Import New Records/Update Linked Records from QuickBooks. | In the Items window, go to the QuickBooks drop down toolbar menu and select Import New Records/Update Linked Records from QuickBooks. | ||
[[File: | [[File:importing_items_from_qb.png|center]] | ||
[[File: | [[File:backup_warning.png|center]] | ||
If you have backed up your | If you have backed up your RangerMSP Data, click OK to continue with the import process. | ||
The import wizard will ask you to select the QuickBooks records you would like to import into | The import wizard will ask you to select the QuickBooks records you would like to import into RangerMSP. By default, all active Items are imported. | ||
[[File: | [[File:items_import_wizard.png|center]] | ||
Select the types of Items you want to import from QuickBooks and click Next. | Select the types of Items you want to import from QuickBooks and click Next. | ||
[[File: | [[File:items_import_wizard_finish.png|center]] | ||
Click '''Finish'''. | Click '''Finish'''. | ||
[[File: | [[File:start_importing_data_question.png|center]] | ||
Click Yes to begin importing the data.<br>The import process will begin. | Click Yes to begin importing the data.<br>The import process will begin. | ||
[[File: | [[File:import_items_progress.png|center]] | ||
Wait until the record are imported from QuickBooks to | Wait until the record are imported from QuickBooks to RangerMSP: | ||
[[File: | [[File:successful_import.png|center]] | ||
Click '''OK'''. | Click '''OK'''. | ||
The import has finished. You can now see all the imported records in | The import has finished. You can now see all the imported records in RangerMSP, in the Items window. | ||
[[File:imported_items_list.png|center]] | |||
===Creating a New Invoice in QuickBooks=== | ===Creating a New Invoice in QuickBooks=== | ||
RangerMSP lets you create QuickBooks Invoices at the '''Account/Ticket/Contract '''levels. | |||
If you create an invoice at the Account level, all Billable charges related to the Account that haven't been billed yet will be included in the invoice, including charges related to Tickets and Contracts. | If you create an invoice at the '''Account level''', all Billable charges related to the Account that haven't been billed yet will be included in the invoice, including charges related to Tickets and Contracts. | ||
If you create an invoice at the Contract level, only Billable charges that haven't been billed yet which are related to the selected Contract will be included in the invoice, including all Ticket-related charges. | If you create an invoice at the '''Contract level''', only Billable charges that haven't been billed yet which are related to the selected Contract will be included in the invoice, including all Ticket-related charges. | ||
If you create an invoice at the Ticket level, only Billable charges that haven't been billed yet which are related to the selected Ticket will be included in the invoice. | If you create an invoice at the '''Ticket level''', only Billable charges that haven't been billed yet which are related to the selected Ticket will be included in the invoice. | ||
In all cases, you can also include not-billable charges in the invoice, which will be displayed in the invoice with a zero billable total amount. This way you can include all the charges without actually billing for not-billable charges. | In all cases, you can also include not-billable charges in the invoice, which will be displayed in the invoice with a zero billable total amount. This way you can include all the charges without actually billing for not-billable charges. | ||
| Line 273: | Line 305: | ||
<u>Option 1:</u> Go to the Accounts/Tickets/Contracts window, and select Create Invoice... on the QuickBooks drop down toolbar menu. | <u>Option 1:</u> Go to the Accounts/Tickets/Contracts window, and select Create Invoice... on the QuickBooks drop down toolbar menu. | ||
[[File: | [[File:accounts_window_create_invoice_menu.png|center]] | ||
or | or | ||
[[File: | [[File:tickets_window_create_invoice_menu.png|center]] | ||
or | or | ||
[[File: | [[File:contracts_window_create_invoice_menu.png|center]] | ||
<u>Option 2:</u> Go to the File menu, select New and then QuickBooks Invoice. | <u>Option 2:</u> Go to the File menu, select New and then QuickBooks Invoice. | ||
[[File: | [[File:New_quickbooks_invoice_menu.png|center]] | ||
After selecting this option the Generate QuickBooks Invoice dialog box is displayed: | After selecting this option the Generate QuickBooks Invoice dialog box is displayed: | ||
[[File: | [[File:general_new_invoice_window.png|center]] | ||
Select the level at which you want to generate the invoice (either Accounts, Tickets, or Contracts). | Select the level at which you want to generate the invoice (either Accounts, Tickets, or Contracts). | ||
| Line 295: | Line 327: | ||
View all the open Billable charges for the level you selected: | View all the open Billable charges for the level you selected: | ||
[[File: | [[File:all_tickets_to_be_invoiced.png|center]] | ||
In the example above, the Ticket level was selected. All the Tickets with open Billable charges are displayed. Select the Ticket for which you want to create an invoice and click Select Ticket and Continue. | In the example above, the Ticket level was selected. All the Tickets with open Billable charges are displayed. Select the Ticket for which you want to create an invoice and click Select Ticket and Continue. | ||
| Line 301: | Line 333: | ||
After selecting the Account/Contract/Ticket record for which you want to create an invoice, the following window is displayed (this window is also displayed when the Create Invoice... option has been selected from the Account/Contact/Ticket window in Option 1 above): | After selecting the Account/Contract/Ticket record for which you want to create an invoice, the following window is displayed (this window is also displayed when the Create Invoice... option has been selected from the Account/Contact/Ticket window in Option 1 above): | ||
[[File: | [[File:invoice_wizard_step2.gif|center]] | ||
All Billable charges that haven't been billed yet and are related to the selected Account, Contract or Ticket record ( | All Billable charges that haven't been billed yet and are related to the selected Account, Contract or Ticket record (Contract in the example above) are displayed and by default are selected (using the check mark) to be included in the invoice. | ||
In the charge list you can select which charges will be included in the invoice by selecting or unselecting them by clicking on the checkbox to the left of the record. | |||
<br><br> | |||
'''Include/Exclude Not-Billable Charges'''<br> | |||
In addition to the billable charges, you can include Not-billable charges in the invoice. When adding them, Not-Billable charges are displayed in the invoice, however, they do not affect the invoice total. | |||
To include or exclude the not-billable charges click the Include Not-Billable Charge/Exclude Not-Billable toggle Charges button. Note that Administrators can set the system to always include the Not-Billable charges from Tools > Options > QuickBooks. | |||
<br><br> | |||
'''To be Printed/To be Emailed Flags'''<br> | |||
Depending on your QuickBooks edition, Invoices in QuickBooks may include the following options: ‘To be printed’ and ‘To be emailed’. | |||
By default, when creating new invoices from RangerMSP, the values for these options are taken from the default settings in QuickBooks (see the selected 'by QuickBooks' option). When un-checking the 'by QuickBooks' option, you can control the values to be used when generating the QuickBooks Invoice. | |||
See more details in [[QuickBooks_Link#QuickBooks_Link_Settings|QuickBooks Link Settings]]. | |||
{| id="mp-tfp" style="margin:7px 0 0 0; width:100%; background:none;" | {| id="mp-tfp" style="margin:7px 0 0 0; width:100%; background:none;" | ||
| Line 314: | Line 355: | ||
| class="MainPageBG" style="width:50%; border:1px solid #FFCB99; background:#ffffff; vertical-align:top; color:#000;" | | | class="MainPageBG" style="width:50%; border:1px solid #FFCB99; background:#ffffff; vertical-align:top; color:#000;" | | ||
{| id="mp-left" cellpadding="2" cellspacing="5" style="width:100%; vertical-align:top; background:#ffffff;" | {| id="mp-left" cellpadding="2" cellspacing="5" style="width:100%; vertical-align:top; background:#ffffff;" | ||
! <h3 id="mp-tfa-h2" style="margin:0; background:#fff3e1; font-size:120%; font-weight:bold; border:1px solid #FFCB99; text-align:left; color:#000; padding:0.2em 0.4em;">Tip | ! <h3 id="mp-tfa-h2" style="margin:0; background:#fff3e1; font-size:120%; font-weight:bold; border:1px solid #FFCB99; text-align:left; color:#000; padding:0.2em 0.4em;">Tip</h3> | ||
|- | |- | ||
| style="color:#000;" | <div id="mp-tfa">You can use the Quick Select and/or Quick Unselect and/or Advanced Sort buttons to more easily select the Charges to be billed (this is usually required when a lot of charges are displayed). </div> | | style="color:#000;" | <div id="mp-tfa">You can use the Quick Select and/or Quick Unselect and/or Advanced Sort buttons to more easily select the Charges to be billed (this is usually required when a lot of charges are displayed). </div> | ||
| Line 333: | Line 374: | ||
The lines of the invoice are now displayed as they will appear in the QuickBooks invoice. | The lines of the invoice are now displayed as they will appear in the QuickBooks invoice. | ||
[[File: | [[File:invoice_wizard_step3.gif|center]] | ||
In this step you can modify the text which will be displayed on the invoice lines. Note that all modifications made to the invoice lines here are not applied to Charges in | In this step you can modify the text which will be displayed on the invoice lines. Note that all modifications made to the invoice lines here are not applied to Charges in RangerMSP, and only apply to the QuickBooks invoice lines. | ||
'''Move Line Up/Down''' | '''Move Line Up/Down''' | ||
| Line 346: | Line 387: | ||
You can also use the "Incl. in Description" button to include additional information to all invoice line simultaneously, such as: | You can also use the "Incl. in Description" button to include additional information to all invoice line simultaneously, such as: | ||
[[File: | [[File:include_in_description_button.gif|center]] | ||
Click on Incl. in Description and select the data you wish to be added to the description for every invoice line. To add this information to all invoices by default go to Tools > Options > QuickBooks and select the information you want to include in invoice lines. | Click on Incl. in Description and select the data you wish to be added to the description for every invoice line. To add this information to all invoices by default go to Tools > Options > QuickBooks and select the information you want to include in invoice lines. | ||
| Line 354: | Line 395: | ||
As mentioned above, these changes will take affect only on the invoice lines in QuickBooks. The original charges will not be affected by these changes. | As mentioned above, these changes will take affect only on the invoice lines in QuickBooks. The original charges will not be affected by these changes. | ||
[[File: | [[File:edit_invoice_line_description.png|center]] | ||
In the image below, you can see that additional information has appeared in the Description column of the invoice lines. | In the image below, you can see that additional information has appeared in the Description column of the invoice lines. | ||
[[File: | [[File:invoice_wizard_step3_with_changes.gif|center]] | ||
When the invoice information is complete, click Generate QuickBooks Invoice. | When the invoice information is complete, click Generate QuickBooks Invoice. | ||
RangerMSP will now verify all the settings with QuickBooks and will add the QuickBooks invoice. Once an invoice has been created, the following unofficial invoice will be displayed. This invoice is just to give you an idea of how the invoice was created in QuickBooks. For complete details, view the invoice details in QuickBooks. | |||
[[File: | [[File:Quickbooks_invoice_details.png|center]] | ||
If you wish to create another invoice, click on Create New Invoice'. Otherwise, you can close the window. | If you wish to create another invoice, click on Create New Invoice'. Otherwise, you can close the window. | ||
| Line 370: | Line 411: | ||
The invoice we've created looks like the following in QuickBooks: | The invoice we've created looks like the following in QuickBooks: | ||
[[File: | [[File:Quickbooks_invoice_in_quickbooks.png|center]] | ||
== Using the | == Using the RangerMSP-QuickBooks Link == | ||
At this stage, where the | At this stage, where the RangerMSP-QuickBooks Link installation setup is complete, you can start using it. | ||
A few clicks will allow you to sync information between the two programs. Thus saving a lot of time and increasing productivity. | A few clicks will allow you to sync information between the two programs. Thus saving a lot of time and increasing productivity. | ||
The first stage after the installation is to import Customers, Vendors and Items from QuickBooks into | The first stage after the installation is to import Customers, Vendors and Items from QuickBooks into RangerMSP.<br>Please note that you can easily perform the imports (as explained below). | ||
However, we strongly recommend to backup | However, we strongly recommend to backup RangerMSP data prior to the imports. | ||
You should backup <server>\ | You should backup <server>\RangerMSP\DB folder including all files while no one is using RangerMSP. | ||
<u>Note:</u> If you are already using | <u>Note:</u> If you are already using RangerMSP for a while and already have all your customers and items record in RangerMSP you should match RangerMSP records with QuickBooks records '''instead''' of importing the records (importing the records in this case will only create duplicates in your database and therefore it should be avoided). To learn more about how to link existing records between the two systems see [[QuickBooks Link Account Options|Link Account to QuickBooks Customer/Job/Vendor Record]] or [[QuickBooks Link Account Options|click here]]. | ||
===Accounts=== | ===Accounts=== | ||
Your company has ongoing interactions with customers, vendors, business partners, friends, leads, and so on. In | Your company has ongoing interactions with customers, vendors, business partners, friends, leads, and so on. In RangerMSP, each of these types of contacts is called an Account. You can manage your Account contact data and all other related data in the Accounts window. | ||
In Accounts, related data is any information related to the Account that is presently being managed in | In Accounts, related data is any information related to the Account that is presently being managed in RangerMSP, such as scheduled Appointments, open Tasks, Phone Call monitoring, Ticket/incident history, Assets (customer equipment and software licenses), Charges, linked Documents (MS-Word, emails, Excel etc.), Sales Opportunities and so on. | ||
Account information is organized in separate information tabs that display different types of data. | Account information is organized in separate information tabs that display different types of data. | ||
| Line 396: | Line 437: | ||
Accounts can be easily imported from QuickBooks, and changes can be synchronized between both systems. | Accounts can be easily imported from QuickBooks, and changes can be synchronized between both systems. | ||
For more details see [[QuickBooks Link Account Options| | For more details see [[QuickBooks Link Account Options|RangerMSP-QuickBooks Link Account Options.]] | ||
===Items=== | ===Items=== | ||
[[Items]] in | [[Items]] in RangerMSP are a catalog of all the services and products you offer. The Items list in RangerMSP acts as your price list. | ||
Each Item has a unique Code, Name, Description and Pricing Setting. | Each Item has a unique Code, Name, Description and Pricing Setting. | ||
There are three types of Items in | There are three types of Items in RangerMSP: | ||
'''Parts''' Items are hardware, software, or any other items you ship to your customer. These items have fixed prices. | '''Parts''' Items are hardware, software, or any other items you ship to your customer. These items have fixed prices. | ||
| Line 411: | Line 452: | ||
'''Expense''' Items are used to charge expenses, such as travel and special deliveries. Expense Items can have a fixed price per unit or a fixed hourly rate. | '''Expense''' Items are used to charge expenses, such as travel and special deliveries. Expense Items can have a fixed price per unit or a fixed hourly rate. | ||
For each new Charge record, an Item is selected and the relevant Item data is automatically copied to the new charge. This streamlines your data entry process. Also, the selected Item for a Charge in | For each new Charge record, an Item is selected and the relevant Item data is automatically copied to the new charge. This streamlines your data entry process. Also, the selected Item for a Charge in RangerMSP will be the Item that appears on the QuickBooks invoice line when the Charge is transferred to a QuickBooks invoice. | ||
Items can be Active or Suspended. A suspended Item cannot be selected when adding new charges. | Items can be Active or Suspended. A suspended Item cannot be selected when adding new charges. | ||
Items can be easily imported from QuickBooks, and changes can be synchronized between QuickBooks and | Items can be easily imported from QuickBooks, and changes can be synchronized between QuickBooks and RangerMSP. | ||
For more details see [[QuickBooks Link Items Options]]. | For more details see [[QuickBooks Link Items Options]]. | ||
===Invoices=== | ===Invoices=== | ||
With the | With the '''RangerMSP-QuickBooks Link''' you can create invoices in QuickBooks based on charges entered in RangerMSP. | ||
This feature allows you to manage all the aspects of your service in one program: | This feature allows you to manage all the aspects of your service in one program: '''RangerMSP'''. You can manage Tickets, enter Charges, etc. in RangerMSP, while all billing is managed in QuickBooks. | ||
QuickBooks invoices can easily be created from | QuickBooks invoices can easily be created from RangerMSP at the customer level, the service contract level and the ticket level. | ||
All invoices created from | All invoices created from RangerMSP are based on Charge records added in RangerMSP. Each Charge record is either a labor charge for work performed, a parts charge describing a part that has been used, or an expense charge for expenses spent on behalf of the customer, i.e. for special deliveries. | ||
It is recommended that you familiarize yourself with the following terms in | It is recommended that you familiarize yourself with the following terms in RangerMSP: | ||
<u>[[Tickets]]</u> – Every incident, problem, or job you handle for a customer is managed in | <u>'''[[Tickets]]'''</u> – Every incident, problem, or job you handle for a customer is managed in RangerMSP using a Ticket record. Click here to learn more. | ||
<u>[[Contracts]]</u> – Contract records are used to manage your service contracts and track their status. Click here to learn more. | <u>'''[[Contracts]]'''</u> – Contract records are used to manage your service contracts and track their status. Click here to learn more. | ||
<u>[[Charges]]</u> – Charge records are used to track all activities that will be charged to customers, such as labor, parts and expenses. Click here to learn more. | <u>'''[[Charges]]'''</u> – Charge records are used to track all activities that will be charged to customers, such as labor, parts and expenses. Click here to learn more. | ||
To learn all about creating invoices from RangerMSP, see [[QuickBooks Link Invoice Creation Options]]. | |||
====Batch Invoice Creation==== | |||
The Batch Invoice Creation Wizard allows you to create many invoices at once at the customer level, the service contract level or the ticket level. This can save you a large amount of time allowing you to invoice many tickets or customers at once. | |||
To learn on how to activate the Batch Invoice Creation Wizard, see [[QuickBooks_Link_Invoice_Creation_Options#Batch_Invoice_Creation|Batch Invoice Creation]]. | |||
===Charges=== | ===Charges=== | ||
Tracking Charges is a key factor for running your service business well and improving its performance. Most employees, however, consider this to be a nuisance or a burden, which makes it difficult to maximize your full income potential. | Tracking Charges is a key factor for running your service business well and improving its performance. Most employees, however, consider this to be a nuisance or a burden, which makes it difficult to maximize your full income potential. | ||
Three types of Charges can be tracked in | Three types of Charges can be tracked in RangerMSP: | ||
<blockquote>Labor Charges for services provided<br>Expense Charges for expenses such as travel and delivery<br>Parts Charges for parts or products used</blockquote> | <blockquote>Labor Charges for services provided<br>Expense Charges for expenses such as travel and delivery<br>Parts Charges for parts or products used</blockquote> | ||
| Line 453: | Line 499: | ||
Once a charged has been included in an invoice, the Charge record is set as Billed, and you can view the QuickBooks invoice reference number in the charge window. This prevents a customer from being billed again for the same Charge. | Once a charged has been included in an invoice, the Charge record is set as Billed, and you can view the QuickBooks invoice reference number in the charge window. This prevents a customer from being billed again for the same Charge. | ||
Adding a Charge is easy and this can be done in | Adding a Charge is easy and this can be done in RangerMSP’s Main menu, the Tickets window (recommended), the Charges main window, or the Account window. Charges can also be added from anywhere using a web browser and an Internet connection, for this you need [[Web Interface|RangerMSP Web Interface]]. | ||
Use Items to speed up the process of entering new Charges. When an Item is selected for a Charge, its description and price are automatically copied into the relevant fields in the Charge record. | Use Items to speed up the process of entering new Charges. When an Item is selected for a Charge, its description and price are automatically copied into the relevant fields in the Charge record. | ||
| Line 460: | Line 506: | ||
For more details see [[QuickBooks Link Charges Options]]. | For more details see [[QuickBooks Link Charges Options]]. | ||
==QuickBooks Link Settings== | |||
QuickBooks Link Settings can be defined from Tools > Options > QuickBooks tab. | |||
[[File:options_quickbooks_tab.png]] | |||
<br><br> | |||
In this window the following settings are available: | |||
* '''Accounting Package to be integrated with RangerMSP''' | |||
** None – means you do not want to integrate with any system | |||
** QuickBooks Desktop– choosing this option you should specify the QuickBooks Desktop edition you use: | |||
*** Edition: US, UK or Canada. Note that users working with the QuickBooks Australia edition or with Reckon Accounts (formerly QuickBooks Australia) should select US in this field (the Australian edition provides the API to external system compatible with the US edition). | |||
*** QBFC: this is the QuickBooks API package. By default the system uses the latest QBFC edition. For very old QuickBooks editions you may need to change the QBFC edition being used. See more details in [[QuickBooks_Link_Troubleshooting|QuickBooks Troubleshooting]]. | |||
** QuickBooks Online - select this option to connect to your QuickBooks Online company | |||
* '''QuickBooks Company File''' (for QuickBooks Desktop) or '''QuickBooks Online Company''' (for QuickBooks Online)<br>Once running the setup wizard (see below) and choosing the company file for QuickBooks Desktop or connecting to QuickBooks Onlince Company, the selected file/company name will appear here. This way you can see at all times which file/company is being used when syncing with QuickBooks. | |||
* '''Invoice Charges''' <br>These settings define which charges will be included in invoices by default. All Billable charges that haven't been billed yet and are related to the selected Account, Contract or Ticket record are included in the invoice by default. It is possible to include Not-billable charges in the invoice as well, if you wish to show the customer work performed which is not being billed (e.g. when it is covered by a service contract). When including not-billable charges in the invoice, they do not affect the invoice total amount.<br><br>Not-billable charges can be added to the invoice on-the-fly from the Invoice Creation Wizard, or you can set the system to always include the not-billable charges in invoices. <br><br>Possible options: | |||
**'''Display and automatically select not-billable charges''' <br>Selecting this option will always include all not-billable charges in invoices. | |||
**'''Display not-billable charges; do not automatically select them''' <br>Selecting this option will always show the not-billable charges in the Invoice Creation Wizard window, however, these charge will remain un-selected, unless you explicitly select to include them in the Invoice. | |||
**'''Hide not-billable charges''' <br>Selecting this option will never hide the not-billable charges. You can have them included manually while creating the Invoice in the Invoice Creation Wizard.<br>See more details on setting options when running the Invoice Creation Wizard in [[QuickBooks_Link_Invoice_Creation_Options|Invoice Creation Options]].<br><br> | |||
* '''QuickBooks Desktop Options: To be Printed & To be Emailed''' <br>Depending on your QuickBooks edition, Invoices in QuickBooks may include the following options: ‘To be printed’ and ‘To be emailed’.<br><br> By default, when creating new invoices from RangerMSP, the values for these options are taken from the default settings in QuickBooks. Using the flags in this options window, you can define default values to be used when generating QuickBooks Invoices from within RangerMSP.<br> | |||
** '''To be Printed''' – | |||
*** By QuickBooks (default) – choosing this option will take the value for this flag from the settings defined in QuickBooks. | |||
*** Yes – choosing Yes will always set the To be Printed as Yes for new invoices created from RangerMSP. | |||
*** No - choosing No will always set the To be Printed as No for new invoices created from RangerMSP. <br>Note that these values can be modified on-the-fly when creating the invoice using the Invoice Creation Wizard. | |||
** '''To be Emailed''' - | |||
*** By QuickBooks (default) – choosing this option will take the value for this flag from the settings defined in QuickBooks. | |||
*** Yes – choosing Yes will always set the To be Printed as Yes for new invoices created from RangerMSP. | |||
*** No - choosing No will always set the To be Printed as No for new invoices created from RangerMSP. <br>Note that these values can be modified on-the-fly when creating the invoice using the Invoice Creation Wizard. | |||
To view additional properties, scroll down as shown in the following screenshot: | |||
[[File:Options_quickbooks_tab_advanced_settings.png]] | |||
* '''Invoice Lines Content''' <br> Here you can select which data you want to include in each invoice line. This will affect all invoices being created via the QuickBooks Invoice Creation Wizard. <br>Data which can be added to Invoices: | |||
** Date | |||
** Date & Time | |||
** Employee name | |||
** Ticket Number | |||
** Contract Code | |||
** Item Code | |||
** Item Name | |||
** Insert blank lines between each invoice line | |||
* '''Advanced Settings''' <br>The Advanced Settings deal with default items created in QuickBooks for un-synced items. In cases when charged Items in RangerMSP were not synchronized with QuickBooks Item, the invoice cannot be created because can't link to an Item in QuickBooks. To make the invoicing process easier and smoother, RangerMSP-QuickBooks Link automatically creates default Items in QuickBooks for such cases. These items can be managed in this window. See more details in [[QuickBooks_Link_Invoice_Creation_Options#Using_Special_QuickBooks_Items_and_Accounts|Using Special QuickBooks Items and Accounts]]. | |||
==See Also== | ==See Also== | ||
| Line 469: | Line 555: | ||
**[[QuickBooks Link Advanced Topics#Changing Path/Company File|Changing Path/Company File]] | **[[QuickBooks Link Advanced Topics#Changing Path/Company File|Changing Path/Company File]] | ||
**[[QuickBooks Link Advanced Topics#Starting a New Financial Year in QuickBooks|Starting a New Financial Year in QuickBooks]] | **[[QuickBooks Link Advanced Topics#Starting a New Financial Year in QuickBooks|Starting a New Financial Year in QuickBooks]] | ||
**[[QuickBooks Link Advanced Topics#Introduction to | **[[QuickBooks Link Advanced Topics#Introduction to RangerMSP Service Tickets|Introduction to RangerMSP Service Tickets]] | ||
**[[QuickBooks Link Advanced Topics#Introduction to Contracts|Introduction to Contracts]] | **[[QuickBooks Link Advanced Topics#Introduction to Contracts|Introduction to Contracts]] | ||
**[[QuickBooks Link Advanced Topics#Detailed Installation Instructions for | **[[QuickBooks Link Advanced Topics#Detailed Installation Instructions for RangerMSP-QuickBooks Link|Detailed Installation Instructions for RangerMSP-QuickBooks Link]] | ||
*[[Billing]] | *[[Billing]] | ||
*[[QuickBooks FAQ]] | *[[QuickBooks FAQ]] | ||
*[[QuickBooks_Link_Troubleshooting|RangerMSP QuickBooks Link Troubleshooting]] | |||
*[[Switching_to_QuickBooks_Online_from_QuickBooks_Desktop|Switching to QuickBooks Online from QuickBooks Desktop]] | |||
[[Category:Setup]] | [[Category:Setup]] | ||
[[Category:User Manuals]] | [[Category:User Manuals]] | ||
[[Category:Billing]] | [[Category:Billing]] | ||
Latest revision as of 09:41, 22 May 2025
Overview
Using the RangerMSP-QuickBooks Link you can run your computer services business more efficiently. It was designed to simplify routine business, accounting and financial management tasks. With the RangerMSP-QuickBooks Link, you only need to enter data once and it will appear in both RangerMSP and QuickBooks. This feature not only saves you the time of manually entering data, but it also minimizes the problems of duplicate, redundant and wrong data common to manual data entry. Now you can synchronize your data between RangerMSP and QuickBooks and ensure data accuracy, enhance your flexibility, and increase your control over your bottom line.
This user manual will help you use the features included in the RangerMSP-QuickBooks Link module.
The RangerMSP-QuickBooks Link includes the following features:
Customers
- Import all your QuickBooks Customers into RangerMSP
- Changes made to QuickBooks Customers can be synchronized with RangerMSP
- Create a new Customer in QuickBooks based on a selected RangerMSP Account
- Create links between existing RangerMSP Accounts and QuickBooks Customers to automate synchronization between them
- Send and receive updates for selected Accounts/Customers
Vendors
- Import all your QuickBooks Vendors into RangerMSP
- Changes made to QuickBooks Vendors can be synchronized with RangerMSP
- Create a new Account in RangerMSP based on a selected QuickBooks Vendor
- Create a new Vendor in QuickBooks based on a selected RangerMSP Account
- Create links between existing RangerMSP Accounts and QuickBooks Vendors to automate synchronization between them
- Send and receive updates for selected Accounts/Vendors
Items
- Import any/all of the following QuickBooks Items into RangerMSP:
- Service Items => Labor Items in RangerMSP
- Inventory Parts => Products/Parts in RangerMSP
- Non-Inventory Parts => Products/Parts in RangerMSP
- Inventory Assembly Items => Products/Parts in RangerMSP
- Other Charge Items => Expenses in RangerMSP
- Changes made to QuickBooks Items can be synchronized with RangerMSP
- Create a new Item in RangerMSP based on a selected QuickBooks Item
- Create a new Item in QuickBooks based on a selected RangerMSP Item
- Create links between existing RangerMSP Items and QuickBooks Items to automate synchronization between them
- Send and receive updates for selected Items
Invoices
- Generate QuickBooks invoices based on charges entered in RangerMSP
- Generate invoices at different levels:
- Account - Invoices generated at the Account level may include any charges linked to this account, its contracts and tickets.
- Contract - Generating an invoice at the Contract level may include only charges which are linked to this specific contract
- Ticket - Generating an invoice at the Ticket level may include only charges which are linked to this specific ticket
- See total unbilled pending charges according to Account, Contract and Ticket
- Select which charges to include in the invoice
- Create a QuickBooks invoice directly from the Account, Contract, or Ticket windows
- View all charges included in a QuickBooks invoice by filtering charges by the invoice reference value
Getting Started
To enjoy the benefits of the RangerMSP-QuickBooks Link you first need to set it up. The setup is a user-friendly process that walks you through all the necessary steps to completion.
Supported Editions
Please note that currently RangerMSP synchronizes with the following versions and editions of QuickBooks:
The following editions of QuickBooks Online are supported: Australia, Canada, United Kingdom, United States (requires RangerMSP 25.0.0.5 or above)
The following US versions of QuickBooks Desktop are supported:
- QuickBooks Enterprise 24.0 (requires RangerMSP 30 or above)
- QuickBooks Desktop 2024 (requires RangerMSP 30 or above)
- QuickBooks Pro 2023 (requires RangerMSP 30 or above)
- QuickBooks Pro 2022 (requires RangerMSP 30 or above)
- QuickBooks Premier 2022 (requires RangerMSP 30 or above)
- QuickBooks Pro 2021 (requires RangerMSP 27 or above)
- QuickBooks Premier 2021 (requires RangerMSP 27 or above)
- QuickBooks Pro 2020 (requires RangerMSP 25 or above)
- QuickBooks Premier 2020 (requires RangerMSP 25 or above)
- QuickBooks Pro 2019 (requires RangerMSP 21 or above)
- QuickBooks Premier 2019 (requires RangerMSP 21 or above)
- QuickBooks Pro 2018 (requires RangerMSP 17 or above)
- QuickBooks Premier 2018 (requires RangerMSP 17 or above)
- QuickBooks Enterprise 2018 (requires RangerMSP 18 or above)
- QuickBooks Pro 2017 (requires RangerMSP 15 or above)
- QuickBooks Premier 2017 (requires RangerMSP 15 or above)
- QuickBooks Enterprise 2017 (requires RangerMSP 15 or above)
- QuickBooks Pro 2016 (requires RangerMSP 10 or above)
- QuickBooks Premier 2016 (requires RangerMSP 10 or above)
- QuickBooks Enterprise 2016 (requires RangerMSP 10 or above)
- QuickBooks Pro 2015 (requires RangerMSP 9 or above)
- QuickBooks Premier 2015 (requires RangerMSP 9 or above)
- QuickBooks Enterprise 2015 (requires RangerMSP 9 or above)
- QuickBooks Pro 2014 (requires RangerMSP 7.0 or above)
- QuickBooks Premier 2014 (requires RangerMSP 7.0 or above)
- QuickBooks Enterprise 2014 (requires RangerMSP 7.0 or above)
- QuickBooks Pro 2013 (requires RangerMSP 5.5 or above)
- QuickBooks Premier 2013 (requires RangerMSP 5.5 or above)
- QuickBooks Enterprise 2013 (requires RangerMSP 5.5 or above)
- QuickBooks Pro 2012 (requires RangerMSP 5.5 or above)
- QuickBooks Premier 2012 (requires RangerMSP 5.5 or above)
- QuickBooks Enterprise 2012 (requires RangerMSP 5.5 or above)
- QuickBooks Pro 2011 (requires RangerMSP 5.5 or above)
- QuickBooks Premier 2011 (requires RangerMSP 5.5 or above)
- QuickBooks Enterprise 2011 (requires RangerMSP 5.5 or above)
- QuickBooks Pro 2010
- QuickBooks Premier 2010
- QuickBooks Enterprise 2010
- QuickBooks Pro 2009
- QuickBooks Premier 2009
- QuickBooks Enterprise 2009
- QuickBooks Pro 2008
- QuickBooks Premier 2008
- QuickBooks Enterprise 2008
Note for QuickBooks 2009, or above, users:
RangerMSP 4.5, or above, is required to integrate with QuickBooks 2009.
RangerMSP-QuickBooks Link uses a single currency. Multi-currency is not supported.
The following Canadian versions of QuickBooks Desktop are supported: supported:
- QuickBooks Canada Pro 2022 (requires RangerMSP 30 or above)
- QuickBooks Canada Premier 2022 (requires RangerMSP 30 or above)
- QuickBooks Canada Pro 2021 (requires RangerMSP 27 or above)
- QuickBooks Canada Premier 2021 (requires RangerMSP 27 or above)
- QuickBooks Canada Pro 2020 (requires RangerMSP 25 or above)
- QuickBooks Canada Premier 2020 (requires RangerMSP 25 or above)
- QuickBooks Canada Pro 2019 (requires RangerMSP 21 or above)
- QuickBooks Canada Premier 2019 (requires RangerMSP 21 or above)
- QuickBooks Canada Pro 2018 (requires RangerMSP 17 or above)
- QuickBooks Canada Premier 2018 (requires RangerMSP 17 or above)
- QuickBooks Canada Pro 2017 (requires RangerMSP 15 or above)
- QuickBooks Canada Premier 2017 (requires RangerMSP 15 or above)
- QuickBooks Canada Pro 2016 (requires RangerMSP 10.0 or above)
- QuickBooks Canada Premier 2016 (requires RangerMSP 10.0 or above)
- QuickBooks Canada Pro 2015 (requires RangerMSP 9.0 or above)
- QuickBooks Canada Premier 2015 (requires RangerMSP 9.0 or above)
- QuickBooks Canada Pro 2014 (requires RangerMSP 7.0 or above)
- QuickBooks Canada Premier 2014 (requires RangerMSP 7.0 or above)
- QuickBooks Canada Pro 2013
- QuickBooks Canada Premier 2013
- QuickBooks Canada Pro 2012
- QuickBooks Canada Premier 2012
- QuickBooks Canada Pro 2011
- QuickBooks Canada Premier 2011
- QuickBooks Canada Pro 2010
- QuickBooks Canada Premier 2010
- QuickBooks Canada Pro 2009
- QuickBooks Canada Premier 2009
- QuickBooks Canada Pro 2008
- QuickBooks Canada Premier 2008
The following UK versions of QuickBooks Desktop are supported:
- QuickBooks UK Pro 2022 (requires RangerMSP 30 or above)
- QuickBooks UK Premier 2022 (requires RangerMSP 30 or above)
- QuickBooks UK Pro 2021 (requires RangerMSP 27 or above)
- QuickBooks UK Premier 2021 (requires RangerMSP 27 or above)
- QuickBooks UK Pro 2020 (requires RangerMSP 25 or above)
- QuickBooks UK Premier 2020 (requires RangerMSP 25 or above)
- QuickBooks UK Pro 2019 (requires RangerMSP 21 or above)
- QuickBooks UK Premier 2019 (requires RangerMSP 21 or above)
- QuickBooks UK Pro 2018 (requires RangerMSP 17 or above)
- QuickBooks UK Premier 2018 (requires RangerMSP 17 or above)
- QuickBooks UK Pro 2017 (requires RangerMSP 15 or above)
- QuickBooks UK Premier 2017 (requires RangerMSP 15 or above)
- QuickBooks UK Pro 2016 (requires RangerMSP 10 or above)
- QuickBooks UK Premier 2016 (requires RangerMSP 10 or above)
- QuickBooks UK Pro 2015 (requires RangerMSP 9 or above)
- QuickBooks UK Premier 2015 (requires RangerMSP 9 or above)
- QuickBooks UK Pro 2014 (requires RangerMSP 9 or above)
- QuickBooks UK Premier 2014 (requires RangerMSP 9 or above)
- QuickBooks UK Pro 2013
- QuickBooks UK Premier 2013
- QuickBooks UK Pro 2012
- QuickBooks UK Premier 2012
- QuickBooks UK Pro 2011
- QuickBooks UK Premier 2011
- QuickBooks UK Pro 2010
- QuickBooks UK Premier 2010
- QuickBooks UK Pro 2008
The following Australian versions of QuickBooks are supported (*):
- Reckon Accounts (formerly QuickBooks Australia) Pro, Premier, Enterprise 2014-2017 (requires RangerMSP 9 or above)
- QuickBooks Pro 2013
- QuickBooks Premier 2013
- QuickBooks Pro 2012
- QuickBooks Premier 2012
- QuickBooks Pro 2010/11
- QuickBooks Premier 2010/11
- QuickBooks Pro 2009/10
- QuickBooks Premier 2009/10
- QuickBooks Pro 2008/9
- QuickBooks Premier 2008/9
*The integration with QuickBooks Australia was tested and works in US compatibility mode.
[multi user mode is supported]
Installation Instructions
QuickBooks Desktop
To setup the integration with QuickBooks Desktop and connect to your company file please follow QuickBooks Desktop Link Installation Instructions
QuickBooks Online
To connect to your QuickBooks Online company please follow QuickBooks Online Link Configuration Instructions
Switching to QuickBooks Online from QuickBooks Desktop
Please click here to learn about switching from integrating RangerMSP with QuickBooks Desktop to integrating with QuickBooks Online.
Importing Customers/Vendors from QuickBooks into RangerMSP for the First Time
This section will show you how to import your Customers into RangerMSP.
Important note: If all your Customers are already in RangerMSP, do not use this import feature until you have created links between existing records in RangerMSP and their related records in QuickBooks. To learn more about how to create these links, click here.
Note that before performing a batch import, it is recommended that you first back up all your RangerMSP data. The RangerMSP data is stored in <server>RangerMSP\DB.
After backing up your data, follow the instructions below to import Customers/Vendors from QuickBooks into RangerMSP:
In the Accounts window, go to the QuickBooks drop down toolbar menu and select Import New Records/Update Linked Records from QuickBooks.
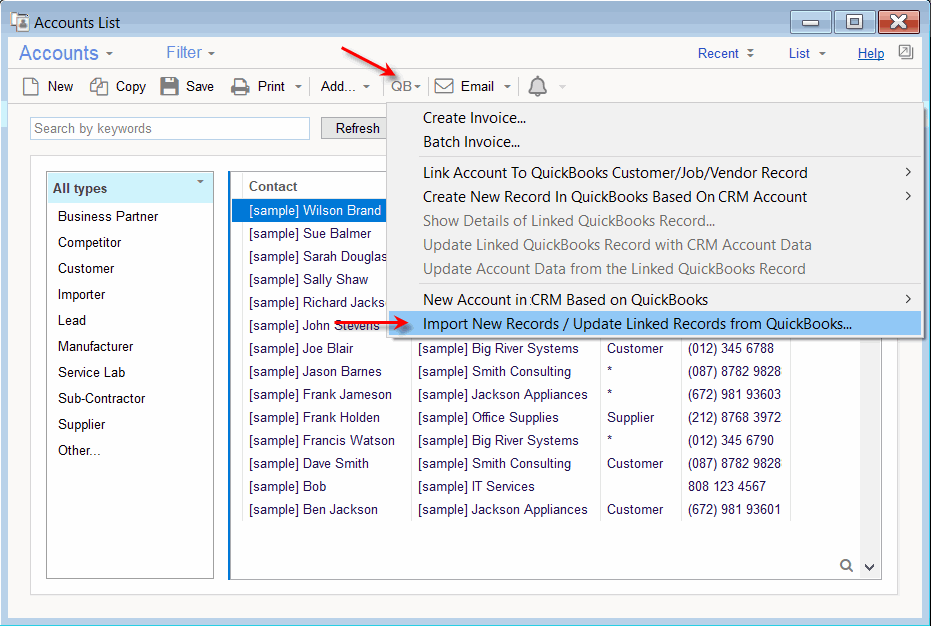

If you have backed up your RangerMSP Data, click OK to continue with the import process.
The import wizard will ask you to select the QuickBooks records you would like to import into RangerMSP. By default, only active Customers are imported. If you want to import your vendors as well, follow the import wizard again once you have completed importing your Customers, and select Vendors.
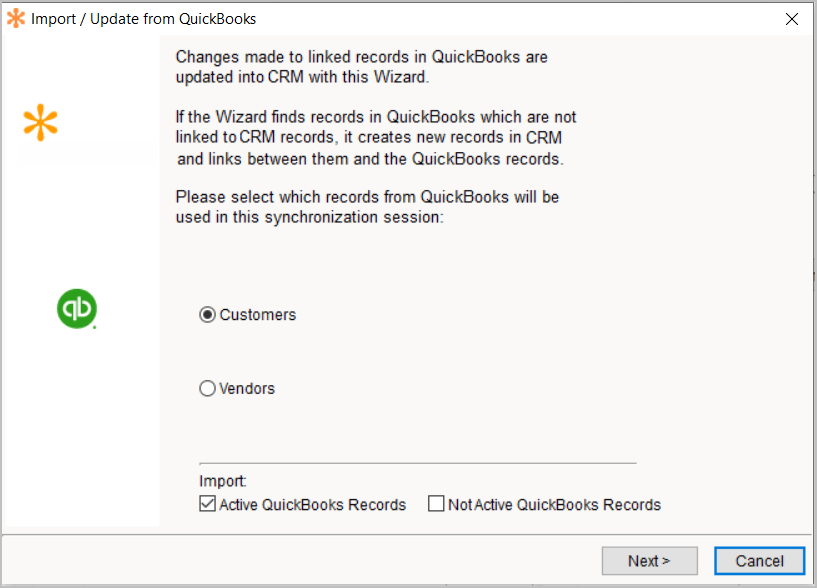
Select the type of QuickBooks records you want to import, and click Next.
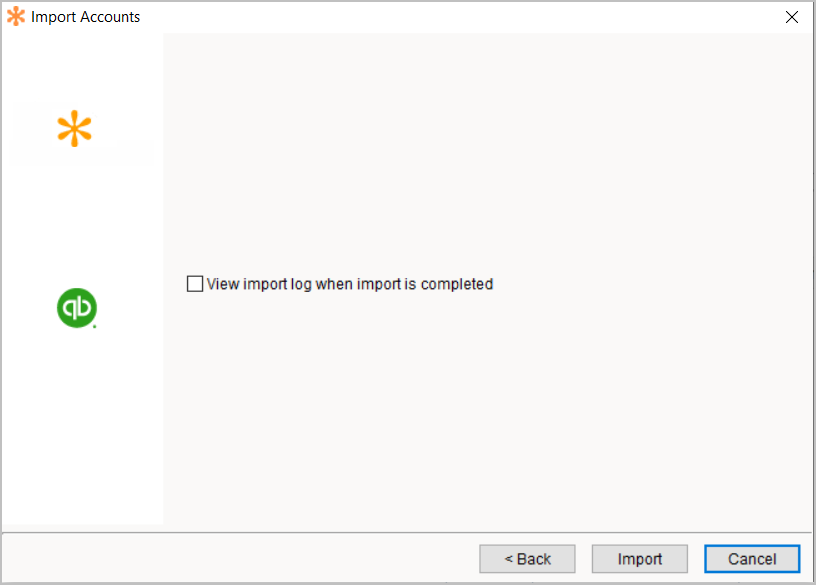
Click Finish.
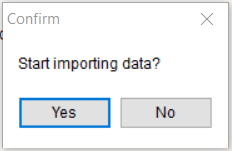
Click Yes to begin importing the data.
The import process will begin.

Wait till the records are imported from QuickBooks to RangerMSP:
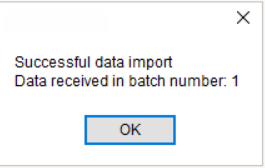
Click OK.
The import has finished. You can now see all the imported records in RangerMSP in the Accounts window:
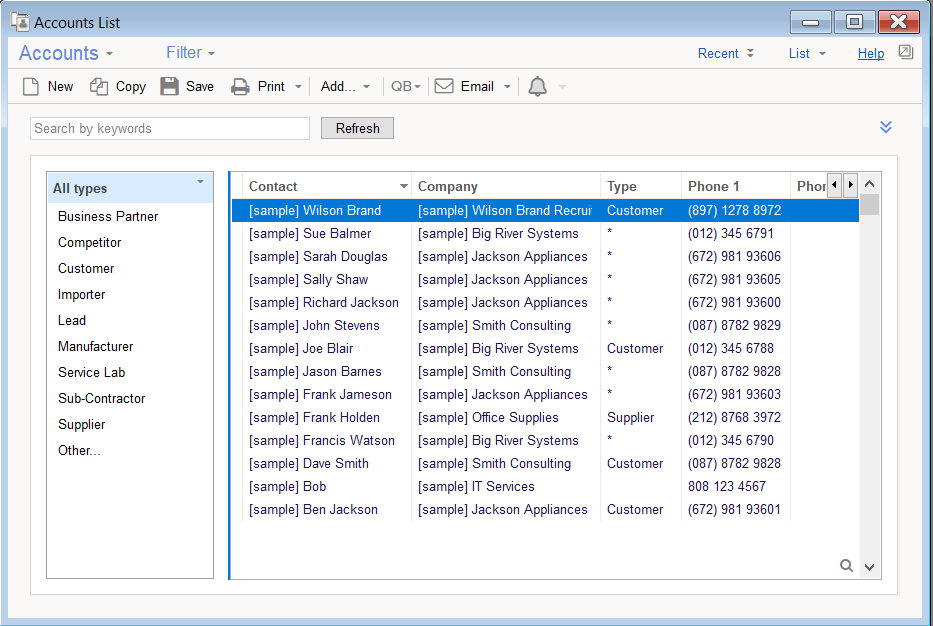
Please note that QuickBooks Jobs are not imported in batch imports from QuickBooks. You can import jobs on one by one basis using the 'New Account in RangerMSP Based on QuickBooks' menu option.
Importing Items from QuickBooks into RangerMSP
This section will show you how to import your QuickBooks Items into RangerMSP.
Important Note: If all your Items are already in RangerMSP, do not use this import feature until you have created links between existing records in RangerMSP and their related records in QuickBooks. To learn more about how to create these links, click here.
Every Labor/Parts/Expense Charge in RangerMSP is based on a selected Item. This is why Items are important to the entire billing process. The RangerMSP-QuickBooks Link enables you to import all your Items from QuickBooks, saving you from retyping Item details in RangerMSP.
Note that before performing a batch import, it is recommended that you first back up all your RangerMSP data. The RangerMSP data is stored in <server>RangerMSP\DB.
After backing up your data follow the instructions below to import Items from QuickBooks into RangerMSP:
In the Items window, go to the QuickBooks drop down toolbar menu and select Import New Records/Update Linked Records from QuickBooks.
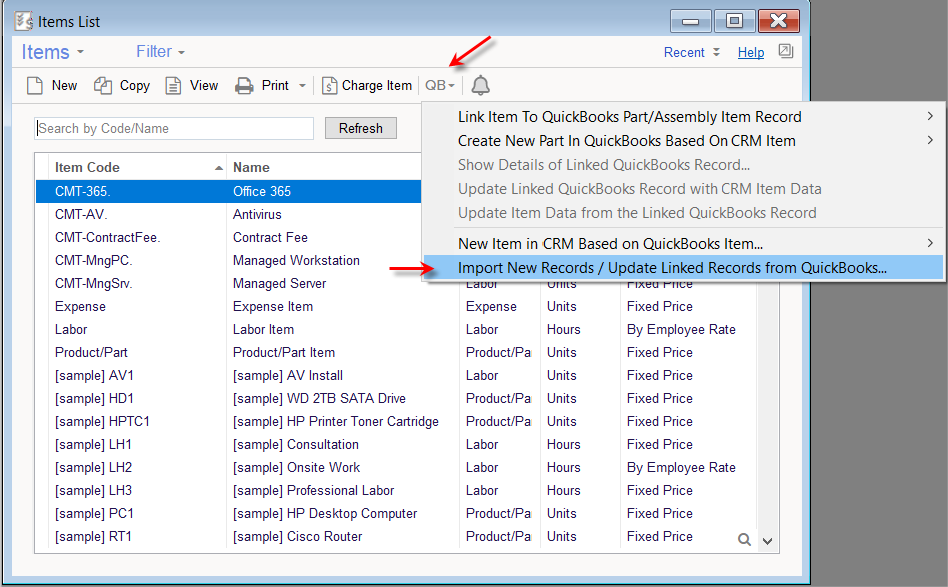

If you have backed up your RangerMSP Data, click OK to continue with the import process.
The import wizard will ask you to select the QuickBooks records you would like to import into RangerMSP. By default, all active Items are imported.
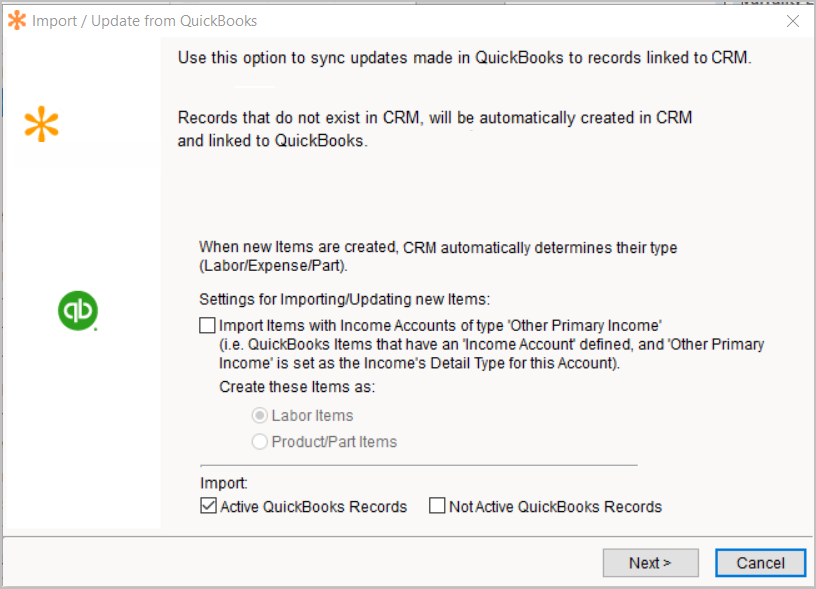
Select the types of Items you want to import from QuickBooks and click Next.
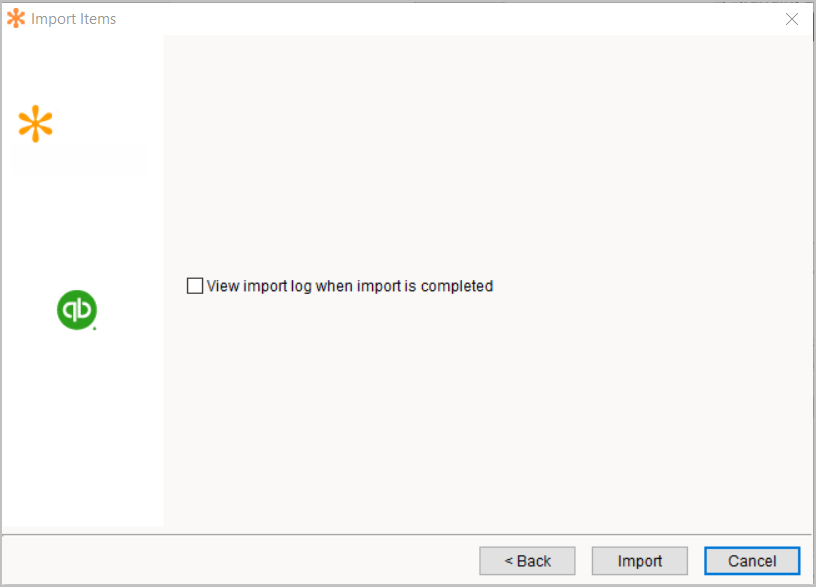
Click Finish.

Click Yes to begin importing the data.
The import process will begin.

Wait until the record are imported from QuickBooks to RangerMSP:

Click OK.
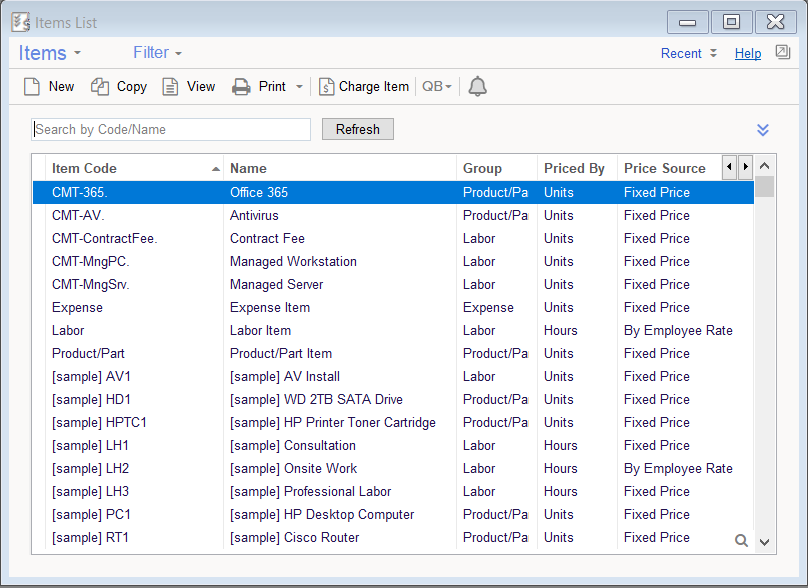
The import has finished. You can now see all the imported records in RangerMSP, in the Items window.
Creating a New Invoice in QuickBooks
RangerMSP lets you create QuickBooks Invoices at the Account/Ticket/Contract levels.
If you create an invoice at the Account level, all Billable charges related to the Account that haven't been billed yet will be included in the invoice, including charges related to Tickets and Contracts.
If you create an invoice at the Contract level, only Billable charges that haven't been billed yet which are related to the selected Contract will be included in the invoice, including all Ticket-related charges.
If you create an invoice at the Ticket level, only Billable charges that haven't been billed yet which are related to the selected Ticket will be included in the invoice.
In all cases, you can also include not-billable charges in the invoice, which will be displayed in the invoice with a zero billable total amount. This way you can include all the charges without actually billing for not-billable charges.
There are two ways to create an invoice. The first option is creating an invoice for a specific Account, Ticket or Contract, and the second option is creating invoices for open balances in general.
Option 1: Go to the Accounts/Tickets/Contracts window, and select Create Invoice... on the QuickBooks drop down toolbar menu.
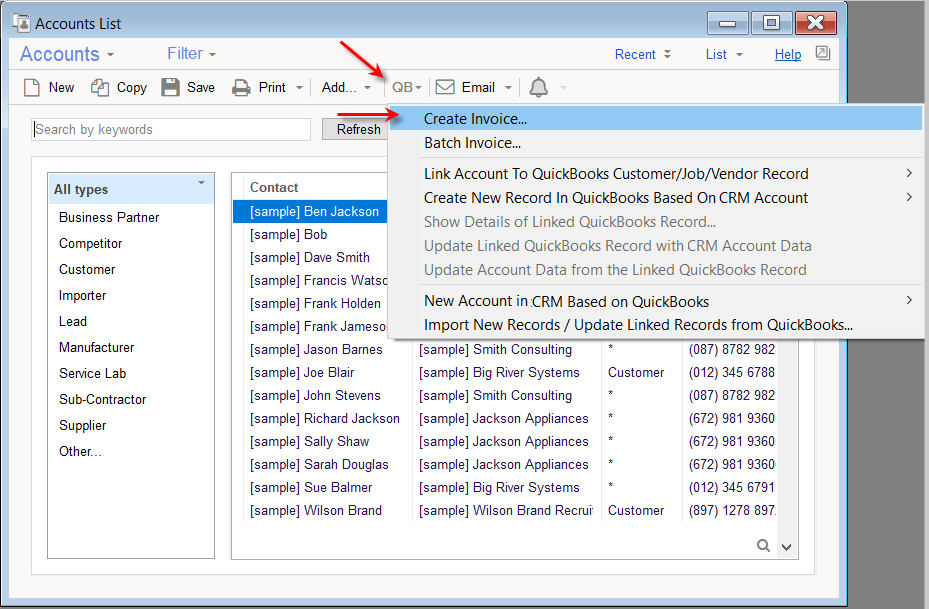
or

or

Option 2: Go to the File menu, select New and then QuickBooks Invoice.
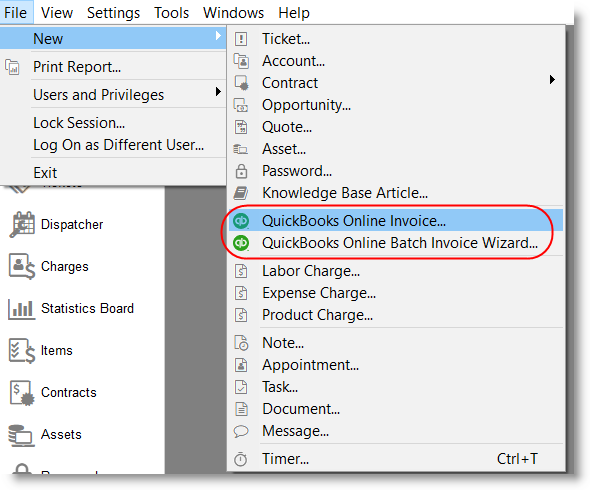
After selecting this option the Generate QuickBooks Invoice dialog box is displayed:
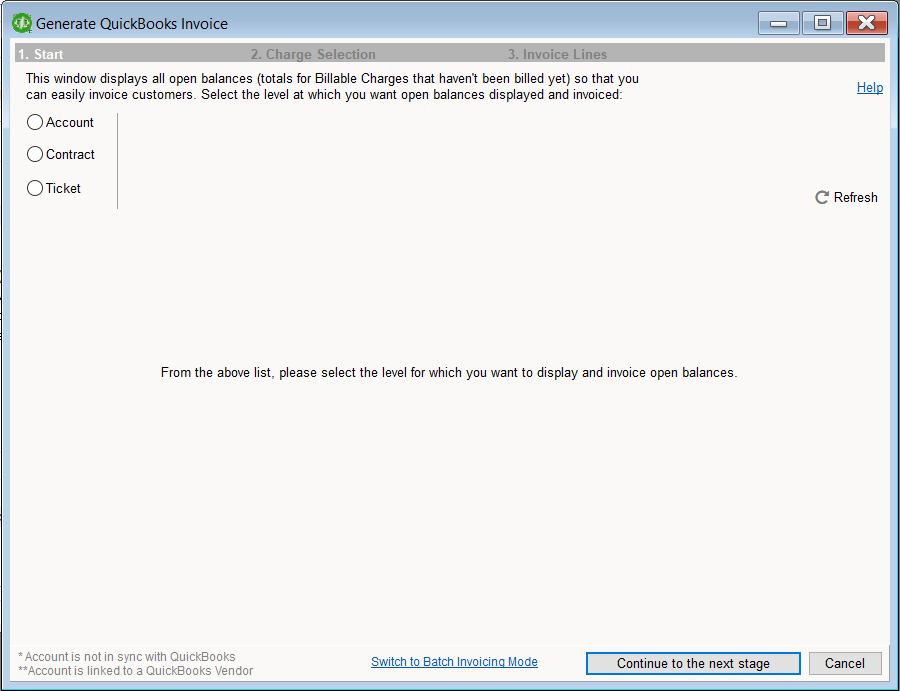
Select the level at which you want to generate the invoice (either Accounts, Tickets, or Contracts).
View all the open Billable charges for the level you selected:
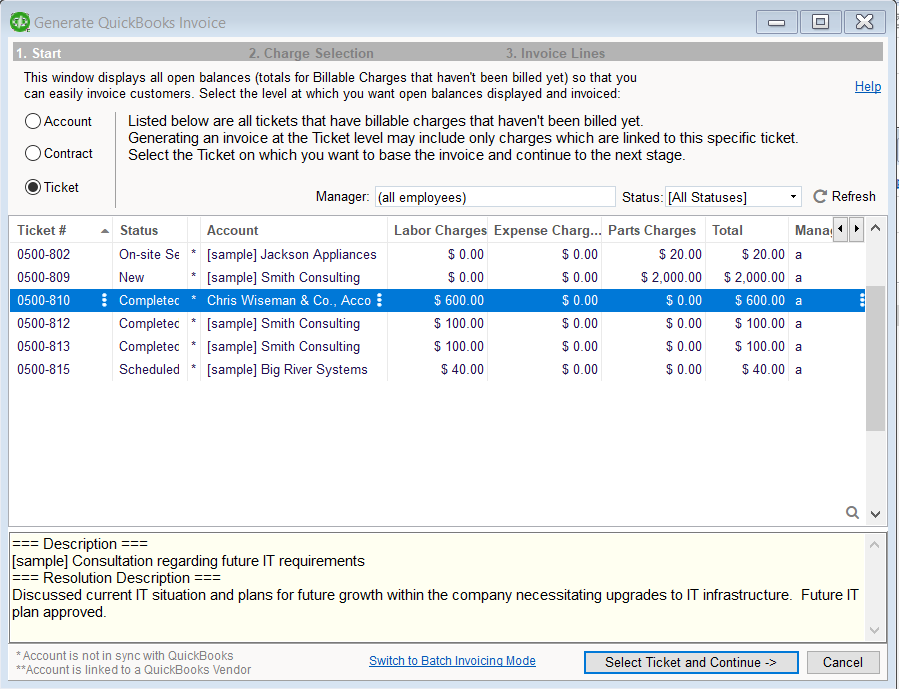
In the example above, the Ticket level was selected. All the Tickets with open Billable charges are displayed. Select the Ticket for which you want to create an invoice and click Select Ticket and Continue.
After selecting the Account/Contract/Ticket record for which you want to create an invoice, the following window is displayed (this window is also displayed when the Create Invoice... option has been selected from the Account/Contact/Ticket window in Option 1 above):
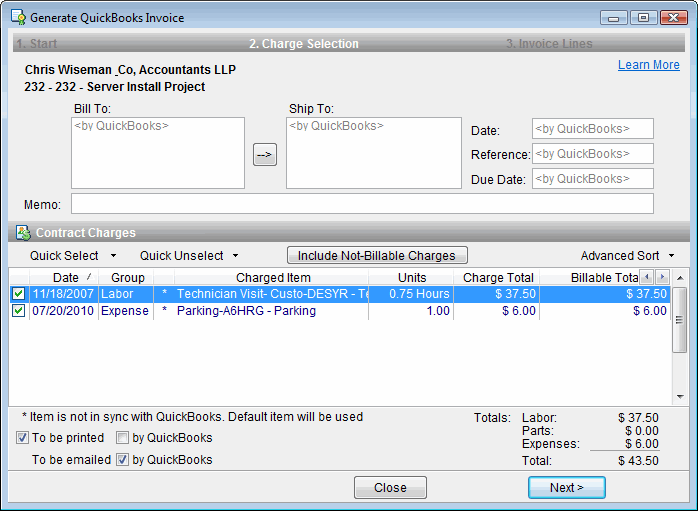
All Billable charges that haven't been billed yet and are related to the selected Account, Contract or Ticket record (Contract in the example above) are displayed and by default are selected (using the check mark) to be included in the invoice.
In the charge list you can select which charges will be included in the invoice by selecting or unselecting them by clicking on the checkbox to the left of the record.
Include/Exclude Not-Billable Charges
In addition to the billable charges, you can include Not-billable charges in the invoice. When adding them, Not-Billable charges are displayed in the invoice, however, they do not affect the invoice total.
To include or exclude the not-billable charges click the Include Not-Billable Charge/Exclude Not-Billable toggle Charges button. Note that Administrators can set the system to always include the Not-Billable charges from Tools > Options > QuickBooks.
To be Printed/To be Emailed Flags
Depending on your QuickBooks edition, Invoices in QuickBooks may include the following options: ‘To be printed’ and ‘To be emailed’.
By default, when creating new invoices from RangerMSP, the values for these options are taken from the default settings in QuickBooks (see the selected 'by QuickBooks' option). When un-checking the 'by QuickBooks' option, you can control the values to be used when generating the QuickBooks Invoice.
See more details in QuickBooks Link Settings.
|
At this stage you can also set different parameters for the invoice itself. The following options are located at the top of the Generate QuickBooks Invoice window:
- Bill To - This is the invoice billing address. By default it is taken from the Bill To data defined for the customer in QuickBooks. You can enter a different address in this box if necessary.
If you have modified this information by mistake and want to use the QuickBooks defaults, right-click above the field and select Set by QuickBooks. - Ship To - This is the invoice shipping address. By default it is taken from the Ship To data set defined for the customer in QuickBooks. You can enter a different address in this box if necessary.
If you have modified this information by mistake and want to use the QuickBooks defaults, right-click above the field and select Set by QuickBooks. - Date - This is the invoice date. By default, the date used is today's date. You can modify the date if necessary by typing an alternate date in this field.
- Reference - This is the invoice Reference number. This number is set by default by QuickBooks. You can modify this number if necessary by typing an alternate Reference number in the field.
- Due Date - This is the invoice Due Date. By default, the date is one month from today's date. You can modify this date if necessary by entering an alternate due date in the field.
- Memo - This field is for invoice memo/notes. If necessary, enter a memo that will appear as part of the QuickBooks invoice.
After entering the invoice details and selecting the relevant Charges, click Next.
The lines of the invoice are now displayed as they will appear in the QuickBooks invoice.
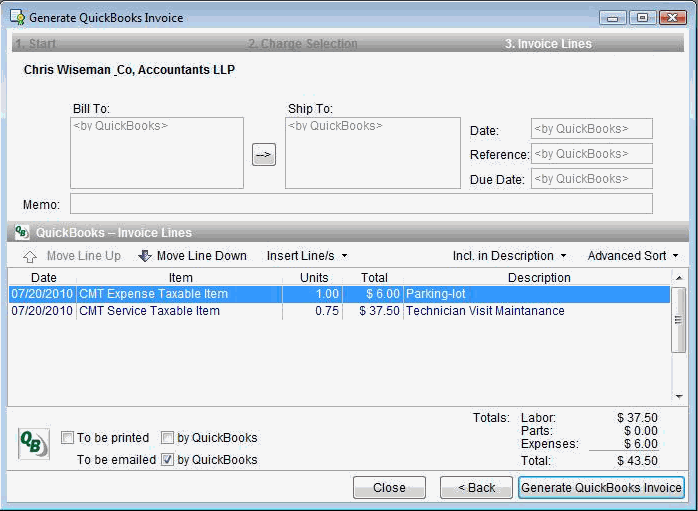
In this step you can modify the text which will be displayed on the invoice lines. Note that all modifications made to the invoice lines here are not applied to Charges in RangerMSP, and only apply to the QuickBooks invoice lines.
Move Line Up/Down You can use the Move Line Up/Move Line Down buttons or the Advanced Sort button to modify the order of the invoice lines.
Insert Line/s You can also use the Add Blank Line button to include blank lines between the invoice lines in order to space the invoice up and make it more readable
Incl. in Description You can also use the "Incl. in Description" button to include additional information to all invoice line simultaneously, such as:
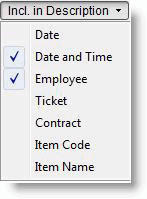
Click on Incl. in Description and select the data you wish to be added to the description for every invoice line. To add this information to all invoices by default go to Tools > Options > QuickBooks and select the information you want to include in invoice lines.
You can double-click on each invoice line to add or edit the text/description of the selected line.
As mentioned above, these changes will take affect only on the invoice lines in QuickBooks. The original charges will not be affected by these changes.
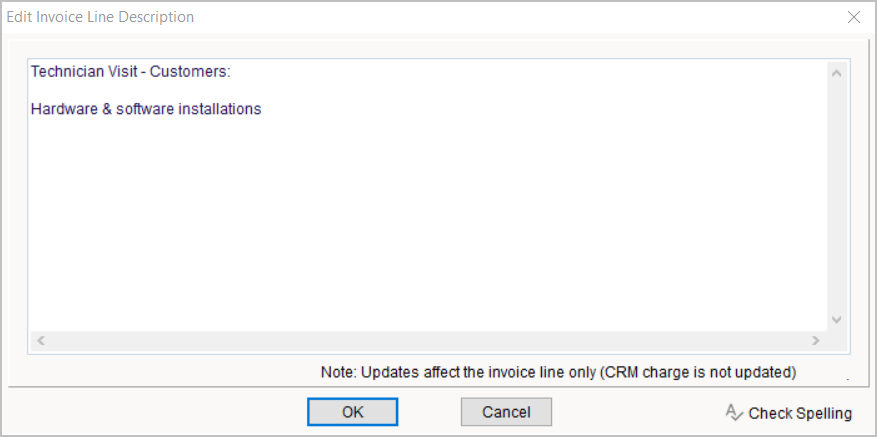
In the image below, you can see that additional information has appeared in the Description column of the invoice lines.
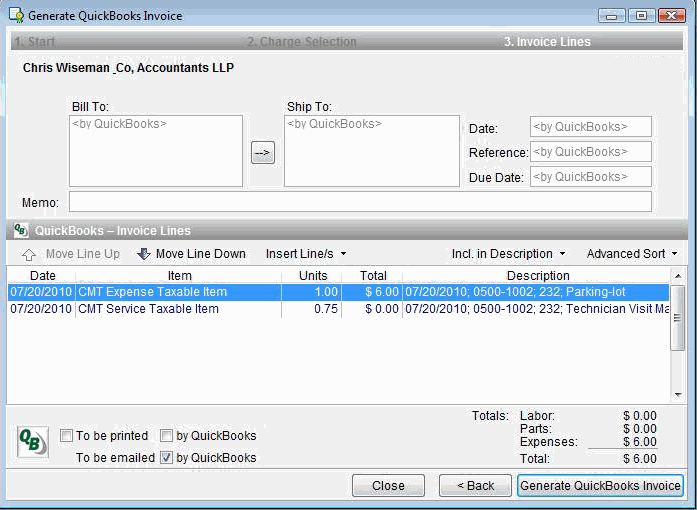
When the invoice information is complete, click Generate QuickBooks Invoice.
RangerMSP will now verify all the settings with QuickBooks and will add the QuickBooks invoice. Once an invoice has been created, the following unofficial invoice will be displayed. This invoice is just to give you an idea of how the invoice was created in QuickBooks. For complete details, view the invoice details in QuickBooks.
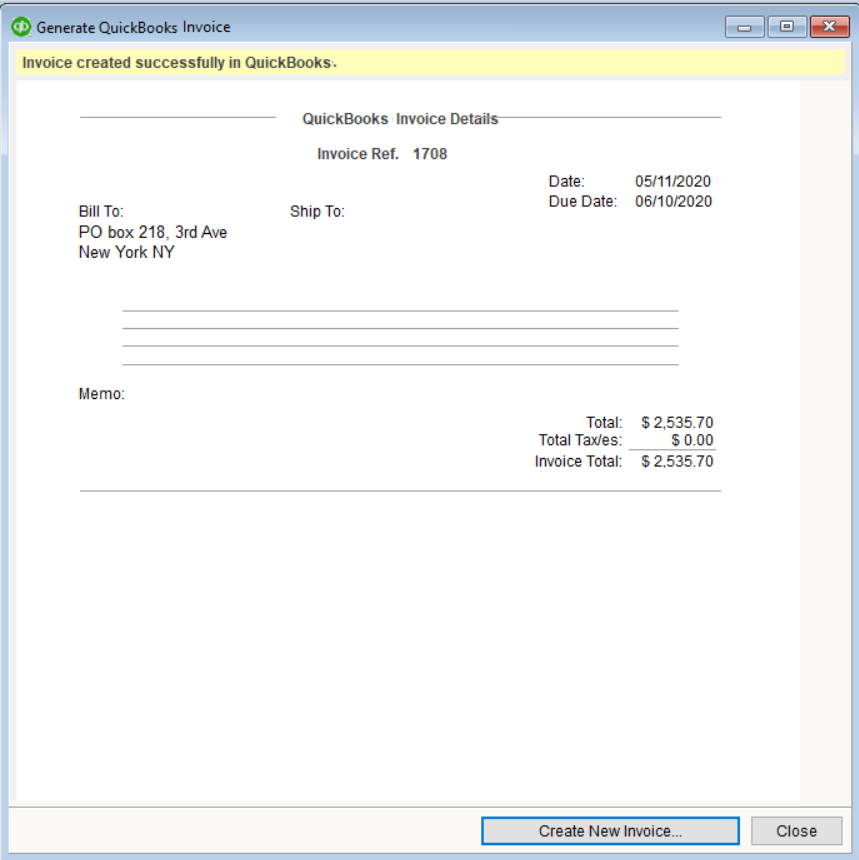
If you wish to create another invoice, click on Create New Invoice'. Otherwise, you can close the window.
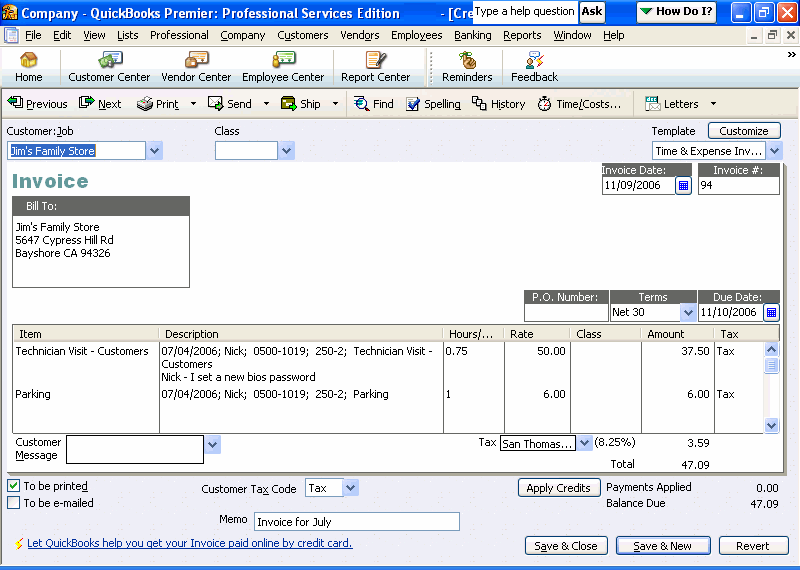
The invoice we've created looks like the following in QuickBooks:
Using the RangerMSP-QuickBooks Link
At this stage, where the RangerMSP-QuickBooks Link installation setup is complete, you can start using it.
A few clicks will allow you to sync information between the two programs. Thus saving a lot of time and increasing productivity.
The first stage after the installation is to import Customers, Vendors and Items from QuickBooks into RangerMSP.
Please note that you can easily perform the imports (as explained below).
However, we strongly recommend to backup RangerMSP data prior to the imports.
You should backup <server>\RangerMSP\DB folder including all files while no one is using RangerMSP.
Note: If you are already using RangerMSP for a while and already have all your customers and items record in RangerMSP you should match RangerMSP records with QuickBooks records instead of importing the records (importing the records in this case will only create duplicates in your database and therefore it should be avoided). To learn more about how to link existing records between the two systems see Link Account to QuickBooks Customer/Job/Vendor Record or click here.
Accounts
Your company has ongoing interactions with customers, vendors, business partners, friends, leads, and so on. In RangerMSP, each of these types of contacts is called an Account. You can manage your Account contact data and all other related data in the Accounts window.
In Accounts, related data is any information related to the Account that is presently being managed in RangerMSP, such as scheduled Appointments, open Tasks, Phone Call monitoring, Ticket/incident history, Assets (customer equipment and software licenses), Charges, linked Documents (MS-Word, emails, Excel etc.), Sales Opportunities and so on.
Account information is organized in separate information tabs that display different types of data.
To view all information related to an Account, open the Accounts window, locate the required Account, and browse through its data by clicking on the information tabs.
Accounts can be easily imported from QuickBooks, and changes can be synchronized between both systems.
For more details see RangerMSP-QuickBooks Link Account Options.
Items
Items in RangerMSP are a catalog of all the services and products you offer. The Items list in RangerMSP acts as your price list.
Each Item has a unique Code, Name, Description and Pricing Setting.
There are three types of Items in RangerMSP:
Parts Items are hardware, software, or any other items you ship to your customer. These items have fixed prices.
Labor Items are services you provide to your customers, such as server installation, network installation, on-site technician visits, etc. Each Labor item can have a fixed price, a fixed hourly rate, or a dynamic hourly rate that varies depending upon the employee who performs the service.
Expense Items are used to charge expenses, such as travel and special deliveries. Expense Items can have a fixed price per unit or a fixed hourly rate.
For each new Charge record, an Item is selected and the relevant Item data is automatically copied to the new charge. This streamlines your data entry process. Also, the selected Item for a Charge in RangerMSP will be the Item that appears on the QuickBooks invoice line when the Charge is transferred to a QuickBooks invoice.
Items can be Active or Suspended. A suspended Item cannot be selected when adding new charges.
Items can be easily imported from QuickBooks, and changes can be synchronized between QuickBooks and RangerMSP.
For more details see QuickBooks Link Items Options.
Invoices
With the RangerMSP-QuickBooks Link you can create invoices in QuickBooks based on charges entered in RangerMSP.
This feature allows you to manage all the aspects of your service in one program: RangerMSP. You can manage Tickets, enter Charges, etc. in RangerMSP, while all billing is managed in QuickBooks.
QuickBooks invoices can easily be created from RangerMSP at the customer level, the service contract level and the ticket level.
All invoices created from RangerMSP are based on Charge records added in RangerMSP. Each Charge record is either a labor charge for work performed, a parts charge describing a part that has been used, or an expense charge for expenses spent on behalf of the customer, i.e. for special deliveries.
It is recommended that you familiarize yourself with the following terms in RangerMSP:
Tickets – Every incident, problem, or job you handle for a customer is managed in RangerMSP using a Ticket record. Click here to learn more.
Contracts – Contract records are used to manage your service contracts and track their status. Click here to learn more.
Charges – Charge records are used to track all activities that will be charged to customers, such as labor, parts and expenses. Click here to learn more.
To learn all about creating invoices from RangerMSP, see QuickBooks Link Invoice Creation Options.
Batch Invoice Creation
The Batch Invoice Creation Wizard allows you to create many invoices at once at the customer level, the service contract level or the ticket level. This can save you a large amount of time allowing you to invoice many tickets or customers at once.
To learn on how to activate the Batch Invoice Creation Wizard, see Batch Invoice Creation.
Charges
Tracking Charges is a key factor for running your service business well and improving its performance. Most employees, however, consider this to be a nuisance or a burden, which makes it difficult to maximize your full income potential.
Three types of Charges can be tracked in RangerMSP:
Labor Charges for services provided
Expense Charges for expenses such as travel and delivery
Parts Charges for parts or products used
Each Charge record includes a description and information regarding the Account being charged, the charged Item (see the section on Items above), quantity, price, and total amount. Each Charge record can also be linked to a Ticket (optional).
All Charges are entered under one of the Account’s active Contracts. Charges may automatically change the current state of the contract where relevant, i.e. a Charge will reduce the time remaining in a Block of Time contract, reduce the amount of money in a Block of Money contract, etc.
A Charge can be set as Billable or Not Billable. When a Charge is set as Billable it means that you intend to bill the customer for this charge. The default billing status for Charges is determined by the type of contract under which the Charge is being created. See Understanding the Billing Status of Charges below. Not-billable charges can also be included in invoices, however, these charges will display a zero amount and will not affect the invoice total amount.
Once a charged has been included in an invoice, the Charge record is set as Billed, and you can view the QuickBooks invoice reference number in the charge window. This prevents a customer from being billed again for the same Charge.
Adding a Charge is easy and this can be done in RangerMSP’s Main menu, the Tickets window (recommended), the Charges main window, or the Account window. Charges can also be added from anywhere using a web browser and an Internet connection, for this you need RangerMSP Web Interface.
Use Items to speed up the process of entering new Charges. When an Item is selected for a Charge, its description and price are automatically copied into the relevant fields in the Charge record.
Many types of Charge reports are available. These reports are used to bill customers and analyze business performance.
For more details see QuickBooks Link Charges Options.
QuickBooks Link Settings
QuickBooks Link Settings can be defined from Tools > Options > QuickBooks tab.

In this window the following settings are available:
- Accounting Package to be integrated with RangerMSP
- None – means you do not want to integrate with any system
- QuickBooks Desktop– choosing this option you should specify the QuickBooks Desktop edition you use:
- Edition: US, UK or Canada. Note that users working with the QuickBooks Australia edition or with Reckon Accounts (formerly QuickBooks Australia) should select US in this field (the Australian edition provides the API to external system compatible with the US edition).
- QBFC: this is the QuickBooks API package. By default the system uses the latest QBFC edition. For very old QuickBooks editions you may need to change the QBFC edition being used. See more details in QuickBooks Troubleshooting.
- QuickBooks Online - select this option to connect to your QuickBooks Online company
- QuickBooks Company File (for QuickBooks Desktop) or QuickBooks Online Company (for QuickBooks Online)
Once running the setup wizard (see below) and choosing the company file for QuickBooks Desktop or connecting to QuickBooks Onlince Company, the selected file/company name will appear here. This way you can see at all times which file/company is being used when syncing with QuickBooks. - Invoice Charges
These settings define which charges will be included in invoices by default. All Billable charges that haven't been billed yet and are related to the selected Account, Contract or Ticket record are included in the invoice by default. It is possible to include Not-billable charges in the invoice as well, if you wish to show the customer work performed which is not being billed (e.g. when it is covered by a service contract). When including not-billable charges in the invoice, they do not affect the invoice total amount.
Not-billable charges can be added to the invoice on-the-fly from the Invoice Creation Wizard, or you can set the system to always include the not-billable charges in invoices.
Possible options:- Display and automatically select not-billable charges
Selecting this option will always include all not-billable charges in invoices. - Display not-billable charges; do not automatically select them
Selecting this option will always show the not-billable charges in the Invoice Creation Wizard window, however, these charge will remain un-selected, unless you explicitly select to include them in the Invoice. - Hide not-billable charges
Selecting this option will never hide the not-billable charges. You can have them included manually while creating the Invoice in the Invoice Creation Wizard.
See more details on setting options when running the Invoice Creation Wizard in Invoice Creation Options.
- Display and automatically select not-billable charges
- QuickBooks Desktop Options: To be Printed & To be Emailed
Depending on your QuickBooks edition, Invoices in QuickBooks may include the following options: ‘To be printed’ and ‘To be emailed’.
By default, when creating new invoices from RangerMSP, the values for these options are taken from the default settings in QuickBooks. Using the flags in this options window, you can define default values to be used when generating QuickBooks Invoices from within RangerMSP.
- To be Printed –
- By QuickBooks (default) – choosing this option will take the value for this flag from the settings defined in QuickBooks.
- Yes – choosing Yes will always set the To be Printed as Yes for new invoices created from RangerMSP.
- No - choosing No will always set the To be Printed as No for new invoices created from RangerMSP.
Note that these values can be modified on-the-fly when creating the invoice using the Invoice Creation Wizard.
- To be Emailed -
- By QuickBooks (default) – choosing this option will take the value for this flag from the settings defined in QuickBooks.
- Yes – choosing Yes will always set the To be Printed as Yes for new invoices created from RangerMSP.
- No - choosing No will always set the To be Printed as No for new invoices created from RangerMSP.
Note that these values can be modified on-the-fly when creating the invoice using the Invoice Creation Wizard.
- To be Printed –
To view additional properties, scroll down as shown in the following screenshot:
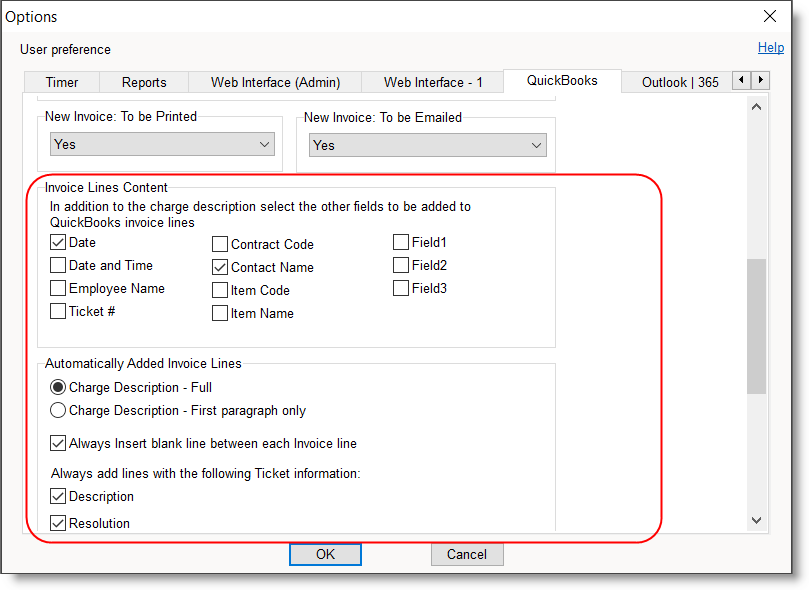
- Invoice Lines Content
Here you can select which data you want to include in each invoice line. This will affect all invoices being created via the QuickBooks Invoice Creation Wizard.
Data which can be added to Invoices:- Date
- Date & Time
- Employee name
- Ticket Number
- Contract Code
- Item Code
- Item Name
- Insert blank lines between each invoice line
- Advanced Settings
The Advanced Settings deal with default items created in QuickBooks for un-synced items. In cases when charged Items in RangerMSP were not synchronized with QuickBooks Item, the invoice cannot be created because can't link to an Item in QuickBooks. To make the invoicing process easier and smoother, RangerMSP-QuickBooks Link automatically creates default Items in QuickBooks for such cases. These items can be managed in this window. See more details in Using Special QuickBooks Items and Accounts.