Email Connector: Difference between revisions
(Created page with 'The Commit Email Connector module automatically generates new Tickets from emails sent by clients to a defined public email address. It also provides a full API to Commit using X…') |
|||
| (147 intermediate revisions by 5 users not shown) | |||
| Line 1: | Line 1: | ||
The | {{usermanualsnav}} | ||
==Introduction== | |||
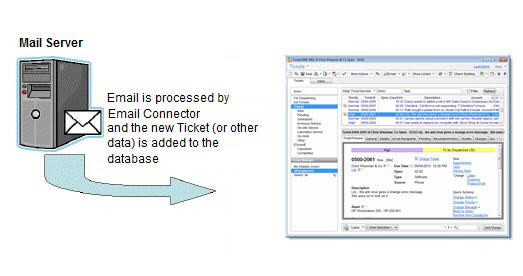
The RangerMSP Email Connector module allows you to process incoming emails and perform appropriate actions (like creating new Tickets). It also allows you to parse and analyze XML formatted emails that contain new Tickets, Accounts, Assets or other RangerMSP record information. | |||
[[File: | The RangerMSP Email Connector module automatically provides the following features: | ||
# Generates new Tickets from emails sent by clients to a defined public email address. | |||
# Manages email threads for existing Tickets ([[Ticket Management#Email Distribution via Email Connector|Email Distribution via RangerMSP Email Connector]]). | |||
# Provides a full API to RangerMSP using XML formatted email messages. | |||
[[File:Email_connector_overview_chart.jpg|center]] | |||
__TOC__ | |||
== Email Threading == | |||
The Email Connector manages email threads for you. If a customer replies to your support email in regards to a specific ticket, or if you, as a technician, reply to the customer, the correspondence will be automatically filed under the ticket in the system and distributed automatically to the recipients defined for the Ticket. | |||
[[File:email_connector_flow.gif|center]] | |||
There are two email threading scenarios: | |||
#A customer replies to Support regarding an email sent from the system, which contains a ticket number in the email subject. In this case, the system files the email under the ticket and distributes it to the Ticket Recipients. | |||
#An employee replies on a customer email, which contains the ticket number in the email subject. The employee needs to send the email to the support email address, and RangerMSP Email Connector will automatically file the email in the system and distribute it to the Ticket Recipients. When a technician Cc or Bcc's the Email Connector, the email will be filed in the ticket, and will not be distributed to Ticket Recipients. | |||
<br> | |||
Note that the email threading management will apply only when the sender email address is defined as one of employee's emails (Email1 or Email2), and the employee is marked as an Active employee in RangerMSP. See more details on matching the email to an account in [[Email Connector#Matching by Email or Domain Name|Matching by Email or Domain Name]]. In both cases, the Email Connector receives the email, finds the ticket in the subject, finds the ticket in the database, and then files the email as a document under the ticket history. | |||
<br><br> | |||
For more details see [[Ticket Management#Email Distribution via Email Connector|Email Distribution via RangerMSP Email Connector]]. | |||
<br><br> | |||
[[File:email_connector_email_threading_flow.gif|center]] | |||
<br> | |||
== Matching by Email or Domain Name == | |||
RangerMSP connects an incoming support email to specific accounts based on the full email address of the sender, or by the domain name (if defined for the account). | |||
If one of your clients has many possible email addresses, you should either add each of the email addresses as the email in the secondary contact (in the Account Contacts tab), or define the client's domain name in one of the Account's email addresses or secondary contacts. | |||
To define a domain name for an account: | |||
Set the domain name (e.g. "RangerMSP.com", with or without the @ sign) as the email address in one of the following places: | |||
*Account's Email field (in the General tab) | |||
*Account's Email 2 field (in the Address tab) | |||
*Add a secondary contact, and set the domain in the contact's email field | |||
Notes: | |||
#Account detection will first try finding the full email address. | |||
#Only if this email address does not exist in the database, the system will search by the domain name. | |||
#Duplicate domain names will create an error when processing the incoming email. Note that the system does not prevent entering duplicate domain names. | |||
[[File:email_connector_setup_processing_domain_name.gif|center]] | |||
== RangerMSP Email Connector Setup == | |||
The RangerMSP Email Connector is a plug-in for the RangerMSP Server. Setting up the RangerMSP Email Connector module includes using general settings used by the RangerMSP Server, and specific settings for the Email Connector plug-in. | |||
To run the configuration application: | |||
#Log into the Server with a Windows Administrator user. Note that the setup program must run from the same server as the one where the RangerMSP installation sits and from where you plan to run the Email Connector. | |||
#Run <Installation_DIR>\RangerMSP\Server\ServerConfig.exe | |||
The following window will open: | |||
[[File::Server_outgoing_mail_server_settings.png|center]] | |||
The server configuration window consists of the following tabs: | |||
#'''Public Email Address''' - the main email address used by you and your clients. All emails sent to this address will be processed by RangerMSP Email Connector. | |||
#'''Outgoing Mail Server Settings''' - outgoing emails settings for sending emails by the RangerMSP Server. | |||
#'''Email Connector Settings''' - RangerMSP Email Connector settings. | |||
#'''Email Alerts Settings''' - RangerMSP Email Alerts settings (not in the scope of this document). | |||
In order to use the RangerMSP Email Connector, the following settings should be configured (in this order): | |||
#[[Email Connector#Public Email Address|Public Email Address]] - The Public Email Address is the main support email address (e.g. support@yourdomain.com) to which customers can send support-related emails. | |||
#[[Email Connector#Outgoing Email Settings|Outgoing Email Settings]] - These settings will be used by the RangerMSP Server for all outgoing emails (by RangerMSP Email Connector or RangerMSP Alerts Server). | |||
#[[Email Connector#Incoming Email Settings|Incoming Email Setup]] – These settings include the Public Email Address for all emails processed by the RangerMSP Email Connector. | |||
#[[Email Connector#Advanced Email Processing|Email Processing Setup]] - Define how incoming email is processed. RangerMSP Email Connector reads each email and performs the actions as defined in these settings. | |||
#[[Email Connector#Internal Support Team Email|Internal Support Team Email]] - Define settings for the Internal Support Team Email, which is used if the system cannot decide what to do with the Email, or if there are errors. | |||
#[[Email Connector#Running RangerMSP Email Connector|Installing and Running RangerMSP Email Connector Service]] - After setting up all of the above, you should actually install the Email Connector service and run it on your server. | |||
Only once the setup is complete can you run the RangerMSP Server and start using the RangerMSP Email Connector plug-in. | |||
====Public Email Address==== | |||
The Public Email Address is the main support email address (e.g. support@yourdomain.com) to which customers can send support-related emails. Tickets are automatically created out of these emails, and this address is also used to process XML-formatted emails (API) sent by external systems, such as a form on your website. | |||
All Emails sent to this email address will be analyzed and processed by the RangerMSP Email Connector. | |||
<u>Note:</u> This email address should ONLY be used as the incoming email for the Email Connector. You should define a different address for your internal email which will be used for unrecognized emails and error handling (see [[Email_Connector#Internal_Support_Team_Email|Internal Support Team Email]]). | |||
[[File:email_connector_setup_public_email_address_window.png|center]] | |||
===Outgoing Email Settings=== | |||
The Outgoing Email settings are used for any outgoing emails sent from RangerMSP Server. | |||
<u>Note:</u> The Outgoing Email settings should be set only once for the RangerMSP Server, so '''if you already defined this for the [[Alerts Server|Email Alerts Server]], you can skip this step.''' | |||
The Outgoing Email settings should be set in the Outgoing Mail Server tab. | |||
[[File:server_outgoing_mail_server_settings.png|center]] | |||
To reduce errors and improve security, it is strongly recommended to use SMTP authentication, with a user name and password for SMTP access. | |||
<u>Parameters:</u> | |||
*'''SMTP Host''' - your Outgoing SMTP Mail Server | |||
*'''Port''' - the Outgoing SMTP port | |||
*'''My outgoing server (SMTP) requires authentication''' - if checked, must fill in the authentication details below: | |||
**'''User Name''' - the User Name to be used for SMTP authentication | |||
**'''Password''' - the password related to the specified User Name | |||
<br> | |||
'''Note:''' If you use '''SSL on your Email servers''', this should be automatically supported (for users working with RangerMSP 6.0 or higher). If for some reason you are facing problems connecting via SSL, please contact our support directly ar support@RangerMSP.com. | |||
<br><br> | |||
<u>Verification Tests (required!):</u> | |||
*'''Test SMTP Connection''' - click this option to verify that your account is working. If there is missing or incorrect information, such as your password, you will be prompted to supply or correct it. | |||
*'''Send Test Email''' - Use this option to send an outgoing email using the settings you defined. After clicking it you need to specify the From email address and the To email address that will be used for sending the Test Email message. | |||
After completing the Outgoing settings, move on to the next step > Setting up the Incoming Email Settings. | |||
===Incoming Email Settings=== | |||
After setting up the Outgoing Email settings, you should now define the incoming mailbox settings. | |||
To set up the Incoming settings, go to the Email Connector tab: | |||
[[File:email_connector_setup_incoming_window.gif|center]] | |||
In this window, fill in the settings as explained in the following sections: | |||
#[[Email Connector#Email Connector Status|Email Connector Status]]. | |||
#[[Email Connector#Public Email Address|Public Email Address]] (defined separately in the Public Email Address tab). | |||
#[[Email Connector#Incoming Mail Server|Incoming Mail Server]]. | |||
#[[Email Connector#Backup Settings (optional)|Backup Settings]] (optional). | |||
====Email Connector Status==== | |||
The RangerMSP Email Connector status can be one of the following:<br> | |||
'''ON''' (default) - RangerMSP Email Connector is active and processes incoming emails.<br>'''OFF''' – RangerMSP Email Connector is not active and does not process incoming emails (emails are left in the defined mailbox until you review them manually or turn the connector to ON again. | |||
Note that in order for the status changes to take effect, you should '''restart CRM Server Service''' (see Running RangerMSP Email Connector). | |||
====Public Incoming Mail Server==== | |||
In this section you will define the pop server settings of the incoming email server: | |||
<u>Server Information</u><br>'''POP3 Host''' - your Incoming Mail Server (POP3)<br>'''POP3 Port''' - the Incoming Mail Server port (POP3) | |||
<u>Logon Information</u><br>'''User Name''' - this is the incoming public support email account used for the Incoming email address described above.<br>'''Password''' - the password for this email account. | |||
<u>Note:</u> To use CRM Server Service with Microsoft Exchange servers, ensure that POP3 is enabled for the relevant account in the Exchange server. | |||
'''Note regarding SSL: If you use SSL on your Email servers, please [[KB:_Setting_up_Email_Connector_and_Alerts_Server_with_SSL|read this article]] in order to find out how to set up the RangerMSP Email Connector with SSL.''' | |||
<u>Misc.</u><br>'''Test''' - click Test to verify that your account is working. If there is missing or incorrect information, such as your password, you will be prompted to supply or correct it.<br>'''Advanced''' - set up timeouts for the connection and polling interval (in most cases you should use the default values). | |||
After filling in the information on this screen, we recommend you test your account by clicking the Test button (requires you to run the setup program from the Server). | |||
<br><br> | |||
===Email to Ticket Settings=== | |||
After setting up the [[Email Connector#Incoming Email Settings|Incoming Email Settings]], you should now define the settings which will be used when converting incoming emails into Tickets in the system. | |||
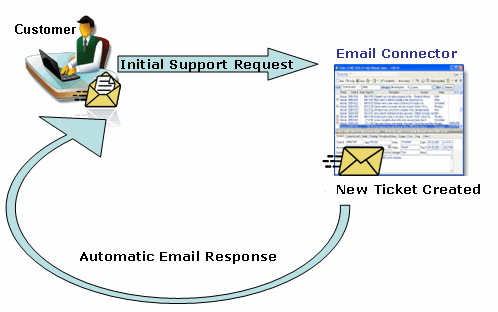
When receiving a new incoming email, the system recognizes the email sender's address or domain from the RangerMSP Accounts database; it automatically opens a Ticket and copies the email content into the Ticket description (the text/plain part). The Ticket will be automatically linked to the Account that matches the email address. | |||
Incoming emails which relate to existing Tickets will be filed under the Ticket History. See more details in [[Ticket Management#Email Distribution via Email Connector|Email Distribution via RangerMSP Email Connector]]. | |||
<br> | |||
====Matching by Email or Domain==== | |||
Matching the incoming email to a RangerMSP Account is performed based on the full email address of the Account, or by the domain name (if defined for the account). This is because clients may be using generic email addresses (such as Yahoo®, Gmail®, etc.) and the system cannot rely on any domain name. If one of your clients has many possible email addresses, you should either add each of them as a secondary contact (in the Account Contacts tab), or define the client's domain name in one of the Account's email addresses or secondary contacts. See more details in [[Email Connector#Matching by Email or Domain Name|Matching by Domain Name]]. | |||
====Auto-Response Settings==== | |||
You can configure the system to automatically send response emails to customers, confirming that a new ticket has been created for their email message. | |||
to configure the automatic response settings, scroll down to the Email to Ticket tab: | |||
[[File:email_connector_setup_auto_reponse.png|center]] | |||
To activate the Auto-Response feature:<br> | |||
#'''Send Response''' – Select this option in order to send automatic email responses and notify your customers who sent emails that became new Tickets. | |||
#'''Use the following Email Template''' – Choose the Ticket Email Template which will be used when sending the auto-response email for new Tickets. | |||
See more advanced options for the Auto-Response feature in [[Email Connector#Advanced Options|Advanced Options]]. | |||
<br> | |||
====Email messages from unrecognized senders==== | |||
When creating tickets from unrecognized senders is enabled, such email messages are converted into the Tickets under your business record. The ticket then can be easily reassigned to the relevant Account. See [[Ticket_Management#Move_a_Ticket_from_one_Account_to_another|Move a Ticket from one Account to another]]. | |||
Use ServerConfig to turn this feature on or off: | |||
Notes: | |||
Verify that you have a Spam filter installed on your mailbox, otherwise all spam messages will get converted into tickets! | |||
[[File:Server_config_uknown_sender.png|center]] | |||
====Advanced Options==== | |||
Note that the Email Connector also provides more advanced processing options, such as using the Email Connector as an API (via XMl transactions), or using Automated Emails. You can read more about the advanced Email Connector options in the [[API by Email and MSP Integration|Advanced Email Processing]] section. | |||
Clicking the ''Advanced Options'' button in the Email to Ticket tab opens the following window: | |||
Here you can define the following options. | |||
[[File:email_connector_setup_advanced.gif|center]] | |||
<br> | |||
=====Store-Folder Settings===== | |||
When creating Tickets from emails, all original email files (.eml) are stored on a dedicated folder on your server's local disk, so that they can be attached to their Ticket.<br><br> | |||
Using this option you can define an alternative default filing folder on your server. Note that this is an advanced option that should only by used by advanced users. Please contact support@RangerMSP.com before using this option. | |||
<br>In order for the Email Connector service to be able to save the emails in the new folder, you must configure the folder location so that the service will have the correct access to it.<br><br> | |||
In the Default Filing Folder, and define both paths, as the server recognizes it and as the client recognizes it. | |||
[[File:email_connector_setup_default_filing_folder_advanced.gif|center]] | |||
=====Backup Settings (optional)===== | |||
Once an incoming email has been processed by the system, it is removed from the email server (i.e. deleted from the mailbox). | |||
For backup and tracking purposes, you can automatically forward all emails to a dedicated email account for storing. | |||
This is an advanced option, and we do not recommend on using it without consulting our support team at support@RangerMSP.com. | |||
[[File:email_connector_setup_backup_advanced.gif|center]] | |||
<br> | |||
To set up the backup email account:<br>'''Backup ALL Incoming Emails''' – select this option to activate the backup.<br>'''Send ALL to this Email Address''' – Enter the Backup Email Address which will be the backup mailbox. Note that this must be a different email address than the Email Connector Incoming Email Address to avoid deadlocks where the backup email is being sent to the Incoming Email Address over and over again | |||
After completing these settings, move on to the next step > Setting up [[Email Connector#Email to Ticket Settings|Email Processing Settings]] email-to-ticket settings). | |||
=====Automatically Add Ticket Email Recipients===== | |||
As part of the Email Connector email threading management, it offers the ability to automatically scan processed email message headers to find relevant email recipients (To and Cc) and automatically add them as Recipients in the relevant Ticket in RangerMSP. | |||
Administrators can control whether to activate the automatic scanning of email messages for recipients from this window under ''General Settings > Automatically find and add Ticket Recipients''. | |||
[[File:email_connector_setup_email_header_scan_advanced.gif|center]] | |||
<br> | |||
In this window you can determine whether to automatically find and add ticket recipients for employees or external recipients. | |||
See [[Ticket_Management#Automatically_Add_Ticket_Email_Recipients|Automatically Add Ticket Email Recipients]] in the Ticket Management user guide for more details about this powerful feature. | |||
=====Auto-Response Advanced Options===== | |||
Clicking the Auto-Response Emails options button opens the following window: | |||
[[File:email_connector_setup_auto_reponse_advanced.png|center]] | |||
<br> | |||
Here you can define the following options: | |||
#'''Embed Web Links''' - Web Links allow your customers to quickly open the customers' Web portal and view or edit the Ticket details. This saves the need to go explicitly to the Web Interface site, login and search for the Ticket in order to see its details. Choosing this option will add Web Links if defined in the email template selected above. <br>''Note: Web Links require using RangerMSP Web Interface for Customers, and that Web Links are enabled in Options > Web Interface tab.'' | |||
#'''Attach the original email to each response''' – Select this option to attach the original email sent by the client to the response email. | |||
=====Send Auto-Response to all external recipients===== | |||
When this feature is enabled, auto-response emails sent by the Email Connector will be sent to all Ticket Recipients – this includes those marked in RangerMSP as default recipients for the Account as well as all other recipients existing in the original customer email. This way everyone can easily participate in the email thread and their reply will automatically be filed under the Ticket in RangerMSP. | |||
[[File:email_connector_setup_send_auto_response_to_all_external_recipients.png|center]] | |||
====Auto Adding of New Secondary Contacts for Recognized Account==== | |||
If an email arrives from a new address and the sender domain exists in the Accounts database then a new Secondary Contact can be automatically created under the relevant Account, with the email sender display name taken as the Contact Name. | |||
If appropriate, a new Ticket is created with that new Secondary Contact set as the Ticket Contact. If the email is a reply to an existing Ticket from a previously unknown sender at the known domain then a Secondary Contact is created based on the new sender. | |||
To configure this: | |||
#Run the '''ServerConfig''' utility. | |||
#Click the '''Email Connector''' tab. | |||
#Go to '''Advanced Options'''. | |||
#Click '''Configure''' in the '''General Settings''' section | |||
#Check the relevant box to enable/disable. | |||
[[File:Auto-add-secondary-contact.png]] | |||
<br><br> | |||
====Auto-append the thread Subject with the Account and sender names==== | |||
The Account Name (File as… field) and Sender Name are added to the email subject line of emails distributed to employees. This way employees on the field can easily detect the Account related to the email correspondence. | |||
This helps overcome cases where the customer email did not include the customer name or in cases where the mail server overwrites the Sender Name with the mailbox name of the email connector. | |||
[[File:Auto_append_account_sender_name.png]] | |||
<br><br> | |||
====Automatically open closed Tickets when customers reply==== | |||
With this option enabled, customer email replies to closed tickets will automatically open the Ticket bringing it back to the open Tickets queue. | |||
Disabling this option will push such replies to the Ticket Inbox, however, the Ticket status will be kept intact. | |||
[[File:Email_connector_reopen_ticket_settings.png]] | |||
<br><br> | |||
====Show Ticket in Dispatcher==== | |||
New Tickets that are created by Email Connector automatically appear in the Dispatcher Ticket list by default. This means that all new Tickets that are created will automatically be marked as "To be Dispatched" by the system. | |||
Users can change this behavior: | |||
# From any RangerMSP client, go to ''Tools > Options > Tickets-1'' tab. | |||
# Select or deselect the option ''Show in Dispatcher > By default, set to display new Tickets in Dispatcher'' to make the system behave as you require. | |||
# Then restart CRM Server Service on your server so new Tickets will be marked accordingly. | |||
''Note: The Show in Dispatcher flag can be modified by any user and it affects tickets being created from anywhere - in the client application, by the RangerMSP Email Connector or by other applications. Make sure you use it consistently. | |||
'' | |||
====Notifying Customers and Technicians on new Tickets==== | |||
Email Connector allows you to notify your customers that the emails they sent became new Tickets. | |||
You can set Email Connector to send an automatic response back to the customer, notifying him or her that a Ticket was opened out of his /her email. When you configure this in the ServerConfig, you can also define a BCC address for keeping track of these emails. In the BCC address you can enter your Internal Support email to receive each notification as an email. | |||
All automatic responses are automatically forwarded back to the Email Connector, and filed under the Ticket as part of the ticket history. | |||
====Assigning SLA to New Tickets Automatically==== | |||
Tickets that are created automatically by the Email Connector, can be automatically assigned to an SLA by defining a default SLA for the Account or for the default Contract of this Account (see [[Contracts#How_does_the_system_select_a_Default_Contract.3F|How does the system select a Default Contract?]]). The [[SLA|SLA Feature]] helps you provide services to your customers within the time frame agreed with them. | |||
If a default SLA is defined for the Account (see [[SLA#Default SLA for Accounts and Contracts|Default SLA for Accounts and Contracts]]), the ticket created by Email Connector will be automatically assigned to it. | |||
<br><br> | |||
===Internal Support Team Email=== | |||
After setting up the [[Email Connector#Outgoing Email Settings|Outgoing Email Settings]] and the [[Email Connector#Email to Ticket Settings|Email to Ticket Settings]], you should now define the Internal Support Team Emails (for forwarding purposes). | |||
The Internal Support Email address is your main activity support mailbox which should be constantly reviewed by your support team. This mailbox will be used by the system in cases where the system cannot decide what to do with the email. The Email Connector will automatically forward these messages to this email address which should be reviewed by a "human" support team to identify emails which need to be handled manually. | |||
<u>Note:</u> If the Ticket was not found in the RangerMSP database, the email will be forwarded to the Internal Support Team email, with an error indicating that the Ticket cannot found. | |||
The Internal Support Email Address is set in the following window: | |||
[[File:email_connector_setup_internal_email_window.png|center]] | |||
'''Email Address''' - This is an internal mailbox which will be used by your support team (e.g. support-internal@yourdomain.com). This mailbox should be manually reviewed on a regular basis to make sure there are no customer issues awaiting response which were filtered out for one of the reasons listed above. | |||
'''The Internal Support Email address is used for the following purposes:''' | |||
#'''Unrecognized emails''' – Unrecognized emails from new customers not yet in the RangerMSP database will be forwarded to this address (and no Ticket will be created). | |||
#'''Error Handling''' - Emails which could not be processed due to errors during the process (such as the wrong format in XML formatted emails) will be forwarded to this mailbox. | |||
Make sure not to use the same email address for the Internal Support Email as you do for the "Public Email Address." Also, make sure that emails sent to the Public Email address and the Internal Support Email address do not end up in the same physical mailbox (i.e. that they are not synonyms/aliases for the same mailbox). | |||
After setting up all of the above, you are now done with the setup and can move on to actually running the service and activating the Email Connector. See more details in Running RangerMSP Email Connector. | |||
<br> | |||
==Running RangerMSP Email Connector== | |||
After you finish setting up all of the required settings (see RangerMSP Email Connector Setup Overview), you can move on to the next step and install the '''CRM Server Service'''. | |||
The RangerMSP Email Connector runs as a plug-in for the CRM Server Service. The RangerMSP Server runs as a Windows Service on your server. | |||
====Before you install the RangerMSP Email Connector==== | |||
#Make sure to complete the above Setup steps prior to installing the Windows Service. | |||
#Make sure to allow the RangerMSP Email Server Service in your DEP settings. | |||
<br> | |||
====Install Service==== | |||
'''This part of the installation should be performed on the server itself. | |||
<u>Automatic installation</u> (requires RangerMSP 14 and up) | |||
Log in to to your Server with a Window's Administrator account and run the installer from: | |||
<blockquote>'''''<Installation_DIR>\RangerMSP\Utils\Install\InstallServerSideWindowsServices.exe'''''</blockquote> | |||
<br><br> | |||
OR - <br><br> | |||
<u>Manual installation</u> | |||
# Open a command prompt window: Right-click the command prompt icon and and choose 'Run As Adminsitrator'. | |||
# Type the following command:<br><blockquote><tt><Installation_DIR>\RangerMSP\Server\CRMServer.exe -install</tt></blockquote><u>Note</u>: The <Installation_Dir> must refer to a LOCAL server path (e.g. C:\ or D:\Software, etc.) and NOT to a shared network name/path. | |||
# Wait for a success message to appear, indicating the service was installed successfully. | |||
# Open the Windows Services Management windows from <i>Control Panel > Administration Tools > Services</i>. | |||
# Verify that a Window's service called '''RangerMSP Server''' is now displayed the services list. | |||
# If the service is not there, make sure again that you are running the command prompt Window using 'Run as Administrator' and try again. | |||
====Running CRM Server Service==== | |||
#Once the CRM Server Service is installed, setup the RangerMSP Alerts Server as explained in RangerMSP Alerts System Settings. | |||
#You should also make sure all the users (employees) configure their own Email Alert settings so they will receive Alerts. | |||
#Open the Windows Services Management windows from Control Panel > Administration Tools > Services. | |||
#Locate the CRM Server Service and start the service (right-click > Start). | |||
# Make sure that it is set to start automatically with a ''Delayed Start'' ('''Startup type > Automatic Delayed Start''') each time the server is restarted. | |||
# (Optional) Allow the CRM Server Service in your Windows' Server DEP settings. DEP can be found under Windows: System Properties -> Advanced -> Performance - Settings -> tab DATA EXECUTION PREVENTION. | |||
'''Troubleshooting:'''<br>In any case of problems, see the [[Email Connector Troubleshooting | RangerMSP Email Connector Troubleshooting]]. | |||
====Uninstall Service==== | |||
To Uninstall CRM Server Service: | |||
# Open the Windows Services Management windows from Control Panel > Administration Tools > Services. | |||
# Stop the CRM Server Service. | |||
# Open a command prompt window: Right-click the command prompt icon and and choose 'Run As Adminsitrator'. | |||
# Type the following command: <br><blockquote><tt> <Installation_DIR>\Server\CRMServer.exe -uninstall</tt></blockquote> | |||
<br><br> | |||
==Advanced Email Processing== | |||
===API by Email=== | |||
The [[Email Connector]] provides advanced processing options, such as using the Email Connector as an API by sending in XML transactions by email. | |||
Setting up the API by Email section is optional and is required only when working with external system which send XML formatted emails to the Email Connector. | |||
See more details in [[API by Email and MSP Integration#API_by_Email_.28XML_Formatted_Emails.29|API by Email]] | |||
<br><br> | |||
===Automated Emails=== | |||
The [[Email Connector]] provides advanced processing options, such as using formatted Automated Emails. | |||
Setting up the Automated Emails is optional and is required only when working with external systems (such as external MSP system) which send formatted email alerts to the Email Connector. | |||
The Automated Email feature in RangerMSP processes incoming emails that have been sent to the Email Address defined for the Email Connector. The emails processed are from automated sources, such as an MSP alerting application, and the Automated Email feature analyzes the email's header in order to create the relevant Tickets in RangerMSP. | |||
This feature allows you to define a set of rules which will be activated one after the other to help the system detect pre-defined email formats, and create Tickets for them. As opposed to the "New Ticket From Email" feature, automated emails do not necessarily originate from a customer's email address, so it is difficult for the system to determine the customer for whom a new Ticket should be opened. | |||
The Automated Email feature allows you to define a set of rules that will help the system detect automated incoming emails which contain information about specific customers, and create Tickets for them. | |||
See more details in [[API by Email and MSP Integration#Automated Emails|Automated Emails]] | |||
== Labels == | |||
Since version 7 the Email Connector can have default [[Labels]] defined so that all Tickets created through Email to Ticket or Automated Emails will have the default labels applied automatically. See more details [[Labels#Default_Labels|here]]. | |||
<br><br> | |||
==Troubleshooting== | |||
For troubleshooting, see [[Email Connector Troubleshooting | Email Connector Troubleshooting]] | |||
==See Also== | |||
*[[Alerts Server]] | |||
*[[Ticket Management#Email_Distribution_via_RangerMSP_Email_Connector|Ticket Email Distribution via RangerMSP Email Connector]] | |||
*[[Email Connector Troubleshooting |Email Connector Troubleshooting]] | |||
*[[Email Connector FAQ]] | |||
*[[MSP Integration Setup]] | |||
*[[API by Email and MSP Integration]] | |||
*[[KB:_Setting_up_Email_Connector_and_Alerts_Server_with_SSL|Setting up Email Connector with SSL]] | |||
[[Category:Setup]] | |||
[[Category:Installation]] | |||
[[Category:User Manuals]] | |||
Latest revision as of 12:37, 18 July 2022
Introduction
The RangerMSP Email Connector module allows you to process incoming emails and perform appropriate actions (like creating new Tickets). It also allows you to parse and analyze XML formatted emails that contain new Tickets, Accounts, Assets or other RangerMSP record information.
The RangerMSP Email Connector module automatically provides the following features:
- Generates new Tickets from emails sent by clients to a defined public email address.
- Manages email threads for existing Tickets (Email Distribution via RangerMSP Email Connector).
- Provides a full API to RangerMSP using XML formatted email messages.
Email Threading
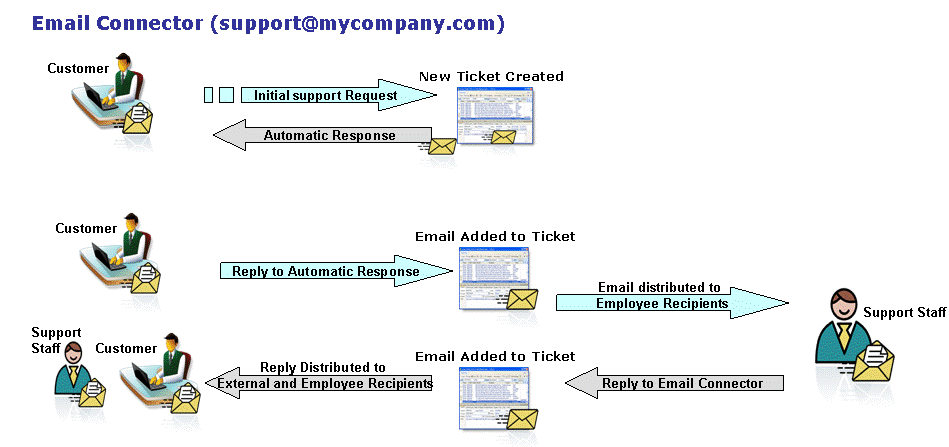
The Email Connector manages email threads for you. If a customer replies to your support email in regards to a specific ticket, or if you, as a technician, reply to the customer, the correspondence will be automatically filed under the ticket in the system and distributed automatically to the recipients defined for the Ticket.
There are two email threading scenarios:
- A customer replies to Support regarding an email sent from the system, which contains a ticket number in the email subject. In this case, the system files the email under the ticket and distributes it to the Ticket Recipients.
- An employee replies on a customer email, which contains the ticket number in the email subject. The employee needs to send the email to the support email address, and RangerMSP Email Connector will automatically file the email in the system and distribute it to the Ticket Recipients. When a technician Cc or Bcc's the Email Connector, the email will be filed in the ticket, and will not be distributed to Ticket Recipients.
Note that the email threading management will apply only when the sender email address is defined as one of employee's emails (Email1 or Email2), and the employee is marked as an Active employee in RangerMSP. See more details on matching the email to an account in Matching by Email or Domain Name. In both cases, the Email Connector receives the email, finds the ticket in the subject, finds the ticket in the database, and then files the email as a document under the ticket history.
For more details see Email Distribution via RangerMSP Email Connector.
Matching by Email or Domain Name
RangerMSP connects an incoming support email to specific accounts based on the full email address of the sender, or by the domain name (if defined for the account).
If one of your clients has many possible email addresses, you should either add each of the email addresses as the email in the secondary contact (in the Account Contacts tab), or define the client's domain name in one of the Account's email addresses or secondary contacts.
To define a domain name for an account:
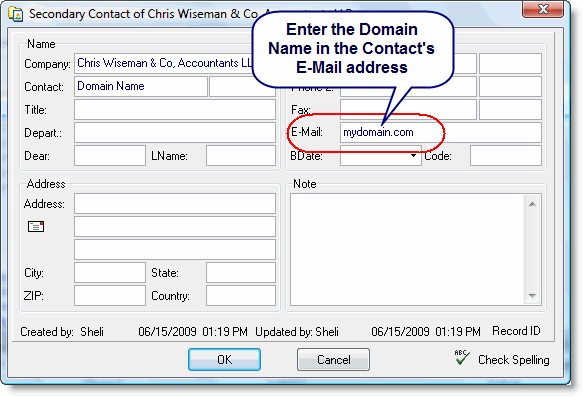
Set the domain name (e.g. "RangerMSP.com", with or without the @ sign) as the email address in one of the following places:
- Account's Email field (in the General tab)
- Account's Email 2 field (in the Address tab)
- Add a secondary contact, and set the domain in the contact's email field
Notes:
- Account detection will first try finding the full email address.
- Only if this email address does not exist in the database, the system will search by the domain name.
- Duplicate domain names will create an error when processing the incoming email. Note that the system does not prevent entering duplicate domain names.
RangerMSP Email Connector Setup
The RangerMSP Email Connector is a plug-in for the RangerMSP Server. Setting up the RangerMSP Email Connector module includes using general settings used by the RangerMSP Server, and specific settings for the Email Connector plug-in.
To run the configuration application:
- Log into the Server with a Windows Administrator user. Note that the setup program must run from the same server as the one where the RangerMSP installation sits and from where you plan to run the Email Connector.
- Run <Installation_DIR>\RangerMSP\Server\ServerConfig.exe
The following window will open:
[[File::Server_outgoing_mail_server_settings.png|center]]
The server configuration window consists of the following tabs:
- Public Email Address - the main email address used by you and your clients. All emails sent to this address will be processed by RangerMSP Email Connector.
- Outgoing Mail Server Settings - outgoing emails settings for sending emails by the RangerMSP Server.
- Email Connector Settings - RangerMSP Email Connector settings.
- Email Alerts Settings - RangerMSP Email Alerts settings (not in the scope of this document).
In order to use the RangerMSP Email Connector, the following settings should be configured (in this order):
- Public Email Address - The Public Email Address is the main support email address (e.g. support@yourdomain.com) to which customers can send support-related emails.
- Outgoing Email Settings - These settings will be used by the RangerMSP Server for all outgoing emails (by RangerMSP Email Connector or RangerMSP Alerts Server).
- Incoming Email Setup – These settings include the Public Email Address for all emails processed by the RangerMSP Email Connector.
- Email Processing Setup - Define how incoming email is processed. RangerMSP Email Connector reads each email and performs the actions as defined in these settings.
- Internal Support Team Email - Define settings for the Internal Support Team Email, which is used if the system cannot decide what to do with the Email, or if there are errors.
- Installing and Running RangerMSP Email Connector Service - After setting up all of the above, you should actually install the Email Connector service and run it on your server.
Only once the setup is complete can you run the RangerMSP Server and start using the RangerMSP Email Connector plug-in.
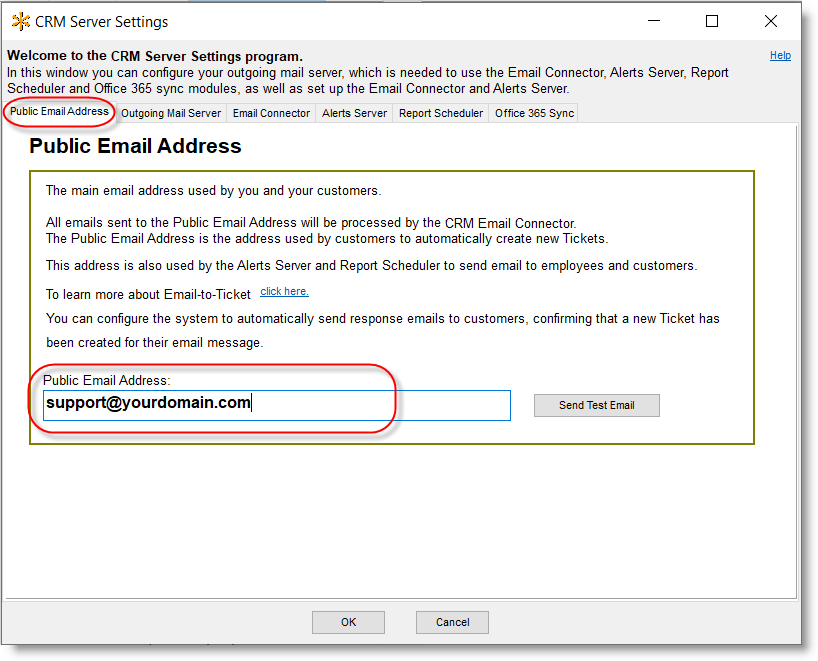
Public Email Address
The Public Email Address is the main support email address (e.g. support@yourdomain.com) to which customers can send support-related emails. Tickets are automatically created out of these emails, and this address is also used to process XML-formatted emails (API) sent by external systems, such as a form on your website. All Emails sent to this email address will be analyzed and processed by the RangerMSP Email Connector.
Note: This email address should ONLY be used as the incoming email for the Email Connector. You should define a different address for your internal email which will be used for unrecognized emails and error handling (see Internal Support Team Email).
Outgoing Email Settings
The Outgoing Email settings are used for any outgoing emails sent from RangerMSP Server.
Note: The Outgoing Email settings should be set only once for the RangerMSP Server, so if you already defined this for the Email Alerts Server, you can skip this step.
The Outgoing Email settings should be set in the Outgoing Mail Server tab.
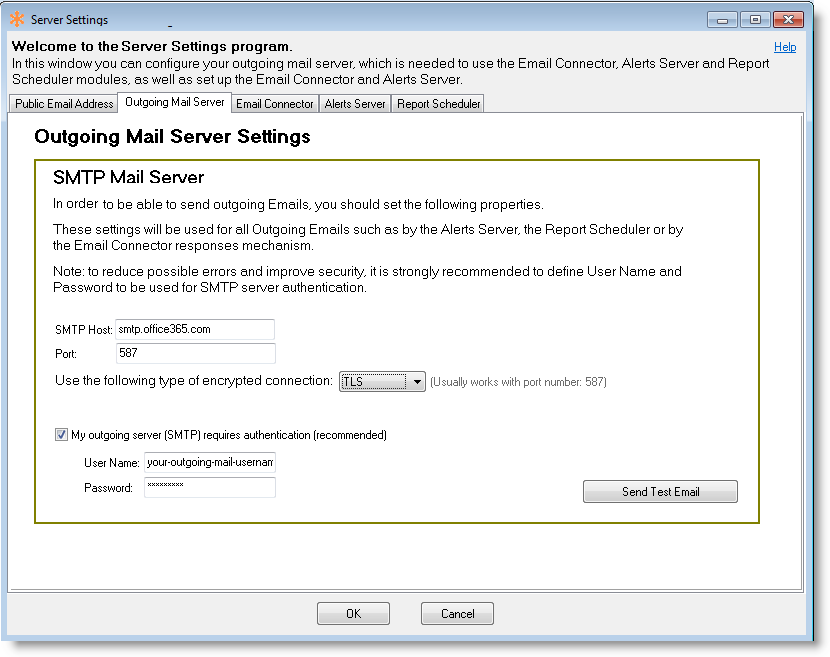
To reduce errors and improve security, it is strongly recommended to use SMTP authentication, with a user name and password for SMTP access.
Parameters:
- SMTP Host - your Outgoing SMTP Mail Server
- Port - the Outgoing SMTP port
- My outgoing server (SMTP) requires authentication - if checked, must fill in the authentication details below:
- User Name - the User Name to be used for SMTP authentication
- Password - the password related to the specified User Name
Note: If you use SSL on your Email servers, this should be automatically supported (for users working with RangerMSP 6.0 or higher). If for some reason you are facing problems connecting via SSL, please contact our support directly ar support@RangerMSP.com.
Verification Tests (required!):
- Test SMTP Connection - click this option to verify that your account is working. If there is missing or incorrect information, such as your password, you will be prompted to supply or correct it.
- Send Test Email - Use this option to send an outgoing email using the settings you defined. After clicking it you need to specify the From email address and the To email address that will be used for sending the Test Email message.
After completing the Outgoing settings, move on to the next step > Setting up the Incoming Email Settings.
Incoming Email Settings
After setting up the Outgoing Email settings, you should now define the incoming mailbox settings.
To set up the Incoming settings, go to the Email Connector tab:
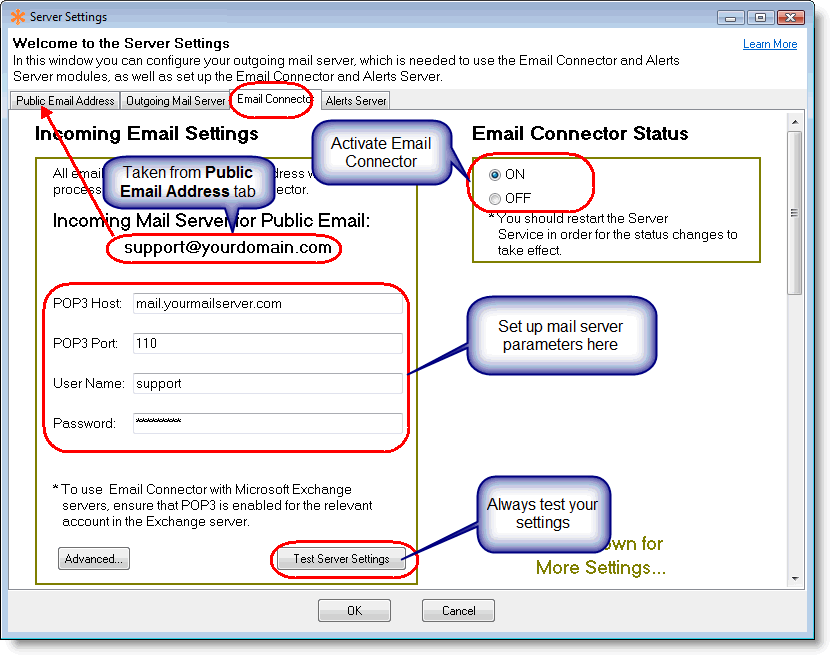
In this window, fill in the settings as explained in the following sections:
- Email Connector Status.
- Public Email Address (defined separately in the Public Email Address tab).
- Incoming Mail Server.
- Backup Settings (optional).
Email Connector Status
The RangerMSP Email Connector status can be one of the following:
ON (default) - RangerMSP Email Connector is active and processes incoming emails.
OFF – RangerMSP Email Connector is not active and does not process incoming emails (emails are left in the defined mailbox until you review them manually or turn the connector to ON again.
Note that in order for the status changes to take effect, you should restart CRM Server Service (see Running RangerMSP Email Connector).
Public Incoming Mail Server
In this section you will define the pop server settings of the incoming email server:
Server Information
POP3 Host - your Incoming Mail Server (POP3)
POP3 Port - the Incoming Mail Server port (POP3)
Logon Information
User Name - this is the incoming public support email account used for the Incoming email address described above.
Password - the password for this email account.
Note: To use CRM Server Service with Microsoft Exchange servers, ensure that POP3 is enabled for the relevant account in the Exchange server.
Note regarding SSL: If you use SSL on your Email servers, please read this article in order to find out how to set up the RangerMSP Email Connector with SSL.
Misc.
Test - click Test to verify that your account is working. If there is missing or incorrect information, such as your password, you will be prompted to supply or correct it.
Advanced - set up timeouts for the connection and polling interval (in most cases you should use the default values).
After filling in the information on this screen, we recommend you test your account by clicking the Test button (requires you to run the setup program from the Server).
Email to Ticket Settings
After setting up the Incoming Email Settings, you should now define the settings which will be used when converting incoming emails into Tickets in the system.
When receiving a new incoming email, the system recognizes the email sender's address or domain from the RangerMSP Accounts database; it automatically opens a Ticket and copies the email content into the Ticket description (the text/plain part). The Ticket will be automatically linked to the Account that matches the email address.
Incoming emails which relate to existing Tickets will be filed under the Ticket History. See more details in Email Distribution via RangerMSP Email Connector.
Matching by Email or Domain
Matching the incoming email to a RangerMSP Account is performed based on the full email address of the Account, or by the domain name (if defined for the account). This is because clients may be using generic email addresses (such as Yahoo®, Gmail®, etc.) and the system cannot rely on any domain name. If one of your clients has many possible email addresses, you should either add each of them as a secondary contact (in the Account Contacts tab), or define the client's domain name in one of the Account's email addresses or secondary contacts. See more details in Matching by Domain Name.
Auto-Response Settings
You can configure the system to automatically send response emails to customers, confirming that a new ticket has been created for their email message.
to configure the automatic response settings, scroll down to the Email to Ticket tab:
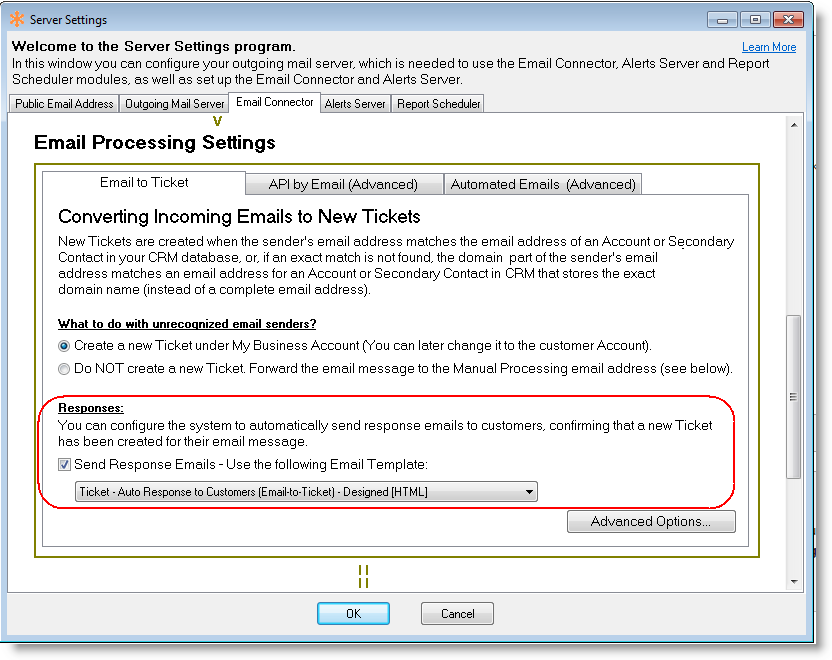
To activate the Auto-Response feature:
- Send Response – Select this option in order to send automatic email responses and notify your customers who sent emails that became new Tickets.
- Use the following Email Template – Choose the Ticket Email Template which will be used when sending the auto-response email for new Tickets.
See more advanced options for the Auto-Response feature in Advanced Options.
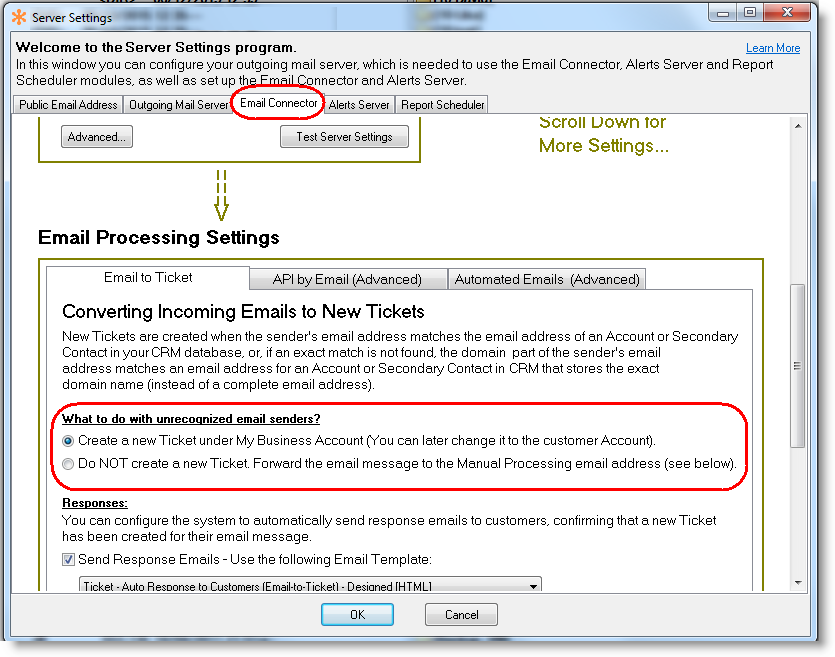
Email messages from unrecognized senders
When creating tickets from unrecognized senders is enabled, such email messages are converted into the Tickets under your business record. The ticket then can be easily reassigned to the relevant Account. See Move a Ticket from one Account to another.
Use ServerConfig to turn this feature on or off:
Notes: Verify that you have a Spam filter installed on your mailbox, otherwise all spam messages will get converted into tickets!
Advanced Options
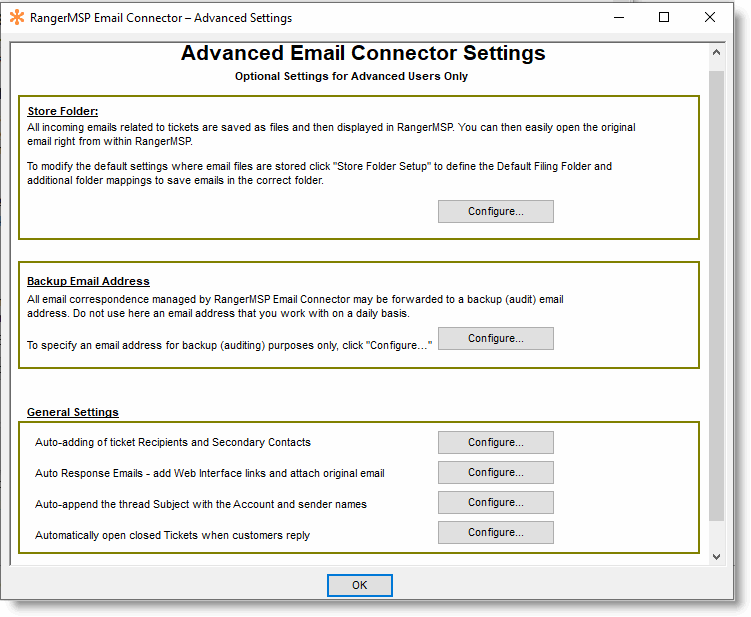
Note that the Email Connector also provides more advanced processing options, such as using the Email Connector as an API (via XMl transactions), or using Automated Emails. You can read more about the advanced Email Connector options in the Advanced Email Processing section.
Clicking the Advanced Options button in the Email to Ticket tab opens the following window:
Here you can define the following options.
Store-Folder Settings
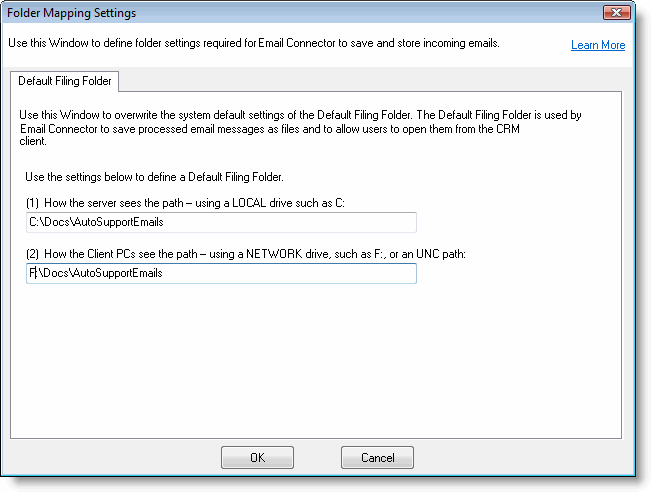
When creating Tickets from emails, all original email files (.eml) are stored on a dedicated folder on your server's local disk, so that they can be attached to their Ticket.
Using this option you can define an alternative default filing folder on your server. Note that this is an advanced option that should only by used by advanced users. Please contact support@RangerMSP.com before using this option.
In order for the Email Connector service to be able to save the emails in the new folder, you must configure the folder location so that the service will have the correct access to it.
In the Default Filing Folder, and define both paths, as the server recognizes it and as the client recognizes it.
Backup Settings (optional)
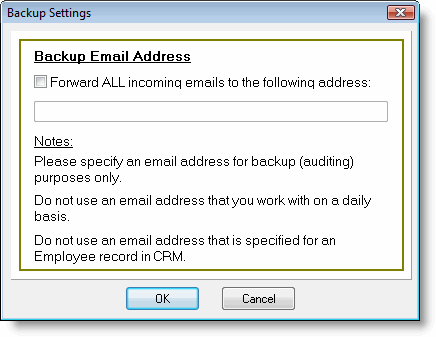
Once an incoming email has been processed by the system, it is removed from the email server (i.e. deleted from the mailbox). For backup and tracking purposes, you can automatically forward all emails to a dedicated email account for storing.
This is an advanced option, and we do not recommend on using it without consulting our support team at support@RangerMSP.com.
To set up the backup email account:
Backup ALL Incoming Emails – select this option to activate the backup.
Send ALL to this Email Address – Enter the Backup Email Address which will be the backup mailbox. Note that this must be a different email address than the Email Connector Incoming Email Address to avoid deadlocks where the backup email is being sent to the Incoming Email Address over and over again
After completing these settings, move on to the next step > Setting up Email Processing Settings email-to-ticket settings).
Automatically Add Ticket Email Recipients
As part of the Email Connector email threading management, it offers the ability to automatically scan processed email message headers to find relevant email recipients (To and Cc) and automatically add them as Recipients in the relevant Ticket in RangerMSP.
Administrators can control whether to activate the automatic scanning of email messages for recipients from this window under General Settings > Automatically find and add Ticket Recipients.
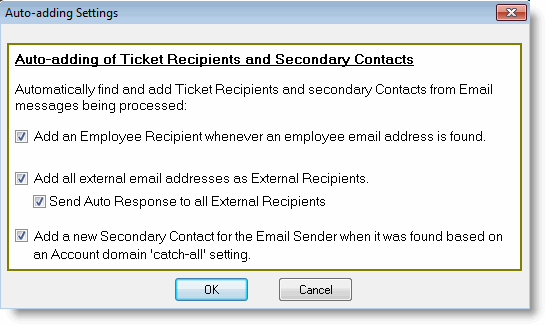
In this window you can determine whether to automatically find and add ticket recipients for employees or external recipients.
See Automatically Add Ticket Email Recipients in the Ticket Management user guide for more details about this powerful feature.
Auto-Response Advanced Options
Clicking the Auto-Response Emails options button opens the following window:
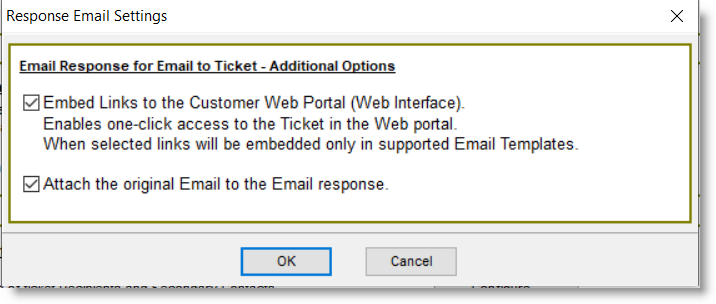
Here you can define the following options:
- Embed Web Links - Web Links allow your customers to quickly open the customers' Web portal and view or edit the Ticket details. This saves the need to go explicitly to the Web Interface site, login and search for the Ticket in order to see its details. Choosing this option will add Web Links if defined in the email template selected above.
Note: Web Links require using RangerMSP Web Interface for Customers, and that Web Links are enabled in Options > Web Interface tab. - Attach the original email to each response – Select this option to attach the original email sent by the client to the response email.
Send Auto-Response to all external recipients
When this feature is enabled, auto-response emails sent by the Email Connector will be sent to all Ticket Recipients – this includes those marked in RangerMSP as default recipients for the Account as well as all other recipients existing in the original customer email. This way everyone can easily participate in the email thread and their reply will automatically be filed under the Ticket in RangerMSP.

Auto Adding of New Secondary Contacts for Recognized Account
If an email arrives from a new address and the sender domain exists in the Accounts database then a new Secondary Contact can be automatically created under the relevant Account, with the email sender display name taken as the Contact Name.
If appropriate, a new Ticket is created with that new Secondary Contact set as the Ticket Contact. If the email is a reply to an existing Ticket from a previously unknown sender at the known domain then a Secondary Contact is created based on the new sender.
To configure this:
- Run the ServerConfig utility.
- Click the Email Connector tab.
- Go to Advanced Options.
- Click Configure in the General Settings section
- Check the relevant box to enable/disable.
Auto-append the thread Subject with the Account and sender names
The Account Name (File as… field) and Sender Name are added to the email subject line of emails distributed to employees. This way employees on the field can easily detect the Account related to the email correspondence. This helps overcome cases where the customer email did not include the customer name or in cases where the mail server overwrites the Sender Name with the mailbox name of the email connector.
Automatically open closed Tickets when customers reply
With this option enabled, customer email replies to closed tickets will automatically open the Ticket bringing it back to the open Tickets queue.
Disabling this option will push such replies to the Ticket Inbox, however, the Ticket status will be kept intact.
Show Ticket in Dispatcher
New Tickets that are created by Email Connector automatically appear in the Dispatcher Ticket list by default. This means that all new Tickets that are created will automatically be marked as "To be Dispatched" by the system.
Users can change this behavior:
- From any RangerMSP client, go to Tools > Options > Tickets-1 tab.
- Select or deselect the option Show in Dispatcher > By default, set to display new Tickets in Dispatcher to make the system behave as you require.
- Then restart CRM Server Service on your server so new Tickets will be marked accordingly.
Note: The Show in Dispatcher flag can be modified by any user and it affects tickets being created from anywhere - in the client application, by the RangerMSP Email Connector or by other applications. Make sure you use it consistently.
Notifying Customers and Technicians on new Tickets
Email Connector allows you to notify your customers that the emails they sent became new Tickets.
You can set Email Connector to send an automatic response back to the customer, notifying him or her that a Ticket was opened out of his /her email. When you configure this in the ServerConfig, you can also define a BCC address for keeping track of these emails. In the BCC address you can enter your Internal Support email to receive each notification as an email.
All automatic responses are automatically forwarded back to the Email Connector, and filed under the Ticket as part of the ticket history.
Assigning SLA to New Tickets Automatically
Tickets that are created automatically by the Email Connector, can be automatically assigned to an SLA by defining a default SLA for the Account or for the default Contract of this Account (see How does the system select a Default Contract?). The SLA Feature helps you provide services to your customers within the time frame agreed with them.
If a default SLA is defined for the Account (see Default SLA for Accounts and Contracts), the ticket created by Email Connector will be automatically assigned to it.
Internal Support Team Email
After setting up the Outgoing Email Settings and the Email to Ticket Settings, you should now define the Internal Support Team Emails (for forwarding purposes).
The Internal Support Email address is your main activity support mailbox which should be constantly reviewed by your support team. This mailbox will be used by the system in cases where the system cannot decide what to do with the email. The Email Connector will automatically forward these messages to this email address which should be reviewed by a "human" support team to identify emails which need to be handled manually.
Note: If the Ticket was not found in the RangerMSP database, the email will be forwarded to the Internal Support Team email, with an error indicating that the Ticket cannot found.
The Internal Support Email Address is set in the following window:
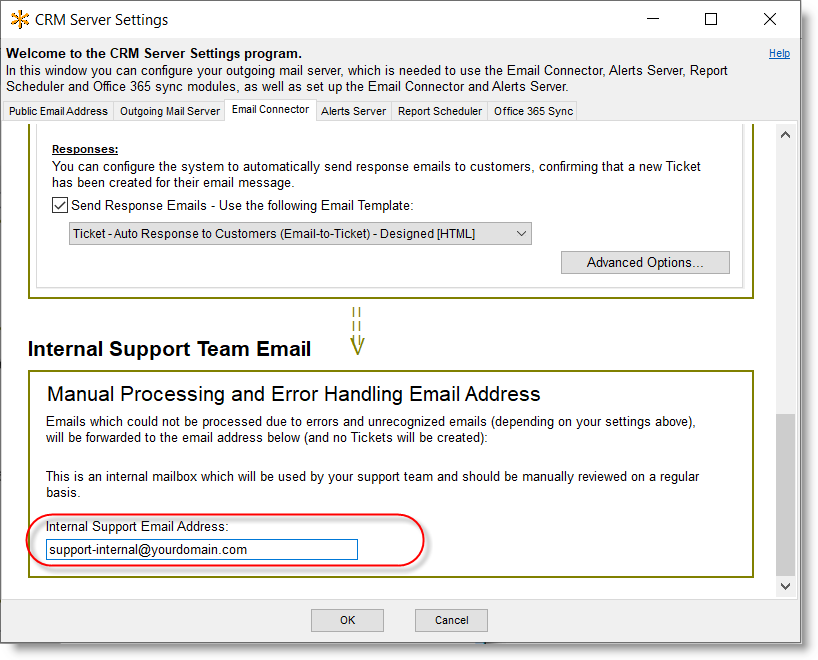
Email Address - This is an internal mailbox which will be used by your support team (e.g. support-internal@yourdomain.com). This mailbox should be manually reviewed on a regular basis to make sure there are no customer issues awaiting response which were filtered out for one of the reasons listed above.
The Internal Support Email address is used for the following purposes:
- Unrecognized emails – Unrecognized emails from new customers not yet in the RangerMSP database will be forwarded to this address (and no Ticket will be created).
- Error Handling - Emails which could not be processed due to errors during the process (such as the wrong format in XML formatted emails) will be forwarded to this mailbox.
Make sure not to use the same email address for the Internal Support Email as you do for the "Public Email Address." Also, make sure that emails sent to the Public Email address and the Internal Support Email address do not end up in the same physical mailbox (i.e. that they are not synonyms/aliases for the same mailbox).
After setting up all of the above, you are now done with the setup and can move on to actually running the service and activating the Email Connector. See more details in Running RangerMSP Email Connector.
Running RangerMSP Email Connector
After you finish setting up all of the required settings (see RangerMSP Email Connector Setup Overview), you can move on to the next step and install the CRM Server Service.
The RangerMSP Email Connector runs as a plug-in for the CRM Server Service. The RangerMSP Server runs as a Windows Service on your server.
Before you install the RangerMSP Email Connector
- Make sure to complete the above Setup steps prior to installing the Windows Service.
- Make sure to allow the RangerMSP Email Server Service in your DEP settings.
Install Service
This part of the installation should be performed on the server itself.
Automatic installation (requires RangerMSP 14 and up)
Log in to to your Server with a Window's Administrator account and run the installer from:
<Installation_DIR>\RangerMSP\Utils\Install\InstallServerSideWindowsServices.exe
OR -
Manual installation
- Open a command prompt window: Right-click the command prompt icon and and choose 'Run As Adminsitrator'.
- Type the following command:
Note: The <Installation_Dir> must refer to a LOCAL server path (e.g. C:\ or D:\Software, etc.) and NOT to a shared network name/path.<Installation_DIR>\RangerMSP\Server\CRMServer.exe -install
- Wait for a success message to appear, indicating the service was installed successfully.
- Open the Windows Services Management windows from Control Panel > Administration Tools > Services.
- Verify that a Window's service called RangerMSP Server is now displayed the services list.
- If the service is not there, make sure again that you are running the command prompt Window using 'Run as Administrator' and try again.
Running CRM Server Service
- Once the CRM Server Service is installed, setup the RangerMSP Alerts Server as explained in RangerMSP Alerts System Settings.
- You should also make sure all the users (employees) configure their own Email Alert settings so they will receive Alerts.
- Open the Windows Services Management windows from Control Panel > Administration Tools > Services.
- Locate the CRM Server Service and start the service (right-click > Start).
- Make sure that it is set to start automatically with a Delayed Start (Startup type > Automatic Delayed Start) each time the server is restarted.
- (Optional) Allow the CRM Server Service in your Windows' Server DEP settings. DEP can be found under Windows: System Properties -> Advanced -> Performance - Settings -> tab DATA EXECUTION PREVENTION.
Troubleshooting:
In any case of problems, see the RangerMSP Email Connector Troubleshooting.
Uninstall Service
To Uninstall CRM Server Service:
- Open the Windows Services Management windows from Control Panel > Administration Tools > Services.
- Stop the CRM Server Service.
- Open a command prompt window: Right-click the command prompt icon and and choose 'Run As Adminsitrator'.
- Type the following command:
<Installation_DIR>\Server\CRMServer.exe -uninstall
Advanced Email Processing
API by Email
The Email Connector provides advanced processing options, such as using the Email Connector as an API by sending in XML transactions by email.
Setting up the API by Email section is optional and is required only when working with external system which send XML formatted emails to the Email Connector.
See more details in API by Email
Automated Emails
The Email Connector provides advanced processing options, such as using formatted Automated Emails.
Setting up the Automated Emails is optional and is required only when working with external systems (such as external MSP system) which send formatted email alerts to the Email Connector.
The Automated Email feature in RangerMSP processes incoming emails that have been sent to the Email Address defined for the Email Connector. The emails processed are from automated sources, such as an MSP alerting application, and the Automated Email feature analyzes the email's header in order to create the relevant Tickets in RangerMSP.
This feature allows you to define a set of rules which will be activated one after the other to help the system detect pre-defined email formats, and create Tickets for them. As opposed to the "New Ticket From Email" feature, automated emails do not necessarily originate from a customer's email address, so it is difficult for the system to determine the customer for whom a new Ticket should be opened.
The Automated Email feature allows you to define a set of rules that will help the system detect automated incoming emails which contain information about specific customers, and create Tickets for them.
See more details in Automated Emails
Labels
Since version 7 the Email Connector can have default Labels defined so that all Tickets created through Email to Ticket or Automated Emails will have the default labels applied automatically. See more details here.
Troubleshooting
For troubleshooting, see Email Connector Troubleshooting


