API by Email and MSP Integration
Introduction
The Email Connector provides advanced processing options, such as using the Email Connector as an API (via XML transactions), or using Automated Emails.
The Email Connector setup window is designed as a flow chart, which represents the lifecycle of the email as it is processed. Each step in the flow requires configuring settings to instruct the system how to handle that step.
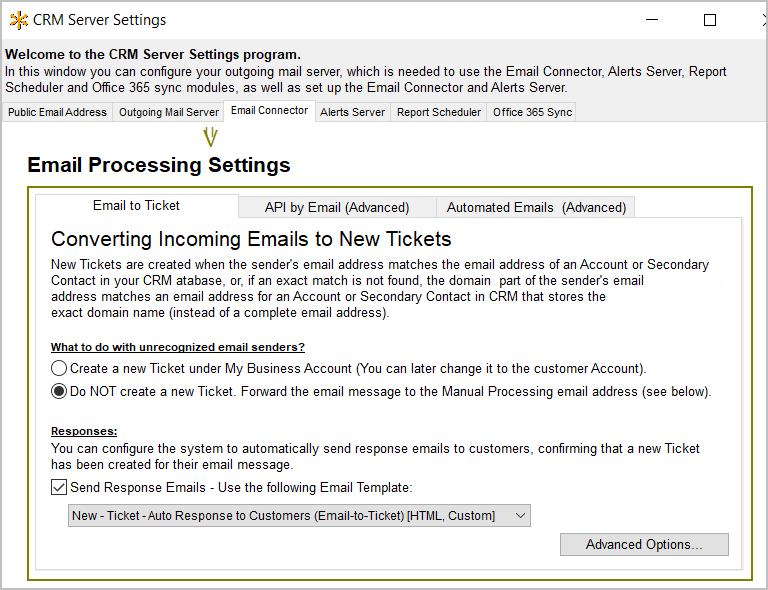
Here you can define parameters for how the system should process the email.
The Email Connector server pulls each email and performs the relevant action as defined in the settings. The basic implementation is the Email to Ticket.
In this section you will learn how to configure the following advanced options:
API by Email (XML Formatted Emails)
Setting up the API by Email section is optional and is required only when working with external system which send XML formatted emails (which contains API transactions) to the Email Connector.
When an email containing XML formatting is detected, the system analyzes the XML content of the email and performs the appropriate action. You may also send automatic replies in response to XML formatted email (see Setting Up Responses Parameters below).
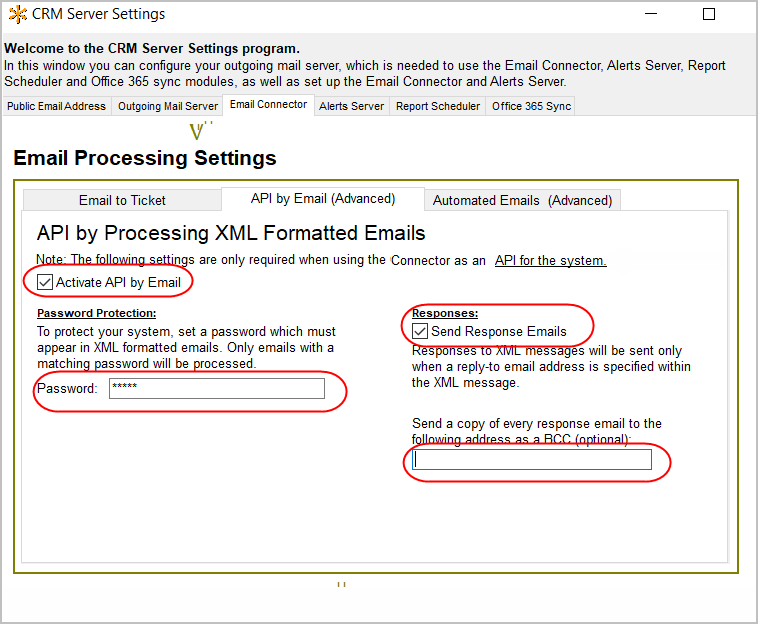
The following settings should be defined here:
- Activate API by Email - select this box if you wish to activate the XML formatting processor.
- Password Protection - to avoid processing spam XML formatted emails which can modify your database, you may define a password in the Password field. When the Password is defined here. this means that incoming transactions must contains the password in the XML in order to be processed.
Setting up the Response parameters:
If an XML email requires a response, the following settings will be used:
- Send Response - Select this box in order to send responses to the API system if requested in the XML. Note that the response will be sent to the email address specified in the XML text (if specified) and not to the sender of the XML email.
- BCC each Response Email to (optional) – If you would like to store all automatic outgoing emails sent in response to processed XML messages, you can automatically BCC your own support team or any other email address where these messages can be stored (again, DO NOT send these automatic emails to the Email Connector Incoming Email Address which is being used for all XML support requests processed by the Email Connector).
See more details on the XML formats and examples in XML Code Samples.
Automated Emails
Setting up the Automated Emails section is optional and is required only when working with external systems (such as external MSP system) which send formatted email alerts to the Email Connector.
The Automated Email feature in RangerMSP processes incoming emails that have been sent to the Email Address defined for the Email Connector. The emails processed are from automated sources, such as an MSP alerting application, and the Automated Email feature analyzes the email's header in order to create the relevant Tickets in RangerMSP.
This feature allows you to define a set of rules which will be activated one after the other to help the system detect pre-defined email formats, and create Tickets for them. As opposed to the "New Ticket From Email" feature, automated emails do not necessarily originate from a customer's email address, so it is difficult for the system to determine the customer for whom a new Ticket should be opened.
The Automated Email feature allows you to define a set of rules that will help the system detect automated incoming emails which contain information about specific customers, and create Tickets for them.
Email Connector Processing Precedence rules:
Incoming emails are processed if sent to the defined incoming mailbox.
The processing order is as follows:
Check if this is an automated email
If Not Automated, then:
Check if this is an XML Formatted email
If not XML, then:
Continue processing as a regular email by the Email Connector
To set up the Automated Emails detection rules, you should start by understanding the work-flow, as described in the Automated Email Processing Flow section below.
Automated Email Processing Flow
Automated Email Processing includes the following phases:
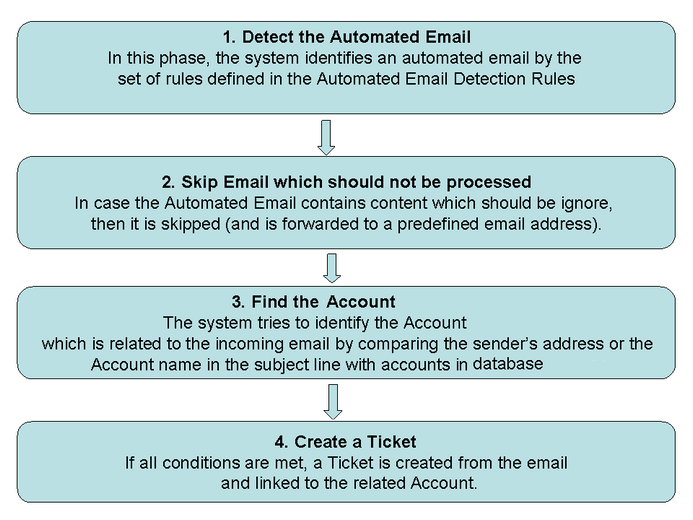
To set up the rules for these phases, follow the instructions in the Automated Email Settings section below.
Automated Email Settings
When the Automated Email feature is Active (ON), you can configure the rules for processing emails by clicking on the Automated Email Settings button.
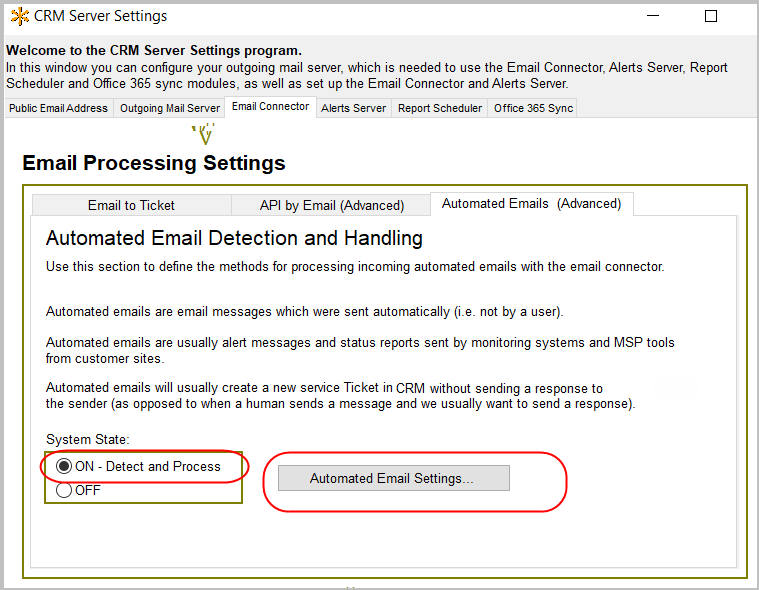
When clicking the Automated Email Settings, the following window will open:
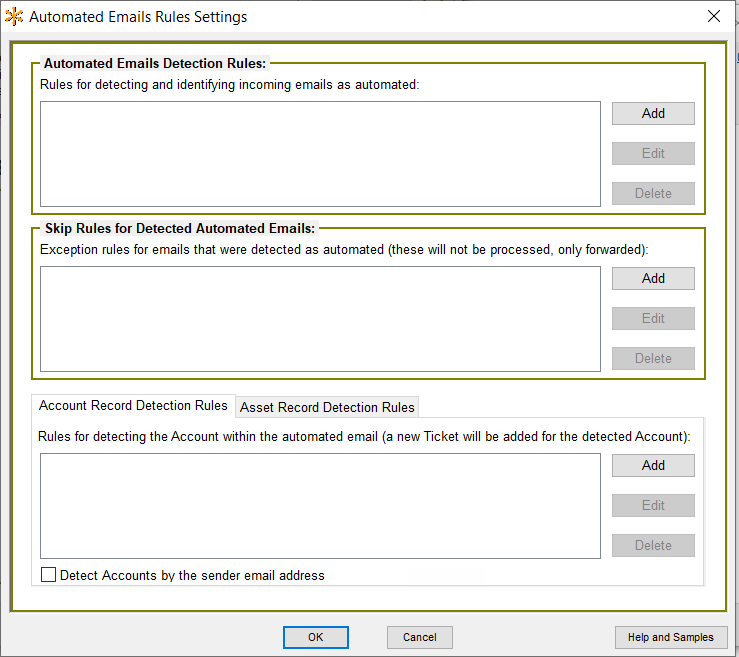
In this window you can add the processing rules. The rules are processed in the order displayed in the window, according to the Automated Emails Processing Flow. Note that the rules are not case-sensitive.
You can define rules for each section, and they will be processed in the order in which they are entered. The first rule that the process comes to that applies will be used. If no rules apply, the email will be identified as not "automated," and will then be processed as a "regular" email connector incoming email and sent to the support email address defined for these types of emails..
Rule settings should be defined in the following order:
- Automated Emails Detection Rules
- Automated Emails Skip Rules
- Automated Emails Accounts Detection Rules
You can also find detailed description on how the Automated Email settings should be configured for specific MSP systems under MSP Integration Settings.
Automated Email Detection Rules
Automated email detection rules tell the system how to identify incoming automated emails which need to be processed. The detection rule includes the Sender's address and a word/phrase in the email's subject line.
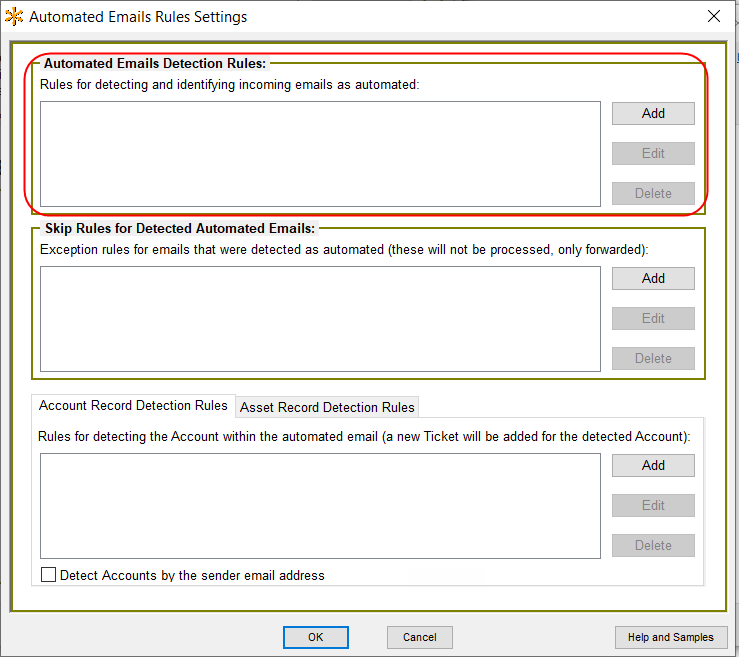
In the Automated Email Detection Rule area, click New. The following window will open:
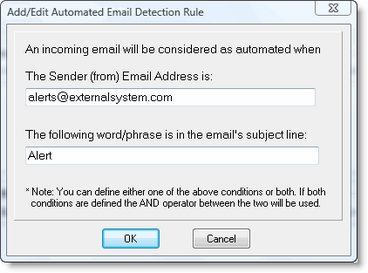
In this window you define a the Email Detection Rule:
- The Sender - Enter email addresses here that you want the system to use to identify emails arriving from this address as automated emails. Note that emails which are detected as automated will not be processed as "regular" incoming customer emails in the Email Connector.
- Word/phrase in the email's subject line - Enter words or phrases here that you want the system to use to identify email with these words/phrases in the subject line as automated email.
Note that you can create rules that use either of these conditions, or both. If both conditions are defined for a rule, the AND operator between the two will be used (i.e. both conditions need to be met in order for the rule to return a positive result and identify the email as automated). By narrowing the rule with two conditions, you can ensure that the right emails are being identified as automated email..
After clicking OK, the rule will appear in the detection rules section as follows:

In this example, any email which comes from alerts@externalsystem.com, and contains the word "Alert" in the email subject line will be detected and identified as an automated email.
When the system detects such an email, it processes it according to the following rules (see Account Detection), and creates a Ticket for the detected Account.
Automated Email Skip Rules
The Skip rules tell the system which automated emails (which were already detected as automated emails with the detection rules) can be skipped and automatically forwarded to an internal email address, without being processed.
This can be useful when working with Managed Services systems (MSP) that send several alerts for the same event or send several status updates of the same event, and you only want to process and open a new service Ticket for the first alert regarding this event.
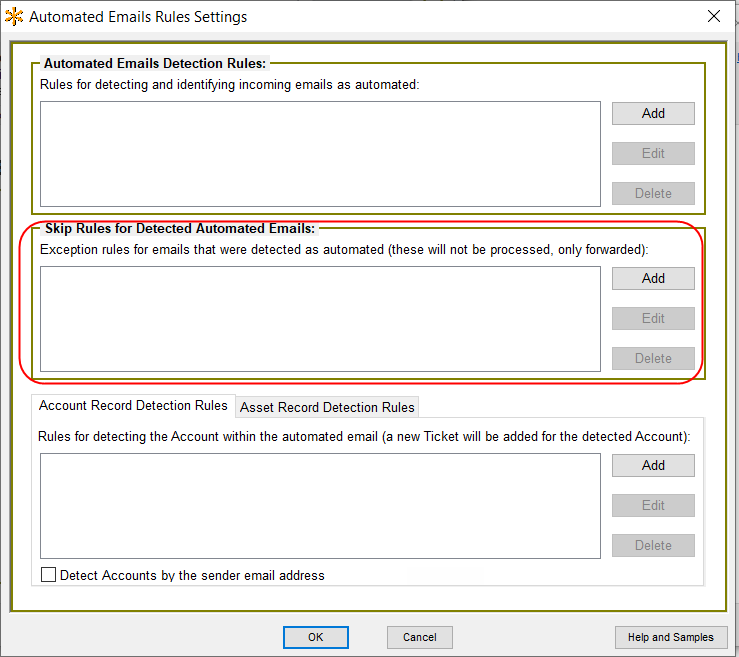
In the Skip Rules area, click New. The following window will open:
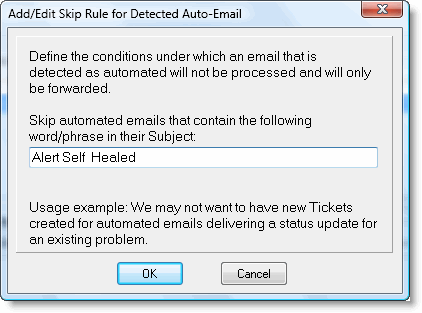
In this window you define a the Email Skip Rule:
- Word/phrase in email's subject line - Once an email has been identified as an automated email, these Skip Rules tell the system when the email should be skipped and sent to an internal email address. Enter words or phrases here that you want the system to use to identify emails that should be skipped.
After clicking OK, the rule will appear in the Skip rules section as follows:

In this example, emails that were detected as automated but have the phrase 'Alert Self Healed' anywhere in their subject will be skipped and forwarded.
These rules can be useful in cases where you do not want to have new Tickets created by automated emails that are only delivering a status update for an existing problem, etc.
You can define as many Skip Rules as needed.
Automated Emails Account Detection Rules
The Account Detection rules tell the system how to detect the Account (customer) related to an automated email. The Account name/ID can be found in the email subject, or by matching the sender's email address with an Account email address in RangerMSP. These rules are applied to emails which the email detection rules have used to identify as automated email.
When an Account is detected, a Ticket will be created for this Account in RangerMSP, based on the incoming email message. Note that if an email is detected as automated, but the account is not found, the email will be sent to the Internal Support Team Email address for manual processing.
The Account Record Detection Rules settings window has two parts:
- Defining detection rules for Account names which appear in the email's subject.
- Flagging a Rule when the Account can be detected by the sender's email address
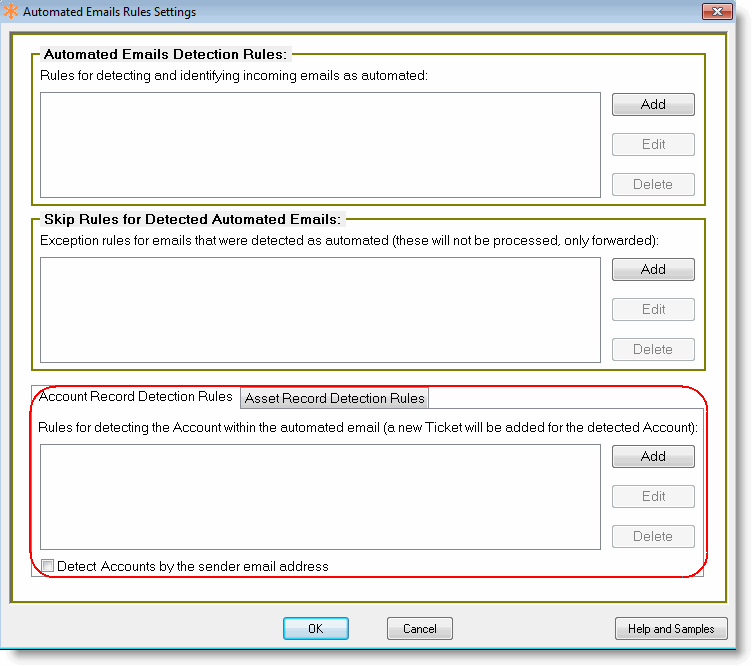
To add a new account record detection rule, click the Add button. The following window will open:
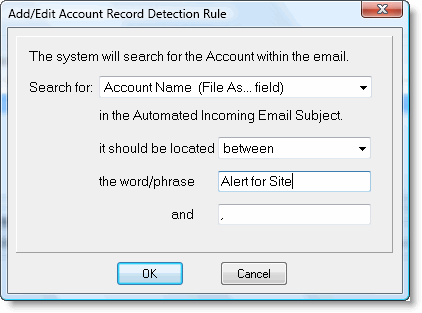
- Search for - RangerMSP can find the matching Account for an incoming email by searching for:
- The Account Name as listed under the File As... field for this Account
- The Foreign System ID as listed under one of the following fields for this Account: Account #, Account ID, Field1, Field2, Field3, Field4. Each of these fields can contain an external identifier of the foreign system, which identifies this Account in RangerMSP (for example, the internal client ID as defined in the MSP system).
- The Account's RangerMSP Record ID number (The RangerMSP Record ID number appears in the Notes tab of every Account. To capture it, click or right click the 'RecID' button at the bottom of the tab.) The Record ID is the internal database ID in RangerMSP.
For some systems that send automated email you can use the Account Name or the Account Foreign System ID for Account identification. In case you use the Account Foreign System ID, you can store the ID in any of the fields listed above.
- It is Located – You can define in which situations RangerMSP should identify incoming emails with an Account name or Record ID in the subject line as automated. Following are the location rules you can define to help RangerMSP determine whether an incoming email should be defined as automated or not:
- if the Account Name or Record ID appears right after a word/phrase in the subject
- if the Account Name or Record ID appears just before a word/phrase in the subject
- if the Account Name or Record ID appears between a word/phrase and another word/phrase in the subject
In this example, the system will search for the Account Name or Record ID in emails which were detected as Automated and were not Skipped. If the subject line contains the phrase "Alert for Site," it will then take the phrase after this, and before the next comma, and will check if the Account Name appears there to see if it should search for the Account in RangerMSP.
Automated Emails Asset Detection Rules
These rules let you detect the Account solely based on Asset details found on the email subject line.
When an Asset is detected, a Ticket will be created and linked to both the Account and Asset. Note that if an email is detected as automated, but the Asset is not found, the email will be sent to the Internal Support Team Email address for manual processing.
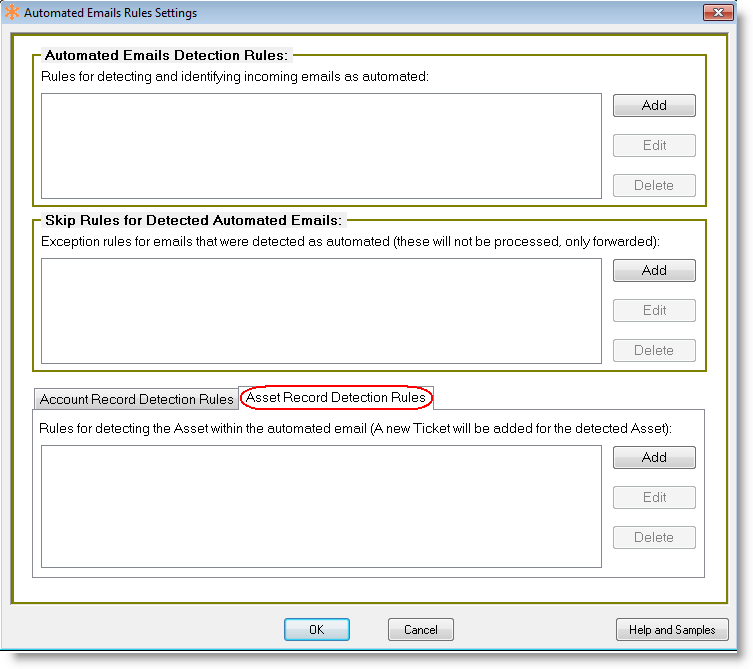
To add a new asset record detection rule, click the Add button. The following window will open:
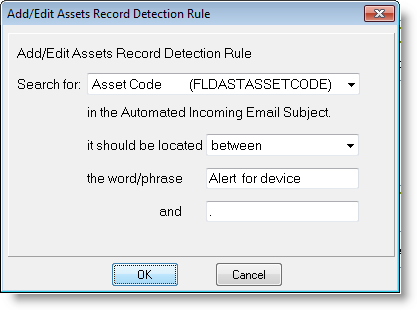
- Search for - RangerMSP can find the matching Asset for an incoming email by searching for:
- Asset Code
- Asset Name
- The Foreign System ID as listed under one of the following fields for this Asset: Asset Serial, Vendor Serial No, Field1, Field2, Field3, Field4, Field5. Each of these fields can contain an external identifier of the foreign system, which identifies this Asset in RangerMSP (for example, the internal asset/device ID as defined in the MSP system).
- The Asset's RangerMSP Record ID number (The RangerMSP Record ID number appears in the Notes tab of every Asset. To capture it, click or right click the 'RecID' button at the bottom of the tab.) The Record ID is the internal database ID in RangerMSP.
For some systems that send automated email you can use the Asset Name or Asset Code or the Asset Foreign System ID for Asset identification. In case you use the Asset Foreign System ID, you can store the ID in any of the fields listed above.
- It is Located – You can define in which situations RangerMSP should identify incoming emails with one of the Asset fields in the subject line as automated. Following are the location rules you can define to help RangerMSP determine whether an incoming email should be defined as automated or not:
- if the select Asset field appears right after a word/phrase in the subject
- if the select Asset field appears just before a word/phrase in the subject
- if the select Asset field appears between a word/phrase and another word/phrase in the subject
In this example, the system will search for the Asset Code in emails which were detected as Automated and were not Skipped. If the subject line contains the phrase "Alert for device:," it will then take the phrase after this, and before the next comma, and will check if the Asset Code appears there to see if it should search for the Asset in RangerMSP.
MSP Integration
The Automated Emails feature provides an easy way to automatically process incoming email alerts arriving from MSP systems and create a Ticket for the alert.
For more details and recommended settings for the each supported MSP systems see MSP Systems Integration.