KB: Managing Group Email Subscriptions
Introduction
Sometimes we like to send group emails out to customers regarding promotions, season’s greetings, new services, and new products. Since not all customers are interested in receiving such messages, business go to great lengths to keep records of which customers want to receive which types of email messages.
This article describes how you can use RangerMSP to create your own data tab that manages your email groups; whether a customer is subscribed to that group, and sending out the email to those groups.
Preparing the Database Architecture for Additional Data
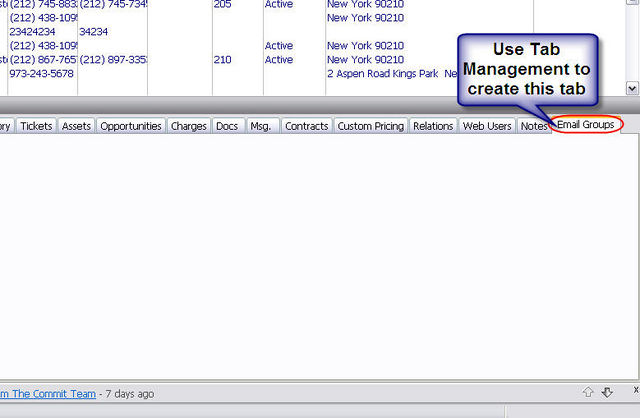
Creating a Tab for Email Groups
Before we can begin with the customizations, it is best to run a RangerMSP backup process, to make sure that you have a restore point to before you’ve customized the system. Only after the system has been backed up, create the fields that will contain the data about our email groups, we need to create a new tab that will house the data fields, while still keeping them separate from the rest of your RangerMSP data.
- We’ll need to create the new tab within the Accounts screen, and call the tab we’re creating Email Groups.
Once we have created the Email Groups tab, we can move on to the next step: Creating Data Fields for Our Email Groups.

Creating Data Fields for Our Email Groups
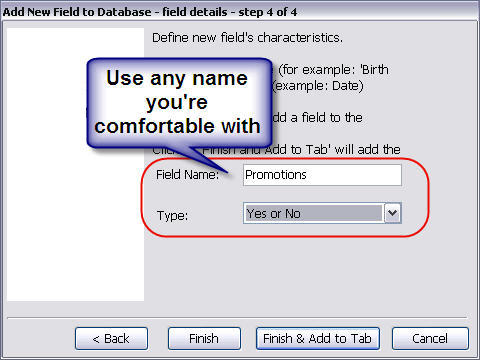
Once we have a tab that can house the user-defined fields we intend to create in this section, we can go ahead and create new data fields which need to hold only 2 values each; True and False will be fine, so we’re going to choose to create Yes or No fields (Checkbox Fields).
During the creation of the first field, you’ll need to create a subject group for the tab you’re creating. Field Subject groups allow you to easily group the fields you create so that you can filter your lists by this subject later, in order to be able to select from a dedicated list of these fields. We’ll get in to that later in this article.
- Go into Field Management. (Accounts Menu > Tools > Tab Management)
- Select ‘Add New Fields’ to Tab.
- Create a new Subject Group called ‘Email Groups’, select it and click Next.
- Give your group a name and select ‘Yes or No’ in the Field Type.
- Place your new field where you want to see it in the tab.
- Repeat the creation process for each field you want to create (each field you create represents a group and whether the account is included in this group or not).
- Add the fields you’re creating to the Email Groups Subject that you already made.
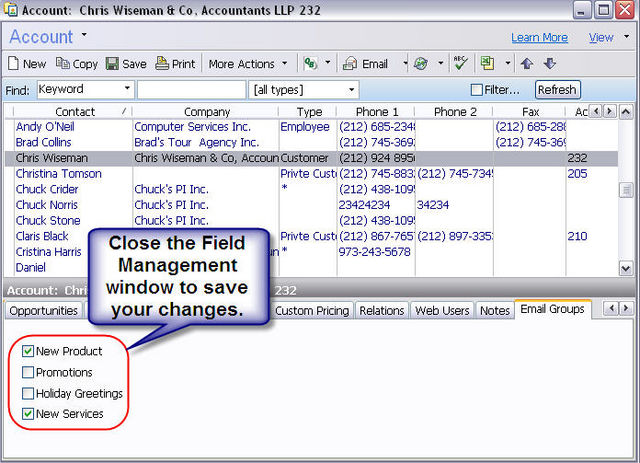
- Close the Field Management window in order to save your changes.


Subscribing Your Accounts to Email Groups
At this point, you’ve already created an Email Groups tab with checkboxes representing each email group you’re managing. The next step is to subscribe your accounts to relevant by marking fields that they want to be subscribed to. This needs to be done separately for each account; however, you can have this field updated while importing new accounts from external files.
Filtering Your List By These Fields
Before you can send out the group emails, you need to filter the accounts list according to the group you want to email to, so that the system knows which accounts you want to send the group email message to. Filtering the list is a rather simple task to perform since we’ve added all the fields to the same Field Subject Category (i.e. ‘Email Groups’). Once you’ve filtered your account list to only include the accounts in a specific email group, you can go on to sending the email message.
To filter your list by one of the Email Groups you’re managing, please follow these steps.
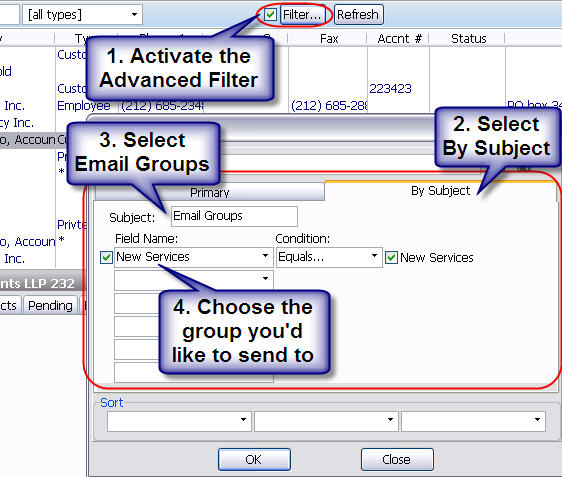
- Activate the Advanced Filter option (Mark the Filter checkbox in the blue filter bar in the accounts screen), and open the Filter window.
- Switch to the By Subject Tab.
- Select the Email Groups Subject from the Subject drop down list.
- Select the Group you’d like to filter the list by in the first filter rule line.
- Mark the checkbox in right side of the rule to indicate that you want to filter based on the True value.

Sending the Group Emails to your customers
Once your accounts list has been filtered to only reflect the accounts that are part of a specific Email Group, you can continue to the next step by preparing the email you intend to send out. Using RangerMSP, you have 2 very powerful options that can send your group email out to your customers. Each method has its benefits, so the best way to choose the correct method is to know what kind of data will need to have merged from the RangerMSP database (if any) into the message.
| Group Mail Method | Description |
|---|---|
| Internal RangerMSP Group Mail | This method allows you to create a static email message that can be emailed to the accounts list you’ve filtered, or all your accounts if the list is not filtered. The static message would not include any referenced database information; however, this method is the most quick and convenient way to send out group emails to your customers. This method includes optional fields for the Subject field and Attachments and requires Microsoft® Outlook® to be installed and configured.
For more information see Group Emails. |
| RangerMSP-MSWord Mail Merge | This method allows you to create a static email template in MS Word, and to have that text populated with RangerMSP referenced account data. This data can be exported from anywhere in the RangerMSP database, and can be easily added to your template so that the message sent to each customer would include the data from the account that the email address came out of. This method is useful if your group email only needs database orientated information embedded in the message.
For more information see RangerMSP Mail Merge. |
Unsubscribing Your Customers
Sometimes customers no longer require some or all of your email newsletters, and need to be removed from the mailing list in the easiest manner; adding a note in the email telling your customer to reply to the email requesting the removal of the subscription by just typing the word Unsubscribe.
This way you can set up an MS Outlook rule that automatically files the email in a special MS Outlook folder to be processed by an employee manually in RangerMSP.
Automatic Links To Remove A Subscription
You can offer your customers the option to automatically remove an email group subscription by clicking a link within the email message HTML email. In order for this to work; you would need a Web Server that supports a server side scripting option such as PHP (used in the samples listed below) and the RangerMSP Email Connector.
Preparation for this type of function would involve setting up an XML template that receives the information from the link and automatically emails the xml template to the RangerMSP Email Connector, using a PHP script that we will also create with you. Once the RangerMSP Email Connector receives the XML message; the system will immediately apply the transaction in the XML to the RangerMSP database. In this case; the transaction would be rather simple:
- Step 1: Validate Transaction Authentication, using API Password.
- Step 2: Identify Customer using Customer RECID
- Step 3: Identify Email group to cancel subscription for
- Step 4: Update value to "False".
Please note: this is an advanced option for users with experience with web servers and PHP (or similar) scripting.
Preparation
The way this is going to work is that the customer clicks a link automatically generated specially for that customer when you send an HTML Email Template. This is done by placing the RangerMSP Account Value (i.e. unique technical identifier) within the link that you're sending (Explained below). Within the link is the URL to the PHP script (explained below), with the Account RECID.
The PHP script needs to take that parameter, and inserts it into a predefined XML template to be emailed to RangerMSP Email Connector; which in turn applies the XML transaction on the RangerMSP database (this is all part of RangerMSP API by Email). Each XML script can only be used on 1 specific email group; so if you use multiple groups, you'll need to create a PHP script and a matching XML for each group.
XML Script
The sample below changes the value of an email group subscription to "False"; effectively cancelling the subscription, using only the RECID (Unique Account Identifier) and the email group name.
<?xml version="1.0" ?>
 <?RangerMSPxml version = "1.0" ?>
 <RangerMSPTransaction>
  <ExternalApplicationName>EmailGroups</ExternalApplicationName>
  <SendResponseToEmail>youremail@yourdomain.com</SendResponseToEmail>
  <Password>the-predefined-api-password</Password>
  <ReturnTransactionID>Removing an Email Subscription
 </ReturnTransactionID>
 <DataKind>ACCOUNT</DataKind>
  <RecordData>
   <FLDCRDRECID>{Insert_RECID_HERE}</FLDCRDRECID>
   <***********>False</***********>
  </RecordData>
 </RangerMSPTransaction>
Changes to the XML text below need to be made each time the transaction is sent to RangerMSP in order for the database to receive the information in the correct syntax; however, before getting to that, the XML template needs to be created as follows, in order to be hosted on the site and used by a PHP script as an XML processor.
| Line Number | Description |
|---|---|
| 5 | Replace youremail@yourdomain.com with the email address you want the XML response to. After a successful, or failure, processing of the XML formatted email, RangerMSP Email Connector will send a status update (again in XML textual format) to the specified email address. This can be used for auditing purposes. |
| 6 | Replace the-predefined-api-password with your own API password.
Learn more about it here. |
PHP Script
Using PHP; you'll be able to retrieve the URL parameters, and insert them into the above mentioned XML script automatically; without user interaction. We have included a sample PHP script that can automatically insert the information from the URL directly into the XML template, to be automatically emailed to the RangerMSP Server.
The following script can be used to cancel any email group subscription; since the URL parameters will have all the account and email group identification information required in order to complete the transaction. This means that you can use the following script in order to cancel any email group subscription for your customers.
Please Note: This script has been tested using PHP5; and may require the same version installed on the web server in order to work.
<?php
//This script is meant for basic RangerMSP database manipulation. The samples included
//here can be adjusted to include different data in the transaction; more information on
//using XML can be found in API_Code_Samples#XML_samples


//================================================================================================
//INSTRUCTIONS: The following variables need to be adjusted in order to make the PHP script know
//how to communicate with RangerMSP Email Connector. The following information will tell the script where
//to send the XML; and how to identify the source address; Please adjust the variables to your own
//preference.

//Edit this variable to reflect the address you want the AI response sent to.
$responsemail = ''response@emailaddress.com';
//Edit this variable to reflect the API Password configured in ServerConfig.exe
$apipasswd = 'your_API_Passwd';
//Edit this variable to reflect the XML Email Destination:
$email_to = ''EmailConnector@yourbusiness.com';
//Edit this variable to reflect the XML Email Subject:
$subject = 'Remove Email Subscription';
//Edit this variable to reflect the XML source email address (Web Form ReplyTo)(Leave "From: " intact):
$replyto = 'From: Webform@emailaddress.com';
//================================================================================================


//Constant variables - These variables will serve to identify the RangerMSP Account and Email Group
//to cancel. Do not edit below this comment!
$recoid = $_GET['recid'];
$emailgroup = $_GET['group'];


//XML Template - Do not alter!
$xml = '<?xml version="1.0" ?>
<?RangerMSPxml version = "1.0" ?>
 <RangerMSPTransaction>
  <ExternalApplicationName>EmailGroups</ExternalApplicationName>
  <SendResponseToEmail>' . $responsemail . '</SendResponseToEmail>
  <Password>' . $apipasswd . '</Password>
  <ReturnTransactionID>Email Group Cancellation</ReturnTransactionID>
  <DataKind>ACCOUNT</DataKind>
   <RecordData>
    <FLDCRDRECID>' . $recoid . '</FLDCRDRECID>
    <' . $emailgroup . '>False</' . $emailgroup . '>
   </RecordData>
 </RangerMSPTransaction>';


//This command will email the XML.
mail($email_to, $subject, $xml, $header);


//This command will give an on screen confirmation to the user.
echo 'Your request has been sent for processing. Thank You.';
?>
Creating Your Link With RangerMSP Templates
When you create your newsletter you can use the email template you send from within RangerMSP or MS Word® Mail Merge to create a unique links for each customer that already include the account RECID parameter and the group identifier; so that your customers can easily click the link to trigger the XML to be applied with that accounts RECID.
The 2 variables in the link need to be gathered as follows:
- Group - Right click the email group checkbox field that represents the group you want the link to cancel, and select Field Settings > Advanced > Tech. Rec ID. This value will need to be manually updated in the link
- Recid - Each customer has a Record Identifier that needs to be passed in order for the system to recognize the account that's canceling the subscription. This RECID is available for each account from the Accounts > Notes > Right Click the Record ID button.
When inserting your link into the template; make sure to use the following syntax:
http://www.YourWebServer.com/script.php?group={email_group_Tech_Rec_ID}&recid={Account_Rec_ID}
Example:
http://127.0.0.1/script.php?group=FLDUSRCRD2Z3U98RAJNY&recid=CRDCO94HUDF8JE06KGTG
If you use Email Templates or MS Word® Mail Merge to generate your news letters; then you can have the Account Record Identifier automatically added into each link sent to each customer within the newsletter; here's an example of how to set this in an email template:
http://127.0.0.1/script.php?group=FLDUSRCRD2Z3U98RAJNY&recid=<CMTLBLDATA_FLDCRDRECID>